Original concept & instructions by Harry Zink
Screenshots & content by Jamie Dresser
| OWC NOTE: Harry is a graphics and visual systems consultant for the entertainment industry. He loves proving 'it can't be done' statements wrong - so of it involves a Mac, Harry's your man. If it involves Windows, you're on your own. Harry lives with his dog, Vladi, in Los Angeles, CA. You can reach him at hzink@fizbin.com. Harry reviewed one of the very first Newer Technology NuPowr G4 Pismo upgrades we sold - you can view that review by clicking here. Thank you Harry! |
I recently received a very interesting email from Harry Zink - Harry had a great idea on how to reduce the "clutter" that having Mac OS X.x and Mac OS 9 installed on the same partition can cause. Harry's idea is to use a Disk Image (.dmg) file to store an installation of Mac OS 9.2.2 instead of your hard drive.
There are both upsides and downsides to this - the major downside is that you no longer have a bootable installation of Mac OS 9 on your hard drive. The major upside is the ability to create a customized installation of Mac OS 9 to your liking, and move it to multiple computers, or to easily back up your installation. Oh, and how about speeding Classic startup time almost 300%? :>)
Harry's original email is available to read by clicking here.
|
Instructions to create the Classic mode startup Disk Image
|
Insert your Mac OS 9.2.1 CD-ROM into your computer.

Locate and launch the application Disk Copy on your computer. It should be stored in the Utilities folder, the default path is Macintosh HD -> Applications -> Utilities -> Disk Copy.

Once Disk Copy is opened, go to the File menu and create a new Blank Image (Command - N)

Now, choose a name to save your new disk image as (I chose 9.2.2 image), and also name the volume (once again, I chose 9.2.2 image).

Once you've typed in the names, click on the Size popup and choose the bottom "Custom" option.
OWC NOTE: In Harry's original instructions, he suggests a 660MB (CD-ROM 12cm) disk image to allow plenty of room for expansion and storage of your Mac OS 9 applications. The choice is yours, either way will work perfectly.

Once you've selected the "Custom" option, this dialog box will pop up. I found that for a standard installation, 250MB was more than adequate. You can reduce this to 100MB, but that information comes at the end of the article :>)
Type in 250MB and press OK.

Your Disk Image will begin creating. This will take a few moments to complete.

Once your disk image is created, it will automount on the desktop.
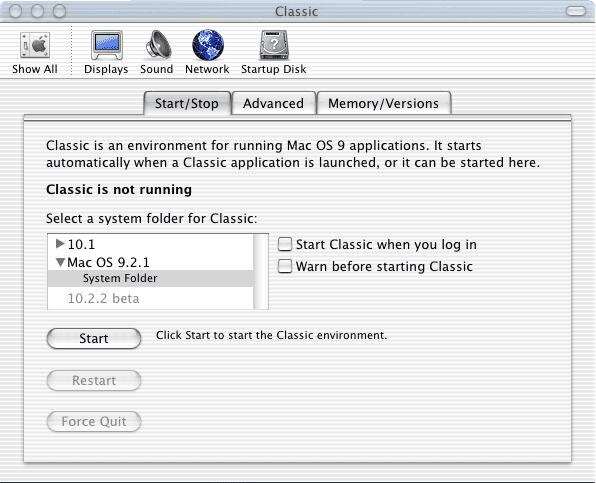
Now, open your System Preferences control panel and select the Classic pane.
Your Mac OS 9.2.1 CD-ROM should show up in the left menu as a bootable volume. Choose the system folder within that CD-ROM and click Start to launch Classic mode.

Once Classic is running, double click on the Mac OS Install application on the Mac OS 9.2.1 CD-ROM to begin the installation process.
![]()
Select the 9.2.2 image disk image you created and begin your installation process on that drive. If you want, you can remove as much unnecessary software that the default installation suggests you install, such as all of the Internet applications, ect. - you will be running native versions of most of the software anyway. The more you choose to not install now means less you delete in the future.

Once you have completed the installation process, you're ready to configure Classic to use your new system installation.
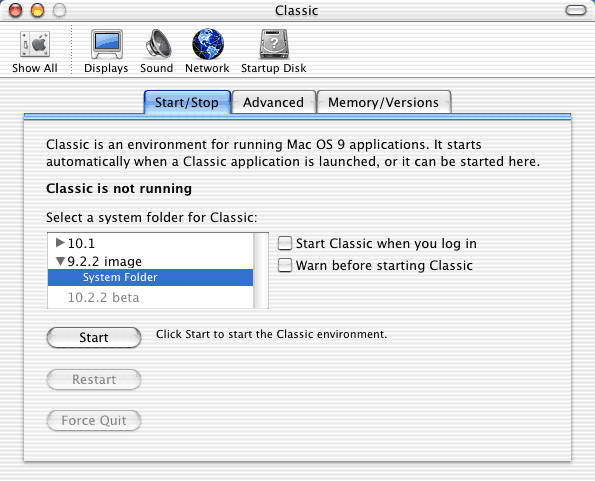
Open your System Preferences and click on the Classic pane.
Click on the Stop button to stop your system from running off of your Mac OS 9 CD. Once Classis has stopped, eject your Mac OS 9 CD-ROM.

Select the 9.2.2 image file you just installed Mac OS 9.2.1 onto. Click on the Start Classic button. Notice that Classic seems to load quicker than it did before (most likely). If asked, update the installation with Classic specific updates.
Update your Mac OS 9.2.1 installation on the disk image using previously downloaded system update files. Bring your Mac OS 9 installation up to date completely if possible, as it will save you headaches in the future.
If you do not already have the software updates downloaded, visit this page on Apple's site and download them.
Also, if you have purchased an OWC Mercury FireWire drive since June, we have been including all recent Apple system updates in a shareware/freeware package on all OWC Mercury FireWire drives. You can find the pertinent system updates there as well. :>)
Your system will now boot from the disk image and you can stop here if you want.
Oh - and don't worry about having to manually mount the OS 9 startup disk image - it does it on it's own every time you want to run Classic now. Can't get easier than that!
|
Accelerating Classic Startup Time
|
The image created in the previous steps is at the minimum, 250MB. You can now take the time to go through the installation and delete all Classic applications that you will most likely never use. Of course, prudence is required here as you can ruin your installation by deleting the wrong item. Before starting, duplicate your disk image on your drive to create a backup.
Once that is completed, start by deleting all applications installed in the Mac OS 9 applications folder. That's right, toss it out. Once that is done, visit this site (and specifically this page in the forum)
On that page, you can follow the instructions that Bob Levitus has provided to remove unneeded control panels and extensions. Either delete them, or simply deactivate them. Thank you Dr. Mac for a wonderful resource site! I visit it daily!
Upon removing all of these items, my system installation went from 212.6MB down to 84.7MB. And that is a very nice savings in space. We all know that hard drives are getting larger and cheaper every day, but if you think about the person using Ryan Rempel's XPostFacto, and still has a 4GB or 9GB SCSI hard drive, well, feel happy for them in the savings of space :>)
Now, you can follow the steps as above for creating a new disk image file, this time 100MB. And copy your remaining files from the original Mac OS 9 installation to the new 100MB disk image. You may have to open the system folder and re-bless the system installation, if the system install does not show up as a valid boot partition in the Classic preference pane, try opening the system folder and a few folders on that disk image. You can't open the system folder itself anymore while booted into Mac OS X, so the old ways of re-blessing the system installation don't apply here. Your system should now boot using Classic except MUCH MUCH FASTER!!
|
How MUCH Faster?
|
Here's some hard numbers.
Power Macintosh G4/733 (QuickSilver)
- Original installation
- Time to boot Classic - 22.57 seconds (Installation as described above)
- "Pruned down" installation
- Time to boot Classic - 12.07 seconds
Power Macintosh G4/867 Dual (Mirrored Drive Doors)
- Original installation
- Time to boot Classic - 27.77 seconds (Factory OS 9 installation)
- "Pruned down" installation
- Time to boot Classic - 9.44 seconds
PowerBook G4/500
- Original installation
- Time to boot Classic - 37.43 seconds (Factory OS 9 installation)
- "Pruned down" installation
- Time to boot Classic - 15.65 seconds
And, the icing on the cake..
Power Macintosh 7300(XPostFacto 2.2.3) w/ a PowerLogix G4/450, ACARD ATA/66 Controller Card, ATI Radeon 7000 PCI Video Card
- Original installation
- Time to boot Classic - 21.49 seconds (Factory OS 9.2.2 installation via OS9Forever.com)
- "Pruned down" installation
- Time to boot Classic - 11.15 seconds
I think you can see why at the very least, optimizing your classic installation is VERY worthwhile! 290% speed improvement with the Dual 867 system is pretty amazing!
Even if you do not decide to migrate your Classic installation to it's own boot disk image, you should take the time to remove those old outdated applications that you will likely never use again. It sure will save you time! And remember - it's always a good idea to have a fallback position if something should ever happen with your system. If you need to perform disk repairs and don't have any means of booting the system from either another disk partition, or system installation, creating a startup volume on a disk image is not a good idea for you. But remember - you can keep that old system installation on your machine for emergency situations, and still have a disk image version of the system to boot to for Classic speed! The best of both worlds IS possible!
Once again, Thanks VERY much Harry for your excellent tip!
