When you work in Adobe Premiere Pro on a daily basis, it’s easy to get stuck in old habits. And while you may be incredibly fast with your old habits, you might also be missing out on some new ways to use the software that will enhance your workflows.
In this article, I’m going to show you a few of the things I’ve been using recently that have really leveled up how I’m using the program. I should note that none of these will necessarily make you a “better” editor, but knowing the ins and outs of your software is critical to working on a team with other creative professionals.
Organizing your projects with audio and video usage metadata
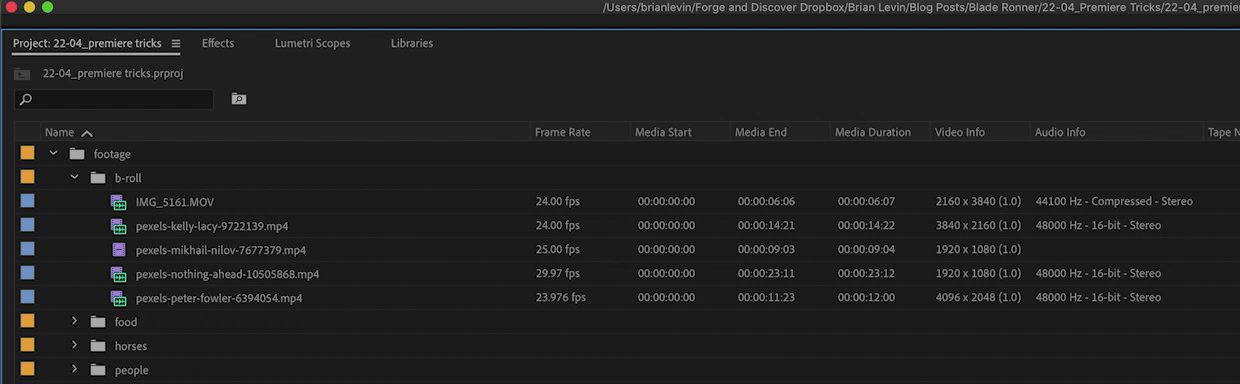
My first simple, yet useful, tool for you is in the Premiere Pro Project panel. By default, Premiere Pro displays columns of valuable metadata in List view. This is great because here you can sort and rearrange the columns. But did you know that you can add more metadata columns? Also, there are some helpful tools out there that will make organizing your projects far simpler.
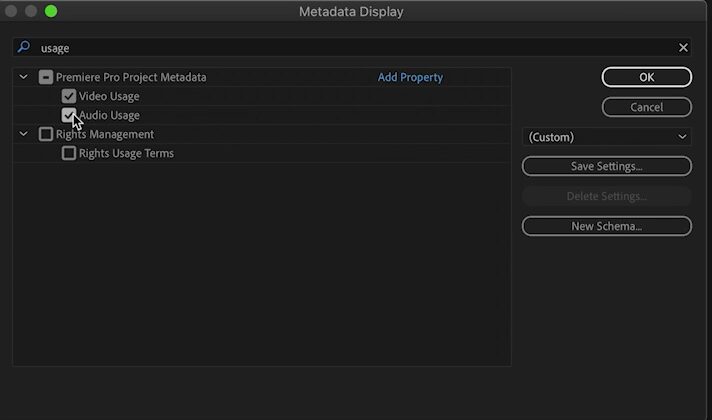
To change your metadata columns, right-click on the column headers and choose Metadata Display. In the dialog box that opens, you can scroll through all of the available metadata options. I have included something called Usage on my metadata columns. You can search for it in the top bar, and check on Video Usage and Audio Usage.
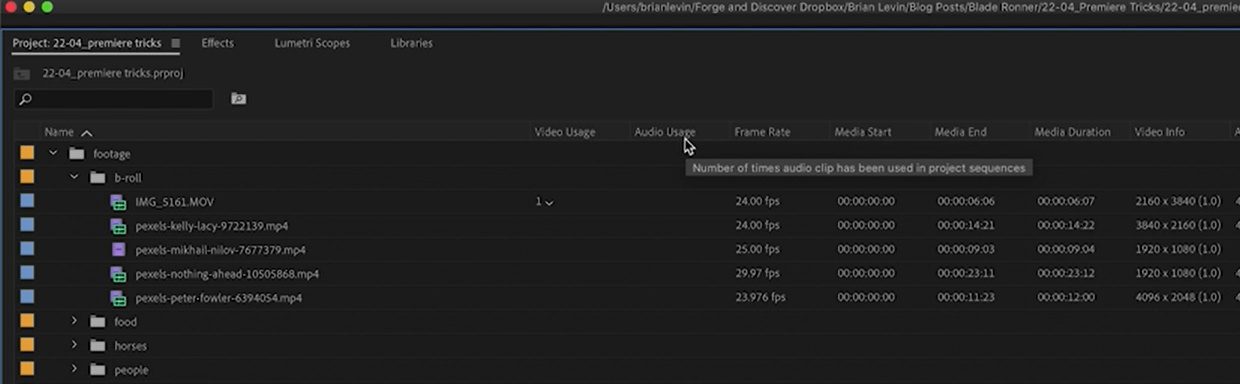
Now back in your Project panel, you’ll see two new columns, one for Video Usage and one for Audio Usage. If you scroll down to find a clip in your bin that has been used in the timeline, it will show a number in either of those columns, depending on whether you used just the video, just the audio, or both.
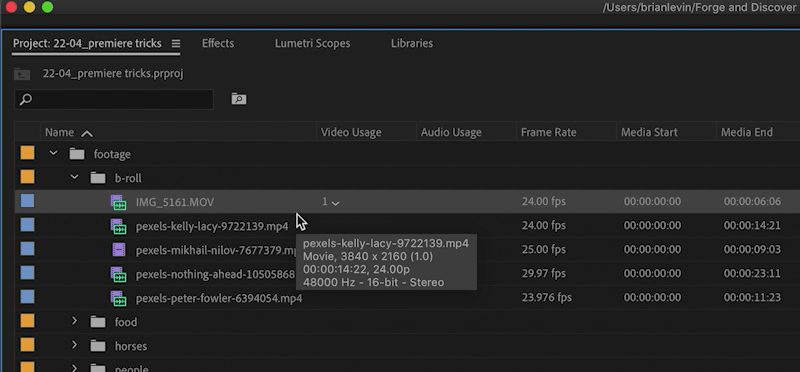
But it’s far more interesting than that because by clicking on that usage number and selecting the usage item from the drop-down list, Premiere Pro will automatically take you directly to the spot in the timeline where you used it.
This is helpful for a number of reasons, but primarily when you are using stock footage for b-roll. It’s helpful to see if you have already used a piece of footage. You don’t want to include that shot of office workers walking down the hall in slow motion twice (maybe once was already too much).
Saving bin and column views
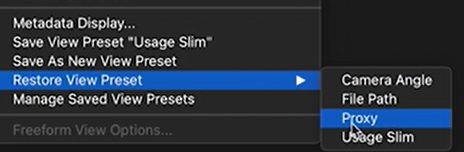
Adding these columns to your Project panel is a good start. But did you know that you can also save this metadata layout and recall it later on? Here’s how.
To begin, set up a column layout that works for you. This is my layout for checking proxy files on my projects:
Click on the hamburger menu on your Project panel and scroll down to Save As New View Preset. Now we can do this again with some new columns.
This is my layout for when I’m in the middle of an edit, I like to keep those Usage columns exposed and near my filenames:
So, I’ll do the same thing as above, and assign this as a new view preset. Now I can restore these view presets easily. I can even assign a shortcut key for each one if I want to Manage View Presets and assign each a preset.
Create time-saving presets that you use all the time
In fact, you can save presets for a lot of things in Premiere Pro. Did you know that you can take a stack of effects you’ve created specifically for a project or scenario and save it as its own preset that you can recall in the future?
Here’s a really simple one that I use all the time. I’m sure you have received the dreaded vertical video and have been asked to simply blur the background and enlarge a copy of it. We’ve all done it.
How you would do this is simple. First, you’d duplicate the layer in your timeline. Then you’d go to your Effects panel and apply the Gaussian Blur, and adjust the blur amount. You might also apply a Brightness & Contrast adjustment, and lower the Brightness value a bit. Finally, you’d Scale the video up to fit the screen with the Scale parameters.
All in all not terribly complicated, but it’s a lot of clicks.
Try this instead:
- Build your effect how you like it.
- For the scaling of the image, apply the Transform effect on your layer instead of using the Motion Scale property. Use the Scale property in the Transform effect.
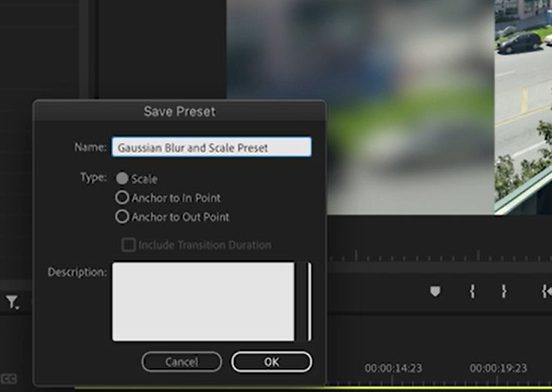
- Next, select all three effects in your Effects panel, right-click, and choose Save Preset.
- In the Save Preset dialog that opens, give your preset a name, and click OK.
Now you can find that preset in your effects panel as a single effect that will take care of all that clicking.
Setting up Avid-style “Source/Record” timelines in Premiere
This tip comes courtesy of someone who started as a Final Cut Pro editor, turned into a Premiere Pro editor, and then later went on to learn Avid. While I don’t use Final Cut Pro anymore, I do begrudgingly use Avid, and although I don’t love it as software, there is one thing I have grown to love quite a lot: the “source/record” monitor style of editing.
If you don’t know Avid and don’t know what I’m talking about, then this tip might still show you a whole new way of thinking about editing in your Premiere Pro timeline. And if you do know Avid and wish you could edit in Premiere Pro with a lot less clicking and dragging, then this tip is for you!
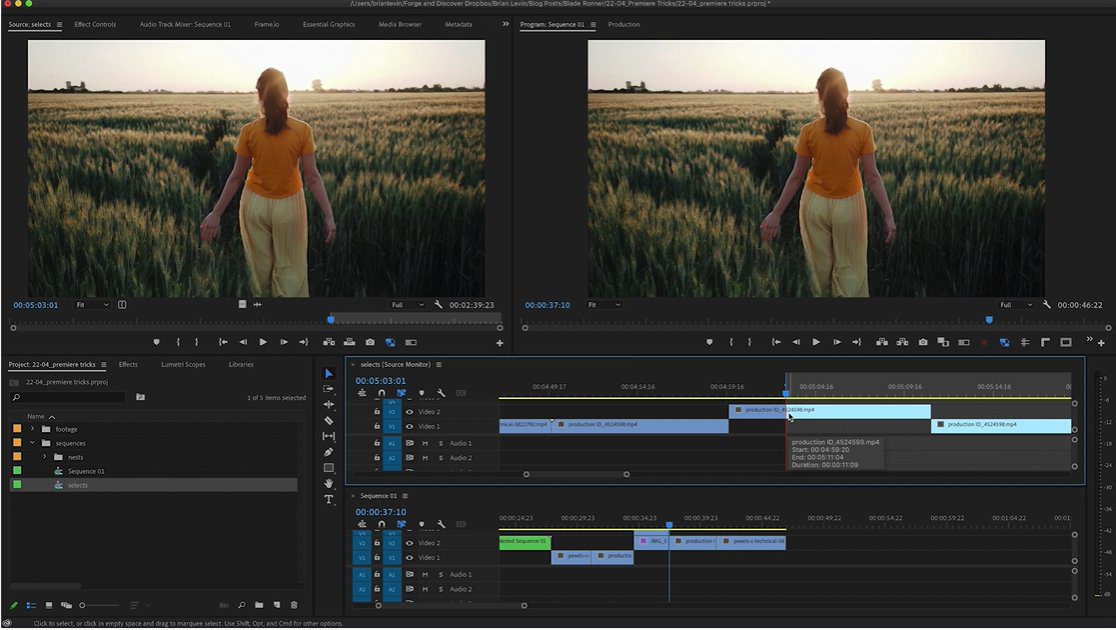
To set this up, I’m working in a timeline here full of selected clips, or “selects,” that I’ve pulled and sorted. You’ll want to create one as well.
To begin, close out any open timelines you have then follow these steps:
- Open up your editing timeline.
- In your bin, click and drag your “selects” timeline up into the Source Monitor. Using the wrench icon on the bottom right of the source monitor, select Open Sequence in Timeline.
- Now you have two timeline tabs open. One is your editing timeline and the other is your “selects” timeline.
- Make sure in your editing timeline you have the button for “Insert and overwrite sequences as nests or individual clips” unchecked, so it does not appear blue.
By default, the shortcut key to focus Premiere Pro on the timeline window is Shift+3, but you can reassign it to any shortcut you want. By pressing your shortcut key for focusing on the timeline, you can toggle back and forth between the two open timelines just like source/record editing in Avid.
You can use in and out points in the source timeline, use a shortcut key to toggle over to the edit timeline, set in and out points in there, and then use your shortcut key for overwriting to cut from the source timeline into your editing timeline.
This is great and fast for a variety of use cases, but most often I use this method when assembling a scene from a movie where I’ve created a line breakdown of the script in its own timeline.
In my companion article about useful shortcut keys in Premiere Pro, I discuss setting up a shortcut key to move the playhead to the position of the mouse. Well, that’s extra useful here as you can also set up a shortcut key to load a sequence into the Source Monitor, and then another shortcut key to open the Source Monitor as a timeline.
And here’s the cool thing: All three of these tasks can be the exact same key. For me, that’s the Backslash key, so three taps of the keyboard take me from the Project panel into my source/record timeline setup, setting my playhead to exactly where I want it so I can begin playing my footage instantly.
An easy way to share just a small part of your project with a collaborator
My final useful tool is hidden in plain sight. No doubt, you have exported your projects out of Premiere Pro by going to the File menu, and then choosing Export > Media.
But if you look more closely at this menu, at the bottom is an option called Selection As Premiere Project. And believe it or not, this is one of the most powerful tools inside of Premiere Pro that you should think about using in the future.
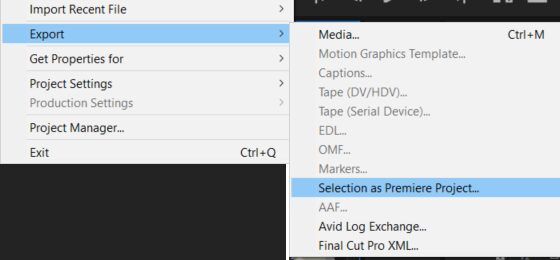
When you select a sequence in your bin, and then go up to File > Export > Selection As Premiere Project, the resultant file that you receive will have only your sequence in it, along with only the assets that pertain to that sequence.
Why is this useful? For one, it’s a good way to consolidate your project using the Project Manager. The Project Manager is notorious for being a little difficult to work with but working out of a project that only contains the used media is one way to set yourself up for success.
Second, this is a good way to share just a single sequence of your project with a collaborator. You might want to send a timeline full of selects to a fellow editor working on the same client as you, but you don’t want them to have to sift through your entire project file to find what they need.
Finally, this is a good technique for saving down backup versions of your sequences if you don’t want to continually duplicate sequences in your project, thus bloating the project file size. Simply select your sequence at the end of the day, choose to save it as a Premiere Pro project, and store it in a folder with today’s date. Now you can easily get back to your sequence from today anytime in the future, without having a bin full of dozens of old sequences clogging up your project.
I encourage you to continue to explore the ins and outs of Premiere Pro and find other cool tools for yourself. There is no shortage of unique ways to utilize the software to fit your needs.