Installing your new OWC Mercury G3 or G4 ZIF in the Beige G3 Power Macintosh system
Page 1
|
| NOTE: If your Apple Beige G3 has a Royal VRM module, it will not be able to use a G4 processor upgrade unless that VRM is replaced. Please click HERE for more information before proceeding abou this issue. |
When you upgrade your Apple Beige G3 with a new and faster OWC Mercury G3 or G4 ZIF (Zero Insertion Force) processor, you will have to change your jumper settings. Apple's Beige G3 motherboards have a series of 9 pins in a line (Fig.1, Arrow A). These pins control the bus and clock speeds of your computer. To change the jumper setting and replace the ZIF chip please follow the steps below.
The jumpers are "sealed" under a label and if this label is removed it will void your warranty! Please note that any modifications you make to your Macintosh are made at your own risk.
|

A: Red stock jumper block --- B: G3 processor with heat sink
|
|
Processor Removal and Installation
|
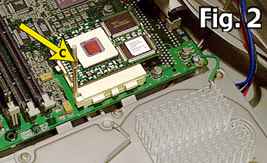
C: ZIF release handle
STEP 1: Locate your original processor (Fig.1, Arrow B). Remove the heat sink clamp. Lift the heat sink and place it aside.
Note: You do not need to disconnect the green grounding wire.
Lift the ZIF release handle (Fig.2, Arrow C) upwards untill it stops. (Remember which direction the ZIF chip is installed, as you will reinsert the new one the same way.)
|
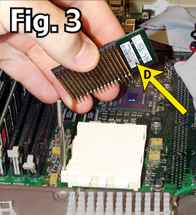
D: G3 ZIF Processor
STEP 2: Remove the original ZIF chip (Fig.3, Arrow D). From this point on reverse the steps you have taken. Place the new chip in exactly how the old was. The new ZIF chip will slide right into it's place when the pins are lined up.
|
Note: Please DO NOT force the new chip into its slot - you might damage the pins.
|
Once the chip is fully seated in the ZIF socket, push the ZIF release handle down until it locks. Place the heat sink back on top the processor and lock the heat sink clamp into place. Be sure that the heatsink clamp is properly aligned with the flat portion of the clamp directly over the center of the new OWC Mercury ZIF processor module.
Processor installation is complete. Continue on to part 2 for configuration information.
Continue--->
|
|

