OWC Guide
Cloning Your Data to a New Hard Drive in macOS
Our primary recommendation for transferring files from an old Mac OS X or macOS drive is performing a clean install of OS X (10.11.6 and under) or macOS (10.12.0 and higher) and migrate your data using Migration Assistant. For instructions please click here. Cloning is a viable option if installing a fresh copy of the OS and migrating your data is not an option.
Cloning is a destructive process that will erase the recipient drive, leaving the source drive intact.
The instructions below are for cloning from the original drive externally to a new drive inside a computer. In certain circumstances connecting the original drive externally is not an option. In those cases using an external hard drive as an intermediate is recommended. This process would consist of cloning the original drive while still inside the computer to a separate external hard drive, then installing the new drive and cloning the external hard drive to that new drive.
STEP#1
Booting into the recovery partition or OS install media
After you install the new hard drive, you will need to boot to the recovery partition on the original drive if OS 10.7 or later is installed. If OS 10.6.8 or earlier is installed, you can use the original OS install discs that came with the computer.
Power on the Mac while holding down the 'Option' key. This will display a boot menu that looks like the picture below. Click the drive icon that says 'Recovery' (OS 10.7 and later) or 'Mac OS X install' (OS 10.6.8 and earlier).
Power on the Mac while holding down the 'Option' key. This will display a boot menu that looks like the picture below. Click the drive icon that says 'Recovery' (OS 10.7 and later) or 'Mac OS X install' (OS 10.6.8 and earlier).
The number of drives listed will depend on the number of
bootable drives in your system.
bootable drives in your system.
STEP#2
Format your new drive
Once booted into the Recovery partition or installer disc, select your desired language. Next, open Disk Utility by navigating to the Utilities menu in the upper-left corner of the screen, then select Disk Utility from the drop down menu. Once in Disk Utility our detailed instructions for the formatting process can be followed: www.macsales.com/tech_center/formatting.cfm
STEP#3 THE CLONING PROCESS
Apple's Disk Utility (10.3.x to 10.12)
WARNING: When using the restore process, the files on the destination volume will be erased! Before you restore a volume, be sure to copy any files on the destination volume that you want to save, to a different storage device or cloud account.

You can also restore one volume from another volume. When you restore from one volume to another volume, it makes an exact copy of the original. For example, you can restore from your startup volume to an external volume to use as a backup.
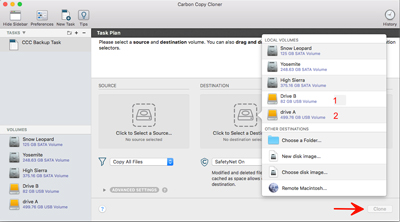
- Select the new volume (indented icon) and click on the 'Restore' tab.
- Drag the old volume to the Source field.
- Drag the new hard drive to the 'Destination' field.
- Click the check box for 'Erasing destination.'
- Click 'Restore' at the bottom to begin the process of copying your data to the destination.
You can also restore one volume from another volume. When you restore from one volume to another volume, it makes an exact copy of the original. For example, you can restore from your startup volume to an external volume to use as a backup.
Apple's Disk Utility (10.13 and newer)
- Select the new drive volume in the sidebar then click the Restore button or choose Edit > Restore. This is the volume that is erased and becomes the exact copy.
- Click the 'Restore from' drop down menu, then choose the volume you want to clone the data from.
- Click Restore. Once the data has been cloned, Disk Utility indicators will show the status as being 'complete'. Click the 'Done' button.