Formatting a Drive for PPC or IntelFormatting your Hard Drive
for Mac By Brian Bellman
1) The first step
to formatting your drive for Mac and PC format is to connect both the data and
power cable to a Mac. This holds true for both internal and external hard
drives. In addition will also need to turn on the power switch if you are using
an external drive.
2) If your drive has never been formatted, you should get
this pop-up message. Click initialize and it will bring you to "Disk Utility"
and Skip to step 4. If you didn't get this pop up, continue to step 3.
Special note for laptop users: If you are installing an
internal drive in a Laptop you will need to boot off of the OS X install disk
and go to the "Utilities" Drop down, then "Disk Utility". Once you complete
this format you will also need to reboot to the OS X installer disc before it
will recognize the hard drive as a valid install location for the Operating
system.
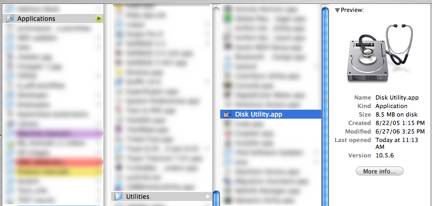
3) Once the drive has spun up, navigate to and open the
"Disk Utilities" under "Applications" and open "Disk Utility" /Applications/Utilities/DiskUtility.app
4) Once you have opened "Disk Utility", click on your new
drive on the left hand side and then click on the "Erase" tab on the right. Name
the Drive and Hit the "Erase" button.
5) You will be prompted with a warning message "Erasing a
disk will destroy all information on the volume of the disk." Click Erase. You
will see a progress bar, once it is finished you will see your new drive on
your desktop. You have completed formatting your drive is ready for use on the
Mac.