
Mirroring/Striping/Spanning/Individual Drive Setup Instructions
For Mac OSX 10.3.X and 10.4.X
By Brian Bellman
NOTE!
This update does not work with Intel based Macs! Oxford is working on a universal binary update, but we do not have any ETA at this time. We're sorry for this inconvenience.
Before proceeding with any firmware change, back up your data!
OWC is not responsible for any data loss!
These instructions are used for changing the OWC Mercury Elite-AL PRO 800 RAID case to one of the following:
Individual, Spanning, Mirrored RAID or Striped RAID(default).
1. Start by downloading "OWC_912_Config" (1MB, .zip file) the Oxford Semiconductor Java Firmware Uploader.
NOTE: DO NOT AT ANY POINT PRESS THE "UPGRADE/UPLOAD FIRMWARE" BUTTON
2. Place the " OWC_912_Config " folder on your desktop for easy access during this process. All directions are provided assuming that location.
3. Make sure that your OWC Mercury FireWire hard drive is powered on, and the only FireWire device attached to your system via either a native FireWire 400 or 800 port. If you have a PCI FireWire 400 or 800 card in your system you may need to remove it before updating. The Java updater sometimes can't decide which port to choose for the update. Use of a built in port eliminates this problem and you can safely update from either 400 or 800 ports.
4. Once you see the OWC Mercury FireWire drive appear on your desktop, dismount the OWC Mercury FireWire hard drive by dragging the disk icon to the trash. DO NOT unplug your FireWire hard drive, leave it plugged in, and powered on.
5. Open the "OWC_912_Config" folder that you downloaded to you desktop. Double click on the "updater.jar" Java application to launch it.
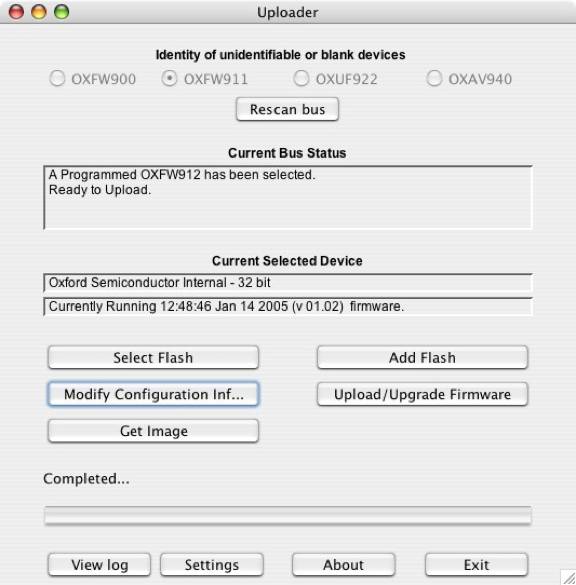
NOTE: DO NOT AT ANY POINT PRESS THE "UPGRADE/UPLOAD FIRMWARE" BUTTON!
6. Click on the "Modify Configuration Inf" button.
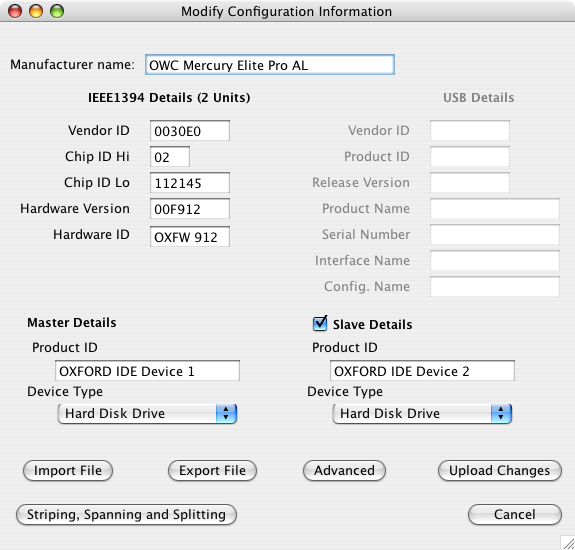
7. Write down your "Chip ID Lo" number.
8. Click on the "Import File" button.
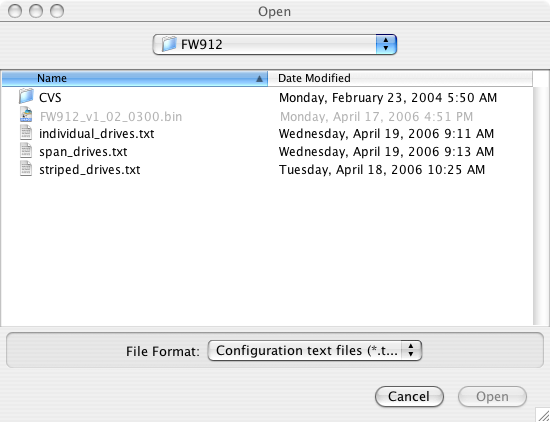
9. Navigate to the "FW912" folder. From the desktop, Double click on "OWC_912_Config" then Double click on the "data" folder, next double click on the "FW912" folder. (Desktop/OWC_912_Config/data/FW912)
10. Double click on the configuration you want. Description followed by .txt file to double click.
Mirrored RAID:
individual_drives.txt = configures the drive to mount as 2 individual drives, also used for setting up a software Mirrored RAID. Ends at step #18
Individual:
individual_drives.txt = configures the drive to mount as 2 individual drives, also used for setting up a software Mirrored RAID. Ends at step #13
Spanning:
span_drives.txt = configures the 2 drives to span and show up as one volume on the desktop. Ends at step #13
Striped RAID (default):
striped_drives.txt = configures the 2 drives into a striped RAID and mounts as one volume on the desktop. Ends at step #13
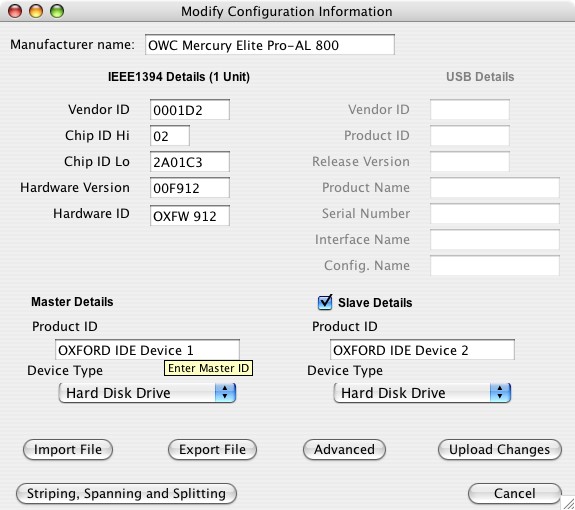
11. Enter the "Chip ID Lo" number you wrote down earlier back into that field.
*If you didn't write down the "Chip ID Lo", you can enter a unique 6 digit number here instead.
12. Click the "Upload Changes" button. Once this is done it should revert to the main firmware page. The firmware may take a few moments to update. Once the activity bar is complete, and the update is done; click the close button. Wait about 30 seconds then turn off the power on the enclosure.
13. If you are setting the enclosure up for a Mirrored RAID, please follow the rest of the instructions. If you are setting the enclosure for Striping, Spanning or Individual drives without a Mirrored RAID, you are finished. You may need to shut down your computer, and turn off the enclosure. Next restart the enclosure and computer for the settings to take effect.
14. Turn the enclosure back on. It should now prompt with two windows to ignore or initialize the drives. Go ahead and hit initialize. This will bring you to Disk Utility. If you donÕt want to setup a mirrored RAID, and just want 2 individual drives you are done. Skip to step 15 if this opened Disk Utility.
Note: If the two drives mount on the desktop, don't worry, you will need to manually open Disk Utility. This is done by:
A) On the desktop double click the hard drive that the operating system is installed on.
B) Double click on the "Applications" folder.
C) Double click on the "Utilities" folder.
D) Double click on the "Disk Utility" Application to launch it.
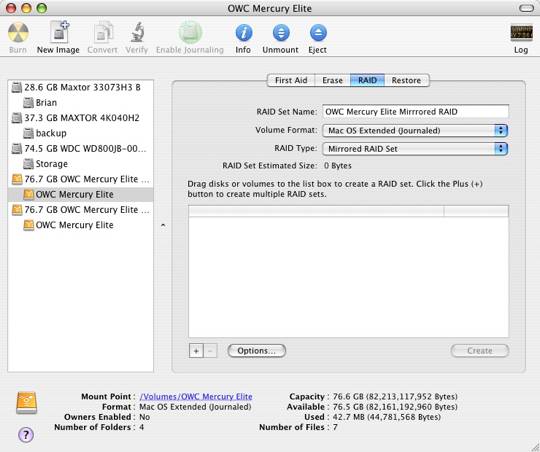
15. Click on the top of one of the drives like the picture above that is highlighted. Next click on the RAID tab. Drag both of the drive icons where is says "Drag disks here to add to set". These are the icons labeled above as the "76.7 GB OWC Mercury Elite" (yours may have a different size or name).
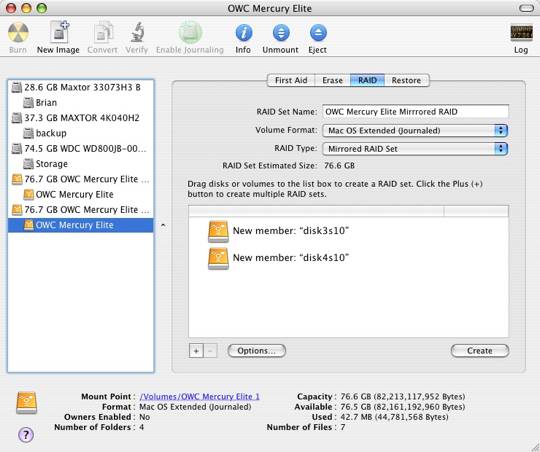
16. Your screen should now look similar to the one above. Under RAID scheme select "Mirrored". Now you can type the name of the RAID in the "RAID Set Name" field. Volume format should remain as "Mac OS Extended (journaled)". Click the "Create" Button.
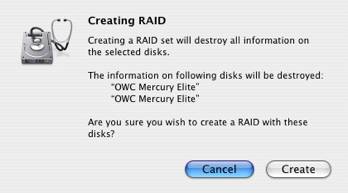
17. You will need to hit the "Create" button again.

18. The RAID setup should now be complete, and look similar to the above screen. There will now be one icon on your desktop for your OWC Mercury Elite Enclosure.
|

