Back in May, OWC's Steve Manke wrote a quick tip titled "The Power of the Eject Key" that had a multitude of tips pertaining to key combinations that can be used with the eject key on the top right of your Apple Pro Keyboard.
But what if you don't have an Apple Pro Keyboard? Or an Eject key?
Apple has provided a quick and easy way to add yet another icon to your menu bar. That's right, you can add an eject menu bar item just like you have a volume control, monitor resolution adjustment, bluetooth status or clock at the top right of your screen. And it's free! :>)
Click to enlarge image to full size
Navigate your hard drive directory to this folder:
MacintoshHD ---> System ---> Library ---> Core Services ---> Menu Extras
In the Menu Extras folder you'll see a folder called Eject.menu:
Grab the Eject.menu folder and drag it to your menu bar:
Once you let go of the mouse button, the Eject icon will appear as shown:
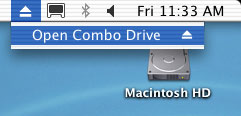
And, if you click on the Eject icon, you'll see you can now open and close your drive with the menu bar item. Pretty cool! And it gets even better if you have a Mirrored Drive Door / FireWire 800 system with two internal drives, it will show both mechanisms and you can choose which one to open. Unfortunately, it won't work with external devices (if anybody knows how to make this work with externals, drop me a note!).
Also, if you want to reorganize your menu bar items, just hold down the command (Apple) key on your keyboard and click on the icon you want to move. Drag them to arrange them in whatever order you want! If you decide you don't like this (or any other menu bar icon) taking up space, grab it and drag it out of the menu bard while holding the command key - poof, it's gone!
|