NOTE: If your Apple Beige G3 has a Royal VRM module, it will not be able to use a G4 processor upgrade unless that VRM is replaced. Please click HERE for more information before proceeding abou this issue.
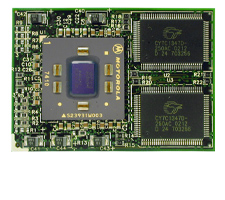
When you upgrade your Apple Beige G3 with a new and faster OWC Mercury G3 or G4 ZIF (Zero Insertion Force) processor, you will have to change your jumper settings. Apple's Beige G3 motherboards have a series of 9 pins in a line (Fig.1, Arrow A). These pins control the bus and clock speeds of your computer. To change the jumper setting and replace the ZIF chip please follow the steps below.
1. Processor Removal
C: ZIF release handle
Locate your original processor (Fig.1, Arrow B). Remove the heat sink clamp. Lift the heat sink and place it aside.
Note: You do not need to disconnect the green grounding wire.
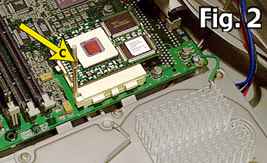
Lift the ZIF release handle (Fig.2, Arrow C) upwards untill it stops. (Remember which direction the ZIF chip is installed, as you will reinsert the new one the same way.)
2. Processor Installation
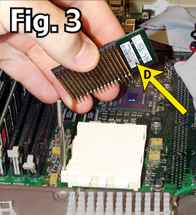
D: G3 ZIF Processor
Remove the original ZIF chip (Fig.3, Arrow D). From this point on reverse the steps you have taken. Place the new chip in exactly how the old was. The new ZIF chip will slide right into it's place when the pins are lined up.
Note: Please DO NOT force the new chip into its slot - you might damage the pins.
Once the chip is fully seated in the ZIF socket, push the ZIF release handle down until it locks. Place the heat sink back on top the processor and lock the heat sink clamp into place. Be sure that the heatsink clamp is properly aligned with the flat portion of the clamp directly over the center of the new OWC Mercury ZIF processor module. Processor installation is complete.
3. Jumper Settings
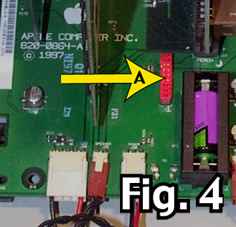
A: Red stock jumper block
Each pin has a certain job to do. The illustration above shows what each pin controls.
The red block (may be a different color on your computer) (Fig.4, Arrow A) is where you configure the pins with jumpers on your G3 motherboard to take advantage of the new OWC Mercury ZIF chip. The red jumper block is Apple's way of setting a configuration for a certain speed. Fig 5. shows jumper configurations. Black = Jumper / White = No Jumper
Tip: A needle nose pliers, tweezers or hemostats work really well for placing the jumpers on the logic board pins.
For more configurations go to the
Complete Jumper Chart.
4. Jumper Configuration
Remove the jumper block off and keep it in a safe place. If you ever want to return your system back to factory stock, you can place the jumper block back onto the logic board.
Take the provided jumpers and install them in the proper order onto your logic board to configure your new ZIF to the desired speed.
If you are looking to squeeze top performance out of your new OWC Mercury ZIF chip, you can attempt to clock your CPU even higher than the rated speed of the ZIF chip. Follow the complete jumper chart for different bus speed configurations. We recommend either 66MHz or 83MHz bus speeds.
Start up your system and install cache controlling software. If you're running Mac OS 9, we recommend using PowerLogix Cache Control software located here, and if you're using Mac OS X, we recommend Ryan Rempel's Cache Control Software located here. You can also use PowerLogix universal CPUDirector software, located here.
NOTE: if your computer will not start up, you may need to reset the CUDA switch, it is a small gray button on the logic board at the top left of the system. It is located next to the PCI slot closest to the edge of the computer. Press the button with a ball point pen for 5 seconds and your system should start up as normal. If you are still unable to start your machine, please contact our tech support department.
Congratulations! After you have completed configuring the jumpers and checked to see if your computer runs stable, you can close the case, plug what you have back in and enjoy your new Mac!
 1-800-275-4576