Experience local shipping options and optimized product inventory for your region.
 1-800-275-4576
 | Remaking the Classics Relocating your Home folder in OSX 10.5.x Leopard and later by M. Christopher Stevens |
 |
||||||
A Historical Perspective In August of 2003, I wrote my first "Quick Tip" for OWC - a "how to" for relocating a user's Home folder to a different partition on the same computer. At that time, the genesis of the project was rooted in the 8GB boot partition limit for OSX on the Beige G3's and the "Wallstreet" PowerBook, of which I was an aficionado. Since that rather low-tech first attempt (which I don't recommend any more), that article has been adjusted and reapplied a number of times, but the overall effect has been the same: You can overcome the limited amount of space on your boot drive by moving your Home folder to a second larger internal - or external - drive. Many Uses Relocating your Home folder is actually a fairly useful procedure, which can be applied in many situations. Sure, it's great if you have an older system with the aforementioned 8GB partition limit, but it is also applicable to much more modern machines.
This process has had applications bounded only by the imaginations of those who were implementing them. And, for the past 5 years or so - from OS X 10.2 all the way through OSX 10.4.11, the same process has worked like a charm. A Change of Plans When I set out to install Leopard on my upgraded Sawtooth G4, I had an interesting "problem". I had three 120GB hard drives, but no good way to combine them all into one large volume. Leopard didn't seem to work well (read as: "had a kernel panic every 10 minutes") when I tried to run it off a software RAID of two of the drives, but when I used a single drive, it ran without a hitch. Unfortunately, Leopard's rather gluttonous use of drive space, combined with my Home folder's own gargantuan proportions, meant that it wouldn't be long before my boot drive would be full. However, I still had that 240GB RAID that was just sitting there unused. Time to bring out the old Home Folder Relocation chestnut and be on my way. There was a slight problem, though. OSX 10.5 did away with the NetInfo Manager, which has been an integral part of the process. Uh oh… Familiar Faces in Different Places After emitting a number of choice explicatives, I did a little digging and found that the functionality I used NetInfo Manager for in this process had been conveniently "hidden" in the Accounts preference pane. Fortunately, in the process, some of the changes to the pane made this whole procedure a lot easier than it was before. So, without further ado (I know… too late…) let's get to moving stuff around. Makin' Copies
Though other options do exist, I found that using the ditto command in Terminal served this purpose nicely, as it is efficient, effective and easy. The syntax of the command, as we'll be using it here, is as follows:
ditto -V /source /destination There's actually quite a bit here, so let's break it down a little.
When I did mine, it appeared as ditto -V /Users/mcs /Volumes/Internal\ RAID/Users/mcs This copied my Home folder (mcs) from the main Users folder to a folder called "Users" on the drive called "Internal RAID". Your command should look similar, but your path names may vary, depending on the names of your drives and folders. Once you have it entered, simply hit the Return key, and the Terminal window will quickly fill with the names of the files that are being copied. As hypnotizing as that is, you can probably benefit from finding something more productive to do while the files copy over. Times will be slightly different from machine to machine, but in the tests I have run, I've averaged about 2 minutes per gigabyte. Redirecting Information
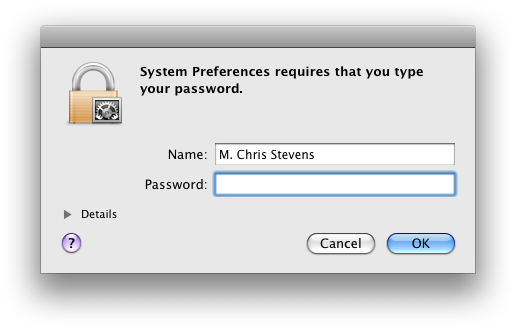
Now comes the tricky part. In earlier OS versions, this is where we'd fire up NetInfo Manager and redirect things that way. Alas, as I mentioned at the top of this article, this program no longer exists in Leopard. Fortunately, its functionality was split up among other applications. In terms of this project, the information we need was moved to a "hidden" option in the Accounts Preference Pane. Open up the Accounts pane in System Preferences. In the lower left corner, you will notice that there's a "closed lock" icon. As we do want to make changes, click on the lock icon. You will promptly be asked for your username and password.
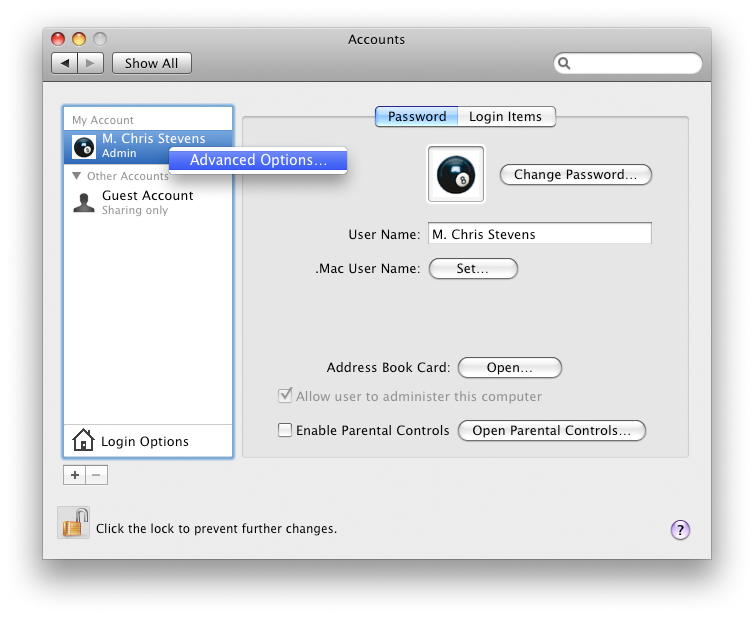
Enter in the username/password of an Administrator's account on your computer (Sorry, my info won't work on your machine…☺) Once you have, the icon will show an "open lock." At this point, you may now right-click (or Control-click) on the account you have moved. A menu should appear with a single item: "Advanced Options…", which you should select.
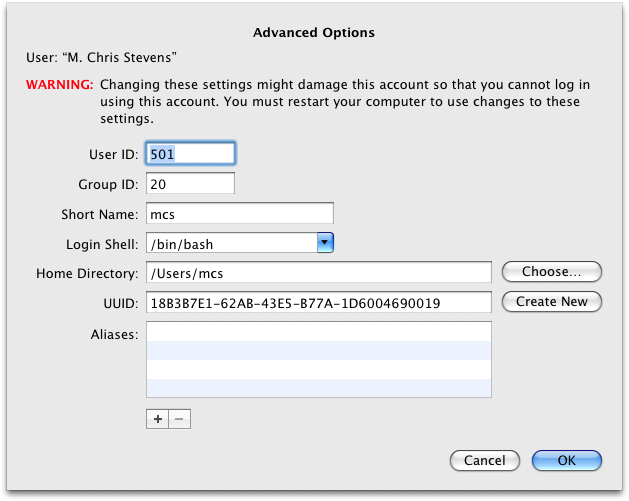
Once selected, a sheet will expand, containing the information for this account. The only thing you need to change is the "Home Directory" option. To change it, simply click on the "Choose…" button.
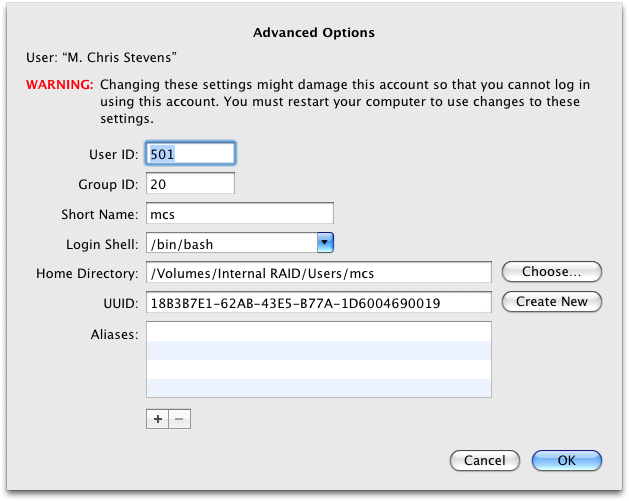
Clicking on the "Choose…" button will bring up the standard Open/Save dialog box. Navigate to your new Home folder and select it and click the "Open" button. You should notice that your Home Directory info has changed to reflect the new location. Click "OK" (confirming if you need to).
Restart and Go! At this point, all the "moving" is done. To use your new Home folder, simply restart and log in as usual. If you followed my tip above, and your other steps were performed correctly, you should have a folder that says "It Worked!" on the Desktop. If not, go back to the beginning of this section and try it again. Once you have successfully moved your Home Folder, you can continue using your Mac as you always have. Now, though, you'll have the space, portability and/or security that comes from relocating to a different volume. |
|||||||

 The first big step in this process is actually copying your Home folder over to the other drive. Unfortunately, a simple drag-and-drop in OS X doesn't quite work, as you run into a number of permissions and ownership issues. In previous iterations of this project, I simply booted into OS 9 to do the drag and drop, and suffered no ill effects. However, of the machines capable of running Leopard, only G4's released prior to 2003 are able to boot into OS 9 natively. So, we need to do this another way.