Guardian Maximus Hardware RAID-1 Mirror Performance Storage Solution
Owner’s Manual

Thank you for purchasing your Newer Technology Guardian MAXimus, the easiest, safest way to add mass storage and expandability to your computer!
Before starting, if your Newer Technology Guardian MAXimus Hard Drive is delivered under extremely hot or cold conditions, you should allow the contents of the package to reach room temperature prior to use.
Treat your Newer Technology Guardian MAXimus just like you do your computer – keep it dry, out of direct sunlight, clean and avoid static electricity.
Installation / Setup Instructions
Macintosh Software Installation
Mac OS X – Any interface connection: Drivers not required. Proceed to hardware installation.
Mac OS 8.6-9.2.2 – FireWire 400: Insert the HDST CD and follow the instructions provided by the installer. You may need to install Apple’s FireWire drivers (see the OWC Tech Center for details). Mac OS 8.6-9.2.2 does not support FireWire 800 or eSATA.
Mac OS 8.6-9.2.2 – USB 1.1: You will need to download USB Mass Storage Support from Apple at http://docs.info.apple.com/article.html?artnum=60394. Mac OS 8.6-9.2.2 does not support USB 2.0.
Windows Software Installation
You will need to format the Guardian Maximus before using. Please visit http://newertech.com/format for detailed instructions.
Windows 98 & ME - FireWire 400: Drivers not required. For use with Windows 98SE or ME, it may be necessary to select the drive in the Device Manager and specify it as a removable drive.
Windows 2000, XP or Vista – FireWire 400, 800 or eSATA: Drivers not required, though users may have to create a have to create a signature for the drive in the Computer Management control panel. Then, proceed to hardware installation.
Windows 98 & ME do not support FireWire 800 or eSATA.
Windows ME & Higher – USB 2.0/1.1: Drivers not required. For use with Windows 98SE or ME, it may be necessary to select the drive in the Device Manager and specify it as a removable drive. Windows 2000/XP Users will have to create a have to create a signature for the drive in the Computer Management control panel.

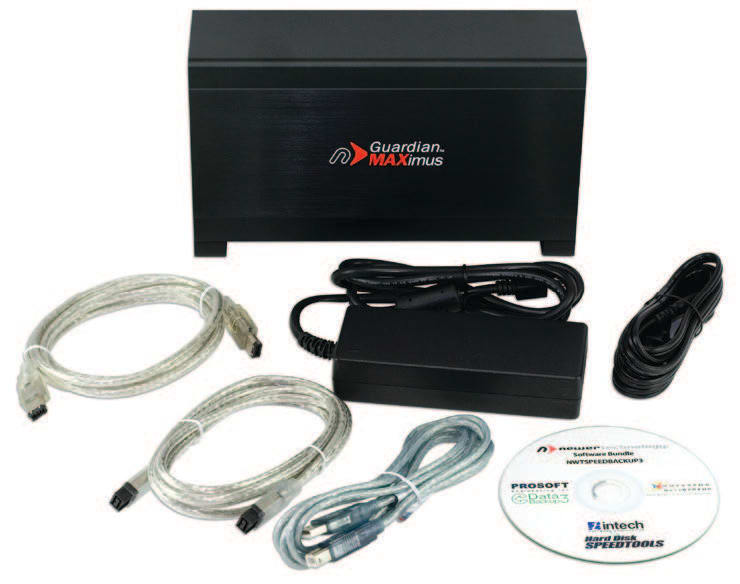
Your Guardian MAXimus includes:
- The Guardian MAXimus solution
- The following cables:
- FireWire 400 (1394a)
- FireWire 800 (1394b)
- eSATA
- USB 2.0 A-B
- A heavy-duty power supply & power cable
- The Newer Technology software bundle
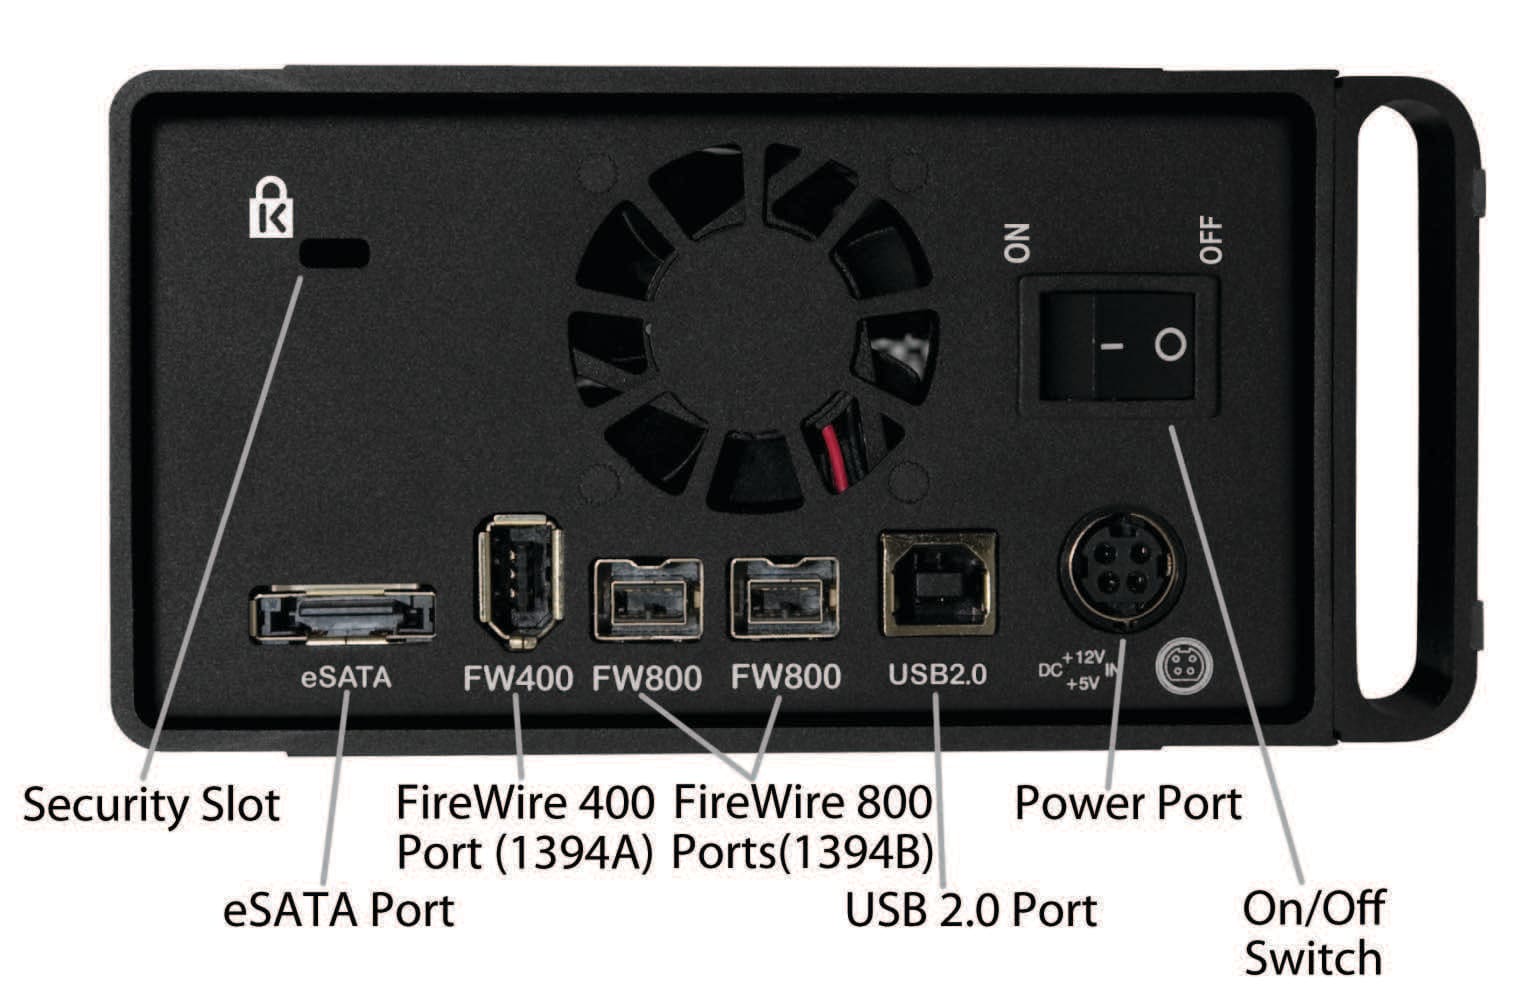
Turn the Guardian MAXimus around and examine the rear ports.

Hardware Installation
Installation of the hardware is simple on any platform
1. Plug the AC power cord into the wall and to the DC transformer.
2. Plug the DC power cord into the Newer Technology Guardian MAXimus.
3. Connect the FireWire 400, 800, eSATA or USB 2.0 cable – appropriate for your the interface your computer supports – into the drive and computer.
4. Power on the Newer Technology Guardian MAXimus! You’re all set!
Note: You may only have one computer interface directly connected to the drive at a time. When using FireWire, the additional ports on the drive may be used to interconnect additional FireWire devices.
Note: If you are using FireWire 800 and add a FireWire 400 device to the chain, all devices will be reduced to FireWire 400 performance.
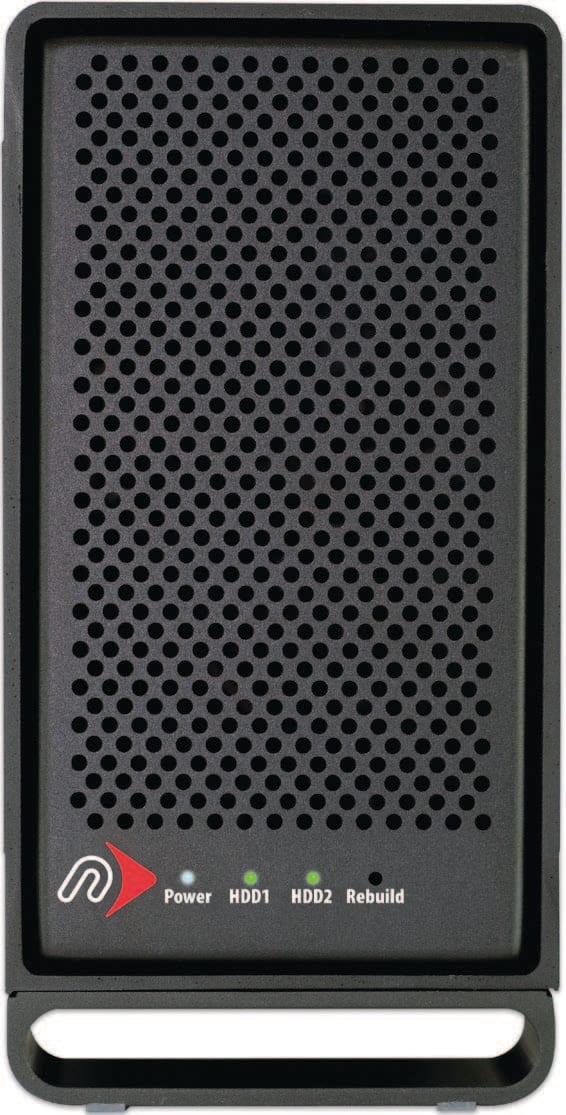
Identifying the Guardian MAXimus front status lights.
The NewerTech Guardian Maximus has 4 LED status lights on the front of the case to visually display what it is doing and to warn you of any errors.

- The leftmost LED is a blue power light. This will illuminate normally when the case is powered on.
- The middle two LEDs (HDD1 and HDD2) are green and will illuminate when hard drive #1 and hard drive #2 are being written to. They will not illuminate if the drive is not being accessed; they will turn off.
- If a hard drive fails, one of the middle two lights (HDD1 or HDD2) will turn red, indicating which drive has failed*. Upon replacement of the failed mechanism, the failed mechanism’s indicator light will change from red to orange, as it is being accessed to write data onto the drive, rebuilding the mirrored RAID.
- The rightmost LED is the Rebuild indicator. If a drive has failed and the Guardian MAXimus is rebuilding, the LED will flash. Blue for HDD 1 rebuild, and green for HDD2 rebuild. If the rebuild fails, the rebuild light will turn off and the failed hard drive light will illuminate red again. If this happens, please contact our support department for further assistance.
In the event of a drive failure, rebuilding can take several hours to overnight. You may continue to use your Newer Technology Guardian MAXimus as you normally would during the rebuild process.
* In the event of a drive failure, you must make sure the good drive with your data is in HDD1 and the new drive you are writing to is in HDD2. If the good drive with your data is in HDD2, it will be overwritten and the data possibly lost.
© 2007-2009 by Newer Technology, Inc. All Rights Reserved
The information contained within is believed to be accurate and reliable. Newer Technology, Inc. assumes no responsibility for any errors contained within. Newer Technology, Inc. reserves the right to make changes in the specifications and/or design of this product without prior notice. The photographs contained within may differ from the product you receive and are there for illustration purposes only. Newer Technology Inc. assumes no responsibility of any differences between the product mentioned in this manual and the product you may receive.
Free Support Chat
Our free award-winning support team is ready to answer all of your questions. Technical support is available Monday - Friday: 9AM - 6PM. Customer Support & Sales is available Monday - Friday: 9AM - 6PM. Support is unavailable on U.S. Federal holidays. Talk to a human today.


 1-800-275-4576