OWC Archive Pro: Mac ATTO SAS HBA Driver Instructions
Support Article
Details
Thank you for purchasing the OWC Archive Pro. Initial use requires a few steps for setup. This process is easy and should only take up to 15 minutes. The OWC Archive Pro LTO tape drive communicates over a SAS connection and requires a driver to enable this interface.
NOTE: Apple silicon Macs and Macs with T2 chipsets require reduced Security Settings to allow for the successful installation of the required SAS ATTO driver.
Apple Silicon Mac Security Settings
1. Click the Apple logo in the top left corner and select “Shut Down”.
2. Press and hold the power button until “Loading startup options” appears.
3. Click Options, then click Continue.
4. Click “Utilities” in the top menu bar. Then click “Startup Security Utility”
5. You will be prompted to select a security policy system. Select the system volume desired to use with the OWC Archive Pro LTO tape. Only one system volume may be available if there are not multiple system volumes.
6. If the system volume is encrypted with FileVault, click Unlock, enter the password, then click Unlock.
7. Click the “Security Policy” button.
8. Select the following security option:
- Reduced Security: Allows any version of signed operating system software ever trusted by Apple to run.
- Allow user management of kernel extensions from identified developers.
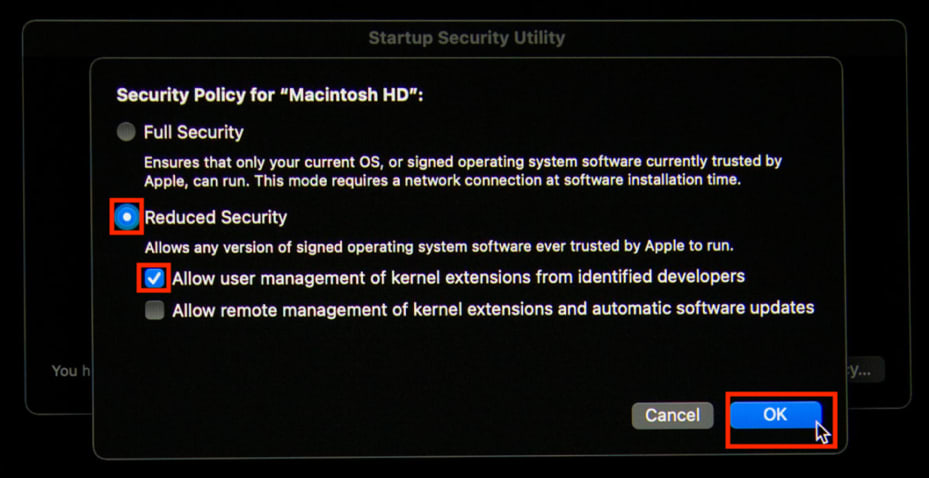
9. Click OK.
10. A menu will popup asking for your administrator credentials. Select an administrator account, enter the password for the account, then click OK. It will take a few moments to set the new security policy.
11. Click the Apple logo in the top left corner and select “Restart”. NOTE: You must restart your Mac for the changes to take effect.
Apple T2 Mac Security Settings
1. Boot into Recovery Mode — restart the Mac, then press and hold Command (⌘)-R as soon as you see the Apple logo.
2. Select Utilities in the menu bar — select the Startup Security Utility.
3. Enter Admin Password — when asked to authenticate, click Enter macOS Password, then select an administrator account and enter its password.
4. Select "No Security" - Startup Security Utility will present three Secure Boot settings:
- Full Security—The default setting that brings the highest level of security. An active Internet connection may be required at software installation time so the Mac can confirm that it’s booting up a macOS or Windows version that hasn’t been tampered with in any way. Leave this setting enabled to run a macOS or Windows version that’s currently installed on the Mac, or any cryptographically signed operating system trusted by Apple.
- Medium Security—This setting verifies the macOS or Windows version on the startup disk only to see if it’s been properly signed by Apple or Microsoft, but doesn’t require an Internet connection or updated integrity information from Apple. It does not prevent the machine from running an operating system that’s no longer trusted by Apple. Use this setting to boot into older versions of macOS regardless of Apple’s level of trust.
- No Security—This setting doesn’t enforce any security requirements for the bootable operating system on your startup disk. Use it to boot into Linux or any other operating system supported on your hardware, no signing or verification with Apple required. NOTE: the setting recommended here does not result in any additional macOS security features being disabled.
5. Click the Apple logo in the top left corner and select “Restart”. NOTE: You must restart your Mac for the changes to take effect.
ATTO SAS HBA Driver - Required
The ATTO SAS driver must be installed based on the ATTO ExpressSAS HBA that is installed in your OWC LTO chassis. To determine which HBA is installed, open System Information and navigate to the PCI section.
1. First open “system information” to determine which ATTO card is in your OWC LTO unit. To open “system information”, hold the “Option” key while clicking the Apple logo in the top left-hand corner of your screen. Continue to hold down the option key while clicking the first drop down titled “System Information.” The application will open.
2. Navigate to the section titled “PCI” on the left-hand side.
3. Select the item titled SAS Controller. The item should say “No” in the “Driver Installed” column as this driver will be installed shortly.
4. In the info pane, there will be a list of specifications about this controller. Find the item titled “Device ID” and note the ID.
NOTE: If the Device ID is neither 0x00e6 or 0x8070 please contact OWC Support.
- If your device ID is 0x00e6, you will need to install the ATTO ESASHBA5 driver. This device ID corresponds to the ATTO ExpressSAS H1244GT HBA (12Gb).
- If your device ID is 0x8070, you will need to install the ATTO ESASHBA4 driver. This device ID corresponds to the ATTO ExpressSAS H1244 HBA (12Gb).
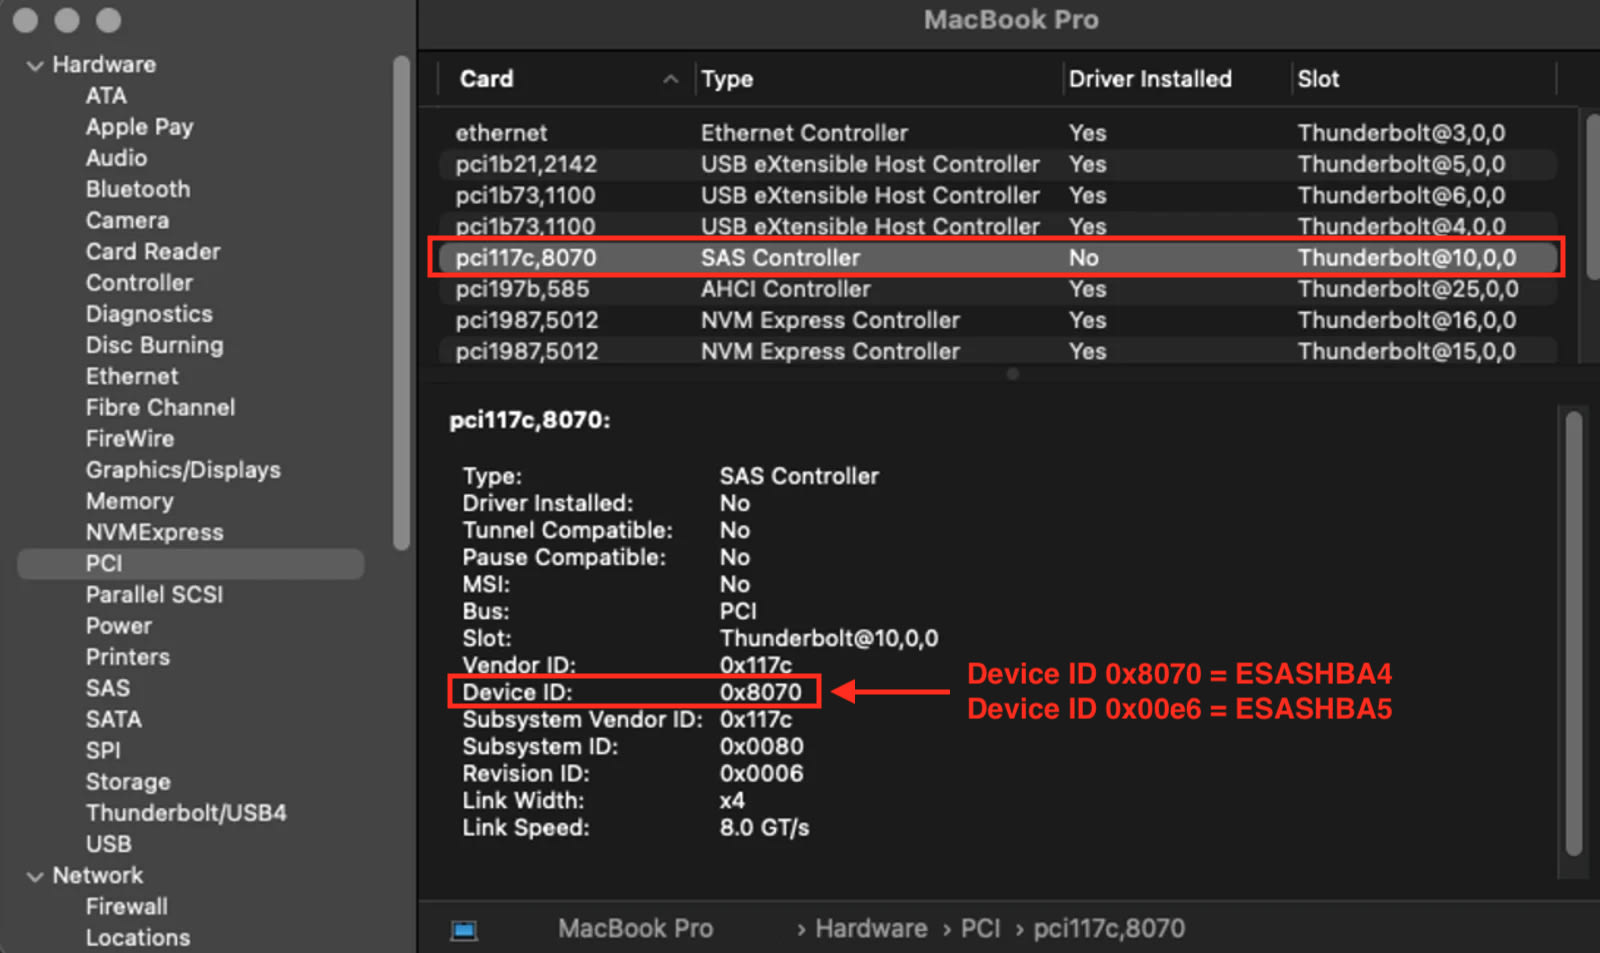
5. Navigate to ATTO’s website to download the required driver.
- If your device ID is 0x00e6 please visit: ATTO Software Downloads
- if your device ID is 0x8070 please visit: ATTO Software Downloads - Legacy
6. Select an ATTO Product plus a Product Family to begin:
- If your device ID is 0x00e6
- ATTO Product: ExpressSAS SAS HBAs
- Product Family: ExpressSAS 12Gb GT HBAs
- Operating System: macOS
Click “Download” for the “ExpressSAS 12Gb GT Driver macOS”. Complete the request form to receive the driver file “ExpressSAS-12Gb-GT-Driver-macOS-8150.zip”.
- If your device ID is 0x8070
- ATTO Product: ExpressSAS SAS HBAs
- Product Family: ExpressSAS 12Gb HBAs
- Operating System: macOS
Click “Download” for the “ExpressSAS 12Gb (Legacy) Driver macOS”. Complete the request form to receive the driver file “ExpressSAS-12Gb-Legacy-Driver-macOS-8519.zip”.
7. There is no need to download the ATTO ConfigTool or “Flash Bundle” packages.
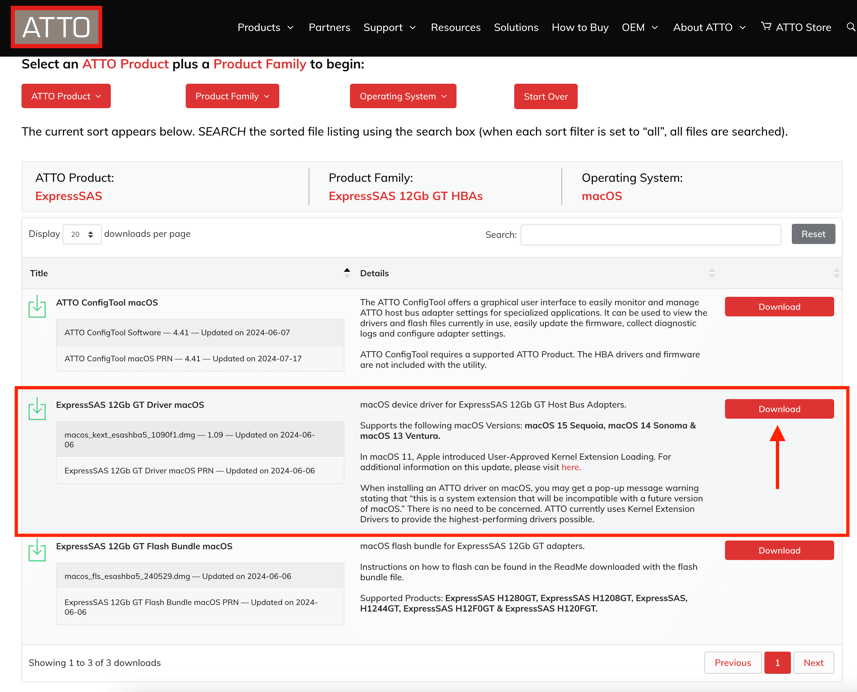
8. Once the download is complete, unzip the downloaded file and open the open the “DMG” file. For example, as of December 2024, the ESASHBA5 file is named “macos_kext_esashba5_1090f1.dmg”. At the time of installation, your file may have a different name to reflect a newer driver. Open the DMG by either double clicking the file or right clicking the file and selecting the “open” button.
9. Open the “PKG” file by either double clicking the file or right clicking the file and selecting the “open” button.
10. Click the “continue” button.
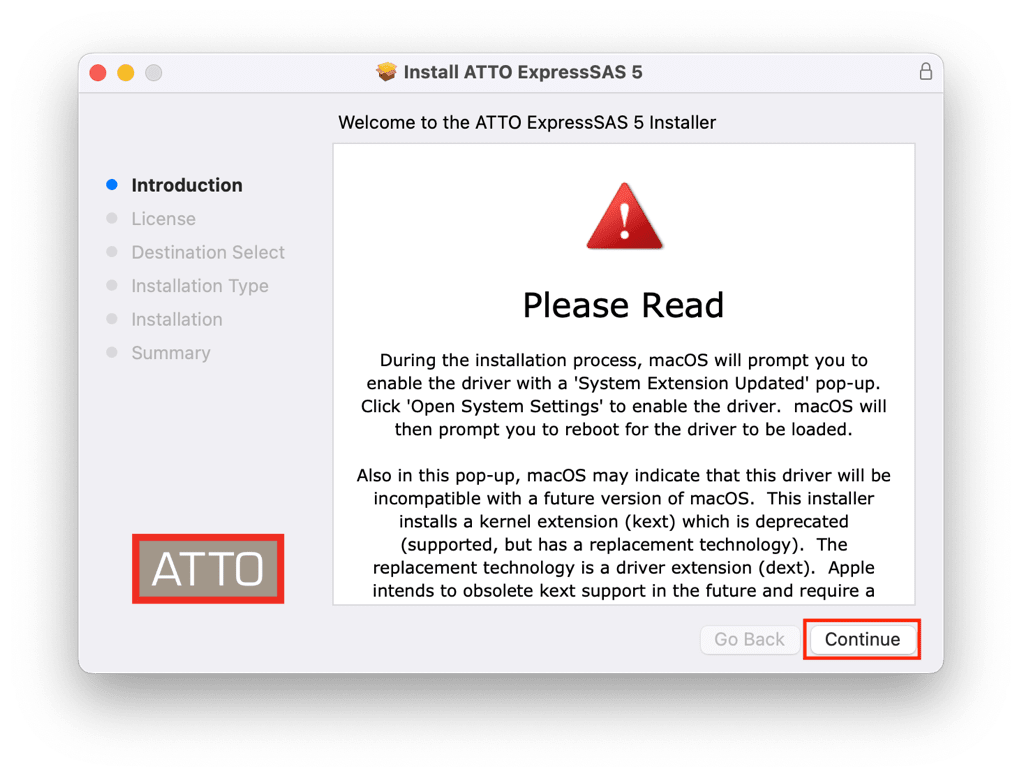
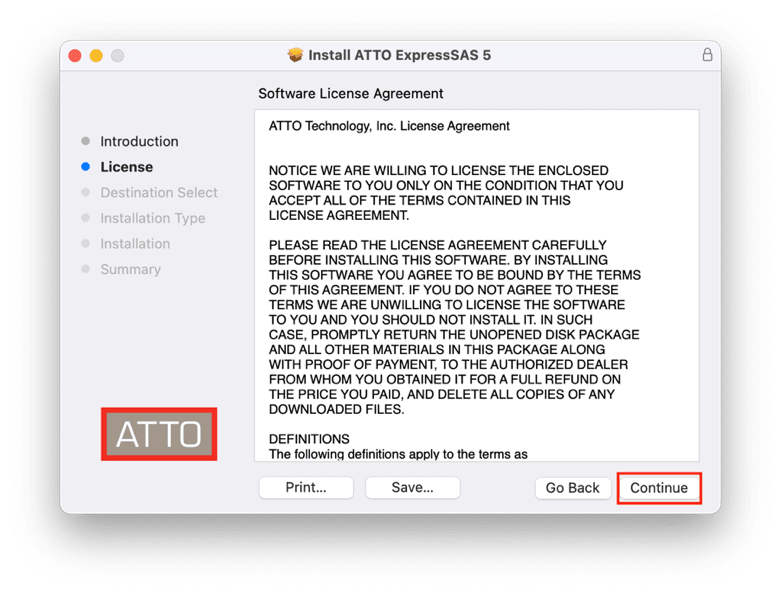
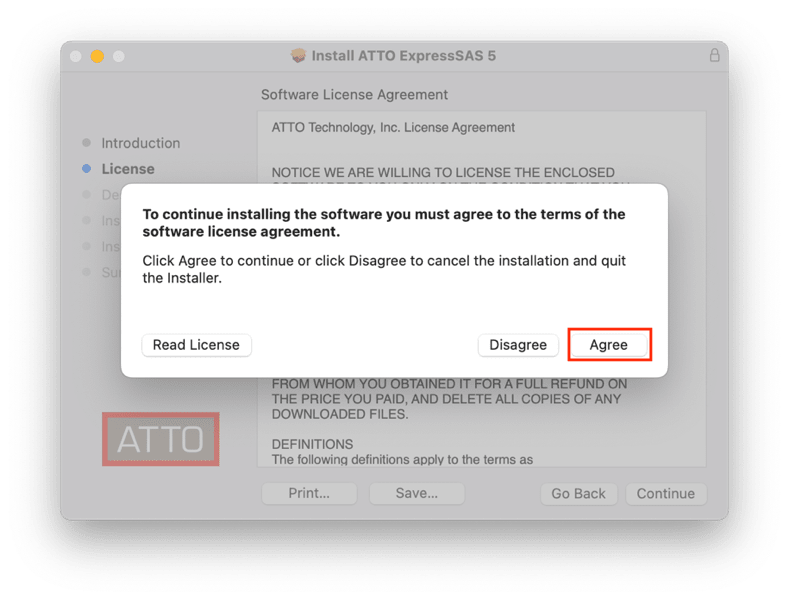
11. Read the ATTO license and select “continue.” Then select “Agree.”
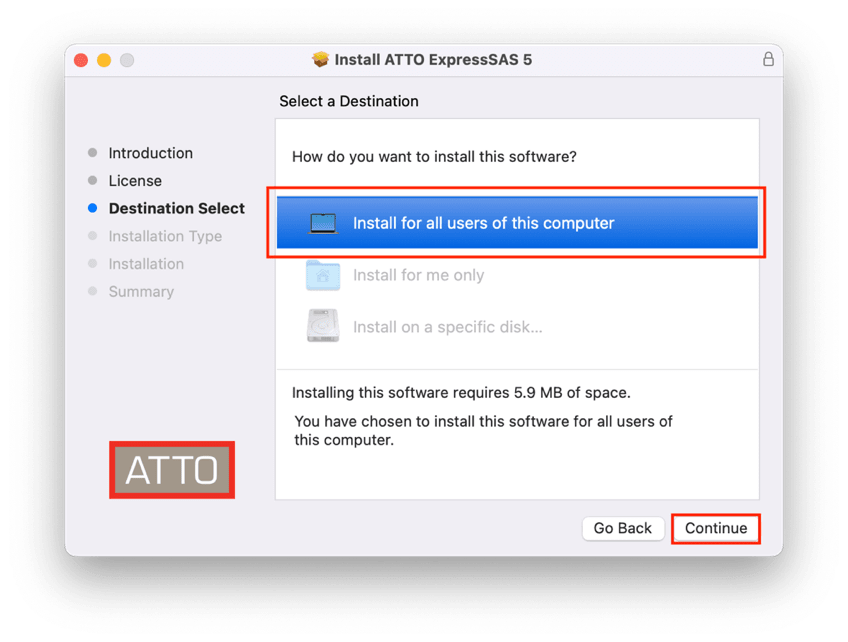
12. Select “Install for all users on this computer” and click the “continue” button.
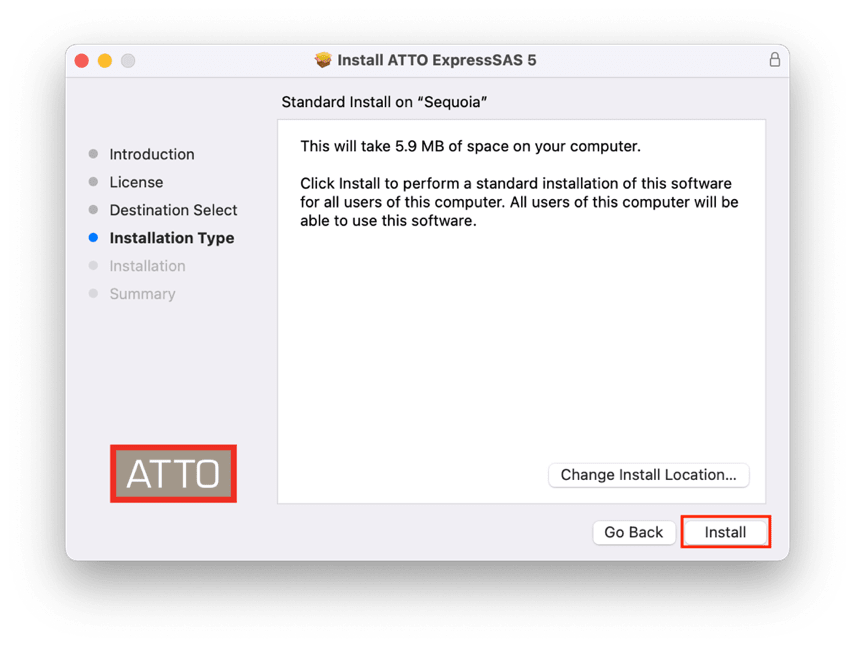
13. Click the “install” button.
14. You will be prompted for your administrator credentials. Enter them here and select “Install Software”.
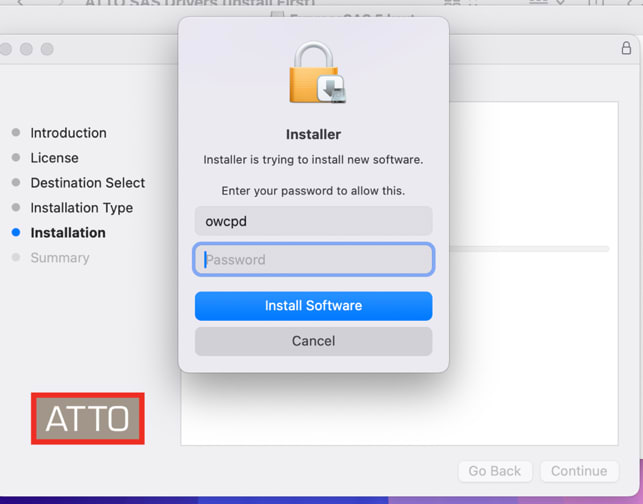
15. The software will install. A popup will show up saying “System Extension Blocked”. Do not click anything until the installation in the background completes. Then click “Open System Settings” on the popup.
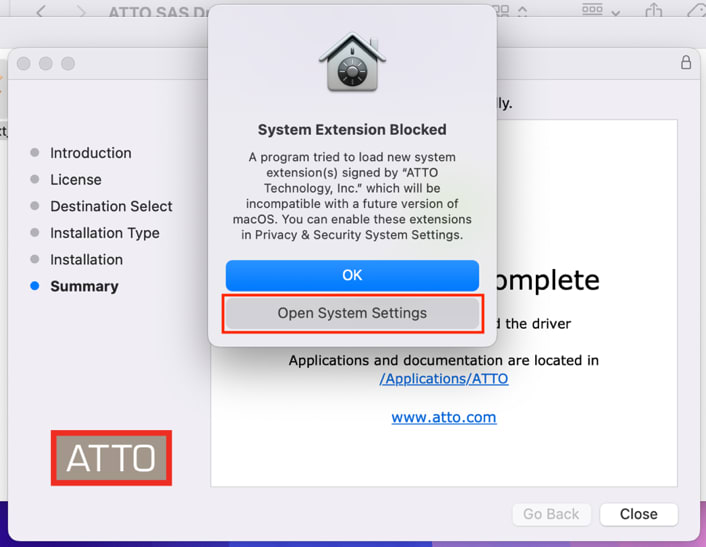
16. A system settings window will open to the “Privacy & Security” window. If this window does not open, select it in the left-hand list.
17. In the “Privacy & Security” window, select “Allow” to allow the ATTO software to load. Enter your administrator password when prompted for your credentials and click “Modify Settings”
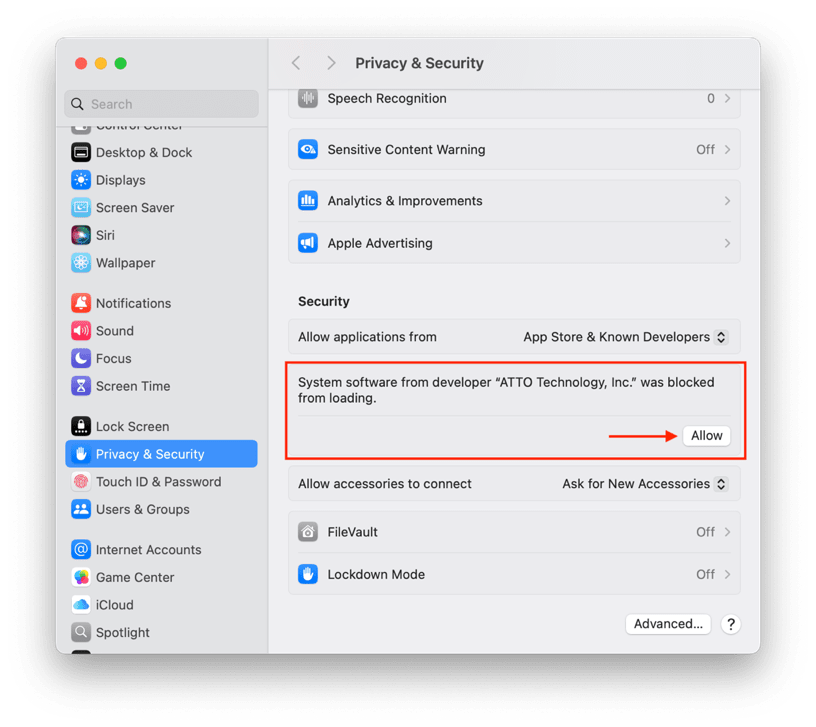
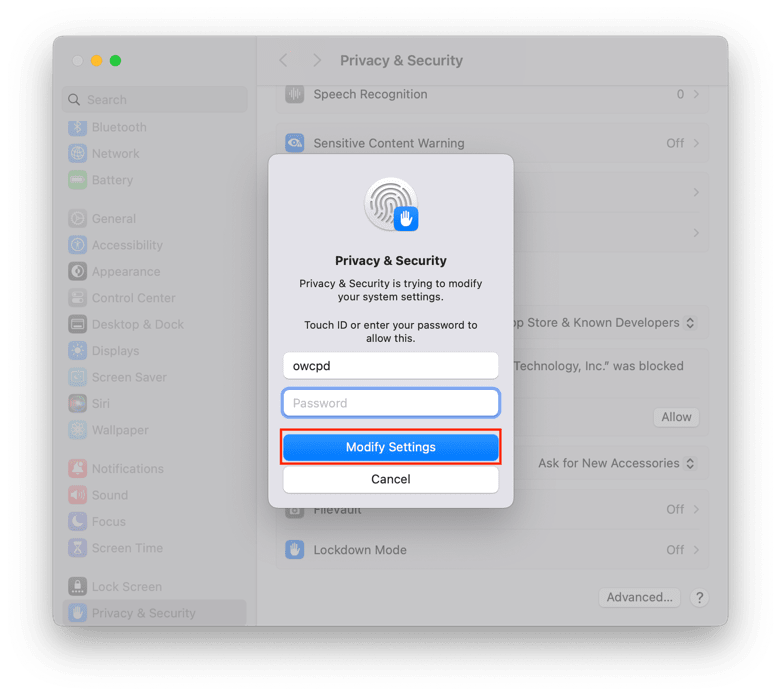
18. Another window will open stating “Privacy & Security needs to authenticate to continue.” Enter your administrator password and click “OK”
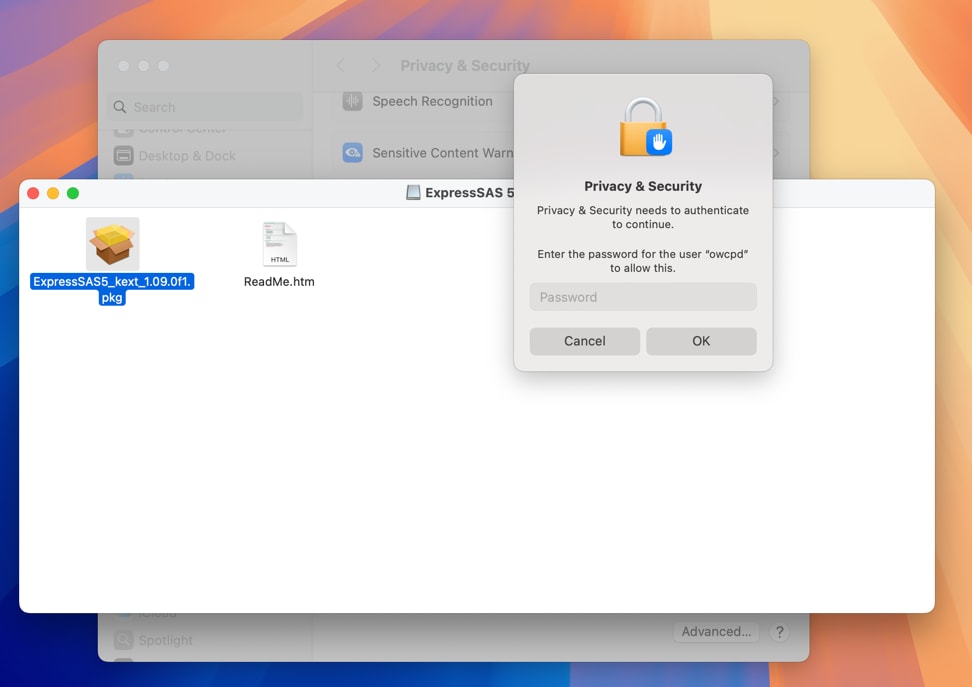
19. You may close the installation window at this time that is in the background. “Installer” may prompt for access files. Clicking “OK” allows installer to delete the installation file. You may keep the file or have it moved to the trash.
20. Select the “Restart” button and your computer will restart. If you click not now, you may also click the restart button in the Privacy and Security pane.
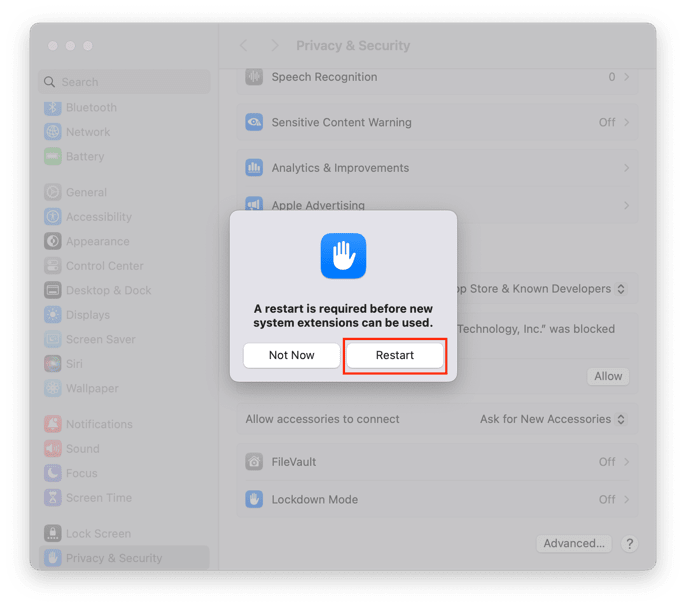
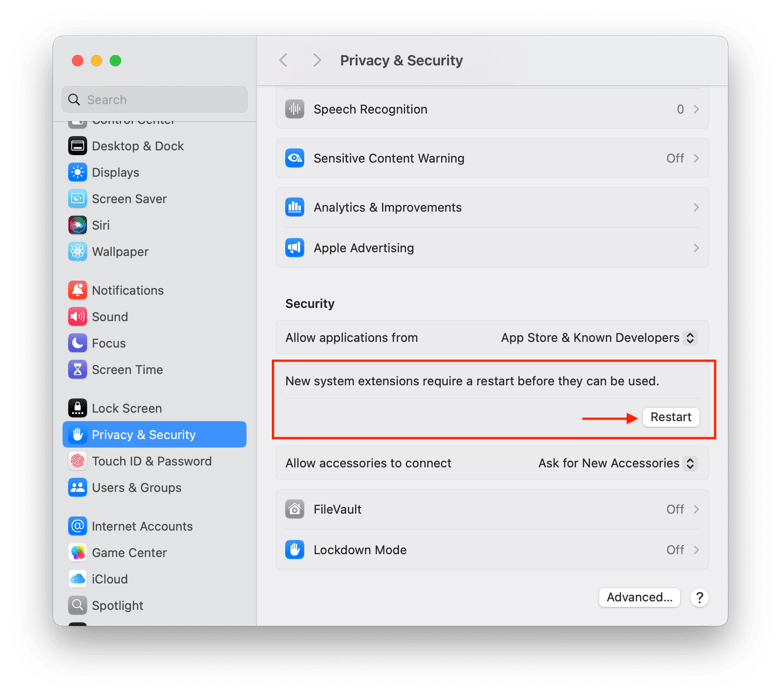
21. After your computer restarts, log in to your account and open the “System Settings” application. Navigate to the Privacy & Security window and scroll down to the “Security Section.” If there is a button asking to allow software from “ATTO Technology, Inc” to load, click it. If not, the driver has successfully installed.
Free Support Chat
Our free award-winning support team is ready to answer all of your questions. Technical support is available Monday - Friday: 9AM - 6PM. Customer Support & Sales is available Monday - Friday: 9AM - 6PM. Support is unavailable on U.S. Federal holidays. Talk to a human today.


 1-800-275-4576