ThunderBay Flex 8
Working with 3rd Party RAID/ SAS Cards
These instructions are provided as a courtesy to customers who would like to work with SAS drivers in their ThunderBay Flex 8. SAS cards are not officially recommended or bundled with the ThunderBay Flex 8 at this time. The card shown in instructions is the Areca ARC1226-8i. While not offered by MacSales at the time of this writing, we are able to confirm that it works on both the Mac and PC, when hosted in ThunderBay Flex 8. Other cards may work but this is not something OWC can confirm at this time.
Please check with your card's manufacturer to verify that any required drivers both work with your chosen platform and with a Thunderbolt 3 host device.
This guide assumes familiarity with the process of installing 2.5 or 3.5 inch drives into the ThunderBay Flex 8. This process does not change with SAS drives. If you have not done this before or would like to review the process, please see the full Assembly Manual & User Guide.
The software portions of this guide assume the end-user is working with macOS 10.14 or later. The exact steps for installing software or drivers for the PC may differ based on manufacturer or other factors.
Section 1 - Installing the RAID/SAS card
This section details the process of removing the OEM SATA controller card from the ThunderBay Flex 8, and replacing it with 3rd party SAS/SATA card. Note that while the specifics of the card you install may differ from the Areca ARC1226-8i card we are using here, the overall process should follow a similar progression.
Before purchasing a RAID/SAS card for use in the ThunderBay Flex 8, please be sure it will fit properly. The OEM card can serve as a reference point; the PCBA is ~ 168mm long and (~56mm high when seated in its slot). Any card that is more than a few mm beyond these dimensions, may not fit in the ThunderBay Flex 8 or if it does, may make it difficult to connect the required cables.
1. Detach the ThunderBay's side cover by removing the four hex screws; you can use the included hex wrench / driver to do this. Make sure the device is oriented as shown below with the front cover facing right.
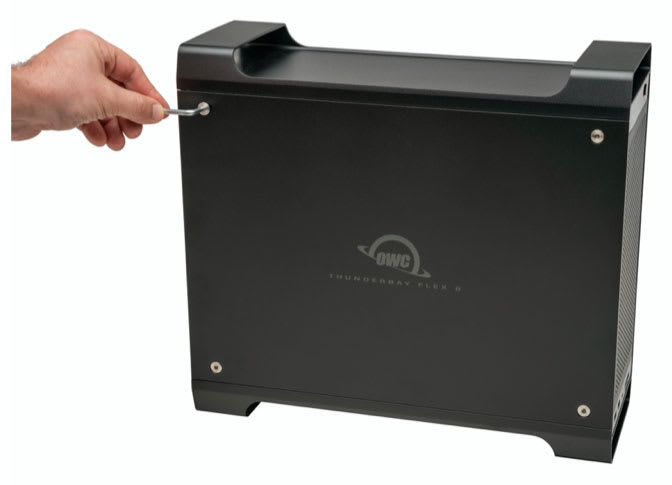
2. Remove the side cover and set it aside.
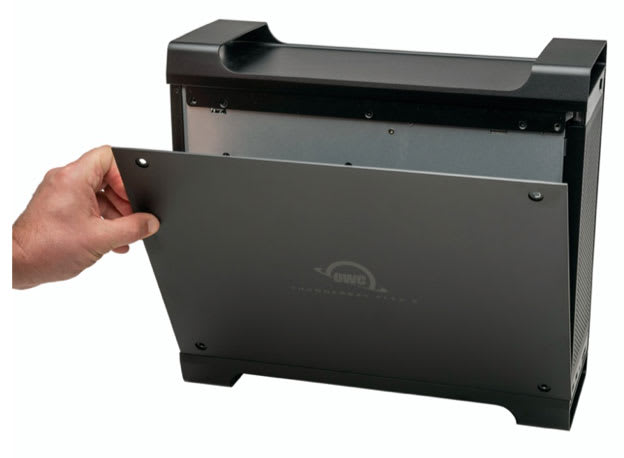
3. Locate the OEM controller card. By default, it is installed in the top PCIe slot.
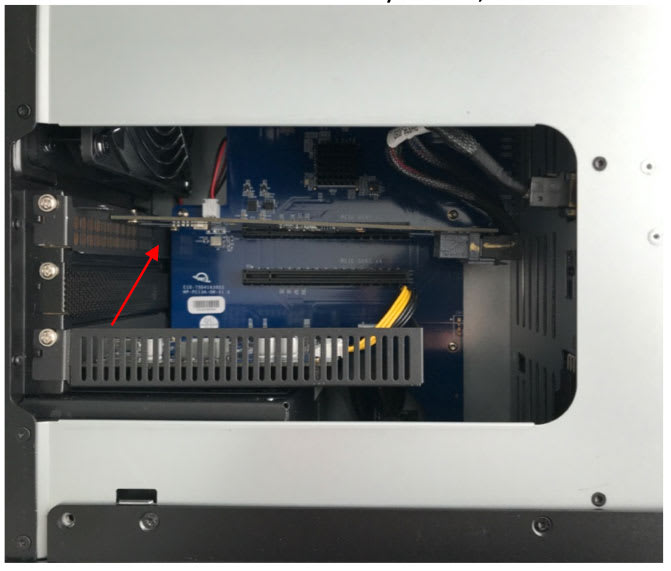
4. Remove the screw from the OEM controller card's bracket.
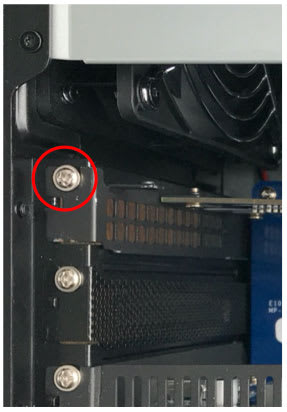
5. Before removing the card you need to position it so you can disconnect the two cables at the back. First, carefully lift the card out of its PCIe slot and angle it as shown.
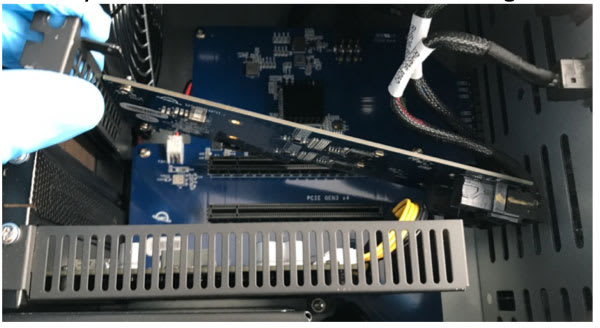
6. Next lift the front side of the card upward so that you can then lift the entire card out of the compartment.
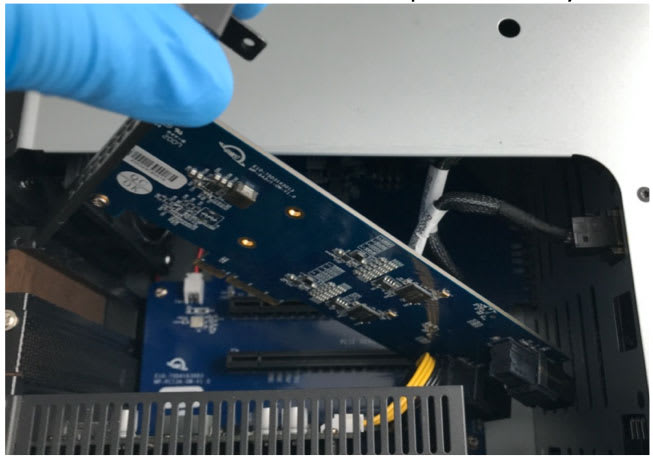
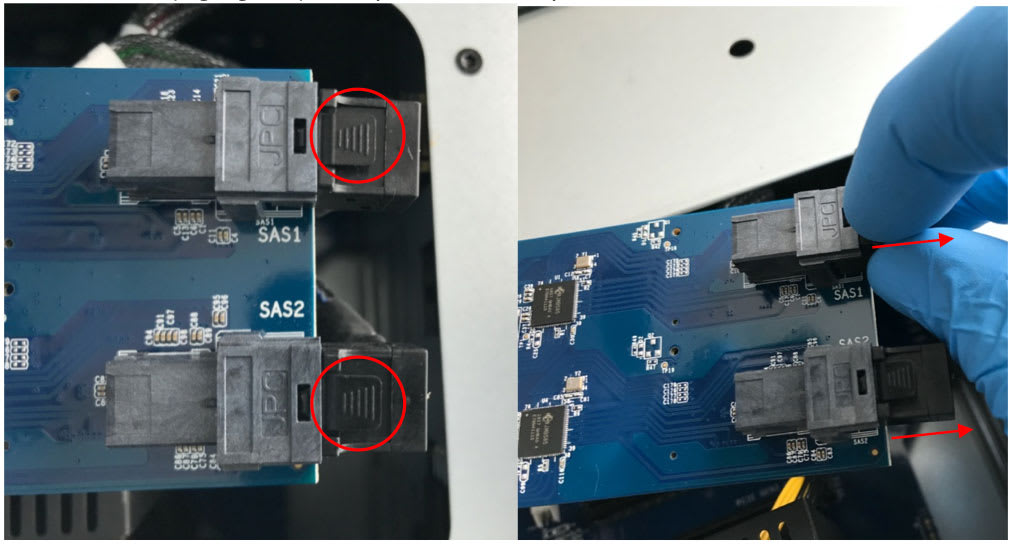
7. Letting the card rest at an angle so there is minimal tension on the cable connections, locate that tab on each connector (highlighted), then press down and pull the cable connectors back. Minimal force is required.
8. Set the card aside but leave the cables connected to the side of the PCIe compartment.
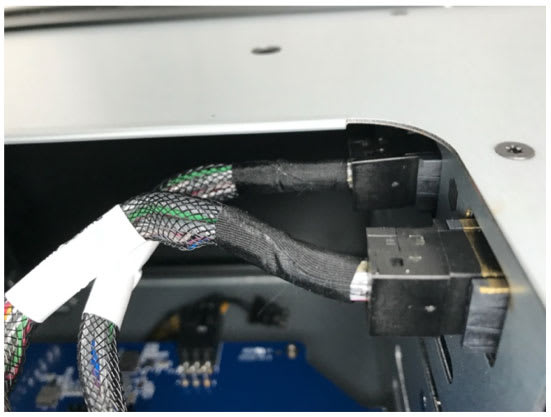
9. Pick up the RAID/SAS card then, making sure the cable with the gold paint mark on it is attached to the top connector, connect both cables to the card.
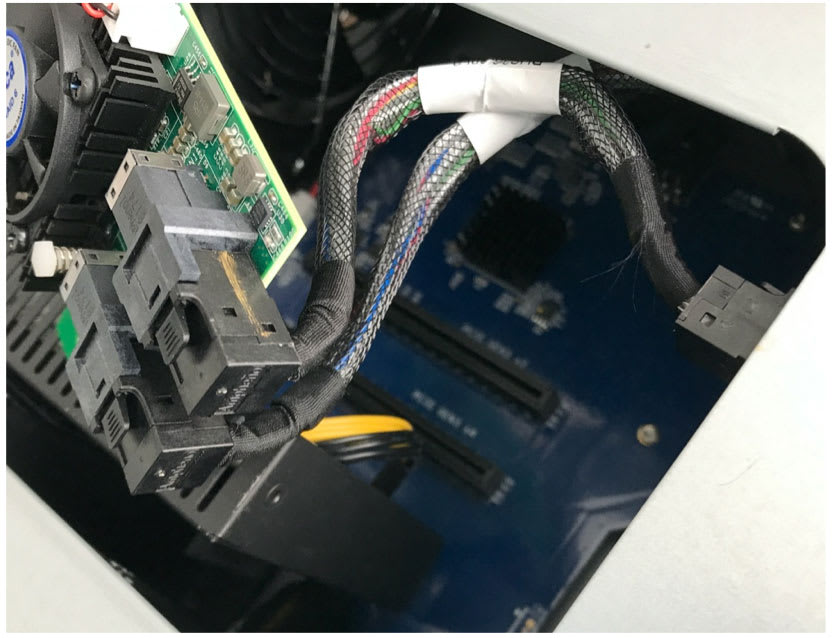
10. Carefully angle the back of the RAID/SAS card down into the PCIe compartment (at a similar angle and position as when you removed the OEM card in Step 6), then lower the rest of the card into the compartment. Last, re-align the card so that it can be seated in the PCIe slot as shown below.
Important: you can install the RAID/SAS card either in the same slot the OEM card was in, or the x4 PCIe slot immediately below it for maximum performance. However, if the card has a fan or connector the contacts the yellow cable connected to the PCBA installed in the lower slot, you will not be able to use the x4 slot as the lower PCIe assembly should not be moved. That is the case in the example of the Areca ARC1226-8i.
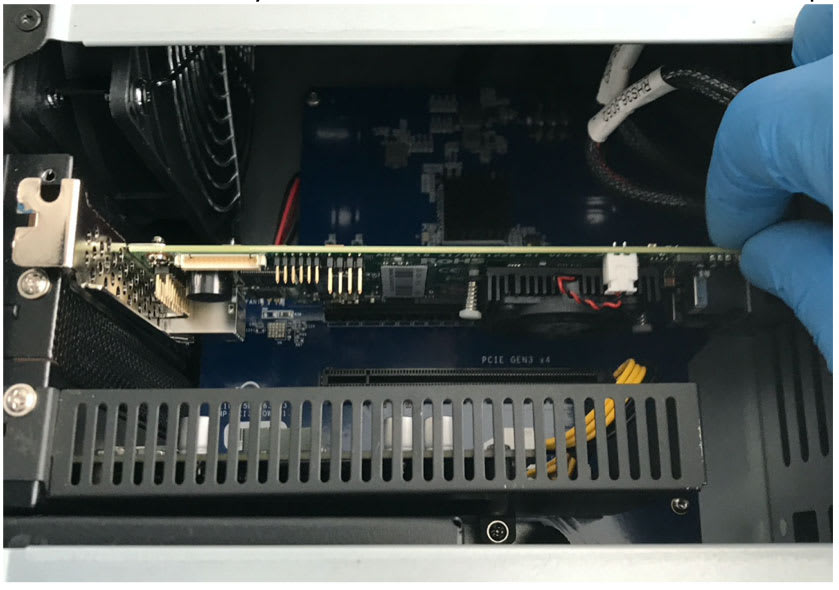
11. Carefully press the card into the PCIe slot, making sure the rectangular notch on the front of the bracket (highlighted) aligns with the small tab on the case. This will ensure the bracket remains positioned so that the cutout for the screw aligns with the hole on the case. Due to the tension from the cabling, it is normal for the card to sit at an angle once seated in the PCIe slot.
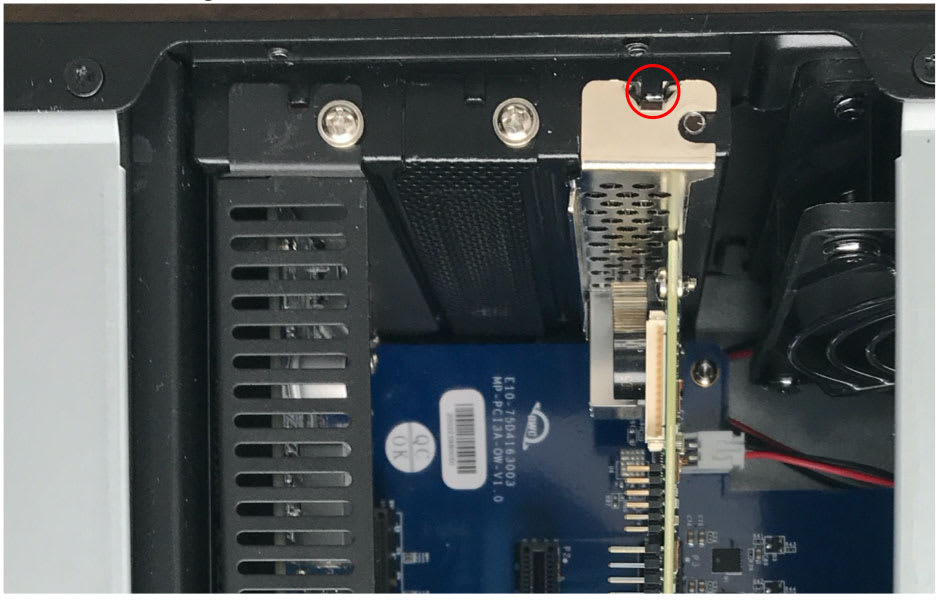
12. Re-affix the screw that you removed in Step 4 to secure the RAID/SAS card bracket.
13. Replace the side cover by re-affixing the four hex screws that you removed in Step 1.
14. Reconnect the ThunderBay Flex 8 to the host, making sure it is powered on. You can now move to the driver and software installation process.
Section 2 - Download and Install Drivers (Mac)
1. Go to the driver section of the card manufacturer's web site and download the driver/software bundle that is associated with your chosen card and operating system. This process will show a typical installation for the macOS driver and software options provided by Areca.
2. Open the file (for Mac it will usually be a .dmg or .zip file) to access the installer application.
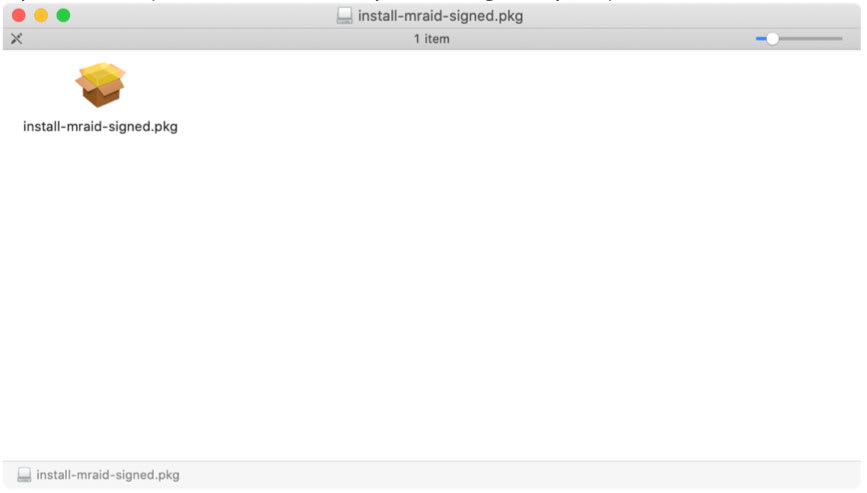
3. Launch the application to begin the installer process. If asked, choose a 'Standard' install.
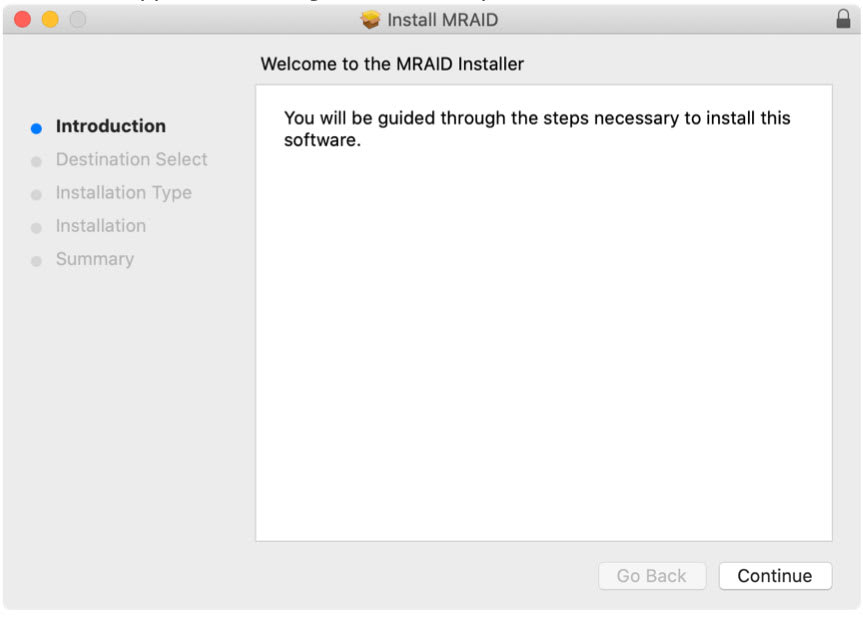
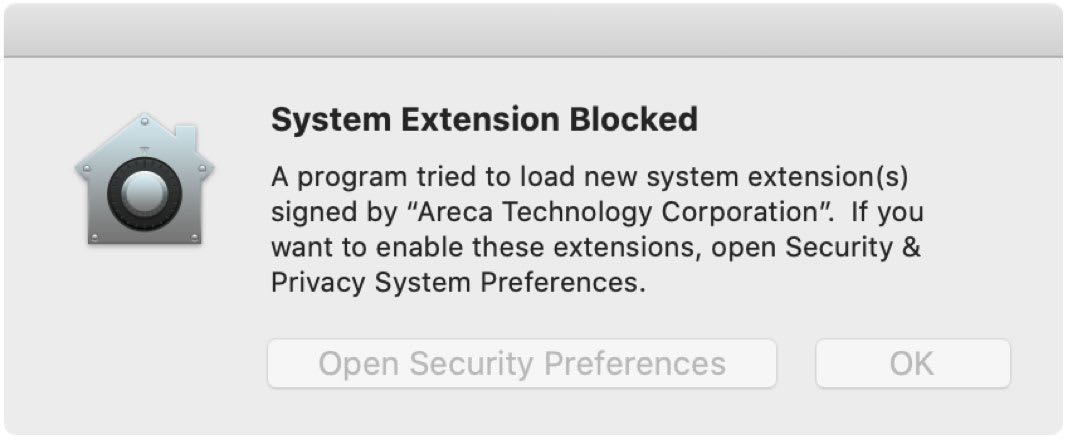
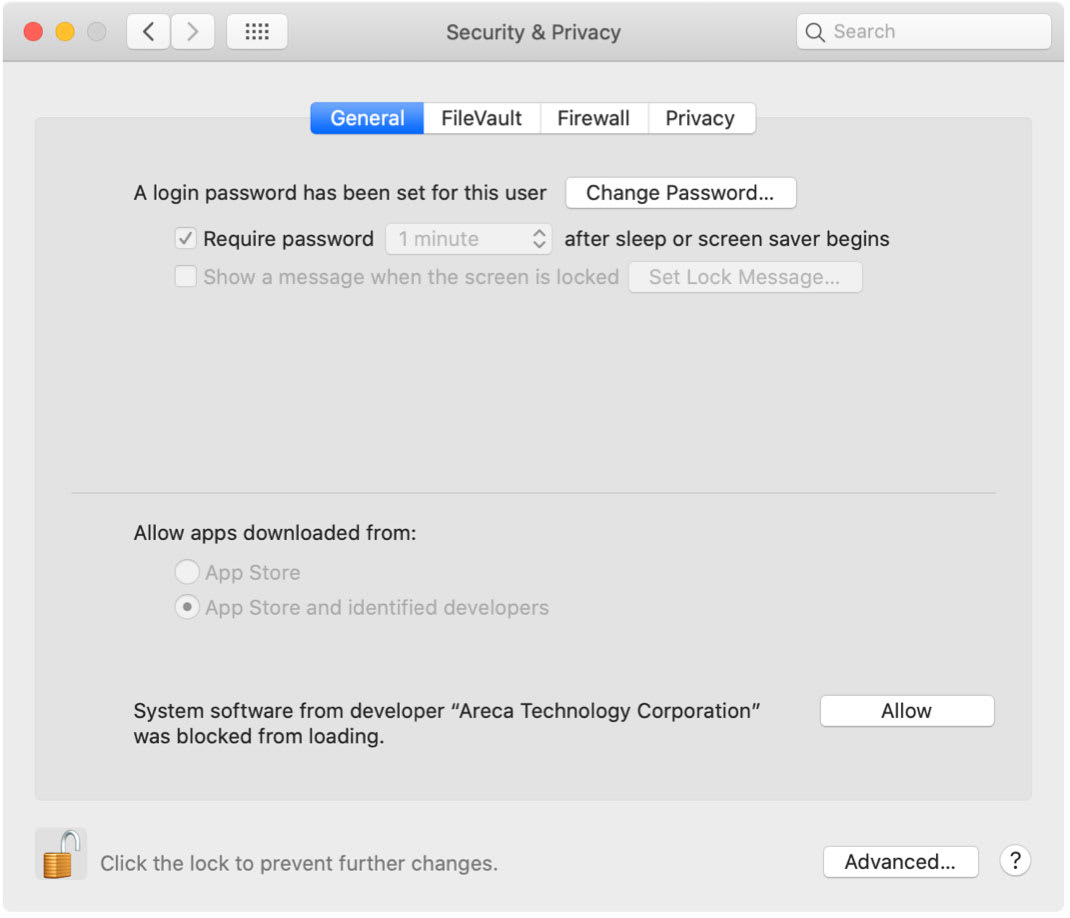
4. Follow the prompts, providing administrator credentials and/or security approvals when needed (example screenshot below). For macOS 10.14 or later you will likely be asked to open the System Preferences and 'Allow' to software you're installing to load.
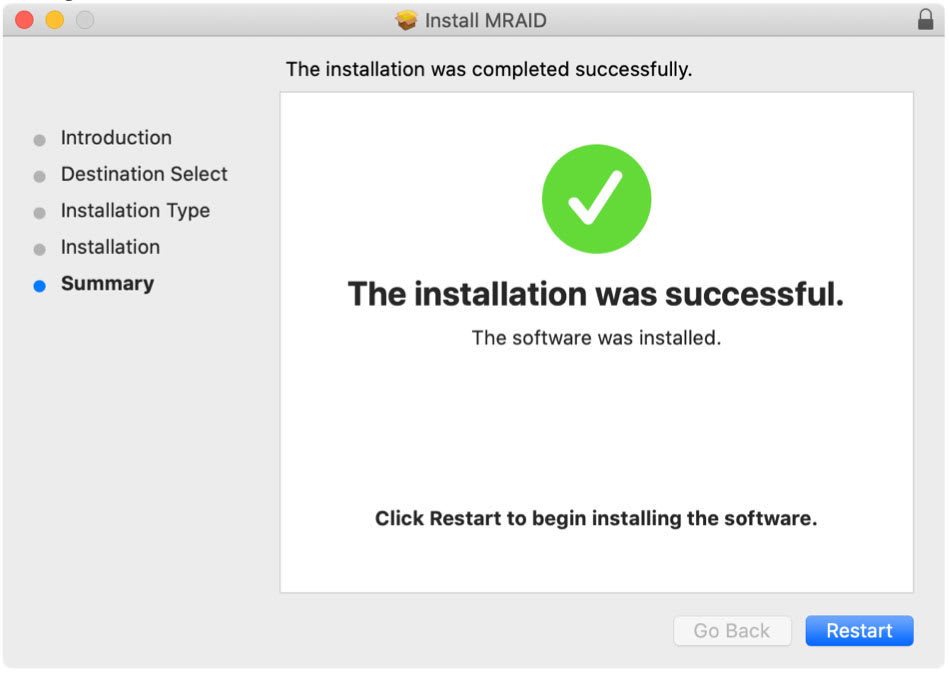
5. At the end of the process, you will need to restart your computer before using any available RAID management or SAS administration software.
6. once you've rebooted, you can launch the manufacturer RAID interface (often works in a combination of command line and web browser) to verify that the card recognizes your installed SAS drivers and is functioning. Please review the manufacturer documents to learn more.
This concluded the installation process.
RAID Management Utility running on macOS
The sections that follow show an example of a typical browser-based RAID management utility running on macOS. Available options will vary by host platform and manufacturer. OWC does not provide official support for 3rd party SAS solutions at this time; please contact the manufacturer for best practices and recommendations for your specific card.
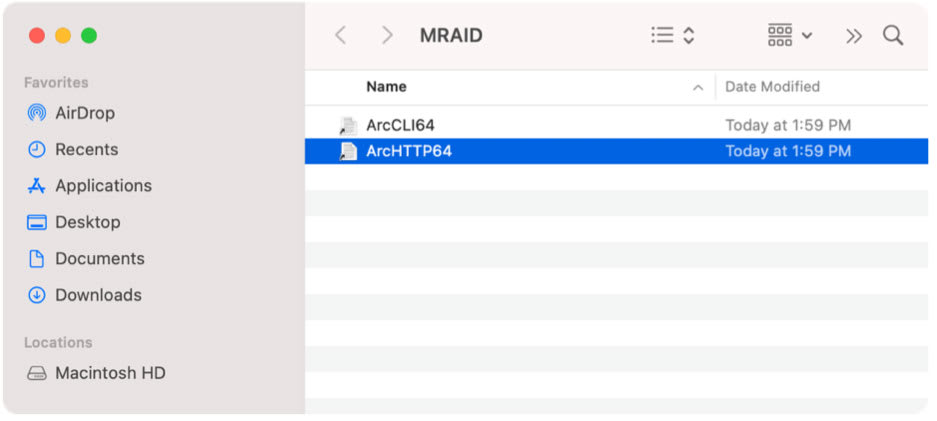
1. Launch the app.
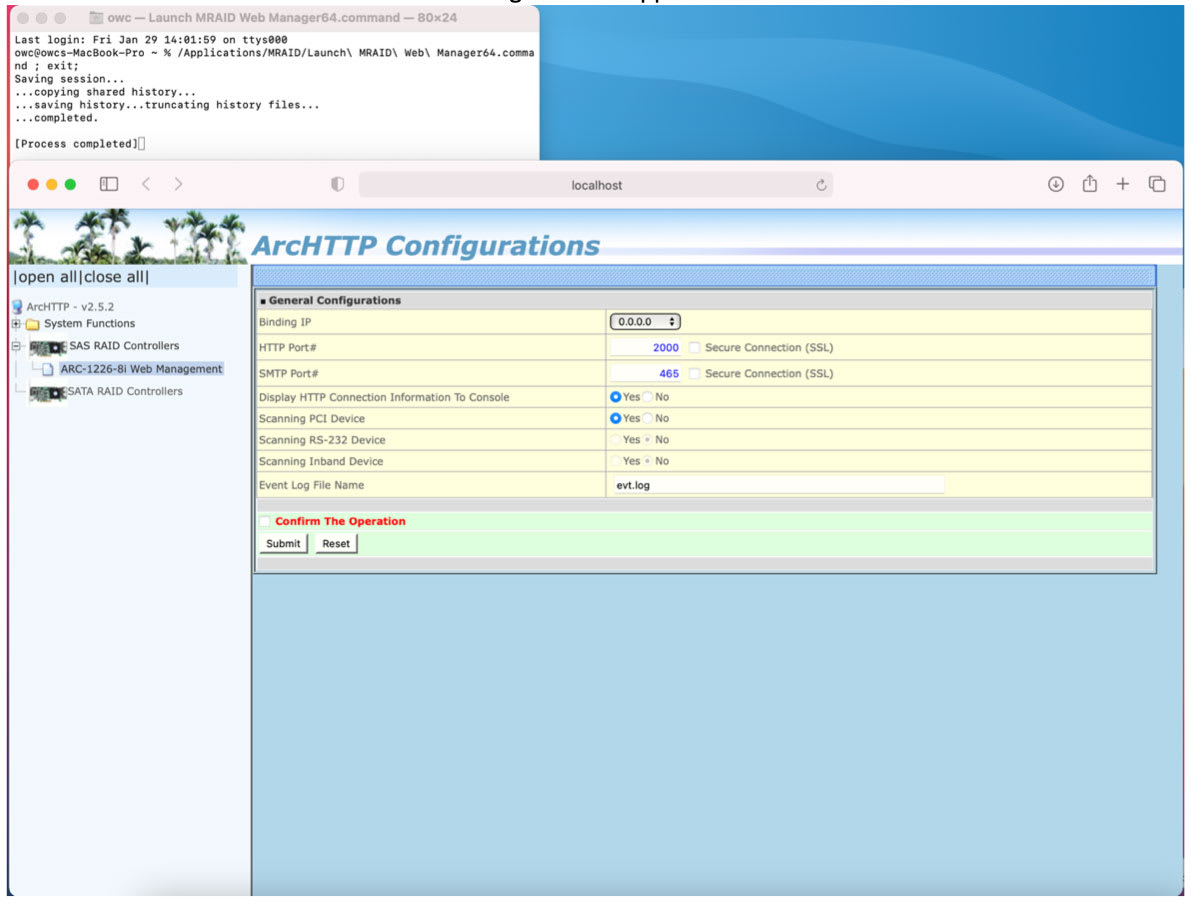
2. Command line and browser with drive management UI appear.
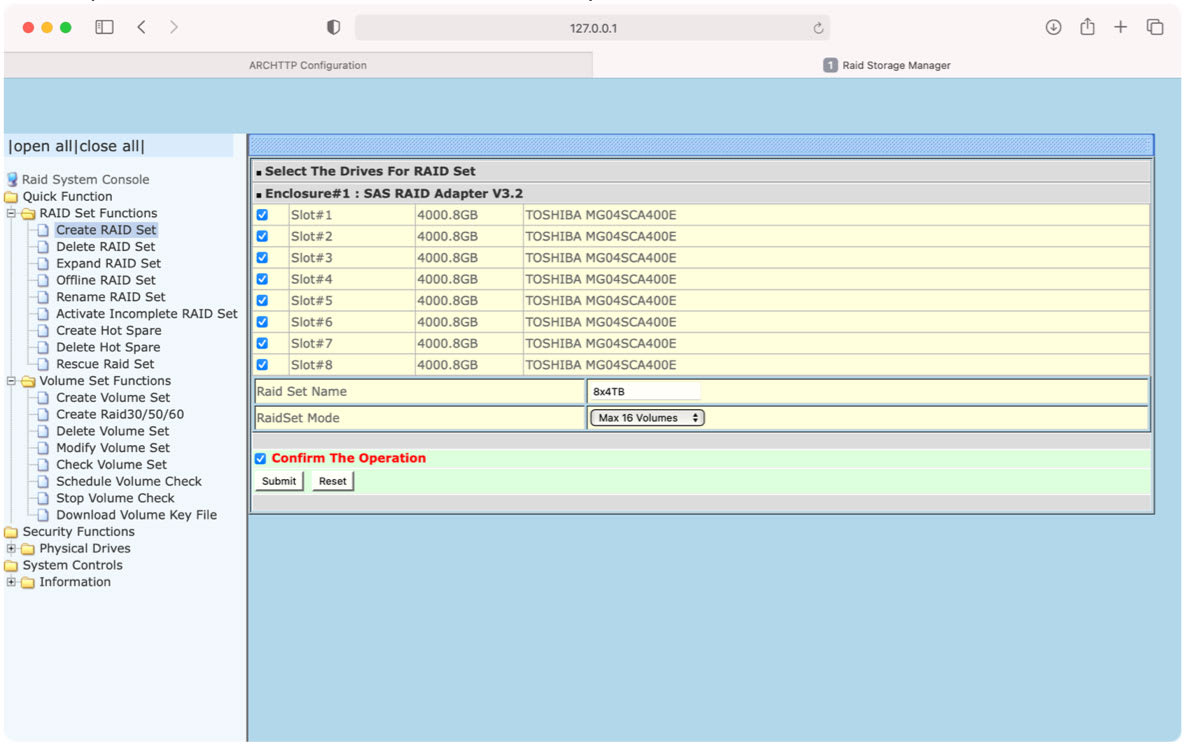
3. Click into the installed device environment, selecting the applicable options and drivers to create an array. Note that the number of drives supported by each card can vary. This Areca card supports the full complement of 8 drives installed in the ThunderBay Flex 8.
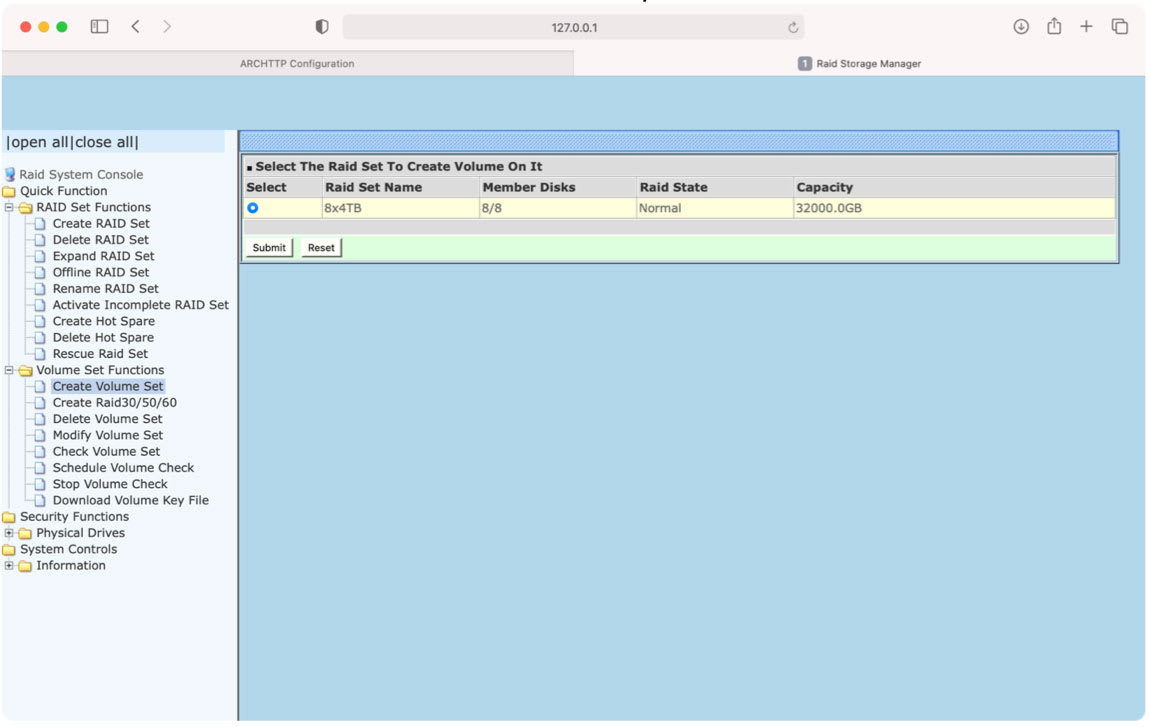
4. Choose to create a volume or "volume set" from the array.
5. Set the volume options and confirm.
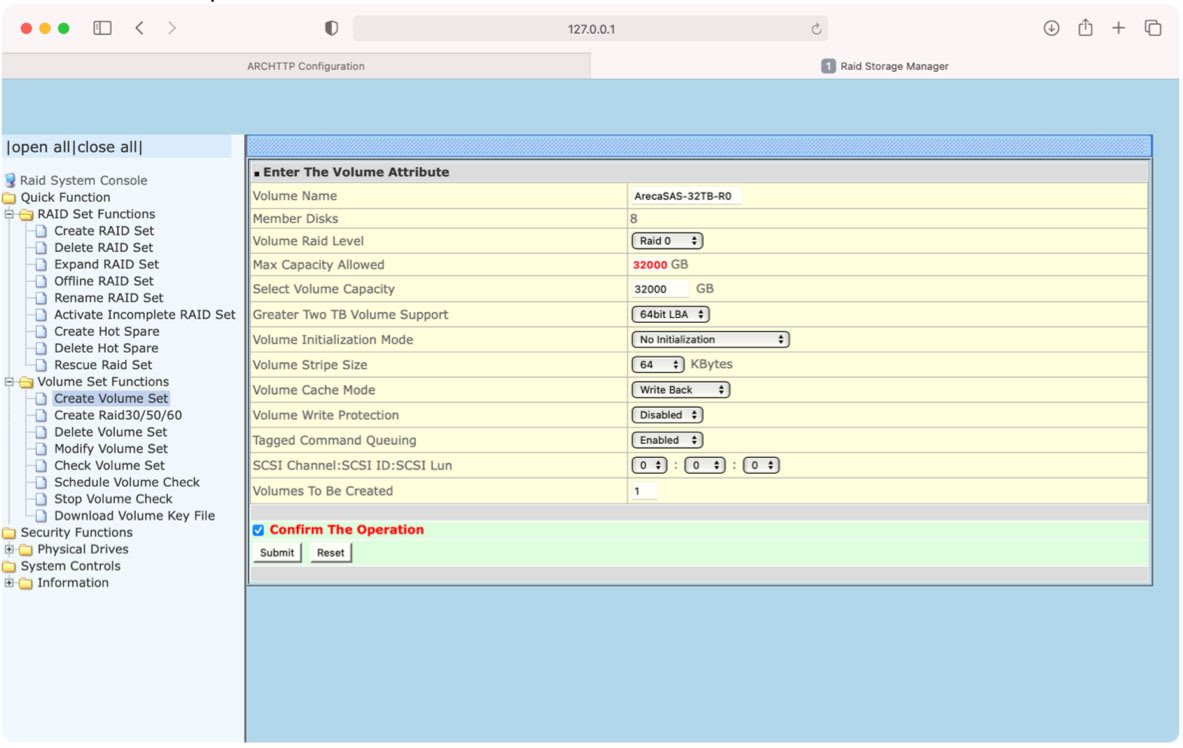
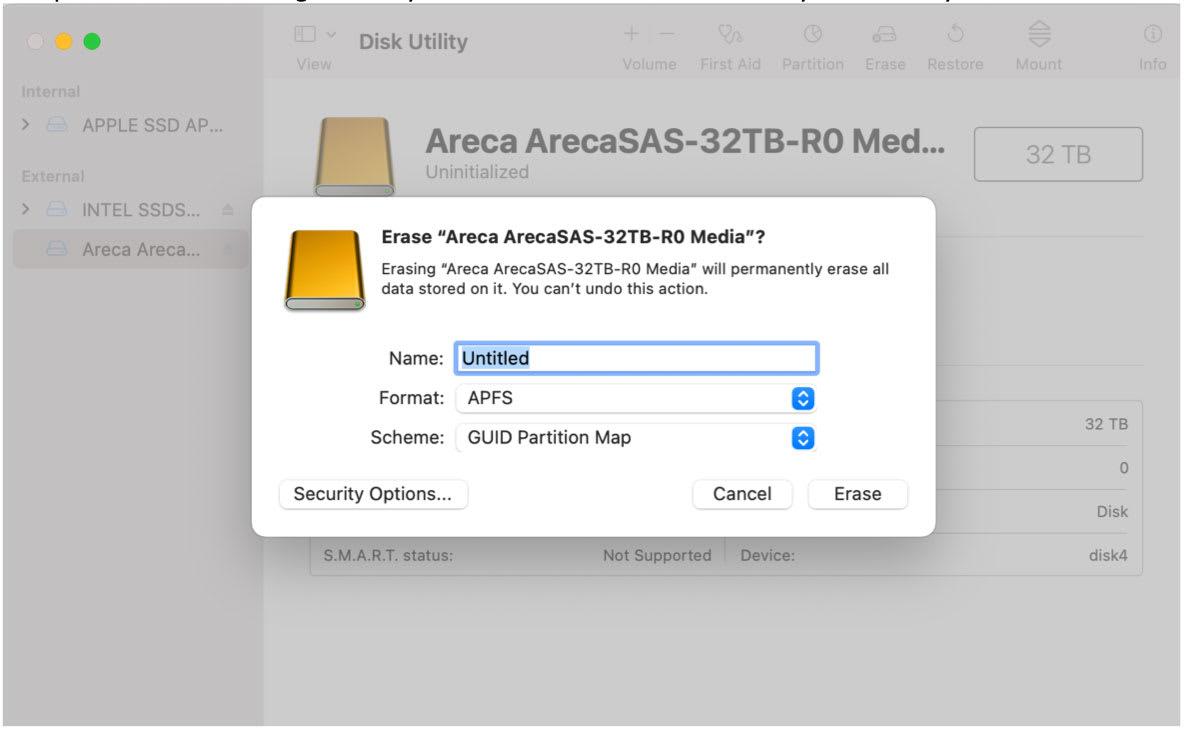
6. Format the new volume in the OS formatting utility. After the volume mounts to the system, you can quit the utilities and begin to use your SAS-based volume the same as you would any other.
Section 3 - Contacting Support
If you have questions about the ThunderBay Flex 8 and third party products it can be used with, please contact MacSales Support. While we can't always confirm support for specific products or configurations, we are happy to assist in making recommendations.
Free Support Chat
Our free award-winning support team is ready to answer all of your questions. Technical support is available Monday - Friday: 9AM - 6PM. Customer Support & Sales is available Monday - Friday: 9AM - 6PM. Support is unavailable on U.S. Federal holidays. Talk to a human today.


 1-800-275-4576