After reading and understanding the XLR8 instruction manual, please use this quick reference guide to help you along your installation process.
1. Read your XLR8 manual. Locate and read the section specifically related to your model Mac. (IMPORTANT: The manual refers to the use of jumpers for settings. Your OWC ZIF does not have jumpers to set. The proper setting of DipSwitches 9 through 12 replace any jumper settings referred to in the XLR8 manual.)
2. Install the XLR8 software from the CD provided in your kit. Restart your MAC to ensure that the "Mach Speed G3" control panel has been properly installed.
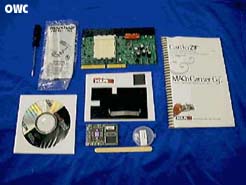
3. Locate and identify all parts and arrange them in a clean, well lit workplace. Attach the anti-static grounding strap before removing parts from their protective packaging.
4. Refer to your Mac's users manual for your maximum BUS speed setting.
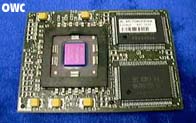
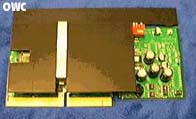
5. Using the Dip Switches only (no jumpers are required for the setting of your ZIF), set your BUS speed and CPU Multiplier according to the chart on page 72 of the XLR8 users manual. Do not exceed your Mac's maximum BUS speed when setting the carrier card.
Example: Open your XLR8 manual to page 72.
If you have a 350mhz ZIF (XGZM350) to install into a Power Macintosh 7300/200, which has a max BUS speed of 50mhz, find 50mhz on the left column of the chart. Next to the speed you see "1,2,4,6,7,8" these are the dip switches to be set to the ON position to set your BUS to the proper 50mhz for the carrier card. Follow that 50mhz row over to your processor speed of 350mhz, then follow that column up to the top to find your CPU multiplier setting. You will find a CPU multiplier of 7 with "9,11,12" directly underneath. Change these dip switches to the ON position to set your CPU multiplier speed on your carrier card.
(NOTE #1: Part Number XGZM300 "fixed" must have a multiplier setting of 6.5 to function properly.)
(NOTE #2: The photo shown does not match the settings described above)
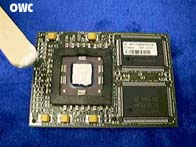
6. Place the rubber "donut" on your ZIF as shown below. DO NOT install the heatsink without the donut in place, damage to your ZIF could result and your ZIF warranty will be voided.
NOTE: SOME ZIFS COME WITH A DONUT ALREADY INSTALLED. ONLY INSTALL ONE DONUT OR THE ZIF WILL NOT BE IN CONTACT WITH THE HEATSINK.
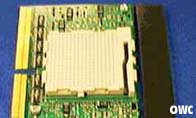
7. Apply thermal grease to the ZIF as shown below. The thickness of the grease should be appx.1/32 of an inch, a light coating over the reflective portion of the processor.
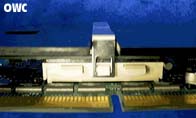
8. Raise the ZIF locking bar on your XLR8 carrier card.
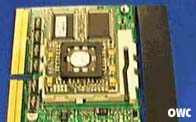
Insert the ZIF into the carrier card. Locate the missing corner pin on the ZIF and the card, line them up, and gently slide the ZIF down into place.
NOTE: There should be NO RESISTANCE when inserting the ZIF. If you feel resistance, remove the ZIF, align it properly, and try again.
Lower the ZIF locking bar to secure the ZIF firmly into place
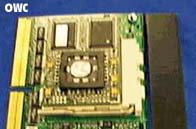
9. Place the heatsink onto ZIF and secure with metal clip provided as shown. When properly installed, the cache end of the ZIF itself will be visible through the end notch of the heatsink.
Holes in the metal band should latch over tabs on the carrier card as shown in lower photo. The photo does not clearly show it, but the clip has a point on it that is offset a bit. The offset should be directly over the G3 CPU, putting pressure over the center of the chip. If you install the clip offset, it will run at a higher temperature, because the heatsink isn't being used effectively.
10. After disconnecting your Mac from power, prepare your Mac for installation. Remove any L2 cache card from L2 cache expansion slot. If your memory is interleaved, rearrange it so it is not interleaved if possible. Failing to do either of these steps can cause your new ZIF to run unstable or not at all.
11. Remove original daughter board and insert assembled ZIF/Carrier into place. Double check that everything inside your Mac is seated properly. Close your case and reconnect your Mac to power.
12. Start your MAC and immediately reset the PRAM three times.
To reset the PRAM three times: Hold down the command-option-P and R keys simultaneously, and continue to hold them down until you here the start-up chime three times with a short delay between each chime. Once you have heard the third chime, release the keys and allow your Mac to start up as normal.
*Perform this entire step only once.
(NOTE: Your volume and mouse-speed settings will reset to their default level as a result of this action.)
13. Once your new G3 PowerMac has started, open your XLR8 control panel (if it did not come up automatically), choose the "advanced" tab, and ensure that the cache speed setting is set to the default speed chosen by the XLR8 software.
(NOTE: Choosing the accelerated cache speed offered by the software will result in a 3% - 6% speed increase but may cause overall system instability.)
14. Enjoy your new G3 PowerMac!
Entire contents copyright ® Other World Computing 1999.
Revision 1 August 21, 1999
RO & JD
 1-800-275-4576