Created on: June 24, 2020
Last updated: June 24, 2020
Note: This article was adapted from the related Rocket Yard feature by OWC Contributor, Tom Nelson. It is supplied here as a courtesy to customers who prefer to search our MacSales Knowledge Base for the help they need.
Introduction
At different times you may find it necessary to share data, software, or other digital content with friends or colleagues using OS X / macOS Disk Images. The most commonly used variant — the .DMG file — serves a similar purpose as a .zip archive file (used in both the Mac and PC worlds). Typically disk images are not secured in the sense of being password protected or the like. However it is possible to create encrypted disk image files, and that's what this support article is about.
Encrypted disk images allow you to protect the content being shared, allowing only authorized individuals to see it. Encrypted disk images can’t be mounted, viewed, or accessed unless you know the password associated with the image file. Here we will look at how to this specific kind of disk images. We’ll start with an overview of the basics of disk images and encryption, and then move on to specific steps, including differences between different OS X / macOS versions.
Encryption Type
Disk images support two types of encryption: 128-bit AES (Advanced Encryption Standard) and 256-bit AES. The two levels refer to the size of the keys used in the encryption nd decryption processes. The 256-bit method is more secure than the 128-bit option, but also takes longer to encrypt and decrypt. For the most common use cases, 128-bit encryption will provide enough security and peace of mind, while the 256-bit method is a better choice for mission-critical data.
Mounting an Encrypted Disk Image
Before you can use of a disk image it needs to be mounted, so your Mac can access the data. Mounting an encrypted disk image isn’t much different than mounting a normal disk image; simply double-click the disk image file, or right-click and select Open... from the contextual menu. Before an encrypted disk image mounts, OS X / macOS will display a window that requests a password, granting access to the information stored in the image. Enter the password then click OK.
Unmounting the Disk Image
Unmounting an encrypted disk image returns it to an encrypted state, preventing access to the stored data. You can unmount a disk image by dragging its Desktop icon to the trash, by selecting it and pressing Cmd-E, or by right-clicking on the image and selecting Eject from the context menu.
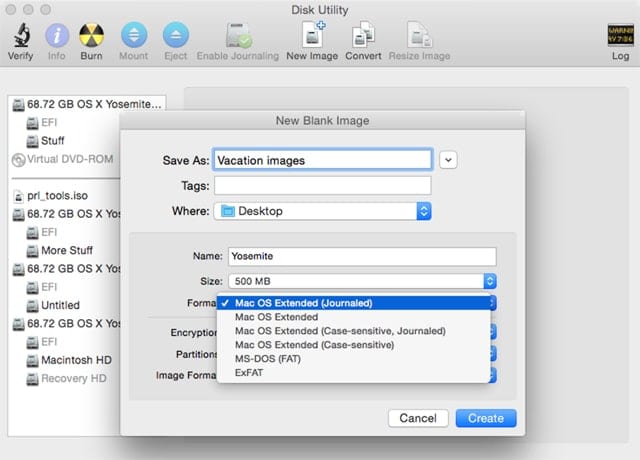
Image Formats
Disk Utility supports several disk image formats (important: this is separate from file system formats like HFS+, APFS, or NTFS). Not all of the following formats are available in every version of Disk Utility, or can be used with every method of creating disk images, but it's useful to be aware of the options. Note that not all of these will be available in every version of the OS. This setting is shown later again, as we create the disk image.
How to Generate a Blank Encrypted Disk Image
1. Launch Disk Utility (found in Applications > Utilities)
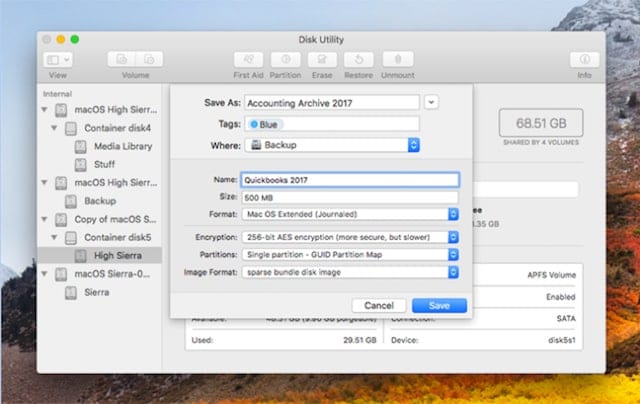
An example of settings used for a new blank disk image, shown here in macOS High Sierra (10.13).
2. If you’re using OS X Yosemite (10.10) or earlier, select File, New, Blank Disk Image. You can also select New Image from the Disk Utility toolbar.
If you’re using OS X El Capitan (10.11) or later, select File, New Image, Blank Image. A New Blank Image window will open, with various fields and menus to allow you to customize the disk image you will create.
3. Choose the required settings and options:
Partition Map: this menu provides the following options, depending on OS version (10.13 shown below):
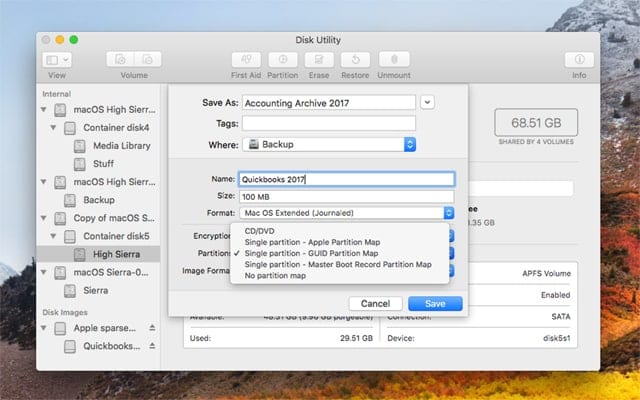
Select a Partition Map setting to reflect the type of OS and/or device that will be used.
4. Click the Create button (10.10 and earlier), or the Save button (10.11 or later).
In 10.10 and earlier, a password dialog like the one below will be displayed.
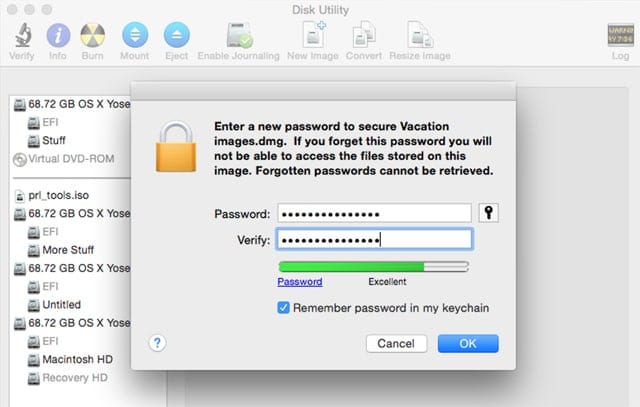
Early versions included a password strength bar graph. Later versions only show the strength graph when the lock key icon is used for generating a password.
5. Once you’ve entered and verified a password, click the OK button. Disk Utility will create the disk image and mount it on the Desktop.
Create a New Image from a Folder
Disk Utility also allows you to create a new disk image that will contain the contents of a selected folder or directory. This allows you to bypass the process of adding files manually after the disk image is created. It also allows you to create Read Only disk images that can’t easily be modified.
The process is nearly identical to the one used for creating a new blank image. The main differences are at Step 1:
A window will open, allowing you to browse to and select a folder to use for the new image.
2. Once you’ve selected a folder, click the Image button (10.10 and earlier), or the Choose button (10.11 or later).
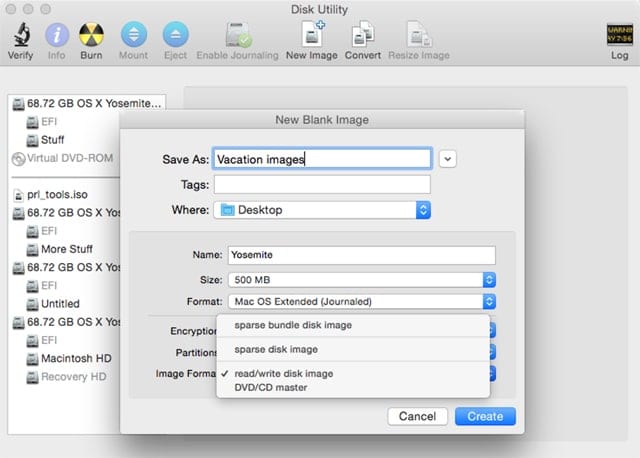
The New Image from Folder window will open; it’s very similar to the one used for selecting options for creating a blank disk image. The difference is in the available disk image format options:
3. Make your selection and click the Create button (10.10 and earlier), or the Save button (10.11 or later).
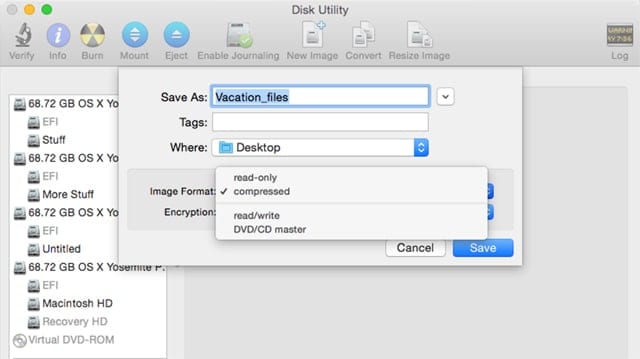
When you convert a disk image or create a disk image from a folder, the image formats available are more limited.
Convert Disk Image
You may find that once you’ve created and used a disk image for a while, the format or encryption options you selected need to be changed. Disk Utility can convert an existing disk image to the following formats:
The Encryption setting can be changed to None, 128-bit AES, or 256-bit AES.
To convert a disk image, first make sure the image is unmounted, then launch Disk Utility and select Images, Convert.
In the Convert window that opens, browse to the location of the image file you wish to convert, select the image, and then click the Convert button.
The Convert dialog box is, in many aspects, just a mini version of the image creation window. Provide a name for the converted image file, a location to store the file, and then use the Image Format dropdown menus to select a format to change to, and the Encryption dropdown menu to select an encryption type to use. When you ‘re ready, click the Save button.
 1-800-275-4576