 The Home Videos category in iTunes 11 was a welcome addition. Before, all videos in iTunes were either TV or Movie, and that was too limiting. I didn’t want to scroll through all the family home movies just to find The Terminator. It was even worse on the Apple TV, where scrolling takes twice as long as iTunes on the desktop.
The one thing I miss from the Hollywood produced movies is the cool DVD cover art. Those look great in Cover Flow mode and really helps you find what you’re looking for visually. iTunes just displays the first frame in the Home Video view, but that first frame generally does not reflect the video well. Wouldn’t it be nice to have DVD-style covers for your home videos?
It’s simple! We just need photo editing software.
While Adobe Photoshop will work just as well, for this article I am using Pixelmator. It is a relatively inexpensive program at $29.99, and has most of the features you will ever need in a desktop photo editing application. I’m a big fan.
The end result is going from this view:

To this view:

The benefits are obvious. First, you actually can fit more on the screen at once. Second, it just looks better! And lastly, you can name the video right on the cover for even faster and easier browsing of your Home Video library.
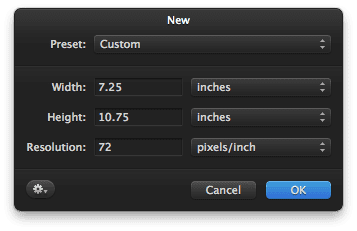
We want to make the DVD-style covers the same size, on screen, as the movies we download from iTunes. A standard DVD cover measures 7.25” x 10.75”, or 522 x 744 pixels. To start, open up Pixelmator (or your photo editing software) and create a new document at that size.

Personally, I like a black background, so that is what I am using here. You can use any color you like as the background. For instance, use a different color background for different years to be able to more quickly find what you’re looking for.

A this point, I usually do a “save as” and name the file something like “new dvd cover for iTunes” so that I can reuse it as a template.
Next, go to iTunes and find the video you want to give a DVD cover to. Play the video and navigate to what you would consider the defining visual moment and pause the movie.

Once paused, the iTunes controls may be in the way. You can drag and reposition the iTunes controls elsewhere on the screen so it does not interfere with the next step.
Take a screen grab of the moment you want on the DVD cover. Keep in mind that we will not be using the entire screen, but only a portion of it.
There are two ways to do a screen capture in Mac OS X.
Command-Shift-3 take a picture of the entire screen.
Command-Shift-4 gives you crosshair control over what you want to grab. This is usually the better option. We only want one part of the image, and it will save you from having to edit a full-screen grab later.
Once I have done the screen grab, a new file will appear on the desktop name “Screen Shot” with the date and time it was taken.
Returning to our blank DVD cover in Pixelmator, you can either drag and drop that Screen Shot onto your blank canvas and reposition/resize it, or you can open that Screen Shot and copy / paste it onto the blank DVD cover. I tend to drag and drop, it’s less steps and very simple.

Reposition and resize the picture where you want it to be.

Once I have repositioned the screen image as I want it, I add some text. Here, I use white text on the black background, but you can use any color text that works for you.
I prefer to put my white text over the black background as shown above because it is easier to read in iTunes or Apple TV. When you place text right on top of the a picture, it can be harder to read. You can also spend some more time working on your DVD cover, adding different elements to the cover as you see fit. PixelMator’s great because it has some nice built-in shapes, as well as the ability to download more. So you can add hearts, starts, or anything else you want to spice up your DVD cover. Add in layers and transparency, and you can really get creative!

Once you have the DVD cover just the way you like, Export the cover as a .jpg. I have a desktop folder created to save them to, for easier finding later.
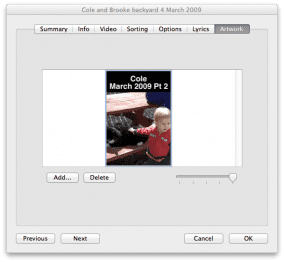
Heading back to iTunes and the Home Video you just created the cover for, select the video, and chose Get Into from the File menu. Navigate to the Artwork tab. You can either click the Add… button, navigate to the DVD cover, and add it that way. Or better yet, just drag and drop your DVD cover on the window.

Click OK, and your Home Video will now have a cool DVD cover! If you decide you don’t like the cover, you can always change it later. An odd bug in iTunes that sometimes happens: my DVD cover takes a few minutes to display correctly. No idea why, but keep that in mind if the cover does not instantly change for you.
Repeat this process for any videos in your library, Home Video or otherwise, to customize your iTunes to your hearts content.
Note: There is one major issue using this method to change cover graphics in iTunes. The covers and changes are applied only in iTunes itself, not the actual video file. If you copy that video to share with a friend, or send it to someone over the internet, they will not see the cool DVD cover you have created. To do that, you will need a different piece of software that allows you to change the descriptive metadata in the actual video file itself. There are many programs that will allow you to add or change descriptive metadata in a video file, but I am currently using MetaZ. I will follow-up with an article on MetaZ in the coming weeks.


For the younger generation:
What’s a DVD?
Like YouTube, but on a media you can’t view anywhere.
;-)