I’ve been making my own Mac icons for folders, applications, and a myriad of other uses for well over 20 years now. Back then, I was stuck with 256 (or fewer) colors, a black/white alpha channel, and pretty much had to make them pixel by pixel in ResEdit (uphill… both ways… barefoot… in the snow…).
Later on, I wound up registering a Developer account with Apple so I could use the icon tools in Xcode (well… and for AppleScript Studio, but that’s a different story), and probably tried a half-dozen different freeware or shareware utilities over the years. Some worked well, and others not-so-well.
In an interesting twist, when Apple made icons a little more complex with the addition of Retina icons in OS X 10.7, they actually made the process of creating the icons a lot easier; all you need is a little skill with your favorite graphics program that can create images with transparent backgrounds (such as TIFFs or PNGs), and you can crank out custom icons for custom folders, internal and external drives, or even applications using built-in utilities and features of Lion and later. So if you have:
- OS X 10.7.5 Lion or later including macOS High Sierra
- a 1024 x 1024 image that you’d like to make into an icon – or the ability to make such an image
- a graphics program that can resize your image and export PNG files (If you have your finished image already, you can do this in Preview).
- and the desire to customize your desktop
Then you have all you need to make your own custom desktop icons. So let’s get started!
Create your base image.

Use your favorite image editor (Photoshop, Illustrator, GIMP… whatever you like) to create a 1024×1024 pixel document with a transparent background and draw/paint/assemble your icon. For this tutorial, I’m going to use Adobe Illustrator to create a real simple circular icon with the Rocket Yard logo inside, mostly because I had the graphic files laying around from another project, so it was quick to put together. Whatever you design is really up to you, but here are a couple of tips that may help make your custom icon look like it came with your system. If you’re making a folder or drive icon from scratch, it helps to use the same proportions as an existing system icon. To get a reference image:
- Select the item in the Finder you want to reference
- Hit Command-I to open the Get Info box
- Click on the icon itself so that it’s highlighted.
- Hit Command-C to copy the icon
- Open up Preview (it’s in your Applications folder)
- Hit Command-N to create a new image with the contents of your clipboard (i.e., your reference icon)
- Export the image as a PNG with an Alpha channel.
This image will now have the same size and transparency as the original, and can now be loaded into its own layer in any graphics editing program that supports them (which should be most of them). If you’re creating an application icon, I highly recommend following Apple’s OS X Human Interface Guidelines when creating your icons. It’s actually an interesting read no matter what (at least if you’re interested in icons and such).
Export a series of PNG files.
Once you have your icon looking the way you want it, go ahead and save the file. That’s just for safety’s sake. Now, we need to export ten PNG versions of this image, each with its own size and name.
| Filename | Image Size (in pixels) |
| icon_512x512@2x.png | 1024 x 1024 |
| icon_512x512.png | 512 x 512 |
| icon_256x256@2x.png | 512 x 512 |
| icon_256x256.png | 256 x 256 |
| icon_128x128@2x.png | 256 x 256 |
| icon_128x128.png | 128 x 128 |
| icon_32x32@2x.png | 64 x 64 |
| icon_32x32.png | 32 x 32 |
| icon_16x16@2x.png | 32 x 32 |
| icon_16x16.png | 16 x 16 |
How you go about exporting these image sizes is up to you. The quickest way is to just take the same image and scale it down while exporting. However, for best quality, I have found it best to actually scale down a copy of the image in the graphics program itself, make adjustments as necessary (some details don’t always look right when simply scaled) and then export the adjusted image. However you do it, though, is really up to you. It should be noted that you technically don’t need to make the versions with names that end in @2x, as they are for Retina screens only. However, since more and more Macs are available with Retina displays, including these versions will ensure your icons look their best, regardless of which kind of screen they eventually get displayed on.
Create an .iconset and preview your work.
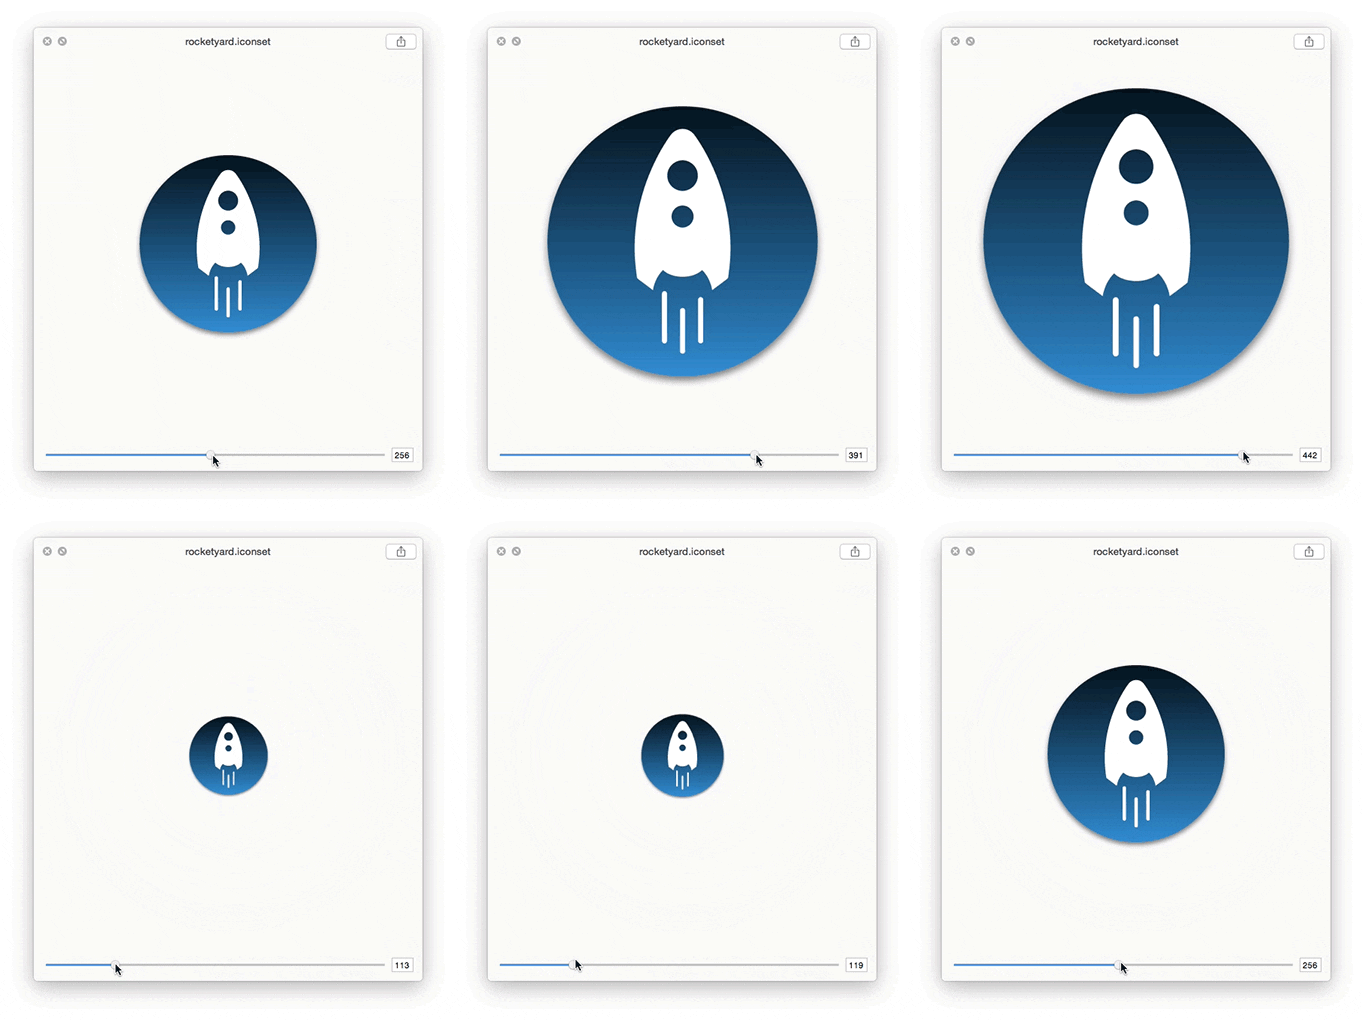
You should now have ten PNG files. Go ahead and put them all in one folder, then name the folder “<name>.iconset”, where <name> is the name of the icon. I named mine “rocketyard.iconset”. You’ll be asked if you’re sure you want to add the extension “.iconset” to the folder; just tell it yes. Congratulations! You’ve just created an .iconset file. Now is a good time to preview how your icon will look at various sizes. Simply select the iconset folder in the Finder and hit the space bar on your keyboard to invoke QuickLook. A preview of your icon will appear in a window with a slider at the bottom. Dragging the slider left or right will change the size of the preview. Check through the range of sizes to make sure everything looks good all the way through. I’ve found that some more complex designs don’t look as good at the smaller sizes. In the Rocket Yard icon example, I found that the gradient background looked fine on a Retina display, but didn’t look as nice on a non-Retina one at sizes below 32×32. Fortunately, fixing that is simple enough. Each of the PNG files covers icon sizes from its size to the next lower; “icon_512x512.png” covers icon sizes from 512×512 through 257×257, “icon_256x256.png” covers sizes from 256×256 through 129×129, and so on. For retina displays, the same thing applies, except for you use the file sizes with @2x in the name. So for this example, I made the background a solid color, and replaced the 32×32 and 16×16 images in the iconset folder. Now that we’re satisfied with how the icon looks at all the different sizes, it’s time to make that desktop icon.
Convert the .iconset folder to an .icns file.
To get the final .icns file that we want, we’re going to use the iconutil Terminal command. This has been built into OS X since at least 10.7.5, so you’ll need that version or later to use it. With your .iconset folder on the Desktop, we’ll need to use the following command: iconutil -c icns path/to/iconset Let’s take a closer look at what this command actually does
- iconutil – this invokes the iconutil Terminal command
- -c icns – this indicates that you want to convert the target file to an .icns file.
- path/to/iconset – this is the actual file path to your .iconset file. If you want to type the whole thing in, go right ahead, but the easiest way is probably to just drag your .iconset folder into the Terminal window and it will automatically type in the correct path.
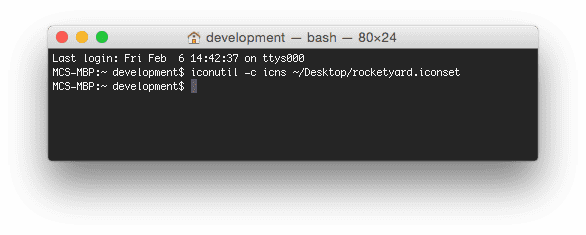
Since my iconset folder is on the Desktop and named “rocketyard.iconset” my Terminal command would be iconutil -c icns ~/Desktop/rocketyard.iconset Once you hit return, iconutil will make an .icns file with the same name and location as your iconset. In my case, “rocketyard.icns” was made on my desktop. This is the file we want.

Use the ICNS file to customize your file icons.
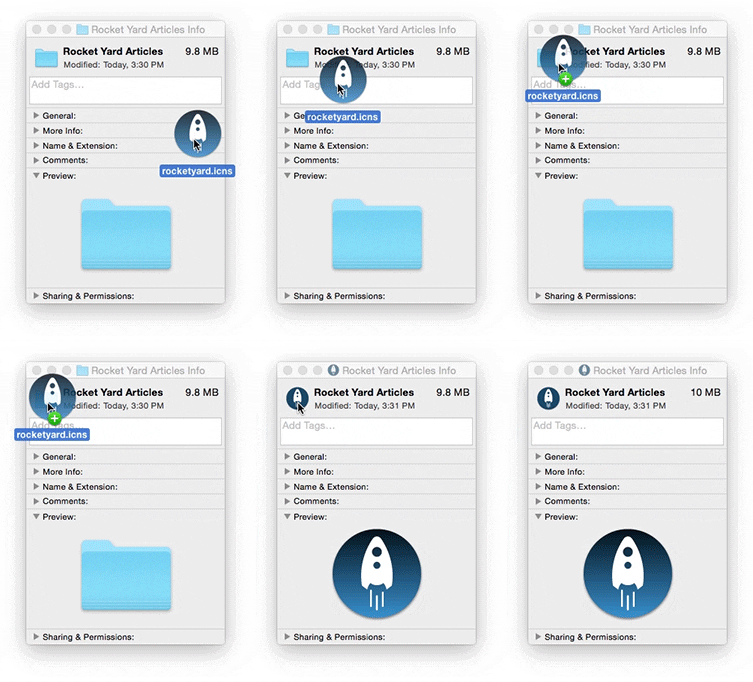
The most common way to swap icons in OS X has generally been the copy/paste method we describe on our Drive Icons page. As long as the item you’re copying has the icon pasted on a folder or file (like our drive icon packs do) you should have no trouble copying and pasting to a new folder or drive. However, what you see on the Desktop isn’t necessarily what you’d be copy/pasting. OS X, by default, is set to render the contents of a graphics file – including JPEGs, GIFs, PNGs, and ICNS files like we just made – on the Desktop, rather than the generic icon for that file type, which is actually assigned to it. That means that if you use the copy/paste method with one of those files, you will be transferring the generic file icon, and not the image within.
With an ICNS file like we just made, though, it’s a simple process to change a desktop icon if you’re running 10.8 or later. Simply open the Get Info box on the item which icon you’d like to change, then drag the ICNS file onto the Get Info box’s icon. Now you’ve got a custom icon on your desktop that scales nicely to all sizes, and you can copy/paste it between other items as mentioned before. It should be noted that dragging and dropping only works with ICNS files like we just created; JPEGs, GIFs, PNGs and other files won’t work the same way.
If you’ll be using these icons with 10.7.5 or earlier, you have two ways you can apply these icons to folders and drives.
The first (and probably the best) way is to use this drag and drop method on a newer OS version, transfer the folder with the icon to the other computer, then use the older copy/paste method there. This will keep all the size variants together and it will scale as it should.
However, if you don’t have any versions of OS X past 10.7.5, then the best you can do for folders and drives is to open the icon up in Preview, select all, then paste it into the target folder’s Get Info Box. Unfortunately, this method only copies and pastes the largest version of your icon and scales it down, which largely negates most of the work described above.
So why would you make ICNS files in 10.7.5? Well, if you make/use a lot of AppleScript or Automator applications, you can also customize their icons with an ICNS file, and these icons will scale properly and do so on all OS versions from Lion to present.
Make a copy of the application (just to be safe), and then right-click on the copy and select “Show Package Contents.” In the window that opens, you will see a folder named Contents. Inside the Contents folder will be one named Resources. Inside the Resources folder will be the ICNS file which gives the app its generic icon. The file will be named “applet.icns” for AppleScript apps, and “AutomatorApplet.icns” for Automator apps. Simply rename your new icon’s ICNS file so that it has the appropriate name, and replace the existing one. Now, once you restart the Finder (e.g., by restarting or logging out and back in), your custom applet has a custom icon that can’t be accidentally deleted.
Conclusion.
Whether it’s to separate out a folder or drive icon so it’s more discernible from a sea of generic icons on your desktop, adding that extra level of polish to your frequently used AppleScript Applets and Automator Workflows, or just tricking out your desktop to better suit your own sense of style and taste, making your own icons can be a fun and easy way to do it.
Of course, if you just want to be able to distinguish your OWC drives from the rest of your drives, we offer a full collection of icons for all OWC and NewerTech storage offerings, all ready for you to copy/paste to your heart’s content. If you’ve got a brand new OWC or NewerTech storage solution, you can find them in the included software under “Other Goodies.” Don’t worry if you erased that folder from your drive, though; you can also find them on our Web site.
Note: We will update once we confirm compatibility with the new macOS Mojave
UPDATE: Rocket Yard has verified that this works in macOS Mojave and Catalina.



In this day and age, a tutorial on the Internet that’s clear, documented and works as it should? I thought it was banned. Loved the explanation re; the command line, usually tutorials skip this. BIG THANKS
This is literally way too much work.
Awesome! I can confirm that this exact procedure still works flawlessly as described on the upcoming macOS Catalina 10.15 (I’m currently testing the Beta version).
Now to figure out how to change the icons of network drives and external devices… and how to add such icons on the Finder’s sidebar as well!
Oh well. Once you go the road of customisation, you’ll never want to stop!
It works on the Mojave, but not on my High Sierra – when I copied the icon, it shows on the Mojave, but just the generic file on the High Sierra. I don’t know what to do from here.
Works great! Using OS Mojave that the copy and paste did not work correctly. Dragging the Icon folder to the Information Icon gives the desired change of Icons!
Thanks for this app.
For years I’ve used a little free app called fasticns to create custom icons and they still appear in Mojave. It’s a great little program. Wonder why it wasn’t mentioned here.
This was great! You should follow it up with a post on StackOverflow
Awesome. Thanks!
I’m getting this error when running iconutil – unsupported image dimensions (16,16)) and unsupported image dimensions (128,128)). I did make sure the icon_16x16.png is 16×16 so I don’t know where to go from here. Any suggestions?
Appreciate any help people might have.
works great, even on el capitan 10.11.6…now I’m gonna custom make everything
!
Hi. Just curious, did you ever get a message that said,
“error: unsupported image dimensions (16,16))”?
I have the exact same version as you and i keep getting that message.
Never mind! i found it.
“In want an icon with words” was a typo. It should be deleted. You confused me by saying that my FIRST message had already been said.
Sorry, this was a mistake. I got frustrated because you told me that my FIRST message had already been said. The correct message is “I just want to add an icon to my dock with a label.”
I just want to add an icon to my dock with a label.
Big thanks for this !
Great. Many thanks. Worked like a dream in Sierra.
hi
Sadly, this doesn’t seem to work anymore. I am running El Capital (10.11.6) at work and when I rename the folder containing the PNG files to whatever.iconset, I am not given any rename warning. Additionally, testing it by hitting the Spacebar while that .iconset folder is highlighted only shows a thumbnail of the folder, not a preview of the files inside. Lastly, running the iconutil command only gives me the error: “Iconset contains no image resources.” Things must have changed since this article was written.
Thank you for letting us know Chris. We will be looking into this further and providing further information once we have it!
Hi, Chris.
I double checked on multiple machines, and I am 100% certain that this does, in fact, work in El Capitan.
Looking at the symptoms you listed, though, it seems there may be something off in a file/folder setup.
The renaming folder issue is unusual, and is the only thing I have no direct idea on. Every time I add “.iconset” (or, for that matter any dot-something suffix), I have always gotten a dialog box. That behavior goes back a long way – even before this technique for icon-making was available.
The issue with the preview and the
iconutilcommand, however, may be related to each other. I ran into a similar problem last month when working on an icon set; it wouldn’t show with the space-bar preview and wouldn’t convert using theiconutilcommand. As it turned out, my original icon (which I was scaling automatically using a script) was not placed on a square canvas, which meant the sizes were not square, and that returned similar errors when I tried to runiconutilon it.tl;dr – make sure the PNG files in the iconset folder are named and sized EXACTLY as listed above.
Hopefully, that’ll clear up any problems you are having.
Hey guys,
I can confirm Chris’ issue, ran into it myself.
I do have extensions viewable by default, I’m not sure if that makes a difference.
Anyways, I went ahead and compressed the folder into a zip first, then changed the .zip extension to .iconset and that worked just fine.
Thanks for the awesome tutorial btw!
In macOS High Sierra I had the same issues, namely Finder not prompting be to confirm the folder name change, and with not being able to open the folder and see a slider. However, it turned out to not really be an issue, as I simply ran the advertised iconutil command and all worked as expected.
THANK YOU SO MUCH! This was awesome, I’ve been playing with this for a while now and your article helped so much. Wonderful
Thanks for an excellent article – very well explained and illustrated. I never knew before that you could drag a file into the Terminal window instead of typing it. That’s going to be very useful to me!
Maybe I missed something critical here so here’s a stupid question. Why not just open it in whatever program, select what you want, copy and paste it into the “get info”? took me all of 20 seconds. resizes nicely too.
While that works in most scenarios, there are some instances where a properly formatted ICNS is preferable – over the years I have had intermittent problems with copy-pasted icons over network volumes and even when swapping files from machine to machine. I especially noticed it with any AppleScript and Automator Applications I made on one machine and moved to another. By putting an ICNS in the Application resources, it allows the icon to travel with the app automatically.
Another benefit to doing making an ICNS file is the resizing. Though your copy-paste version may scale correctly, there are instances (such as I noted in the article) where simply scaling a design may not be the best choice; you may want to simplify it at smaller sizes. This becomes more pronounced if you start using the same file across multiple machines – especially if it’s a mix of Retina an non-Retina Macs. With an ICNS, you’re sure to get the best quality available, regardless of which machine you’re using it on.
Finally, if you’re one of the folks who likes to tinker with their system interface (and, say, replace all your system icons)… you’re definitely in ICNS-town there.
To be sure, the method written here certainly isn’t the only one for producing custom icons for your Mac, but it is one that is very controllable and produces results that are usable in a wide range of situations.
Thank you! I was looking for a way to do this, and it worked great for me! :)
I am on High Sierra and tried this = when I hit return on the Terminal message I get = “Failed to generate ICNS. When I tried to select the folder ‘iconset’ and use Space bar to test the look, it came back “Missing icon variant in icon set (icon_16x16.png) But I double checked and it’s there as are the rest
Same issue here. Can’t get a 16×16 iconset recognized. Tried recreating the file and the folder but it’s just not recognizing 16x16s.