![]() It’s the end of the week, but that doesn’t mean an end to learning more about your favorite devices. Each week, the Friday Five takes a quick look at a Mac OS X or iOS app or tech subject to point out five things you may have overlooked before.
It’s the end of the week, but that doesn’t mean an end to learning more about your favorite devices. Each week, the Friday Five takes a quick look at a Mac OS X or iOS app or tech subject to point out five things you may have overlooked before.
Like it or hate it, most of us who use Macs spend a lot of time in the Mail app. Whether you’re new to the Mac or have used every version of OS X since Cheetah (version 10.0!), there are ways to customize and use the Mail app to make it better fit your style and knowledge. Let’s take a look at five easy and useful customizations and tools in Mail:
1.) Add text labels to the buttons in the Mail toolbar
Newbies to the Mac platform might not be familiar with those buttons in the Mail toolbar. Fortunately, there’s a way to add text labels to them to make it easier to figure out exactly what each button does.
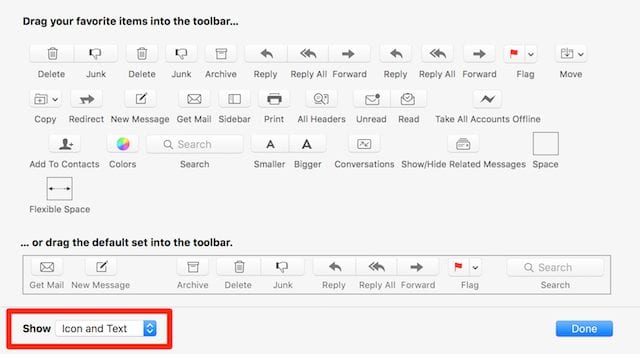
To turn on the labels, select View > Customize Toolbar from the menu bar. What you can see is that there are not only a ton of different tools you can add to the toolbar simply by dragging and dropping them, but there’s a handy drop-down menu at the bottom of the customization dialog (see screenshot below):
That drop-down is set by default at “Icon Only”, meaning that Mail displays only the button icon. You can change it with a click to “Text Only” — which does away with all of the buttons and replaces them with text links — or to “Icon and Text”.
The latter displays the buttons as well as a text label showing exactly what each button icon means. It’s a handy setting for beginning Mac users that can later be turned off using Customize Toolbar.
2.) Hide Mailboxes
Another thing that can be confusing to new Mac users is the variety of mailboxes that will appear in Mail’s left sidebar, especially if they have more than one email account. Mail generates a number of mailboxes — inboxes, flagged, drafts, sent, junk, trash, and archive — for each email account, and even more can be listed if the user creates his or her own email folders.
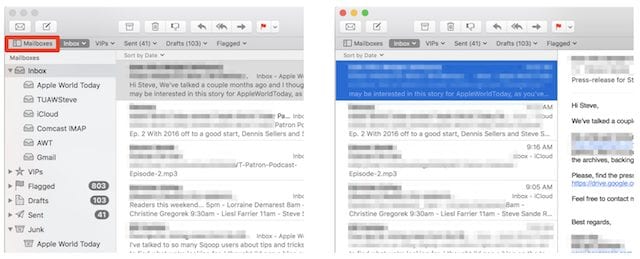
For those who may only have one email account and don’t want to be confused by the plethora of mailboxes, hiding the mailboxes might be a good idea. It’s simple to do: just click on the Mailboxes button to toggle back and forth between seeing (left, below) and hiding (right, below) the mailboxes.
3.) Add or Delete Cc, Bcc, Reply-To or Priority Fields to Mail Address Box
By default, the Mail app is set up with the following fields to use when addressing an email — To, Cc, Subject, and From. “To” is easy; that’s where you put the address of the person you’re sending an email to. “Cc” stands for “carbon copy”, meaning that you’re sending another person a copy of your email for their review. “Subject” is, of course, what your email is all about, while “From” is one of your email addresses.
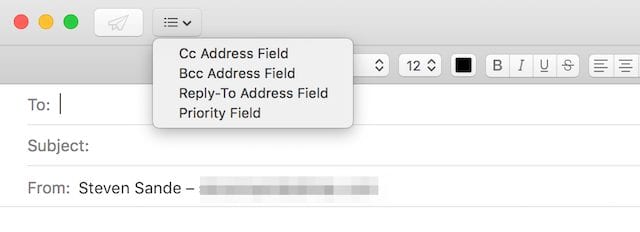
Mail has more fields that you can use when addressing an email to someone. To add them or delete them, simply click on the button that’s next to the “Send” (paper airplane) button in a blank email. You can add three different fields to each address box; blind carbon copy (Bcc) Address Field, Reply-To Address Field, and Priority Field (see image below).
Blind carbon copy is when you’d like to send a third party a copy of an email you’re sending, but you don’t want the primary recipient to know that the third party is getting a copy. Reply-To is used when you want replies to your email to go to a different email address from the one the original message was sent from, and the Priority Field is used to set a priority (low, normal or high) for your email.
The latter field sets an “X-Priority” for each email from 1 (highest priority) to 5 (lowest priority) in the message header. Some email servers can read and react to the priority of a message, passing along the most important emails faster than others. This doesn’t seem to make too much of a difference nowadays, but if you’re one of the few who still uses a slow dialup connection to the Internet, setting a higher priority can insure that important email is sent before run of the mill messages.
4.) Add invitations and contacts to your Mac Calendar and Contacts apps from Mail
While this isn’t a customization, it’s a cool thing to know about. The OS X Mail app has some amazing capabilities, among those being the ability to “see” contact information and invitations in incoming mail messages. With a click, it’s possible to add those contacts and invitations to the appropriate apps.
For example, Mail looked at this message and saw that I was inviting myself to lunch next Wednesday at 12:30 PM. It added a line in the email just under the header that says “1 event found in this email…” along with the date and time. At the far right is a link to add that invitation to my Calendar.
With a click on the “add” link, Mail opens a small calendar view showing what other appointments I may have around that time (see image below). I can add an event name and details like location prior to adding it to my calendar with a click.
Likewise, let’s say that I get an email from an existing contact with new street address or other contact info in it. Opening that email, there’s a small note telling me that “New contact info found in this email” (see image below). With a click on the “add” link, I can see what new information is available for my contact and add it to her contact card.
5.) Using complex searches in OS X El Capitan Mail
The last of our Friday Five tips is surprisingly useful! Most people I know only search for emails by the name of a sender, but OS X El Capitan makes searching through thousands of emails much easier by allowing complex search criteria.
An example of this would be “emails received yesterday with attachments”, which not only looks for emails that were received the previous day, but checks to make sure that there’s an attachment in the email.
As the search is typed into the Search field in Mail, suggestions appear just below that make it possible to filter the search. Selecting one of those suggestions adds it to the search field (see screenshot below). The more filters that are added, the more finely focused the search becomes. Some of the items you can search for include:
- Message headers, by entering the header, adding a colon and then adding a value you’re looking for. For example, “from: jarrod rice”, “subject:contracts” and “cc: barb sande”.
- A date or range of dates, by entering “date”, adding a colon and then the value or date range you want to look for. As an example, “date:05/01/15-08/01/15” finds emails sent in that particular range of dates.
These search criteria can also be linked together with Boolean operators. Those operators are AND, OR, and NOT. For example, I needed to find all emails that I received from my sister during a three-month period last year, so I searched for “date:05/01/15-08/01/15 AND From:Susan”. That brought up 72 matches and a good history of what happened during that busy time. Perhaps I want to exclude certain emails dealing with a certain home furnishing store? I can add “NOT IKEA” to the search to exclude those emails, and only 56 matches are made.
Searches can be saved for future use as well. Once you’ve entered your search criteria and feel that the results you’re getting are what you need, there’s a tiny “Save” button that creates a “Smart Mailbox” with all of those messages in it.
That’s it for this week’s Friday Five. Do you have any favorite tips or customizations for Mail? Let’s hear about them in the comments section below.






I just went to Sierra last night. NOW I see that my MAIL messages always show who it’s from First, THEN the SUBJECT, then that it’s TO ME, and last the “REPLY TO” line. WHY is this all changed up? I don’t like it. I want the SUBJECT to be at the bottom of that list like it used to be, and the FROM or REPLY TO at the TOP like it used to be. Is there a way to change it back like it used to be? I can’t find it. I have over 10,000 “unread” (my way of “marking them”) messages if that makes a difference. NO IDEA how many “read” msgs. I have in there. THANKS for any/all help.
Many thanks for the useful tips on searching email.
In your next suggestions, i wonder if you could give some tips in using feature in the editor like sub- or superscript or any other special characters.
Steve… Thank you for the tips. I immediately applied the “icons AND text” tip. Being new to El Capitan (my last OS was Snow Leopard, long may it live) and, I’m having to use my web based mail account to successfully send JPGs and PNGs to a Windows-based, Outlook-using client. If I don’t, they either don’t see my attachments or, they’re embedded in the body of the email. I check “Send Windows Friendly Attachments” and, I used to use Attachment Tamer but, it is no more. Any tips for this one? :)
Unfortunately, in El Capitan you can only enable text and icons for the inbox. When you COMPOSE email there is no text option for the icons. And yes, it drives me crazy.
Brad I would recomend Universal Mailer http://universalmailer.github.io/UniversalMailer/ great plugin for emails to get rid of the dreaded .att extension.
Sean
Thank you, Sean! I’ll definitely look into it.
Thank you for this information! One thing I would love to see is a follow up article or tips on managing an extensive (multiple years worth) email file/database in OS X Mail. It would be nice to be able to archive emails to speed searches or conserve space, etc.
spot-on…25k messages and growing…needing access from multiple devices…without iCloud’s fuzzy constraints…thanks for your suggestion
Share your blog on Facebook or email link. This is perhaps the best source available to find tips and tricks for both OS and iOS. Too many people invest in technology yet do not understand how to get the max out of it. So,having been a Mac user for over 15 years I send your stuff si I don’t get the ” how do you” calls! Keep it up. Great job. BTW,love OWC.
How can I change the very hard to see grey text to dark black throughout all apps and mail?
Steve, I just want to thank you for the excellent job that you do with the Friday Five tips. When I first saw the title, I thought, “Well I know a lot about Macs and iPhones, etc. I doubt I need to read these posts.” I would file the email “just in case” but I really didn’t look at it. Then you posted on an application that I hadn’t used before. So I decided to check it out to see if I could learn anything. I certainly did learn some new things, and I was also impressed by the time which I could tell that you had taken to craft the blog post and include graphics, etc. After that experience, I went back and looked at the ones I had saved and found excellent information there as well. I now look forward to seeing what topic you choose each week and what I can add to my pool of knowledge. Again, thank you for all of your hard work and the care you put into these blog posts. It certainly shows!
Erik,
Thank you so much for the nice comment! It’s rare when those of us in the tech blogging business get a pat on the back, so it is very much appreciated.
Steve
So…..it appears that I’m not the only one that has stumbled onto this blog.
This is awesome! I have learned (well…I haven’t really learned it, yet) more in one day than I have for years.
And I thought I knew everything there was to know about Preview and Mail. Boy! Was I wrong!
Thanks again,
Rainman