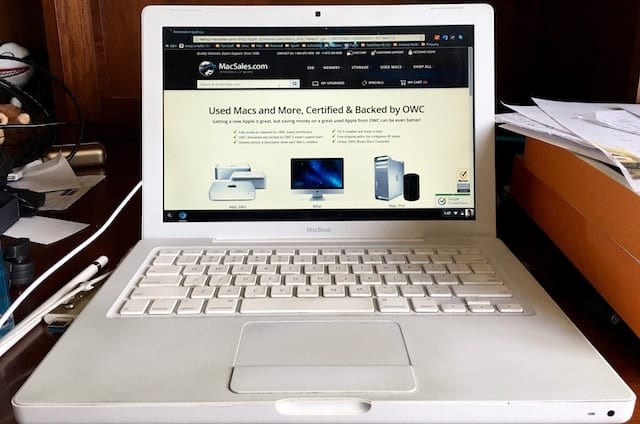
Maybe your older MacBook doesn’t meet the specs to run OS X El Capitan, or your child’s school decided to switch to Google Chromebooks. Either way, there’s now a very simple way for you to convert that semi-retired Mac into a Chromebook-compatible device.
Neverware’s CloudReady can run on a huge number of devices — PCs as well as Macs — but for this article, we’re going to concentrate on one thing: how to turn an older Mac into a Chromebook.
For individual users, CloudReady is free, meaning that you can give it a try without spending a dime. So how is it done? Simply follow the steps below to find out:
1.) Make sure your Mac is certified to run CloudReady. The following models will work perfectly:
- iMac 7,1 – 2007 20 and 24 inch models
- iMac 8,1 – Early 2008 20 and 24-inch models
- iMac 9,1 – Early/Mid 2009 20 and 24 inch models
- iMac 11,2 – Mid 2010 21.5 inch model
- MacBook 3,1 – Late 2007 13-inch black or white plastic
- MacBook 4,1 – Early 2008 13-inch black or white plastic
- MacBook 5,1 – Late 2008 aluminum 13-inch unibody
- MacBook 5,2 – Early/Mid 2009 13-inch white plastic
- MacBook 7,1 – Mid 2010 13-inch white plastic
- MacBook Pro – Mid 2012 13-inch Core i7, Core i5
For the purposes of this article, I have a MacBook 4,1 on hand that is in working condition, although the screen has a tendency to blank out if the machine is jiggled. Still, it’s a perfect candidate to become a Chromebook. (Note: The screenshots in this article were taken with a camera. During installation, there is no way to get a Chromebook screenshot.)
And to get the best performance from your Chromebook-in-the-making, MacSales.com offers memory and storage upgrades. You can also pick up a Refurbished Mac from MacSales.com if you’re in need of a second or even a first Mac.
2.) Get your hands on a USB 2.0 flash drive with either 8GB or 16GB of storage. It must be 8GB or 16GB, so don’t try to use something larger. Don’t have one on hand? OWC offers several different models of 16GB flash drives for sale.
Be sure to erase the drive. For this, and for the purpose of creating the USB installer, you can use any Mac. I used my supercharged 27-inch 5K Retina iMac.
3.) If you already have Google’s Chrome browser installed on your Mac, go to step 5. If not, proceed to Step 4.
4.) Download Chrome browser from Google’s website, and install it on your Mac. Be sure to log into Chrome using a Google account (usually associated with a Gmail account).
5.) Next, we want to open the installation zip file that will be downloaded in Step 6, so install The Unarchiver (free) from the Mac App Store.
6.) Launch the Chrome browser on your Mac, and enter www.neverware.com/freedownload into the search/address bar before pressing the Return key. The file “cloudready-free-46.1.20.bin.zip” is downloaded to your Mac automatically and appears in your Mac’s Downloads folder.
7.) Open the Downloads folder, then right-click the file “cloudready-free-46.1.20.bin.zip” and select “Open With The Unarchiver”. If you’re asked where to save the unarchived file, click the button that indicates that you wish to save it in the same folder as the archive file. The file is unzipped, and a new file named “chromiumosimage.bin” appears in the Downloads folder.
8.) In the Chrome browser on your Mac, type or paste in this address: https://chrome.google.com/webstore/detail/chromebook-recovery-utili/jndclpdbaamdhonoechobihbbiimdgai?hl=en. This takes you to the Chrome Web Store and to the Chromebook Recovery Utility that allows you to create a recovery media for a Chromebook. Click the Add To Chrome button in the upper right corner (see image below).
9.) The Chromebook Recovery Utility is added to the Chrome App Launcher, which is installed by default in your Mac Dock. When you click on it, the App Launcher displays all of your Chrome apps (see image below):
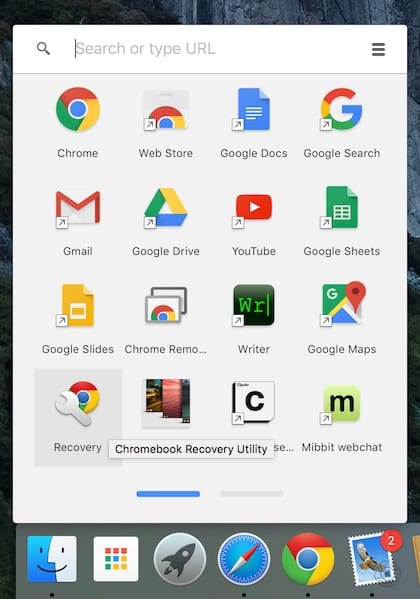
10.) Click on the Recovery icon to launch the Chromebook Recovery Utility. When prompted, plug in the flash drive. It is erased and the Recovery media is created. Remove the flash drive when you’re done, and now let’s move to the old Mac.
11.) Make sure that everything you need is off of the old Mac, because installing Chromium OS on this device is going to wipe out everything on the internal drive.
12.) Power down the Mac, then plug the flash drive into one of the USB ports.
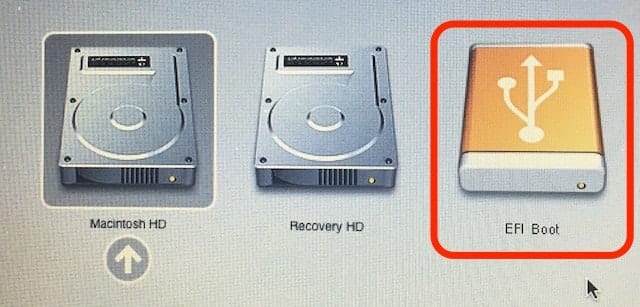
13.) Hold down the Option key on the keyboard, then power the Mac back on. Pressing the Option key while booting displays all of the available boot devices, which should include whatever version of OS X you had installed, the OS X recovery partition, and the flash drive, which will be listed as EFI Boot (outline in red on the image below). Use the arrow keys on your keyboard to select the flash drive, then press the return key.
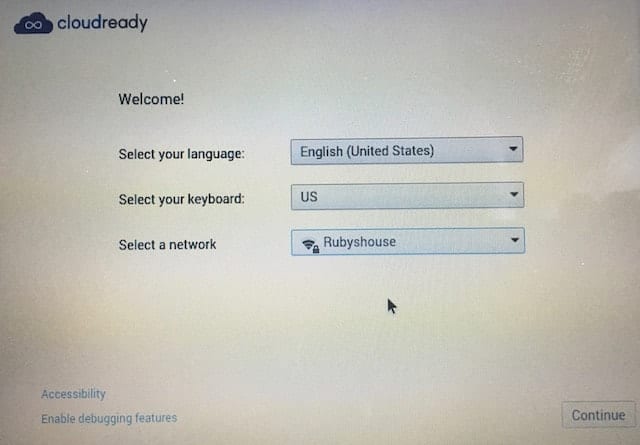
14.) Now CloudReady installs itself temporarily on the system. You’ll get to a point where you’re asked for your language, keyboard type and to connect to a Wi-Fi network (see image below). When those tasks are done, press the Continue button. Next, you get to install Adobe Flash. And finally, you’re asked to “Sign in to your Chromebook”.
15.) At this point, enter your email address (see image below) and password. If it’s a Gmail address you have associated with Chrome at some point, any and all Chrome apps you’ve installed will automatically appear on your Chromebook.
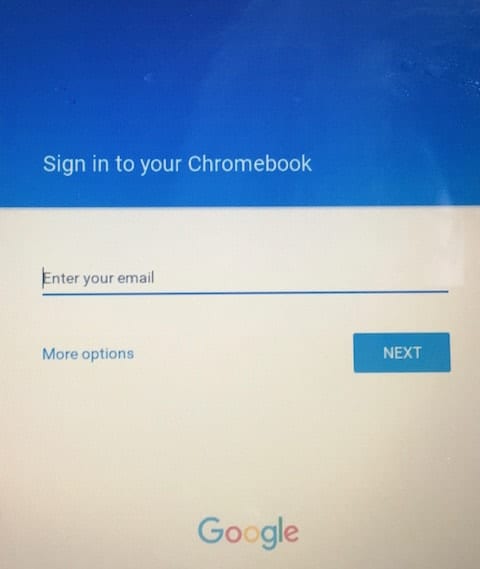
16.) “Howdy, User.” Once you have been greeted by your Chromebook (see image below), it’s a good time to check out the quick tour of Chromium by clicking the Take a tour button.

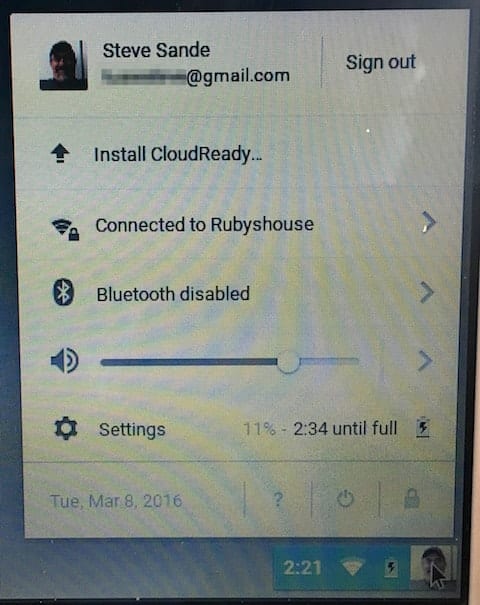
17.) Pretty fast tour, isn’t it? Well, you’re not done yet. Go over to the lower right-hand corner of the screen and click that little image of you. A menu appears, and the top item on the list under your name is “Install CloudReady”. Wait, didn’t you already do this? No, you actually booted off of the flash drive. Here, you’ll launch a CloudReady installer that installs a copy of CloudReady onto your Mac/Chromebook hard drive. Click the Install CloudReady button.
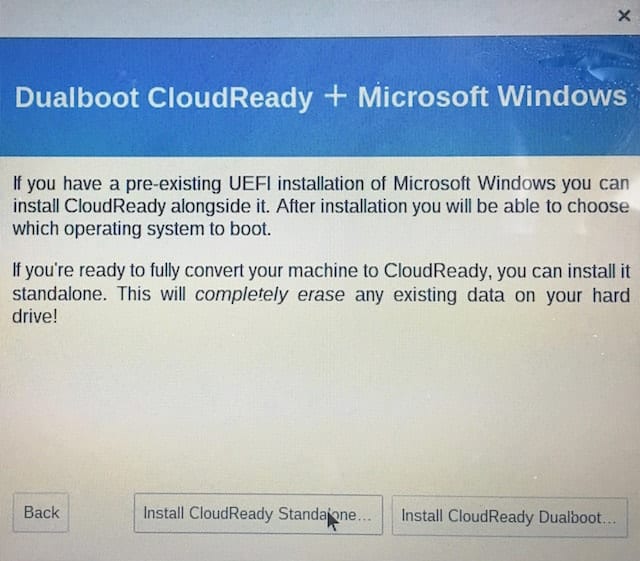
18.) You’re given the option to create a dual-boot CloudReady + Microsoft Windows device. Since your Mac doesn’t already have Windows installed, select Install CloudReady Standalone (see image below). Now, in about 20 minutes, everything is installed for you and the device is rebooted. A “CloudReady Installation in Progress” screen keeps you entertained during this time.
19.) This time, the only choice you have is to boot right into CloudReady and Chromium. You’ll hear the standard Mac startup tone, but you’re not going to see the Apple logo on the screen. Instead, you’re greeted with “Welcome to Grub!” (a boot loader) in text and shortly thereafter your face appears on the screen, signaling that you can log in.
20.) Once you log in again with your Google account, you can go wild with installing Chrome apps from the Chrome Web Store. Since the only thing on your toolbar will be the Chrome browser, do a search for “Chrome Web Store” and then follow the link.
So, how does it work? Surprisingly well. The boot time can be a little slow, but once the system is up and running you have access to a world of Google and third-party apps. If you’re already using Google Docs, Sheets, Slides, Drive or any of those other apps on your Mac or PC, they’re available from the browser on your Chromebook. Want to listen to music or watch movies from your favorite non-Apple services? Players for Spotify, Google Play, Netflix and more are available.
A word of warning, though — some of the apps and browser extensions in the Chrome Web Store are just plain flaky, and it doesn’t appear that there’s as much proper vetting of apps going on as you see in the Apple App Stores. But for those of you who may be working in that world already, converting an unused Mac to Chromium using CloudReady is a fascinating alternative to just letting it gather dust.
Related article: Friday Five: Amazing Things You Can Do with Google Chrome Browser on a Mac
Note: The Rocket Yard has no affiliation with the software mentioned in this article and receives no benefit related to this support (other than a benefit we all share in the continued support of these applications). If you appreciate the function or functionality this software offers, we encourage you to support the authors.
Related Reading: See why OWC drives and docks are the perfect Chromebook companion


I have an a1181 and it hangs up whenever I try to a shut cloud ready down. The cooling fan revs up and it keeps running with a black screen. I waited about 15 minutes, but it only shut down when I manually held the power button down. I had an issue when I loaded Linux in cloud ready and had to remove it. I too had the issue with the isight camera.
Hi there,
followed your same method with a MacBook 4,1, installed fine but iSight camera not recognised. Do you have some suggestion on this?
I had the same problem. Upon further research I found it was caused by Apple keeping the driver proprietary. Th eLimis community found a work around, but the repository that held the information was gone when I looked.
Hello,
I did the installation procedure exactly as yoiu described at the macbook 4,1 early 2008.
Chrome Os is working fine, with one exception: built in camera is not found….
What can I do?
Any proposals?
I had exact same problem
Have you had any solution yet
Thanks
I’ve the same issue on camera not found. Anyone have solution?
If I convert my old macbook pro to a Chromebook, what will be the status of ram and storage? It will remain as before or not?
I didn’t see the option for the dual-boot install on my Windows pc so I think I might have wiped it. Windows 10 was running horribly so it’s not a total loss but I was interested to see it work.
I did run this on my old iMac 8 and it worked fine but my built-in camera isn’t found. I’ve looked everywhere but it’s not showing up. I was able to use a usb camera but prefer to get the internal camera working. Any thoughts? Is this blocked on Macs?
I need some help. When installing on a 2006 iMac, I see the Cloud Ready screen and then a mess of wavy lines. I believe the dialog boxes follow the info above but it’s impossible to tell where the cursor is. At one point I thought I had started the permanent installation, but after waiting 30 min I shut it down. Any ideas for how to resolve this?
I did this on my Macbook Air 11 inch 2014 and it worked. I don’t know if this is normal or not but I don’t have the Google Play Store on it. I want to watch Netflix it too but I only have Chromium.
Is there a way to get the Google Play Store and get Chrome instead of Chromium?
Did anyone get this to work on a white 2006 Macbook 1,1? Whenever I try to download Chrome in it’s original OSX, it says it can’t bc it’s too old. Does that mean i won’t be able to do this?
Surprisingly, I got this to work on Macbook 1.1 by just installing to an internal hard drive from a flash drive I made on Windows. I was all ready to do the entire efi gymnastics with installing MacOS on an external drive to boot and install refind bootloader, but after the install, the computer was hanging (I waited about an hour) so I rebooted and the computer restarted with CloudReady from the hard drive!
I’ve done this successfully on old PC’S before, having trouble with my early 2007 imac 7,1, supposed to work, after i boot with the usb, the screen goes “snowy” and can just make out the cloud ready logo and then freezes or says error– any help? i’ve redowloaded it several times already to same result
I’m not able to install chrome on my Mac because it’s too old (MacBook pro 2006). And I able to Tim the installation some other way without chrome installed?
Pretty happy with the results, but I can’t find the Window Switcher key to do a screen shot with
Were you able to find a way to take the screenshot with the keyboard? I realize there’s a menu option in Chromium but what about a faster key combo?
This is an intriguing option for my Late 2007 MacBook…will this support external displays as well? I currently use this computer in a docking station with an external display, keyboard and mouse.
You can’t. You can use Excel online at office.live.com/start/Excel.aspx
Thank you for the tutorial. I succeed it.
Then the problem is, i don’t know how to install excel to my new chromebook. Can anyone help me??
My chromebook recovery utility asks me to identify a model. Anyone know what to enter?
Click on the wheel icon in the top right and then erase and once that’s done click on the wheel icon again and then choose a local image. Navigate from there to where you saved your .bin file and then go.
all you have to do is press the gear icon and press use local image
Does this still let me boot into Mac? I am thinking of doing it on my 2017 MBP 13″ as a great way to keep work Google separate from personal Google and this would be great if I could still boot back to mac.
This process worked well and as described. Except for #10 but I saw the comment about “Use local image”. So, I was surprised when it was all done. When I turn my Mac on after it has shut off after installing CloudReady, I get a flashing folder. It appears to not have set the boot drive. How do you do this? Thanks!
Posting again with the boxes checked so activity will come to my email
Apple IT Guy here. Hold the option key down when turning on your Mac. You’ll get an option to select a drive. Hold down the control key and then select your drive with CloudReady on it and hit enter while holding the control key. That should set it as the default boot drive. To verify, restart. Success!
has anyone tried this with their macbook 2.1?
My new Chromebook/old iMac worked for a while, but now it is in a startup loop. Any ideas how to get out of it or reinstall it (the option key doesn’t seem to work)?
I have set a partition to boot the installer of “El Capitan” instead to use an USB drive, my question is if I can prepare an 8gb partition to install Chromebook from there?
Than you for the “tuto”
Thanks for posting the great explanation.
You left out a key part of step 10:
You need to go to the gear icon (top right) and choose “Use Local Image” and open the .bin extracted in step 7.
That’s what Grant B Temple was missing too. Jeff T pointed the same thing out a year ago…
It’s a little obvious (otherwise the .bin file steps don’t to anything) but I missed that.
Sorry I’m missing something here … What is the .bin file for? If its in the download folder what is its purpose? Should it be on the USB?
I did all of the step you ask but ran into a problem. When i hold down my option key and try to start to boot from my USB. The screen just turn BLACK and never boot to ChromeBook. I have a Macbook Pro(15 inch, Mid 2010 and have 8GB of ram and 500GB of hard drive space. How can you help me to completed this to a Chromebook
Note that — at least in the current version — it is not necessary to unzip the image file first. Just use the restore tool — gear icon — local image –> point at the zip file itself. The tool will extract a local image and copy that to the USB storage device.
This looks great, and I’m trying to get it running on an early-Intel Mac Mini whose hard drive died. I installed a new HD, and would now like to install Chrome OS, but I don’t have a Mac to generated the USB boot key. I’ve been trying to make the key on a PC. Is that making a difference??
It shouldn’t make any difference
This sounds like a useful repurposing of an older Mac. But how old can you go in downloading Chrome? I have a couple of PowerPC laptops (an iBook and a Mac Powerbook) which could only go up to OSX 10.4.11. Is there a Chrome application for these oldies, or any other newer use to which I may apply etiher laptop? They do work for flattening a grandchild’s favorite autumn leaves…..! bob.c
These instructions need to be updated. I tried to follow them, but hit two snags.
#1: There are now two versions of CloudReady, and the link in the instructions takes you to a page where you have to choose between two versions.
#2: The Chromebook Recovery app will not proceed unless you choose the model of your Chromebook. Not surprisingly, none of the Apple models are listed.
Any chance of an update?
Hi, Joe —
Thanks for the comment; I’ll take a look at what’s changed and see if I can work up an update to the post.
Steve
when prompted to select model, just click on the Gear Icon at top right and choose Local Image File. All works when you select the .img file
Thanks, Jeff! Choosing the local image file worked like a charm!
The only advice I have for users following this guide is to make sure they pick the 64 bit installer described in step 6.
I tried this on a 2010 13″ white MacBook (7.1) and used the 32bit version. This installed, but failed to show any graphics. The 64 bit version worked fine. Since the CPUs are 64bit, this is the logical choice anyway.
Hi,
I’ve converted mid 2013 air and all works fine except:
iSight camera
Backlit keyboard
Sd card slot
Three finger drag
Didn’t try usb port…
Any found way to work around these please…
Great tutorial, thanks. Got Chrome OS working fine on my black MacBook4,1 no issues at all. I needed to read the below additional guidance regarding Step 10 as I did find it a little slim also.
Question: Do you have a link to a page describing the Mac keyboard shortcuts for Chrome OS? I ask for a start, as I can not for the life of me, find the ‘search’ keyboard key.
Cheers.
Hi – the keyboard shortcuts can be found here: https://support.google.com/chromebook/answer/183101?hl=en
Steve
Great, thanks Steve. For the search button, as none exists on the MacBook, I set up CAPS LOCK as primary function being search (in the OS keyboard settings). To select caps lock, it’s now simply done by ALT+CAPS.
Hey, Having issues on a Plastic White Macbook 4,1 – the option to boot from the USB doesnt appear on boot when holding down option – only the option to boot from the main harddrive – is there anything I can do? Looks like you got it working?
At step 10, the recovery utility ask me what is the brand and name of the chromebook to recover from…
What should I select?
Step 10 above is woefully short on proper instructions. Launch the Restore App. Then click the gear in the upper right corner and choose Use local image. That starts you down the right path. Just launching the Restore App puts you into the process to restore a factory Chrome Book.
What is the minimum drive size for the actual Mac? I see no mention of that in their instructions or the OWC. I have an OWC 30GB SSD that would be perfect. I assume that is plenty big enough?
The app launcher is going away as such and will be on the Chrome toolbar.
The process asks for your chromebook model. No idea so we will have to see.
CloudReady runs nicely in a virtual machine under VirtualBox. A safe browsing environment? Doesn’t seem to have any access to Mac OS X file system so only concern ought to be via the Google account ID and info accessible through that.
Is it possible to just use a drive, such as OWC Envoy, to use with a Mac?
Hey, that’s pretty cool. Is there any reason you couldn’t put this on a separate partition, so you could keep your Mac OS, too?
Is the ChromeOS updated by Google just like a Chromebook?
Yes, it is. So far I haven’t seen any updates come through so I don’t know the actual update mechanism, but from what I understand it’s pretty transparent since the OS is really “online” and is always up to date.
If they ever get to the point that we can do that to PowerBook 12, E-Mac, and the last of the original iMacs, that will be fantastic!
Chromium OS only supports x86 and arm architectures, therefor getting them to run on powerpc macs would be impossible.
Hi Bob: thanks for the reply on powerpc macs. I guess my old powerbook will make a fine dvd player and will still get on the ‘net although slowly. bob.c