 One of the more useful things you can do as a Mac expert is to help others in your company or home who need assistance. There are a lot of third-party apps and services that let you share your screen with another person or control the Mac of another user, but most of them have a cost associated with them. Mac OS X has a feature called Screen Sharing built into it that makes it simple for you to take over control of another Mac. Today we’re going to show you how that works.
On the Mac(s) you wish to control
The first thing you’ll need to do is to turn on Screen Sharing on each of the Macs you wish to control. Perhaps it’s a Mac that is being used by another person and you want to be able to show them how to perform some function, or maybe it’s a “headless” Mac with no monitor that’s being used as a server.
- Launch System Preferences
- Click on Sharing
- Click the “On” box next to Screen Sharing
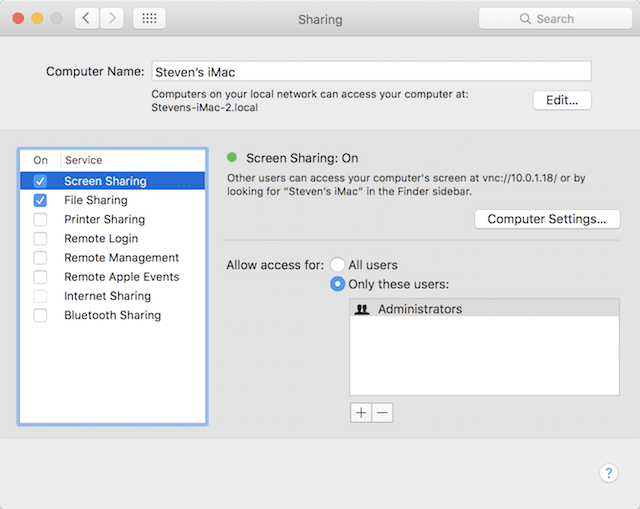
Pretty simple, right? There are some other settings that can be made. First, clicking the Computer Settings… button brings up two checkboxes (see below):

Checking the “Anyone may request permission to control screen” button gives everybody the ability to ask the user if they can control the Mac, while checking “VNC viewers may control screen with password:” sets a password (entered into the empty field seen in the dialog) that must be entered for someone to control that Mac. Using this method to control a headless server, you should definitely set up a password so that others cannot accidentally log in and change settings.
The other setting is for who can actually have access to the Mac’s screen. Clicking the “All users” radio button provides everyone with access, and for the sake of security that’s probably not a good idea. Administrators — in this case the primary user of the Mac — are given access by defaults. Here, I’d need to know the user name and password for the Mac that I’m controlling. In a true server environment with users and groups, a number of administrators can be assigned to a group and then that group can have access to all devices if desire. For home users, it’s probably best just to know the user name and password for the other Mac.
On the Mac that is controlling the shared Mac
That was pretty simple, right? It’s also simple to control the other Mac. Here’s how you do it:
- Click the Finder icon in the Dock
- Scroll the sidebar until you see Shared devices. The shared computer should be in the list.
- Click on the shared computer name

- Sign in as the user/administrator of the shared computer using the “Connect as” button.
- Click the “Share Screen…” button
The remote Mac’s screen should now appear on your Mac (see image below). You may need to sign in as the Mac’s user again, or you might even see a black screen if the Mac has gone to sleep.
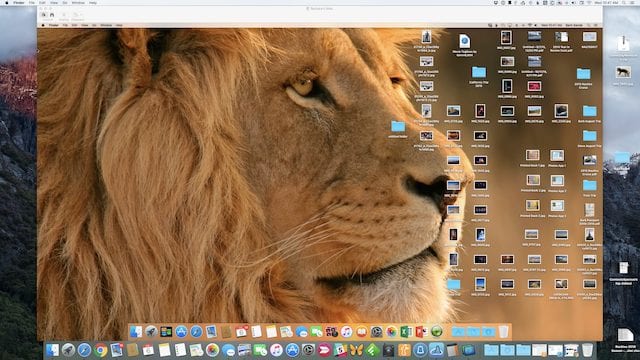
There are several controls on the top left of the remote Mac window:
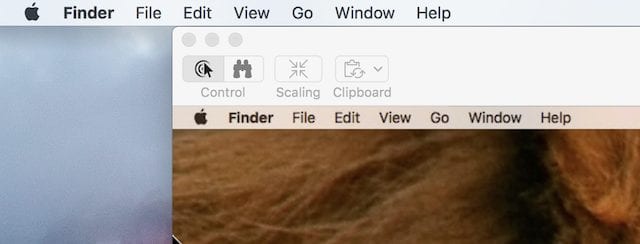
The first two — showing a cursor and a “target”, as well as a pair of binoculars — are used to control the remote Mac or alternatively just watch the screen. You might be having the other person show you something remotely, and then you can take control to remedy a situation or show them how to do something.
When clicked, the Scaling button toggles between fitting the remote screen into your display and scaling it to its natural size. In the latter mode, the screen will scroll as you bring your cursor near the edge of the remote screen. It’s also possible to use the Mac’s Full Screen Mode, in which the remote Mac’s display fills your screen.
Finally, the Clipboard button gives you the power to either copy something on your Mac and paste it onto the other Mac, or vice versa.
While sharing a screen, the Mac uses a “Screen Sharing” app that has its own set of preferences. As seen below, those preferences provide a way to not only scale the screen like the Scaling button does, but also to change the quality of the remote Mac’s image and allow or block other users who may want to share the Mac’s screen.

Controlling another Mac through Messages
You may have on noticed that the rightmost panel of the image above shows a lot of phone numbers as being blocked from doing screen sharing. There’s a reason for that; these are numbers that I’ve blocked on my iPhone and in FaceTime. Would you believe that you can share your screen or ask to share the screen of another person through Messages?
While you’re in a chat with another person in the OS X/macOS Messages app, click the Buddies menu. The following menu appears:
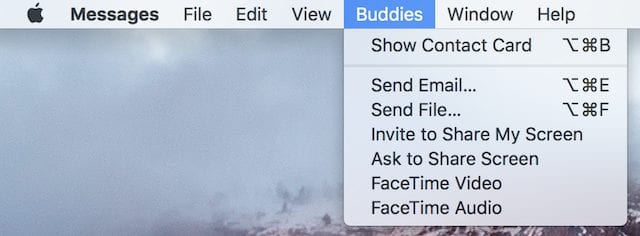
The two important commands for screen sharing are “Invite to Share My Screen” if you want someone else to view or take control of your Mac, or “Ask to Share Screen” if you wish to control another Mac. Once the other user (or you) accept the invitation, the same Screen Sharing app is launched to begin your session.
It’s a great way for Mac users in an office to contact their support personnel in a chat, and then have the Mac whiz solve a problem or show them how to do something — all without anyone leaving their seats.
There’s another way to do Screen Sharing from remote Macs over the Internet called “Back To My Mac”. We’ll take a look at that capability in a future tip here on The Rocket Yard.




Using tools like on premise R-HUB web conferencing servers, one can easily control MAC computers with screen sharing from anywhere anytime.
In Sharing Preferences, if you select “Remote Management” instead, it lets you chose between screen sharing to the user account using the display or logging in as another user.
This comes in handy when you want to screen share into a system to perform some updates, but not interfere with the user currently on the system.