 During November and December, we offered up a series of suggestions for travelers who take their tech on the road with them. In one of those articles, the use of the Find My iPhone app was described in detail for finding a lost or stolen device, notifying a finder that you’d like it returned, or wiping the device. Today we’ll look at how to use iCloud to perform the same tasks from any computer.
Enable Find My iPhone/iPad/Mac…
None of this is going to work if you haven’t enabled Find My iPhone/iPad/Mac on your devices. Here’s the process when using iOS 10.3 (see image below):
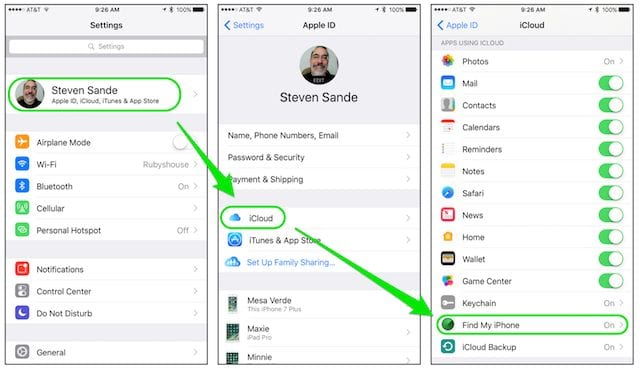
1) Launch Settings
2) Tap on your name at the top of the Settings list (this should show services that you’re currently logged into, like Apple ID, iCloud, iTunes and App Store)
3) Tap the iCloud button
4) An overview of your iCloud storage usage and a list of apps using iCloud is displayed. Scroll down the list until you see “Find My iPhone / iPad” and tap it to turn on that service or ensure that it is enabled.
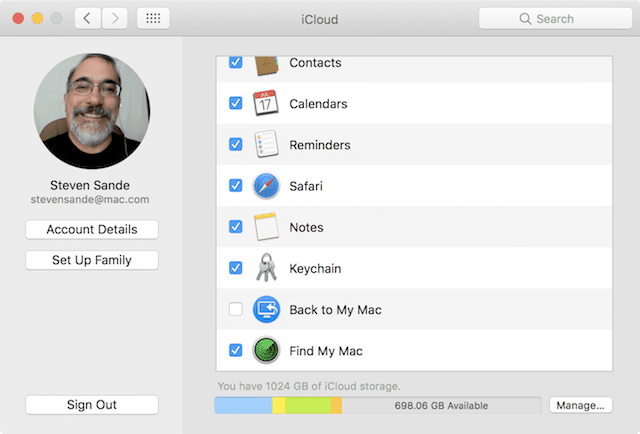
When using macOS Sierra 10.12.4 or later, the process is as follows:
1) Launch System Preferences
2) Click the iCloud button
3) Scroll down to the bottom of the list of iCloud services (see image below) and make sure that Find My Mac is checked (enabled)
Find Your Mac or iOS Device from iCloud
Why would you want to use a web browser to find your Mac or iOS device? Simple — you can use any Mac, PC, Chromebook, you name it, to access iCloud. This is especially handy if the device that you’ve lost is the one you’d normally use to find your Apple gear. Here’s how this works:
1) Launch any web browser – as an example, I’m using a Linux machine running Firefox browser
2) If you’re on somebody else’s machine, see if you can start a private browsing session so that your information isn’t stored on the computer.
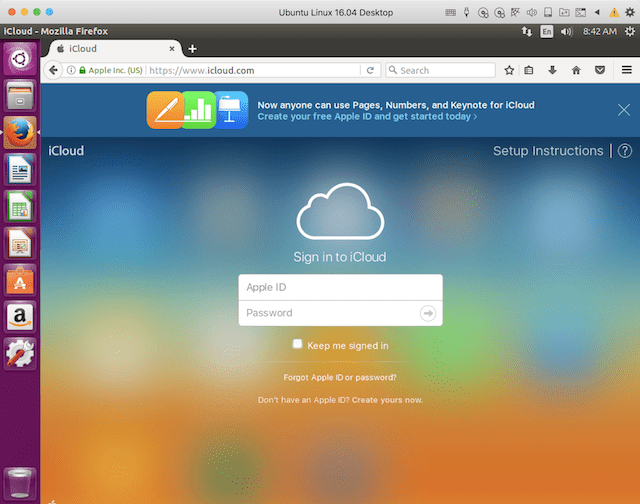
3) At the login screen (see image above), type in your Apple ID and password, then click the arrow button on the Password line
4) Note that if you have enabled two-factor authentication, you’ll be asked to enter a six-digit code that’s sent to one of your other devices. This can be an issue if your other devices are what you’ve lost!
5) Double-click the Find My iPhone button
6) You will be asked to log in again with your Apple ID; type it in, then click the Sign In button
7) Find My iPhone displays a map showing all of your devices. Note that even if they’re all in the same room, the inaccuracies of geolocation can show them spread out!
8) Click “All Devices” to see a list of all of your devices, then click on the device you wish to find. In this example, I wish to find an iPad mini named “Minnie” (see image below):
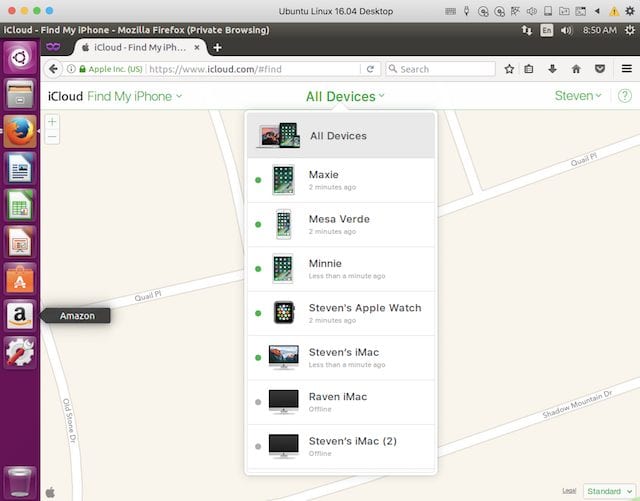
9) The last known location of the device appears, along with a set of buttons:
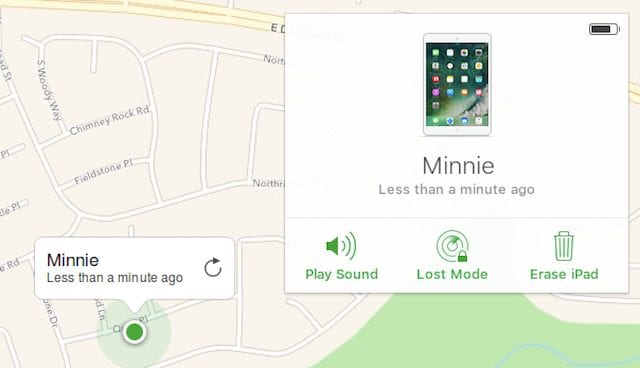
Play Sound plays a loud and continuous alert noise that’s sure to get the attention of anyone nearby. If the device is muted, a dialog appears on the screen saying “Find My iPhone alert”
Lost Mode asks you to enter a phone number where you can be reached. This can be useful if you wish for the “finder” to return the device. Once the phone number is entered, you can also add a message. For example, I entered “This iPad has been lost. Please call me and I will pay you $25 for returning it.” Upon clicking Done, the lost device is locked and the message is displayed on the screen:

Notice that putting a device into lost mode not only locks it, but for iOS devices it also places your iPhone or iPad into Low Power mode. Give Lost Mode a chance…but if you haven’t heard from somebody in a while, you may wish to wipe the device remotely.
Erasing the Device from iCloud
When you’ve given up all hope that you’re going to get your device back, the Erase iPad (or Erase iPhone, or Erase Mac…) button comes in handy. This is a last resort, as the device will no longer display the “lost” message on the screen and you will not be able to locate the device. To erase the device, click the Erase button. You can always restore the device later if it turns up.

