


Believe it or not, it’s already March 31 and that means it’s World Backup Day! World Backup Day is recognized every year and is a day for people to learn about the increasing role of data in our lives and the importance of regular backups.
At the Rocket Yard, we take data backups very seriously and in April we’ll cover everything you need to know about backing up all of your digital life. Today, we start with those who aren’t yet backing up their Macs with a quick tutorial on using Time Machine to start constant backups.
1) Determine the existing capacity of your Mac’s storage.
To find out how much space is available on your Mac’s internal storage, click the Apple menu, select About This Mac, and then click the tab marked “Storage”. Your main storage drive and any attached external drives will appear, with a color coded stripe showing what’s taking up space on your drive. In the screenshot below, the 2.12TB Fusion Drive in my iMac has 1.12TB of available space.
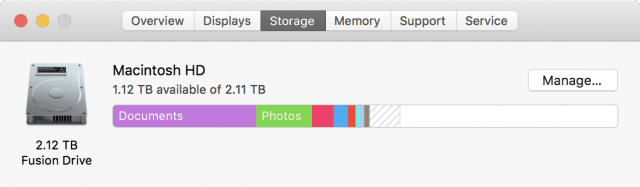
While Documents and Photos are clearly marked, what are some of those other color stripes? Hover your cursor over each one to see what category — like iTunes, Apps, iOS files, etc… — is using up in your storage.
2) Multiply the current usage by two, then round up
We use a rule of thumb for backup drive capacity: have twice the amount of capacity in your backup drive that your Mac could theoretically use. My 2.12TB Fusion Drive would, according to this rule of thumb, need a backup drive with at least 2.12 x 2 or 4.24TB of space. Since hard drives and solid state drives rarely come in sizes like that, we’ll round up to 5TB.
Why so much space? Well, Time Machine backups are constantly growing in size as time passes. Being able to “look back in time” for four or five years takes a tremendous amount of storage, but it’s worthwhile if you need to recover a file that you threw away back then.
For laptops with much less storage capacity – for example, the 512GB SSD-based MacBook Pro with Touch Bar – a 1TB backup drive would be sufficient.
3) Buy an external drive with the capacity you need
MacSales.com offers a variety of external drives that are perfect for backups.
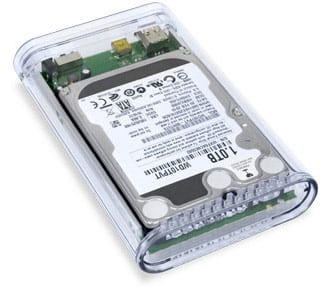
For MacBooks: OWC Mercury On-The-Go Pro drives (pictured above) are perfect for backups on-the-go. They’re small, weighing in at less than 11 ounces, use fast USB 3.0 connectivity, and don’t require an external power source. They’re also inexpensive. A 2.0TB version is less than $145, while a super-speedy 1.0TB SSD (solid state drive) version is under $380.
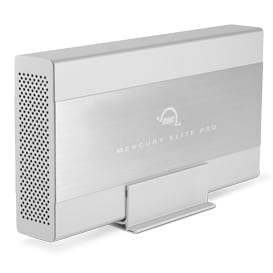
For iMacs or MacBooks used in the office: That iMac of mine doesn’t go anywhere, so a desktop drive like the OWC Mercury Elite Pro (pictured above) is a great choice. Available in capacities up to 6TB, a USB 3.0 version with 5TB of space (what I would need) is less than $260.
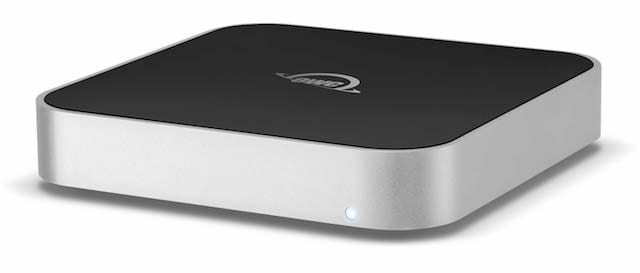
For Mac minis: Mac minis made since 2010 have a companion external drive that sits right under the computer — the OWC miniStack pictured above. Available in capacities up to 6.0TB, the new version of this drive uses USB 3.1, a 7200RPM drive mechanism, and 64GB cache to speed your backups. It comes with a 3 year OWC warranty, too!

For Power Users: Videographers and photographers need a lot of fast storage to keep their media backed up safely. That’s where RAID (Redundant Array of Independent Disks) solutions come in. RAID arrays pack two or more drives into a single enclosure, and they can be set up as one big speedy drive with redundancy — if one or more drives fail, your data is still safe until the bad drives are replaced.
I’ve personally tested the ThunderBay 4 – RAID 5 Edition, which can handle up to 40TB of capacity. Utilizing Thunderbolt 2 for connectivity, these four-bay drives are big and fast.
4) Set Up Your External Drive As A Time Machine Backup Drive
Once your new external drive is unpacked and plugged in, setting up Time Machine is insanely easy. A dialog automatically appears on your Mac desktop:
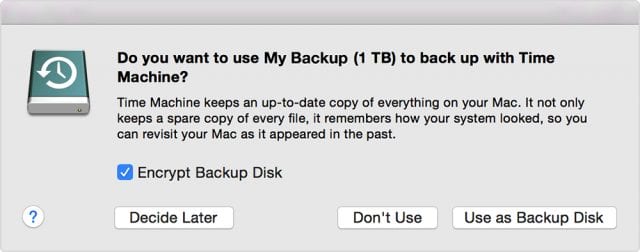
Click “Use as Backup Disk” and that’s all you need to do. Initially, a full backup of your data (not including OS X or your apps) is run, and that can be a lengthy process. Once the full backup is complete, the Mac backs up new documents and any changes made once an hour. Each day, those changes are condensed into a daily image of your Mac’s content. It’s fast, transparent, and you don’t need to do a thing.
Hopefully you’ll never need to restore a file or a complete Mac from a Time Machine backup, but if you do, the process is once again quite simple. For more details on how Time Machine works and how to restore files or a complete Mac, check out this Rocket Yard article from 2015. Note: This page is not officially supported or endorsed by World Backup Day.


I have a Thunderbay 4 (Thunderbolt 3) and use it to backup my Mac mini server.
The mini died recently and had to be replaced.
The Thunderbay needs a driver to show up in Finder. How do I bring back my TimeMachine backup to a virgin Mac with no additional software installed?
very informative.thanks
great info.thank you for it.
My Time Capsule has stopped backing up. All the old backups are in the file
system but it will not make new backups even though there is plenty of space,
and I cannot retrieve old files via the Time Machine functionality.
It is connected over my Ethernet LAN. Perhaps permissions have gotten
messed up. Is there a spec somewhere of exactly how the file system should
be set up so I can go through and fix whatever is wrong? I don’t want to
erase and start over again.