There comes a time in the life of just about every Mac where its usefulness has become limited or it will be too expensive to repair or update, so you decide it’s time to sell it or give it away. Your Mac might be just right for a person who just wants to check email and browse the web, so while it may have limited utility for you, it can be the perfect computer for someone else. In today’s article, we’ll show you how to prepare your Mac for a new owner while protecting yourself and your data.
1) Back Up Your Data
Chances are very good that your old Mac contains data that could be useful to you in the future, so it’s always advisable to make a complete backup. For those who have been using Time Machine to make backups on a continual basis or who use other applications like Carbon Copy Cloner to make up-to-date bootable backups, this critical step may be already complete.
Many people occasionally upgrade to a new Mac, in which case the backup is useful for transferring the data; if you’re not replacing the Mac (moving to an iPad Pro, for example), you might consider purchasing a low-cost hard disk drive like the OWC Mercury On-The-Go to make a backup for archival purposes.
2) Sign Out of iTunes
It might surprise you to know that iTunes can only be authorized on a certain number of computers. As a result, you should sign out of and deauthorize iTunes on any Mac you’ll be getting rid of. To do this, launch iTunes on the Mac, then select Account > Authorizations > Deauthorize this computer. During this process, you are prompted to enter your Apple ID and password, then click the Deauthorize button.
There’s an Apple support page describing the deauthorization process in detail if you need to know more about happens or how to deauthorize or reauthorize all computers tied to a specific Apple ID.
3) Sign Out of iCloud
For those who have more than one Apple device, iCloud is a critical part of the Apple ecosystem that keeps data synchronized on both Mac and iOS devices. A Mac that is going to a new owner should be signed out of iCloud to prevent others from gaining access to your information. Apple suggests archiving or copying the iCloud data from your Mac as a precaution, and there is a detailed support article on the Apple website all about how to back up data from iCloud Drive, Photos, Mail, Contacts, Calendars, Reminders, Safari, Notes and iTunes Store purchases.
Once that is complete, launch System Preferences from the Mac Dock or Apple Menu > System Preferences, click on the iCloud button, and then uncheck the Find My Mac checkbox (highlighted in red in the screenshot below). This is important — if you do not erase the Mac drive and reinstall the operating system as described later, the recipient of your computer might not be too happy to know that you’re able to track its movements!
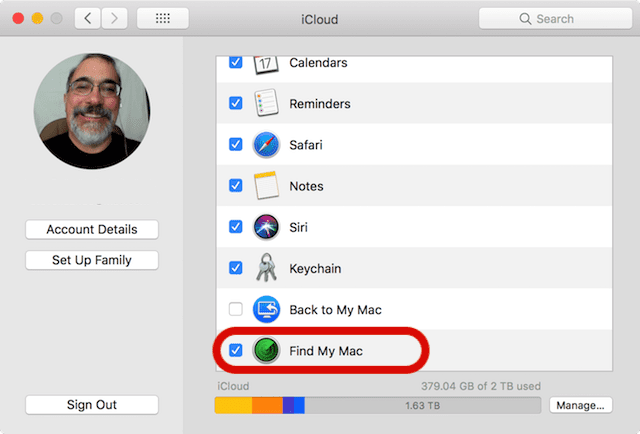
Next, sign completely out of iCloud in System Preferences by clicking on the Sign Out button in the lower left of the iCloud pane (see image above). When you sign out, a dialog asks if you wish to remove iCloud data from the Mac. It’s recommended that you do remove the data from any Mac that will no longer be in your direct control.
4) Remove the Mac from Apple Support Registration
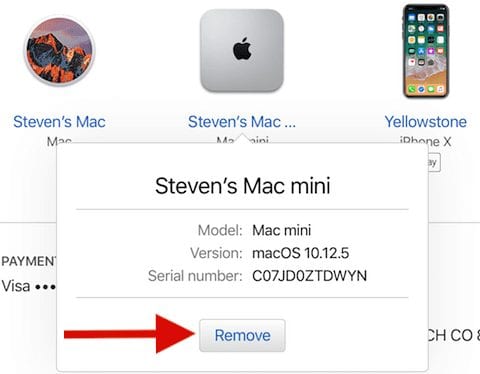
Your Mac may have been registered with Apple Support at some point, so it’s important that you take it off of your list of registered devices before relinquishing ownership. Sign into appleid.apple.com with your Apple ID to see information associated with your account, as well as a list of devices that you’re currently signed into (see screenshot below).

It’s a good idea to look at this list occasionally even if you’re not getting rid of a Mac! I found two Macs on this list (one a virtual machine, the other a Mac mini) that are no longer under my control. To remove a Mac or other device that you no longer own, click on the button for that device to reveal details. To remove a Mac, click the Remove button (see image below) and verify that you wish to remove it from being linked to your Apple ID.
5) Sign Out of Messages
If the Mac is running OS X 10.8 “Mountain Lion” or later, take the time to sign out of Messages while preparing the Mac for repurposing. Launch Messages from the Mac Dock, then select Messages > Preferences > Accounts. Click the Sign Out button (indicated by the red arrow in the screenshot below).

6) Erase the Mac and Reinstall macOS
In this step, we’ll go through the actions necessary to erase a Mac and reinstall the operating system on it. Note that these instructions are specific to a Mac running a recent version of the Mac operating system; for much older devices that are still running on old versions of OS X that were originally installed from a DVD, it’s recommended that you use that media to reload the original operating system (the final step of this section).
• Start by making sure that the Mac is connected to the Internet via Wi-Fi or an Ethernet connection.
• Restart the Mac by going to Apple Menu > Restart…, then hold down the Command (⌘) and R keys simultaneously. This starts the Mac from the Recovery partition, and a screen similar to the one seen below appears (note that this is from a Mac that was running OS X 10.9 Mavericks):
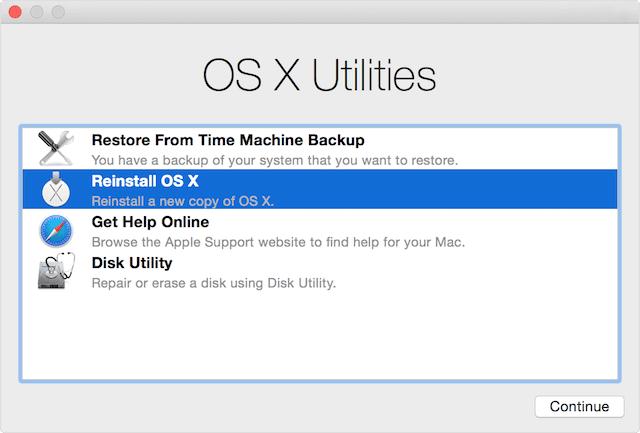
• From the Recovery window shown above, select Disk Utility, then click the Continue button.
• Select the indented volume name of your startup disk from the left sidebar of the Disk Utility window seen below. In this example, the volume name is Macintosh HD while the physical disk name is Fusion Drive. We wish to erase Macintosh HD.
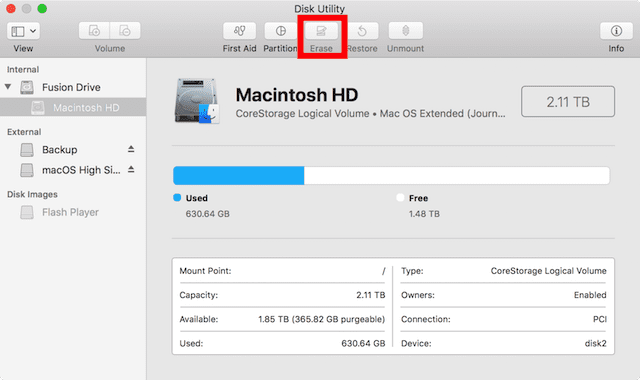
• Click the Erase button seen in the center of the top toolbar of Disk Utility (outlined in red in the screenshot above). If you’ve booted from the startup disk rather than the Recovery partition, the Erase button is grayed out and cannot be pressed. In this case, reboot and hold down Command (⌘) – R again to boot into the Recovery partition.
• Erase provides several methods of overwriting the data on the Mac drive in what is called a “secure erase”. If the Mac has had financial or other private information on it, it’s a very good idea to do a secure erase. Click Security Option, elect the erase method desired (up to seven passes of overwriting the disk with ones and zeroes), then click OK. The most secure method can take days to erase a large capacity drive, so be prepared to just let the Mac sit and do the job.
• Before the erasure begins, you’re asked to select a disk format. From the Format pop-up menu, select Mac OS Extended (Journaled) for devices with hard drives or Fusion drives. If you’re on a Mac running macOS High Sierra that uses a solid state drive (SSD), you’ll be given the option to format the drive in Apple’s new Apple File System (APFS) format. Enter the name of the disk (the default is Macintosh HD), and click the Erase button.
• When the drive erasure has completed, close the Disk Utility window, which will take you back to the Recovery window.
• If the Mac is no longer connected to the Internet, be sure to select a network from the Wi-Fi menu in the right side of the Mac menu bar, or make sure that your Ethernet connection is live.
• The Recovery window includes an option to “Reinstall OS X” or “Reinstall macOS”. Click this to select it, then click Continue and follow the onscreen instructions to reinstall the Mac operating system. Note that you will be asked to enter an Apple ID and password in order to download the installation files; this does not link this device to your Apple ID.
7) What To Do Once macOS is Reinstalled
Once the operating system has been reinstalled, the Mac restarts to a Welcome screen that asks you to select a country or region from a list. To give the new owner an “out of the box” experience similar to the one you get with a factory-fresh Mac, do not continue with the setup of the Mac. Instead, press Command (⌘) – Q to shut down the Mac. When the new owner plugs in the Mac and turns it on, the Setup Assistant begins to run again and the user can set up the Mac as if it were brand new.
That’s it! Now you can hand over the Mac to a new owner and let them begin customizing it to their needs, knowing that your private data and cloud connections are completely off of the device.




All was going well until I couldn’t erase on the Disk Utility Page. It tells me that OS X Base System is in use and that is why I can’t erase it.
I am so frustrated and want to donate my MacBook Pro. Can you help me please. I felt like I was almost there…. Thanks.
Thanks for this. Super helpful! I did all of these steps then realized I didn’t turn off find my MacBook app/service. I actually tried but didn’t find it easily. But these steps should suffice, yes? I don’t need to turn this off now, right?
Thanks for that. I have this problem:
Macmini decommission – will not quit from setup assistant using command-Q
How to proceed?
I can’t thank you enough for your clear instructions. Apple sent me information How to erase a disk for Mac, but your instructions were excellent and exceeded the information from Mac. So thank you again from this young senior citizen.
We are very glad this helped you out!
Priceless information. Thanks for presenting this much needed information.
Great info!
the Mac I am sanitizing has two internal drives. “System SSD” and “Internal HDD.” The erase function in Disk Utility does not offer the security options when erasing the SSD. Does a simple erase properly obliterate the data on a SSD?
Just went through this yesterday on an old iMac. HOWEVER, when it came to reinstalling using the Recovery Partition (local or web) to reinstall 10.11, it insisted I provide my login to App Store. As this machine was going to a new person, I was not happy about this. Thankfully I previously had made a USB Install of 10.11 and I switched to using it! In the past, Apple has never asked me to login. This is new! And it needs to have a disclaimer telling the user if by doing so, that install of the OS will remain under “my account”.
I tried doing this with my mid 2010 MacBook I purchased used from OWC and when I click on the Install “LION’ and put in my password for my app store account it constantly comes back saying that Lion is temporarily unavailable to come back at a later time. I have been trying everything I know how to do and it just won’t work. My laptop is dead. Any suggestions? Thanks.
Gerald Baes
Concerning disks sanitization, is there an application to format disk, dopy large monolithic file like movie, duplicate it until disk is filled and then do the same with smaller file and so on until 0 byres are left?
I meant “copy large monolithic file”. It would be great if editing was allowed in this forum.
What if I want to include a few applications on this “new” Mac? How do I add some of the apps from the original setup?
Best bet, include them on a Thumb drive for the new person to install or Target Disk Mode and copy the installers on.