At Wednesday’s Apple “Gather Round” event, one of the expected announcements is the date that iOS 12 will be released to the public. It could be as early as this week, so The Rocket Yard wants you to be prepared for the release with this quick guide on how to prepare for iOS 12.
Clean Up Your Device
We’re not referring to physical cleaning of your device — although that’s not a bad idea. Instead, we’re talking about doing a digital cleanup of the apps and files on your device as well as documents that may be stored locally.
iOS 12 will probably require about 2GB of free space on a device in order to be installed. The installer can actually offload some apps temporarily to free up space, but it’s not a bad idea to occasionally go through your devices and eliminate outdated or unused apps.
On your iPhone, iPad or iPod touch, launch Settings, then tap on General and then iPhone/iPad/iPod Storage (the name depends on the device type). iOS provides a handy set of recommendations that can open up a surprising amount of storage on a constrained device. The screenshot below shows some of the recommendations, like enabling “Offload Unused Apps,” “Review iTunes Videos” and so on.
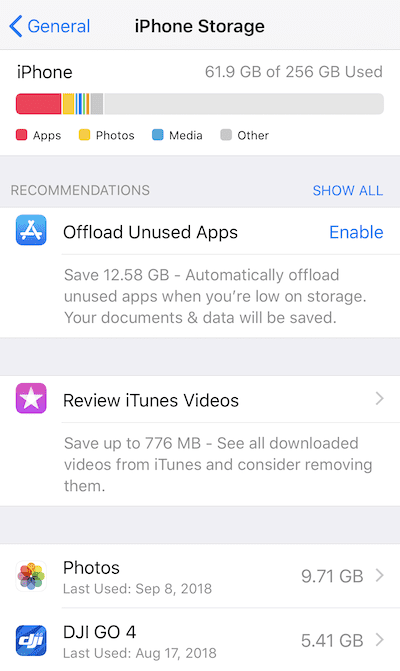
Individual apps on your device are listed below the recommendations, showing how much storage is used for each. For example, the app shown below is only 557.5MB in size, but contains 4.85GB of documents and data. While the 256GB iPhone X used in this example doesn’t have a storage constraint, an iPhone with less storage could free up close to 5GB of space by simply deleting the app.
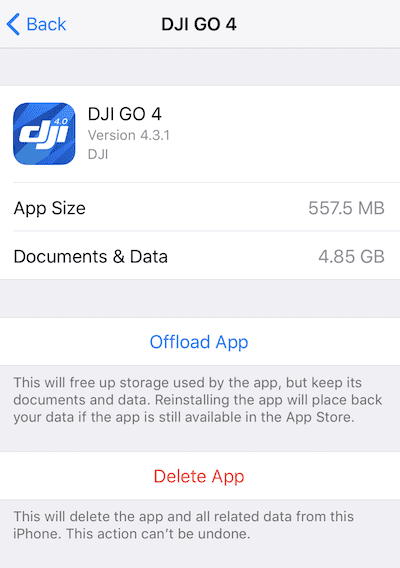
Most apps provide two alternatives when you tap on the storage listing. Visible in the screenshot above, the first alternative is Offload App, which means that it will free up storage used by the app but keep the documents and data created by the app so that the app is ready to run when it is reinstalled later. The other choice is Delete App, which not only deletes the application but also erases all related app data from the device.
One other handy thing to look for is a label that says “Never Used” below an app in the storage listing. For example, although I use GarageBand on my Macs, I never used it on my iOS devices. Removing GarageBand can save me a whopping 1.57GB of storage.
Update Your Apps
Now that you’ve decided which apps are going to stay on your device after iOS 12 is installed, it’s a great idea to update those apps prior to the operating system upgrade. This can backfire sometimes; a lot of developers like to wait until just after the release of a new iOS version to update their apps, so you’ll have to update again shortly after iOS 12 arrives.
Astute Rocket Yard fans know that it’s a good idea to set up automatic downloads of updates in Settings, so that they don’t usually need to wait for update files to be downloaded. If this isn’t set up yet on your favorite iOS device, launch Settings, tap on Apple ID then tap on iTunes & App Store. Below your Apple ID is a list of items — Music, Apps, Books and Audiobooks and Updates — that can be automatically downloaded (see screenshot below). Tap the button on the right side of those listed items to enable automatic downloads.

It’s always a good idea to also *disable* Use Cellular Data for automatic downloads. This forces your iOS device to download updated files only when it is connected to a Wi-Fi network; it can keep you from a costly data overage charge from downloading files over your cellular data account.
Back Up Your Device
Now that you’ve done a cleanup of unused apps on your iOS device, it’s a good time to back it up in preparation for the upgrade. If you’re like many readers of The Rocket Yard, you already have iCloud Backup turned on. That means that every night when your iPhone, iPad or iPod touch is plugged in and the device is connected to a Wi-Fi network, that device backs up data and settings to iCloud.
For those of you who don’t use iCloud Backup, this may be an appropriate time to begin using the utility. Launch Settings, then tap on your Apple ID — it’s the top item in Settings showing your name and the services that you use. The Apple ID display has links for such things as your name, phone numbers, email and passwords plus a link for iCloud (see screenshot below, left). Tap iCloud, and you’ll see a bar chart showing how much iCloud storage is available. You will also see a list of Apps Using iCloud. Scroll down until you see “iCloud Backup;” if the label on the right side shows “On,” then the backup utility is enabled. To ensure that your device is indeed being backed up, tap on iCloud Backup and look at the last line (see screenshot below, right). If it tells you that your last successful backup occurred recently, you’re ready to roll.
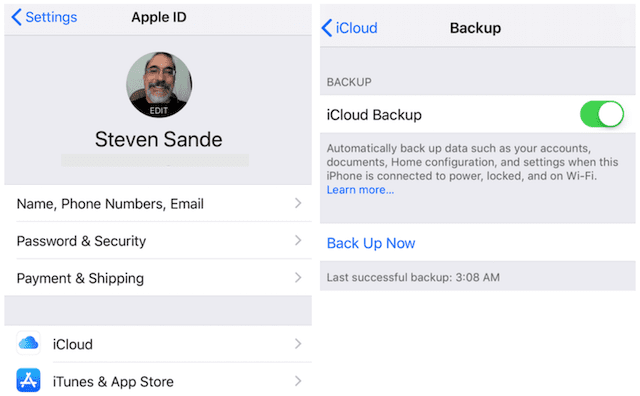
Being the paranoid person that I am, I always tap on Back Up Now and do one more backup to iCloud before starting an update.
Many readers of The Rocket Yard also have Macs. If you don’t use iCloud or want a redundant backup, you can use iTunes to make a backup. Here’s how to do it:
1 – Using a USB to Lightning cable, connect your Mac and iOS device.
2 – Launch iTunes. You may see a dialog that asks if you want to allow the Mac to access information on the iOS device; if that happens, click Continue.
3 – When prompted, enter the passcode on your iOS device.
4 – Now look at the iTunes window again. In the upper left part of the window you’ll see a device icon for the iPhone, iPad or iPod touch you’ve connected to the Mac. Click that icon to see the summary screen for the device.
5 – Under the Backups heading on the summary screen, select This Computer to set the Mac as the location for the iOS device to be backed up to. It’s also good practice to check the box marked Encrypt iPhone (iPad/iPod touch) backup.
6 – If you’ve made purchases on the device that have not been backed up previously to iTunes, you’ll be prompted to transfer them to the Mac. Once again, this is a good thing to do …
7 – Click Back Up Now. Note that the backup can take quite a while to complete, and you should not interrupt the process.
Beta Users: Opt Out of the Beta
Many iOS users have begun taking advantage of Apple’s Public Beta program so that they can try the features of new operating system versions before the general release. If you’re on a public or developer beta version of iOS 12, it’s a really good idea to opt out of the beta so that you get the official Apple general release.
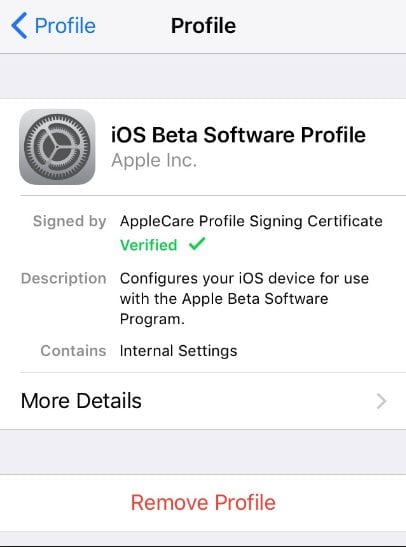
This is done by deleting the beta profile that’s installed on your device. Launch Settings, then tap General > Profile > iOS 12 Beta Software Profile. See the “Remove Profile” link in the screenshot above? Tap on it to opt out of the beta and you’re ready to install the official iOS 12 the minute it’s released.


My iPhone is up to date at 11.4.1 on 9/15/2018.
Does that mean that iOS 12 is not out yet and the article needs to be updated?
Or does that mean that an iPhone 6 Plus can’t update to iOS 12?
Very clear and well written. Please keep up the good work!