 The other day, we showed developers how to install macOS 10.15 Catalina Developer Beta 1 onto a Parallels Desktop virtual machine. At the same time, we offered a few cautions about doing so — the beta operating system runs slowly on Parallels at this point and there are some other issues. On Monday, June 24, Apple released the first Public Beta of Catalina, so anyone can give it a try. In today’s article, I’ll show you two more methods of installing the beta of Catalina onto your Mac—including one that I consider being the best possible way to test Catalina’s features.
Wait – Why Can’t I Just Run the Beta on the Primary Boot Drive in My Mac?
You can. However, Catalina is currently called a beta operating system for a reason — not all features are working, it hasn’t been optimized for performance, and it may not work with all of the apps on your Mac.
If you have more than one Mac and have no issues with possibly breaking some apps, then, by all means, feel free to install the Catalina Public Beta on one of your computers. Just don’t install Catalina on your main “production” Mac’s primary boot drive if you want to have a machine that’s always going to work for you.
For those who have just one Mac or can’t afford potential downtime by installing Catalina over the currently installed version of Mojave, an external boot drive is a great idea. You can boot your Mac from the external drive to try out Catalina features, or boot it from the internal drive to “get back to work”. If you just have a USB external drive, you will find that running from that drive is just about as slow as running the virtual machine. Things are much more responsive if your external boot drive is a Thunderbolt 3 SSD like the speedy new OWC Envoy Pro EX.
I’ll describe the external drive method at the end of this article, but first I’ll let you in on a little secret…
The best and fastest way to run Catalina on your Mac is to create an APFS (Apple File System) volume on your boot drive and then install Catalina onto it. You can then either boot into your Mojave Mac or the Catalina Mac just by holding down the Option key when you’re booting the computer. A list of boot drives appears, from which you select either Mojave or Catalina.
The APFS Volume Method
You’ll need a Mac that can run Catalina:
- MacBook, 2015 and later
- MacBook Air, 2012 and later
- MacBook Pro, 2012 and later
- Mac mini, 2012 and later
- iMac, 2012 and later
- iMac Pro, 2017 and later
- Mac Pro, 2013 and later
Make sure that you have plenty of storage space for the new operating system and any apps you wish to test under Catalina. At a minimum, I’d suggest having at least 75–100GB of free space on your boot drive. Now let’s get ready to roll!
1 – Before you start, it’s a good idea to have your existing Mac running macOS 10.14.5 Mojave (or whatever the latest version is as you are reading this article). You can check the OS version by selecting > About this Mac.
2 – Before we do anything else, we need to make an APFS container that Catalina will run in. Launch Applications > Utilities > Disk Utility. When Disk Utility appears, click on your boot drive (usually labeled Macintosh HD) in the left sidebar.
3 – Click the + (plus sign) above the word Volume. You want to add a volume to your usual Mac boot volume, which is found in an APFS “container”. The following dialog appears:
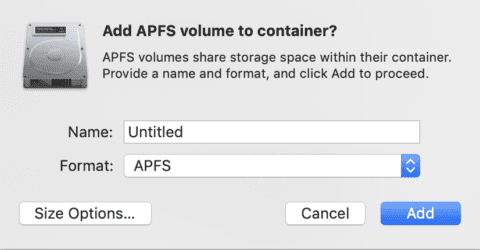
4 – Type in a name for the volume – I’m partial to “Catalina Beta” – and then click Add.
5 – In a few seconds the new volume is created and appears in the left sidebar. At this point, you can quit Disk Utility and launch a browser.
6 – Point your favorite web browser to the Apple Public Beta page or the Apple Developer page. If you’re not part of the public beta program, you can sign up on the public beta page. Should you decide that you’ve like to become a developer, you can get information on how to join the program for $99 per year. I’ll assume that most readers are going to go for the public beta of Catalina, so the instructions from this point on are targeted to the public beta instructions.
7 – Once you’ve signed up to be part of the Apple Public Beta Program, return to the public beta page and sign in. You’ll be sent to a Guide to Public Betas page with info on each of the operating system available for test — Catalina, iOS, iPadOS and tvOS:
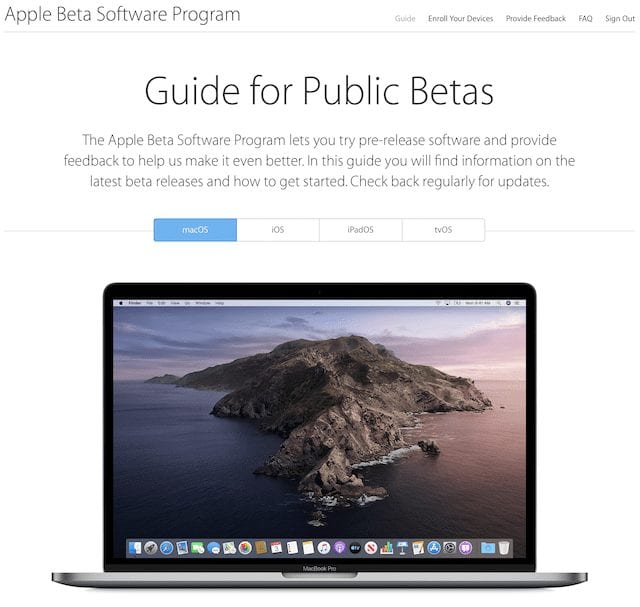
8 – Click the macOS tab (as seen in the image above) to see more about the steps involved in getting the beta software. You’ll need to enroll your Mac by installing the macOS Public Beta Access Utility. Apple requests that you back up your Mac prior to beginning any installation, so if you’re not doing regular backups, please take the time to do a one-time full backup of your Mac.
9 – Scroll down the page under “Enroll Your Mac” and click the blue “Download the macOS Public Beta Access Utility” button (see image below):
10 – A package containing the utility is downloaded to your Mac. If it is not auto-mounted, double click it to mount and open the package file, then double click the installer. You’ll be asked to enter your administrator password for the Mac. Once that is complete, follow the simple directions to install the utility. When you’re done, System Preferences will be open to the Software Update pane, and you’ll see something like this:
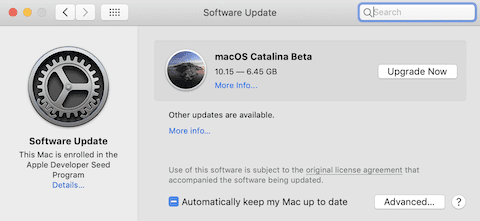
Since you don’t want to upgrade your Mojave boot drive, DO NOT click Upgrade Now yet. Instead, click on the Advanced button and uncheck the “Install macOS updates”. This ensures that your working boot drive is not upgraded to Catalina. Click OK, and then click the Upgrade Now button.
11 – You’ll be greeted by a macOS Catalina Beta splash screen. Click Continue. Next, you’re asked to agree to the terms of the software license agreement. Click the two Agree buttons that appear. Finally, you’ll see a screen saying that “macOS Catalina Beta will be installed on the disk Macintosh HD”. We do NOT want to do this, so click the Show All Disks… button found below the disk icon.
12 – Icons for all of your available disks are displayed. Find the one you created (hopefully named something like Catalina Beta), click on it, then click Install. At this point, the installer takes over and your Mac is rebooted several times while files are installed in the Catalina Beta volume. Finally, the Mac boots into Catalina and the Setup Utility. Answer the questions to get your Catalina installation up and running.
As noted earlier, you’re now able to boot either into Mojave or Catalina. If you’re in Mojave and want to go back to Catalina (or vice versa), just shut down your Mac using > Shut Down…, then power it back on while holding down the Option key. Doing this displays a list of all available boot drives; select the one you want and it will boot into that operating system.
When you’re done with your beta testing (hopefully sometime in September), you can delete the Catalina Beta volume as well as a Catalina Beta – Data volume that is automatically created.
Now let’s look at the other method of getting your developer or public beta running.
Installing Catalina on an External Boot Drive
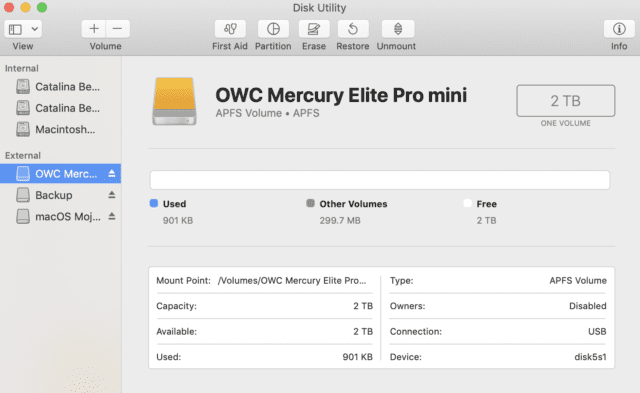
You’ll need to have a Mac that’s capable of running Catalina (see the list above), and an external disk drive. For this example, I’m going to install Catalina on a 2TB OWC Mercury Elite Pro mini. Here’s how to do that:
1 – Attach the drive to your Mac using a USB cable. Once it connects, you may be asked if you wish to use it as a Time Machine backup drive (you don’t).
2 – Launch our good friend Disk Utility (Applications > Utilities > Disk Utility). Chances may be good that your drive is still formatted as Mac OS Extended (Journaled). We’d like to make it an APFS (Apple File System) volume. Click on the drive name in the left sidebar, click the Erase button at the top of Disk Utility, then give the drive a name. Select APFS as the format, then click the Erase button.
3 – Once the drive is erased, you should see something like this in Disk Utility:
4 – Quit Drive Utility, then follow steps 6 through 11 as listed for the APFS Volume Method above. Stop at the end of step 11 and continue here!
5 – Instead of selecting the APFS volume we created on your boot drive (in the first part of this article), we’re going to select the external drive as the recipient of a fresh new load of Catalina. In the following screenshot, you see that the OWC Mercury Elite Pro mini drive has been selected. Click the Install button and follow the instructions, and soon your external drive has a copy of Catalina on it.
Once again, you can select which drive your Mac will boot from by holding down the Option key at startup, and then selecting the external drive from the list displayed.
Three Different Methods of Installing a Beta — Which Method is the Best?
You already know the answer to this — the APFS volume method. But why is it better than the other two methods of installing the Catalina beta?
Because it is running on your main boot drive (in my iMac it’s a 2TB Fusion Drive), the beta operating system is able to run at its fastest possible speed. It’s not limited by the speed of connectivity to an external drive, nor is it running in a software-based virtual machine. Catalina will also load faster onto a volume on the boot drive of your Mac than onto an external drive or into a virtual machine. Switching between your Mojave “work machine” and the beta installation is as simple as restarting the Mac while holding the Option key and selecting the proper drive.
The final reason the APFS volume method is better? When you’re done with your beta testing, you can simply use Disk Utility to remove the Catalina Beta and Catalina Beta – Data volumes that have been created. All of the space used by the beta reverts back to your primary machine…which will hopefully be running an optimized version of Catalina by sometime in September.
Since the APFS volume method is quite safe and responsive, there’s no reason why any Mac user with a little curiosity can’t install the Catalina public or developer betas for testing right now. If you do install Catalina, be sure to let us know how you like the new features and the installation instructions.




One thing to consider is if you decide to revert back to Mojave (or whatever OS you upgraded from), it isn’t a simple process. I installed Catalina and quickly decided it wasn’t for me. Too many apps that should work fine just didn’t. I though I would be able to simply clone my Mojave install back to my main drive like I have in the past. No such luck. APFS seeds up two partitions for Catalina, one called xxx and one called xxx Data. Getting back to one partition for the Mojave reinstall took and senior tech advisor at Apple about an hour to accomplish. Not recommended for the casual user.
When finished with testing/playing with Catalina, is the new volume easily removed?
And when removed, does the freed up disk space automatically return to Mojave?
Thank you
Why add an APFS “Volume” to the existing APFS container instead of creating a separate APFS physical “partition”? Is there something different with APFS in Mojave vs. APFS in High Sierra? When I was testing the Mojave beta on a High Sierra drive, I created a separate physical partition.
If you have a huge drive with lots of empty space giving up half for a separate physical partition probably wouldn’t matter, but using two containers would allow you to be more flexible with your space, since the containers only use the space they need and dynamically reallocate space as needed, without the hassle and drawbacks of resizing partitions.