A bootable version of the macOS Catalina installer is one of the often-overlooked tools a Mac user should have on hand before upgrading to or performing a clean install of Catalina. The bootable installer you create in this guide will be housed on a USB flash drive, but you can use any bootable device you may have lying around, including internal or external drives.
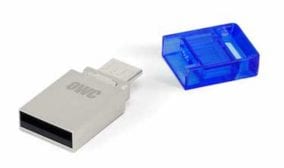
A bootable flash drive is the preferred method, however; here’s why:
- It’s small and easy to store in a safe place.
- It’s inexpensive. You can buy a new USB flash drive large enough for this project for less than $10.
- All current Macs support booting from a USB port. Macs with Thunderbolt 3 can also use a USB flash drive as bootable media (an adapter may be required).
Why Make a Bootable macOS Catalina Installer?
There are multiple reasons for having a bootable macOS Catalina installer. The four primary reasons are:
- It allows you to perform a clean install of the operating system on your Mac using the existing startup drive. By booting to the installer, you can perform a full erasure of your normal startup device before installing the new OS.
- It lets you install the OS on multiple Macs without having to download the installer multiple times.
- It allows you to archive a copy of the macOS installer, which you may need if you ever want to downgrade to the version on the installer. You may have noticed that with each new version of the macOS that’s released, there are usually some users who have one or more issues with it and wish to return to a previous version. This can usually be done provided you have a copy of the installer for the version of the Mac OS you wish to return to. This bootable installer meets that requirement.
- It can be used as a bootable troubleshooting tool, letting you access the same apps that are found in the Recovery Volume.
What You Need to Create a Bootable MacOS Installer
The list of items needed to complete this project is fairly basic, and I suspect you may already have everything you need.
A connection to the Internet: You’ll need an Internet connection for downloading the installer from Apple.
A USB flash drive: 8 GB is the minimum size required, at least for all the versions of the macOS through macOS Catalina. Future versions may require larger flash drives, but for now, 8 GB is big enough. Going larger isn’t a bad idea, though; you can use the extra space on the flash drive to store apps and utilities you may need for troubleshooting purposes.
You should also consider using a fast flash drive. A USB 3 flash drive with fast read speeds would be a good choice.
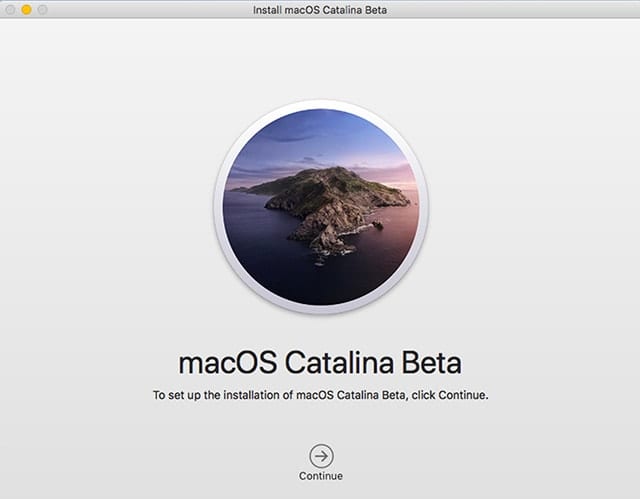
A copy of the macOS Catalina installer.This is usually downloaded via the Software Update preference pane (macOS Mojave and later), or the Mac App Store (macOS High Sierra and earlier). If you’re working with the beta of the OS, you can find the downloadable version either on the Apple developer site, or Apple’s public beta web site.
About 30 minutes of your time: The amount of time it will take is difficult to estimate; making the bootable flash drive is dependent on the speed of the flash drive you’re using, and whether you’re including the time it will take to download the installer, which is dependent on your Internet connection speed and how much traffic exists when you’re downloading. So, take my 30-minute estimate with a grain of salt.
Create the Bootable macOS Catalina Installer
With everything acquired, let’s start by making the bootable installer. Here are a few tips:
Warning: The developer beta and public beta of macOS are not finished products and are actively undergoing tests and revisions to mitigate bugs and improve performance. Beta software can cause unexpected results that could impact the use of your Mac. Before you make use of any beta software you should ensure you have a working backup of your existing system. If possible, beta software should be installed on a test machine and not one used for mission-critical workflows.
When you download the installer, it’s going to automatically launch and offer to start the installation process on your Mac. Be sure to quit the installer; don’t let it start the installation process.
Prepare the flash drive by erasing the drive and ensuring it’s formatted using the macOS Extended (Journaled) file system. You can find instructions in the Rocket Yard guide: How to Use macOS Sierra Disk Utility to Partition, Erase Drives. Although the guide was made for macOS Sierra it should work well enough for erasing a USB flash drive.
We’re going to use the Terminal app to execute an instruction that Apple includes within the macOS installer. The instruction “createinstallmedia” has been part of macOS installers for some time.
Normally, commands entered into Terminal need to be very precise in order to work. This means the command we want to execute will be different for every version of the macOS for which you wish to make a bootable installer. Since there are likely to be at least three versions of macOS Catalina (a developer beta, a public beta, and a released version), we’re going to use Terminal, along with a drag-and-drop method, to ensure the Terminal command is always correct no matter which version of Catalina you’re going to use.
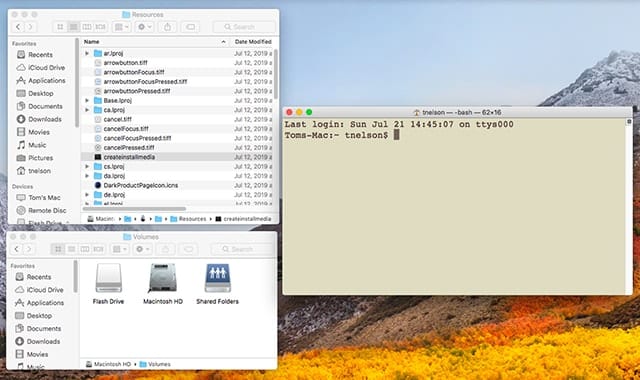
drag-and-drop creation of the bootable installer.
Open a Finder window and navigate to /Applications.
Within the Applications folder, you will find the installer for macOS Catalina. It will have a name similar to “Install macOS Catalina Beta” or “Install macOS Catalina,” depending on whether you’re using the beta or the release version.
Once you locate the installer, right-click on it and select Show Package Contents from the popup menu.
The Finder window will change to show the internal contents of the installer. Open the Contents folder and then the Resources folder. Scroll through the list of items in the Resources folder until you come to the createinstall media.
For now, set this Finder window aside, putting it someplace where it is visible on your desktop.
Open a second Finder window by selecting File, New Finder Window from the Finder menu.
From the Finder menu, select Go, Go to Folder.
In the sheet that opens enter /Volumes and then click the Go button.
You should now have two Finder windows open, one showing the content of the Resources folder on the macOS installer, and the newest one, showing the volumes that are attached to your Mac.
In the list of volumes locate the USB flash drive you prepared earlier. Its name may be Untitled, or it could have a name you gave it when it was erased. I chose to name mine Flash Drive, making it easy to find. If you’re not sure, you can always return to Disk Utility, erase the USB flash drive again and give it a distinctive name.
With the two Finder windows ready, it’s time to open the Terminal app:
Launch Terminal, located at /Applications/Utilities.
Terminal will open and display a prompt waiting for you to enter a command. Instead of typing a long command string you will build the command using drag and drop.
Warning: The createinstallmedia command will erase all content on the flash drive.
Type the following at the Terminal prompt:
sudo
Add a space after the word sudo, Do not press the Enter or return keys.
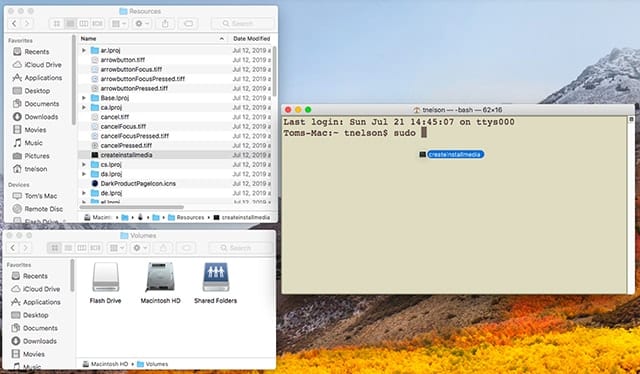
From the Finder window showing the content of the Resources folder, drag the createinstallmedia file to the Terminal window and drop it on the prompt. This will create a long entry that begins with /Applications/Install\ macOS\ Catalina\ and ends with /createinstallmedia.
Type the following in Terminal after createinstallmedia;
–volume
Make sure you enter a space after the word volume and do not press the Enter or return keys.
From the Finder window showing the content of the Volumes folder, drag the USB flash drive to the Terminal window.
Type the following in Terminal after the USB flash drive name:
–downloadassets
The completed Terminal command should look something like this if you’re using the Catalina beta:
sudo /Applications/Install\ macOS\ Catalina\ Beta.app/Contents/Resources/createinstallmedia –volume /Volumes/Install\ macOS\ Catalina\ Beta –downloadassets
Or, if you’re using the release version of Catalina, it will probably look like this:
sudo /Applications/Install\ macOS\ Catalina.app/Contents/Resources/createinstallmedia –volume /Volumes/Install\ macOS\ Catalina –downloadassets
Note

You can now hit the Enter or return key.
Terminal will ask for your password. This is your administrator account password for your Mac. Enter the password and hit the Enter or return key.
You’ll be asked if you wish to continue and erase the flash drive; type Y at the Terminal prompt, then hit return or enter.
Your flash drive will be un-mounted and its contents erased; the process of creating the bootable installer will then begin.
Once complete, Terminal will display:
Install media now available at “/Volumes/Install macOS Catalina”
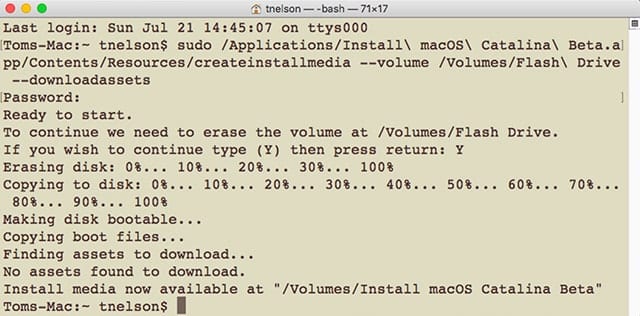
Your flash drive is now ready to be used as a bootable installer for macOS Catalina.
Alternatives to Using Terminal
If you’re not comfortable using Terminal to create the bootable installer there’s another option. DiskMaker X is an app that can build the bootable installer for you. The current version DiskMaker X 8.0.3 is designed for use with macOS Mojave. The DiskMaker team usually updates the app after the release version of a new Mac OS is released.
If you need to make a bootable installer of the beta versions of the macOS, Terminal is your best choice. If you want a bootable installer of the released version of macOS Catalina, you can use either Terminal, as described above, or DiskMaker X, once it’s updated.
Using the Bootable Catalina Installer
The bootable installer is used like any other bootable device connected to your Mac. Restart your Mac and immediately hold down the Option key as your Mac boots.
After a few moments the Mac’s boot manager will display all the bootable devices connected to your Mac. Use the arrow keys to select the USB flash drive (likely named Install macOS Catalina).
The boot process will continue, eventually displaying the macOS Utilities window.
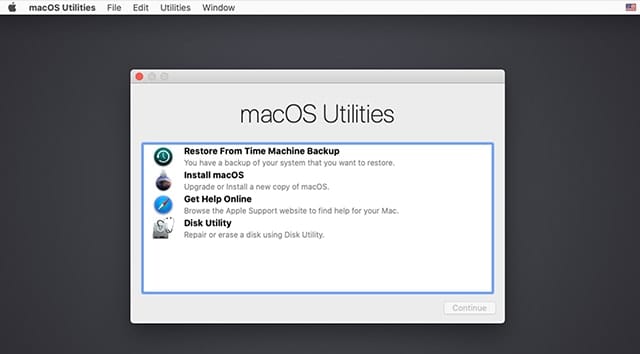
At this point, you can choose to:
- Restore From Time Machine Backup: If you have a system backup, you can choose this option to restore from Time Machine.
- Install macOS: You can choose to install macOS Catalina.
- Get Help Online: Browse the Apple support site for help
- Disk Utility: Use Disk Utility to erase, repair, format, or partition storage devices.
You can also use the Utilities menu to gain access to:
- Startup Security Utility
- Network Utility
- Terminal
Using the various macOS Utilities is beyond the scope of this guide, but a common option is to use Disk Utility to completely erase and format the Mac’s internal startup drive, and then use Install macOS to perform a clean install of macOS Catalina.
Warning:A clean install will erase everything on the selected startup device.


I did not know about the drag and drop method to terminal, very cool, thank you. Process worked very well for me once I got past an issue with the admin password. FYI, I did this process as a user, my admin password has special characters, terminal would not accept the password. On a hunch I promoted the user to an admin as the user PW had no special characters in it. After a reboot, Terminal accepted the password and the Catalina boot flash drive was created just like the instructions provided.
Cannot get this to work. “Install macOS Catalina.app does not appear to be a valid installer”. Tried on two different machines, 2013 and 2017 iMac. Does the same thing using terminal or Install Disk Creator app. Have verified the files are there, downloaded them via App Store. Has something changed recently??
followed the steps, Terminal gave me this message:
“To use this tool, you must download the macOS installer application on a Mac with 10.12.5 or later, or El Capitan 10.11.6 and run it from within the application. For more information, please see the following: https://support.apple.com/kb/HT201372.”
So be sure you aren’t running 10.9.5 like me…
This applies to Catalina too.
Sadly, I have only Nehalem Mac Pros, so Catalina users need to verify this CD/AIFF file playback problem.
IMPORTANT!!!
These tests all use and are verified using Audio Line Out.
No tests performed on any other output and that is a critical for verification. (the D to A hardware portion of your computer)
If you have problems with CD playback or Quicktime movie playback, read this.
NOTE: Apple removed this thread from Apple Discussions because it was proven a fact.
(sorry its so long)
November 2 2019
Mojave 10.14.6 will not play a factory CD. The music skips and stutters and is choppy.
I searched apple discussions and found a thread involving Mojave not playing AIFF files. AIFF files are the files that are on factory CD’s and have been for the past 37 years.
Not mentioned was the fact that Mojave would not play a CD.
The high point value apple specialists said that there is something wrong with the file, something wrong with the hard drive, something wrong with the computer.
Before these self appointed specialists say something wrong with the CD, here are the tests performed.
Three separate installs of Mojave on three separate SSD’s were tested all on the same Nehalem Mac Pro. The results are identical.
iTunes will not play a CD. (constant choppy and skips)
iTunes will not play an AIFF file. (constant choppy and skips)
Quicktime 10 will not play an AIFF file. (partially plays with random skips)
Quicktime 7 will not play an AIFF file. (constant choppy and skips)
The only solution found is this.
Boot the exact same Nehalem Mac Pro in….
Leopard
Snow Leopard
Lion
Mountain Lion
Mavericks Yosemite
El Capitan Sierra
High Sierra
….and play the exact same CD with the same CD drive or try to play the same AIFF file and it all works perfectly with iTunes, and either version of Quicktime.
(yes, Nehalem Mac Pros run all those version of OS)
In other words….
Nothing wrong with the CD, Nothing wrong with the CD drive, Nothing wrong with the AIFF file, Nothing wrong with the computer.
November 8 2019
This thread begins with Mojave 10.14.6 will not play a CD or any other AIFF file “properly” on a Nehalem Mac Pro.
No help is given and the only response appears to be at least inaccurate in its report.
No competent person would say anything that accuses the computer or its components.
Here is why.
My first step in troubleshooting was to go backwards.
Apple does not allow this.
The customer must learn from others, how to create an installer since Apple has not made an installer the customer can purchase for more than a decade.
I have made such an installer for all versions of Apple OS for more than a decade.
I make thumbdrive and DVD installers. (it’s called data backup, try it)
So I began today (Thursday Nov 7 2019) to install Mojave 10.14.3 as a random choice to test the AIFF file issue.
Well slap me senseless!!!!
NONE of my installers would install, neither the DVD or thumb drive versions.
Good thing I make notes.
On February 14 2016 all the updaters and installers that all these competent people created and kept stored stopped working.
That’s right, they all stopped on Valentine’s Day.
No, I am not joking, that is historical fact all non geek Mac users know.
NONE of my Mojave installers would function.
That seems darn suspicious huh? (the DVD altered its content????,…. how?….Magic?)
Error Message said that the installers were all “damaged” and could not be used.
Further tests revealed that none of my High Sierra installers would work either.
My notes said that Apple once made a software time bomb that screwed up everybody.
Guess what?
I booted the Mac on a completely different system and changed its date back one year.
Now I tried those “damaged” installers once again and like magic, now they all work just like before.
Conclusion, Software Time Bomb.
Mark my words, this latest time bomb will also be recorded by the technical community just like the other one.
In fact a quick search today will show people asking why their external installers will not show up on Option boot operations or boot or install.
I just proved the cause.
UPDATE:
I spent days going though my installers and produced the conclusion and of course the absolute empirical proof.
The newest software time bomb has an expiration date of October 24 2019.
If you attempt to install an operating system without setting your date to October 23 2019 or earlier, your installer will state that it is damaged and cannot be used.
You can use any date prior to October 24 2019 and like magic, your installer will work.
This was proven repeatable on two different Mac Pro computers.
This software time bomb occurs in all Offline Installer versions 10.12.6, 10.13.x and 10.14.x.
Installer Versions of 10.11.x and earlier ignored the date and function normally. (no software time bomb)
I just spent a week going through every possible trouble shooting procedure available to discover why my installers all report as “damaged”.
The reason is criminal.
Why is it a crime?
Because of time and labor.
98% of Apple computer users own laptops.
You cannot install ANY version of operating system past today’s date OFFLINE unless….
The laptop battery must be completely dead (completely) and…. the PRAM battery must be disconnected.
Virtually all Apple laptops no longer have removable batteries. (must be unsoldered)
The laptop must also be opened to disconnect the PRAM battery.
No other way to change the date and reinstall the OS on a laptop OFFLINE.
So, the customer who needs to create a boot drive is disabled by all possible means from succeeding.
Why…. so the customer will buy a new computer.
If you can’t install a new boot drive and ALL boot drives fail, rest assured the vast majority will not even realized they have been robbed blind.
Us old Mac Pro users have more than one boot drive capability.
Easy for us to recover and defend against criminal actions such as software time bombs.
Do you really think Apple will allow users to install a compatible OS for older hardware via internet in the near future? (your answer should be no)
OK…. now that I had my major cussing and swearing session and wasted a week of my life…
The question is, will Mojave 10.14.3 play CD’s and AIFF files “properly”?
The answer is YES !!!!
Plays them perfectly.
Once again we have irrefutable proof that there is nothing wrong with the Mac, the CD, the CD player, the Files, or anything else.
STEP 1
Test Mojave 10.14.3.
Installed Quicktime 7 Pro and Toast 17 with HD/BD.
Tested factory CD’s with iTunes and AIFF files with Quicktime.
All works perfectly.
Step 2
Updated to Mojave 10.14.4.
CD’s no longer play properly, AIFF files will not play properly with iTunes or Quicktime.
Coincidentally???? 10.14.4 is the first version of Mojave that would not allow the Mac Pro to sleep.
This sleep problem is known on the web as “pmlock waited too long” error.
There is no reason to proceed any further since 10.4.5, and 10.4.6 has the “exact same AIFF playback errors”.
The Date only affects the installers (software time bomb) and has no effect on playing AIFF files.
The AIFF file problem (CD playback) first appears in 10.14.4 and persists as of this writing.
Step 3
Repeat entire process to verify.
Sure enough the failure repeats itself exactly.
Step 4
While a complete waste of time technically, test 100% clean installs versus installs loaded with user software applications.
The failure repeats itself precisely.
SOLUTION:
Final conclusion.
All versions of Mojave 10.4.4 and above will not play AIFF files properly on Nehalem Mac Pros and the failure sounds “EXACTLY” like a bad file, a bad CD, a bad CD drive or a computer hardware problem.
The problem is Mojave it is not your computer or anything else.
The solution is, Use 10.14.3 or any other operating system all the way back to OS9 and none of these problems will exist.
NOTE: Mojave 10.14.4 and above playback skips and stutters on quicktime .mov files as well as stutters and skips on CD file songs imported into iTunes Library as .m4a. Mojave plays compressed streaming formats like .mp4 files just fine. (repeat, none of this happens in Mojave 10.14.3)
The crime is that those who own thousands or CD’s can no longer play them on their Macs and the Mac has always been able to play a CD. (AIFF files)
I own $50,000 worth of CD’s that do not require an ISP or WiFi or internet at all.
The music I own does not cost me a $100 a month or more to access.
My music plays for free anytime anywhere with superior spectral quality to any compressed file.
I own 10 Mac Pros and if I update them as Apple demands, they become broken by design.
Mojave has just robbed me of over $100,000 in truth and fact.
There are laws against malicious code that causes hardware failures.
The really scary part is that it seems I was the first to notice the theft.
There are many rational technically competent reasons that the government still uses optical discs to store data and they are still sold. (no arguments exist)
I use M Disc.
Makes zero sense not to use them yourself and that includes the CD.
8 GB wasn’t large enough for me. I succeeded with a 16GB volume, and the final installer shows that just over 8GB is used.
There used to be a way just to find the installer before it completed the install in the utilities folder, which you could drag to a flash drive. Is that still an option?
I am a little dense sometimes but I don’t understand how you get the installer for MacOS Catalina file into your Applications folder. It certainly doesn’t exist in mine now. You go right from talking about the Terminal Application to finding the Catalina installer file in my Applications folder. Did I miss something?
You can download the installer from the Apple website, either from the Mac App store, the Software Update service, or from the developer or beta users website.
Once the download completes, the installer will be found in the/Applications folder.
Tom
Apple is blocking any chance to update even from Sierra to HighSierra when you change your HD or SSD
I’ve run into trouble with bootable USB macOS installers with either;
a certificate failure
a message saying that I could’nt install an older version of the OS
Does your method factor in these issues?
Or just download the installer and install on any disk, including external portable SSD or pendrive.
If you need to make more than one installer drive, a short shell script is a lot easier.
——–
#!/bin/bash
# make macos bootable installer thumb drive on $Volume, using macos
# install app at $AppHome (default High Sierra)
# takes about 6 minutes on an unloaded 4-core iMac
AppHome=’/Applications/Install macOS High Sierra.app’ # default High Sierra
Volume=’/Volumes/NO NAME’ # default SanDisk name
echo “To accept a default in parenthesis, enter RETURN at prompt.”
echo -n “Enter pathname of install image ($AppHome):”
read line
if [ “$line” != “” ]; then AppHome=”$line”; fi
echo -n “Enter pathname of volume ($Volume):”
read line
if [ “$line” != “” ]; then Volume=”$line”; fi
sudo “$AppHome”/Contents/Resources/createinstallmedia –volume “$Volume” –applicationpath “$AppHome” –nointeraction
Thanks, Ed
A pretty nice shell script. For those who wish to use Ed’s script be aware that our blog software has changed the double dash this is needed in front of the volume, applicationpath, and nointeraction options into single em dashes.
Also, the applicationpath option is not required for macOS Catalina version of the createinstallmedai command allowing you to change the last line of the script to:
sudo “$AppHome”/Contents/Resources/createinstallmedia –-volume “$Volume” –-nointeraction
Tom
Does the T2 chip require changing to allow external boot device?
For those Macs with a T2 security chip, you need to enable the option to allow external booting. This can be done from the Startup Security Utility:
Boot your Mac while holding down the Command + R key to enter Recovery mode.
Select the Startup Security Utility from the Utilities menu.
Select the option to Allow booting from external media.
You should then be able to boot from the USB flash drive you created to install macOS Catalina.
Tom