Smart Folders have been around in one form or another since OS X Tiger. For a while, the Finder’s sidebar included a dedicated Search For section, with predefined Smart Folders that displayed apps and documents you used “Today,” “Yesterday,” or “Past Week.” There were also Search For entries for “All Images,” “All Movies,” and “All Documents.” These smart searches were a popular feature and served as an introduction to what Smart Folders could do.

The Search For section of the Finder sidebar went away with the introduction of OS X Lion, but Smart Folders remained. This allows you to recreate the old Search For entries in the Finder sidebar if you wish, but you can do so much more as well. In this Rocket Yard guide, we’ll point you to the basics of working with Smart Folders, as well as show you how to create some very useful Smart Folders to help you with your workflow and Mac maintenance.
Smart Folder Basics
A good place to start learning about Smart Folders is in the Rocket Yard guide:
• The Incredible Power of macOS Smart Folders
In the above guide, you’ll learn some of the basics, including what a Smart Folder is and how to create one.
Spoiler Alert: Smart Folders are a Spotlight-based saved search that is dynamic; that is, the results displayed within a Smart Folder are always up to date.
The next Rocket Yard guide:
• How to Create, Modify, and Use Smart Folders in macOS
This tutorial is a quick review of Smart Folders, including how to edit existing Smart Folders you may have created in the past, as well as how to add a Smart Folder you created to the Finder Sidebar.
Tip: You can also add a Smart Folder to the sidebar by holding down the command key and dragging the Smart Folder from its saved location (usually: ~/Library/Saved Searches) to the Finder Sidebar.
The last guide in our review of Smart Folder basics:
• How to Add a Smart Folder to the Dock
This guide presents the steps needed to add a Smart Folder to your Mac’s Dock for easy access, even when a Finder window isn’t available.
With the basics taken care of, let’s move on to creating some helpful Smart Folders.
The Today, Yesterday, and Last Week Smart Folders
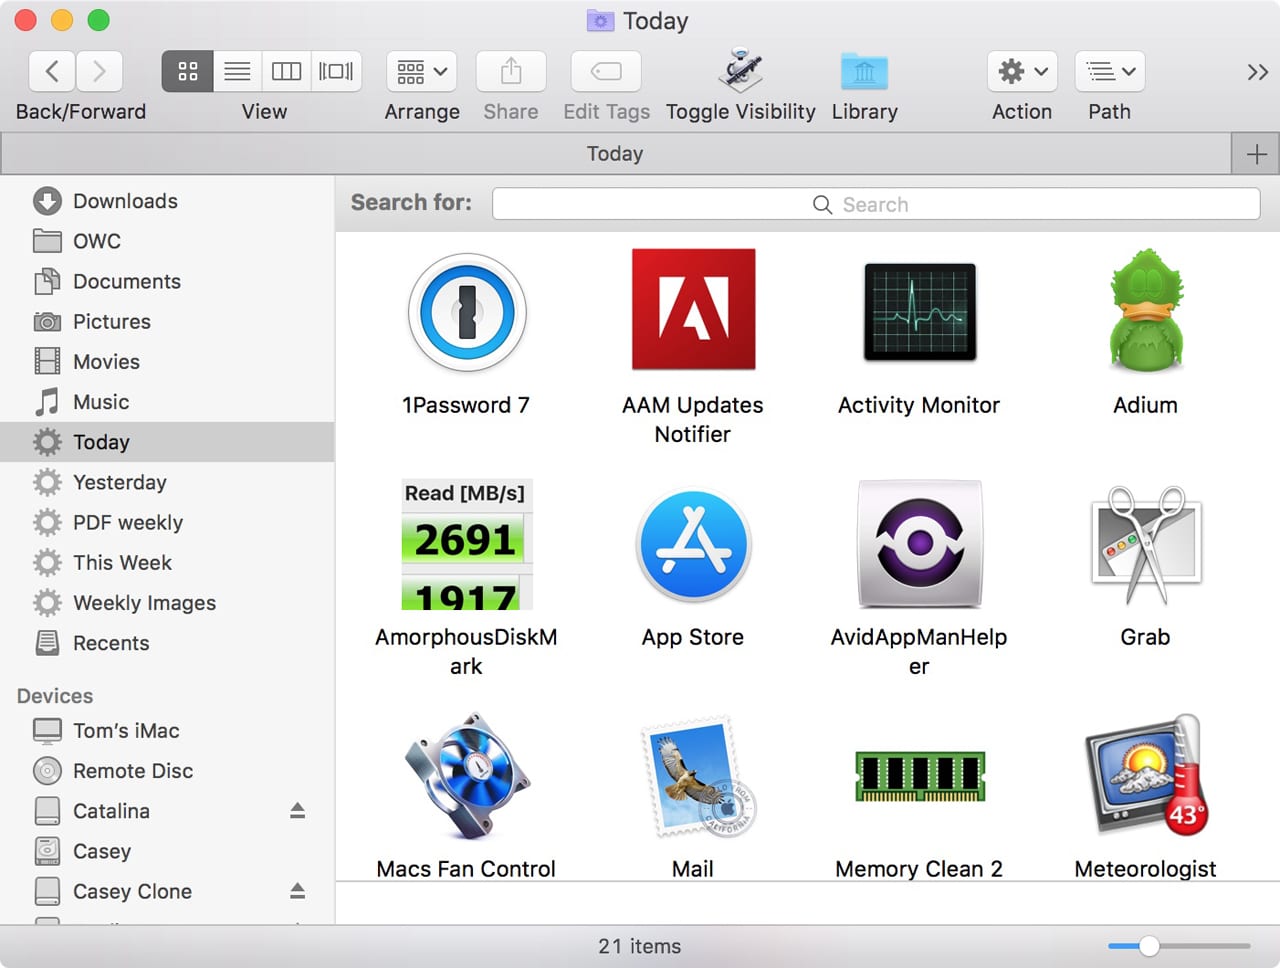
These three were part of the original Search For sidebar items; they showed apps and documents you had worked on within the specified time period. To recreate these as Smart Folders, perform the following steps:
- From the Finder menu, select File, New Smart Folder.
- A new Smart Folder Finder window will open, with a search bar displayed and a search criteria tab shown just below the search bar.
- Leave the search bar blank, and select This Mac from the search criteria tab.
- Next, click the plus (+) button at the end of the tab. This will allow you to add additional search criteria.
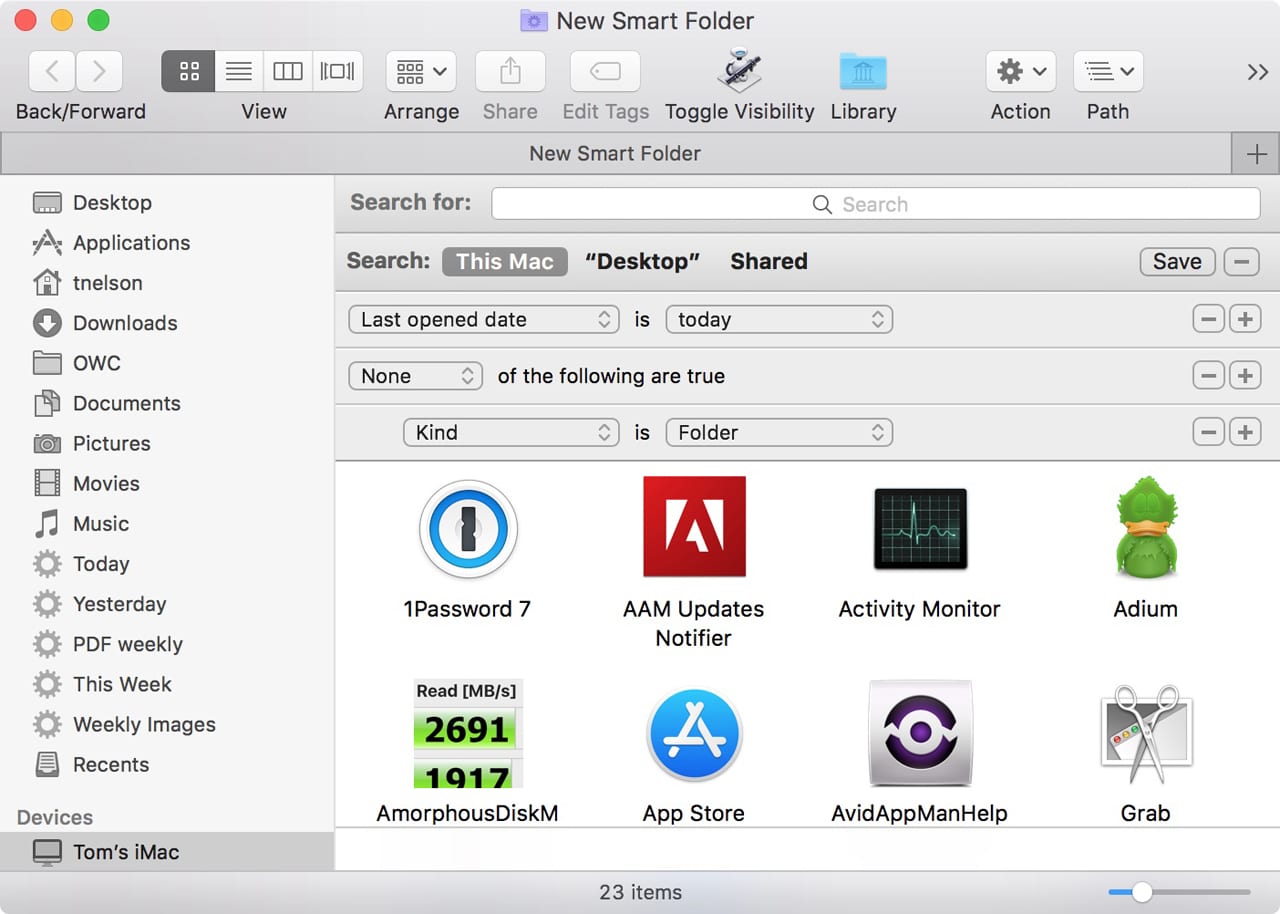
- Using the first dropdown menu, select “Last opened date” from the list.
- Using the second dropdown menu, select “Today” from the available items.
The search results will be displayed within the folder. You may notice it contains all apps, documents, and folders that were opened today. Originally, folders were not included, and we can add an additional search criteria tab to keep folders from showing up in the search results.
- Hold down the option key and click the ellipse (…) button in the search criteria tab.
Note: Holding down the option key and clicking the ellipse button allows you to include Boolean logic search criteria, such as Any, All, or None, that apply to subsequent search criteria.
- Change the Any dropdown menu to “None.”
- In the search criteria bar below the one that reads, “None of the following are true,” set the first dropdown menu to Kind. Set the second dropdown menu to Folder.
- The resulting search shows all apps and documents that were opened today but excludes any folders you worked in.
Note: You can change the search criteria used with the Last opened date to values besides “Today.” You can select Yesterday, This Week, This Month, or This Year to meet your needs.
When you’re satisfied with the Smart Folder results, click the Save button, give the Smart Folder a name, and place or remove the checkmark that will add the Smart Folder to the Finder sidebar.
Find Large Files
One of the banes of managing a Mac is keeping the storage system healthy, with plenty of free space to ensure peak performance. You may be inclined to increase your storage space with one of OWC’s internal or external drive upgrades, something I’ve done myself quite often. But you can also use a Smart Folder to help you weed out those large files that are taking up space.
Using a Smart Folder this way may help you in the short run to reduce the amount of space taken up, and let you finish a project. To create the space-saving Smart Folder, start by opening a new Smart Folder using the first step from the “Today, Yesterday, and Last Week Smart Folder” section, above.
With the Smart Folder open:
- Leave the search bar blank.
- Set the first search criteria bar to This Mac.
- Add a second search criteria bar by clicking the plus (+) sign.
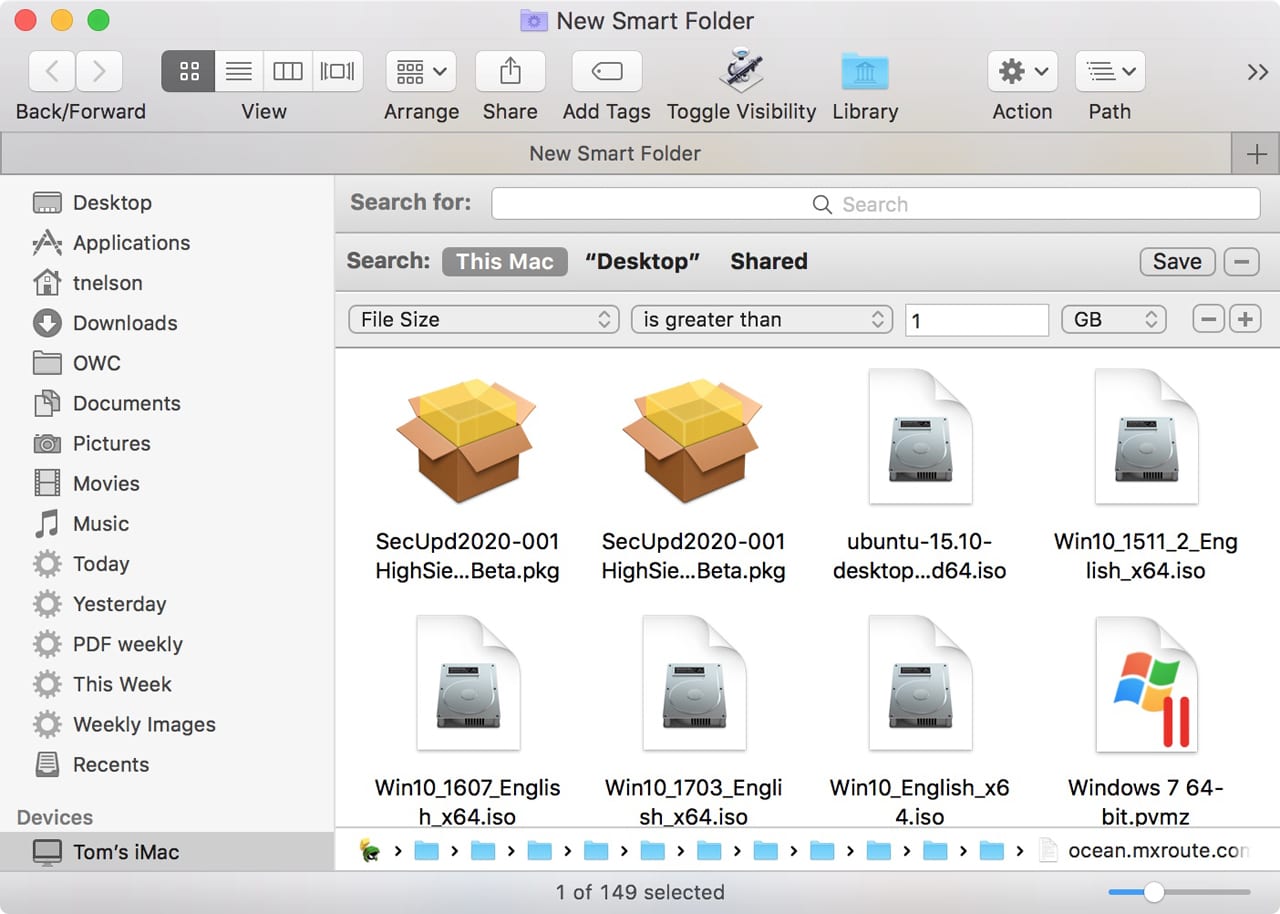
- Using the first dropdown menu, select Other from the list.
- A pane will drop down, listing a large number of additional search attributes you can use. Scroll through the list, select File Size, and then click OK.
- Set the second dropdown menu to “is greater than.”
- Enter a minimum size in the blank field to the right of the second dropdown menu. Any file larger than this value will be displayed in the search results.
Note: You can use the option key, as noted above, to add conditional search criteria to filter out file types you don’t wish to include in the results. For instance, you may wish to screen out movies from the results, using the None conditional search and the Kind type of Movies.
Tip: Turn on the Path Bar in the Finder to show the path of any file you select in the search results (Finder menu, View, Show Path).
Find Duplicate Files
You can use Smart Folders to find duplicate files based on the file names (not the file contents). This little trick works because when asked to duplicate a file, the Mac OS file appends the word “copy” to it. If you continue to make duplicates of the same file, it appends a number after the word copy, so you could end up with My File, My File copy, My File copy 1, My File copy 2, etc.
You can take advantage of this in a Smart Folder to find this type of duplicate:
- Create a new Smart Folder.
- Leave the search field blank and set the search criteria to This Mac.
- Hold down the option key and click the ellipse (…) button.
Tip: If you don’t see the ellipse button, click the plus (+) button to add a new search criteria bar, then hold down the option key and click the ellipse button. Once the conditional tab is displayed, you can delete (hit the minus button) for the first search criteria bar you made.
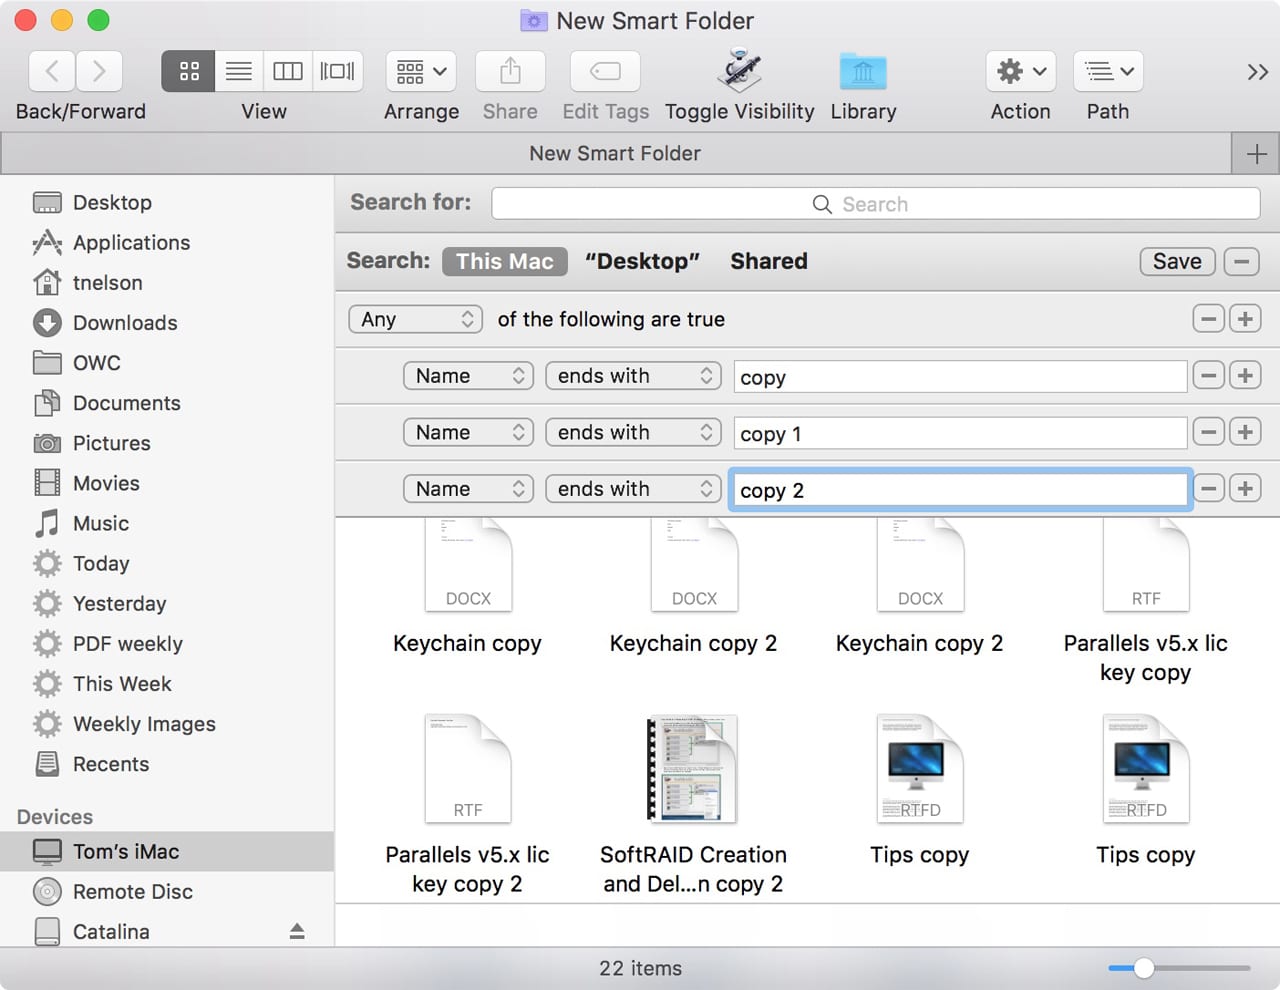
- Leave the conditional tab set to Any, then click its plus (+) button to add another search criteria bar.
- Set the criteria bar to “Name ends with” then type the word “copy” (without the quotation marks) in the field provided.
You can add additional search criteria bars to look for additional duplicates. Try adding one set as follows:
- “Name ends with” copy 1
- Repeat adding search criteria bars, incrementing the copy number for each one, until no additional files show up in the search results.
Tip: You can see the number of files that are in the search results by making sure the Status bar is displayed in the Finder (View, Status Bar).
Find Apps You Haven’t Used Recently
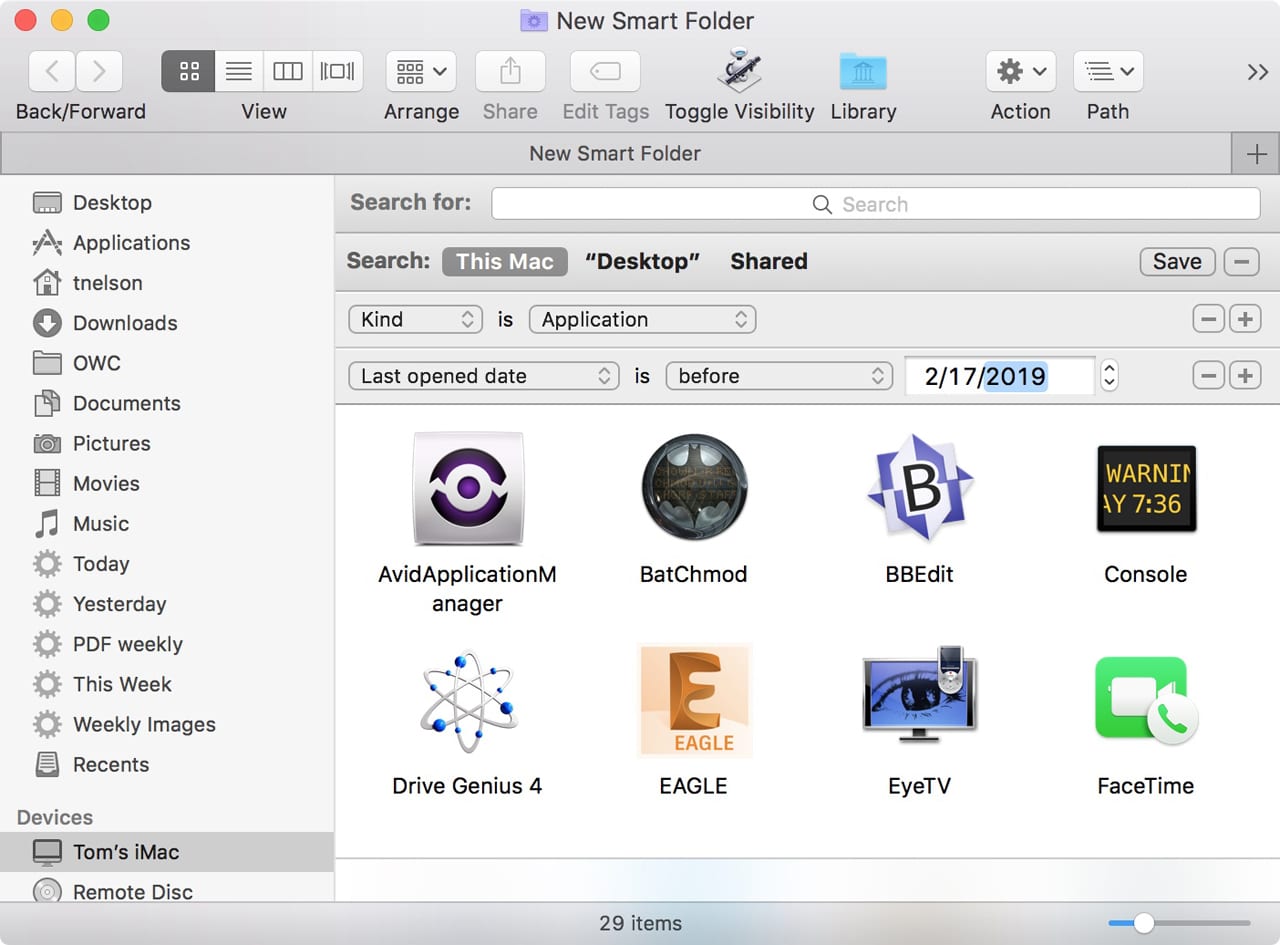
If you’re still looking for storage space to free up, you may want to consider removing apps you don’t regularly use. Smart Folders can handle this task for you with this simple set of search criteria:
- Open a new Smart Folder.
- Leave the search field blank, and set the search criteria to “This Mac.”
- Click the plus (+) button to add an additional search criteria tab.
- Set the tab to “Kind is Application.”
- Click the plus (+) button to add another search criteria tab.
Set the new tab to “Last opened date is before” then enter a date in the field provided. You may want to try a year ago, under the assumption if you haven’t used an app in a year, you probably don’t need it installed and taking up room.
Find Old or New Downloads
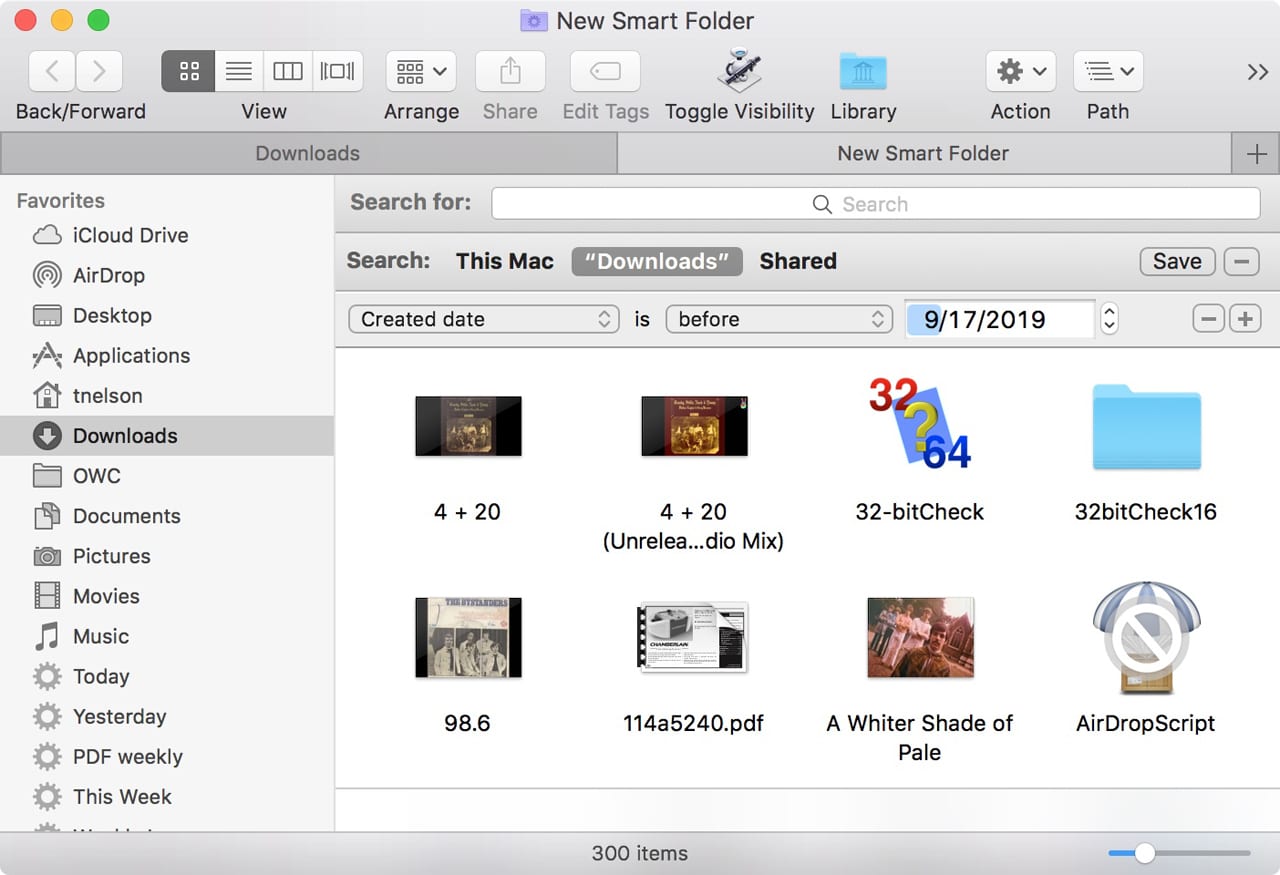
The last example of useful Smart Folders is to find old downloads that you probably no longer need or new downloads that you may have forgotten about. This is an interesting Smart Folder setup because it shows how to add a specific folder to search in the Smart Folder.
- Open a Finder window (not a Smart Folder) and browse to your Downloads folder. It can usually be found in the Finder sidebar or under your Home folder.
- With the Downloads folder open in the frontmost Finder window, select New Smart Folder from the Finder File menu.
- A Smart Folder will open with the Downloads folder added to the Search Criteria tab.
- Leave the search field blank, and select “Download” from the search criteria tab.
- Click the plus (+) button to add an additional search criteria tab.
- Set the search criteria tab to either:
- To find old downloads: “Create date is before” and then enter a date in the empty field. Search results will be any files in the download folder with an earlier creation date than the one you entered.
- To find new downloads: “Create date is within last” and then enter the number of days, weeks, month, or years to search back for downloads.
Additional Search Attributes
You may have noticed that when you created the Find Large Files Smart Folder, a sheet was displayed with a long list of search attributes you can use. If you look through the list, you’ll find many file attributes and app attributes you can use to create amazing Smart Folders that can help with your workflow.
Some of the interesting attributes available include:
Altitude, Due date, Exposure time, F-number, File label, Keywords, Projects, Recipient Email address, Tags, and Video bit rate.
Those are just a small example of the types of search criteria you can use to create custom Smart Folders. If you look through the attribute list, you will likely gain ideas for creating your own custom Smart Folders.
Leave a comment below, and let us know what type of Smart Folders you’re using.







It’s unbelievable that with all those search criteria, none include Path Name, for instance to exclude files with a certain folder in the path name. That’s a howler.
How can I have multiple criteria to be contained in one folder; an address, buyer name, messages on late pays or escrow matters. I want to search on all those items and have them appear in one folder. Is that doable?