Ever wanted to start a podcast, but didn’t know which software to use? There are a lot of great free options out there and some of them may already be on you computer. However, I think you should give DaVinci Resolve careful consideration.
Though it’s primarily known for its video editing capabilities, Resolve also includes a powerful built-in digital audio workstation (DAW), making it a great choice for free podcast recording on Mac, Windows, and Linux. The software works with any microphone that is connected to your computer, so you can get started right away.
Of course, DaVinci Resolve also features great video editing, color correction, and visual effects tools, which can be a little intimidating for new users. Follow along and I’ll show you how to start recording and editing audio in this application.
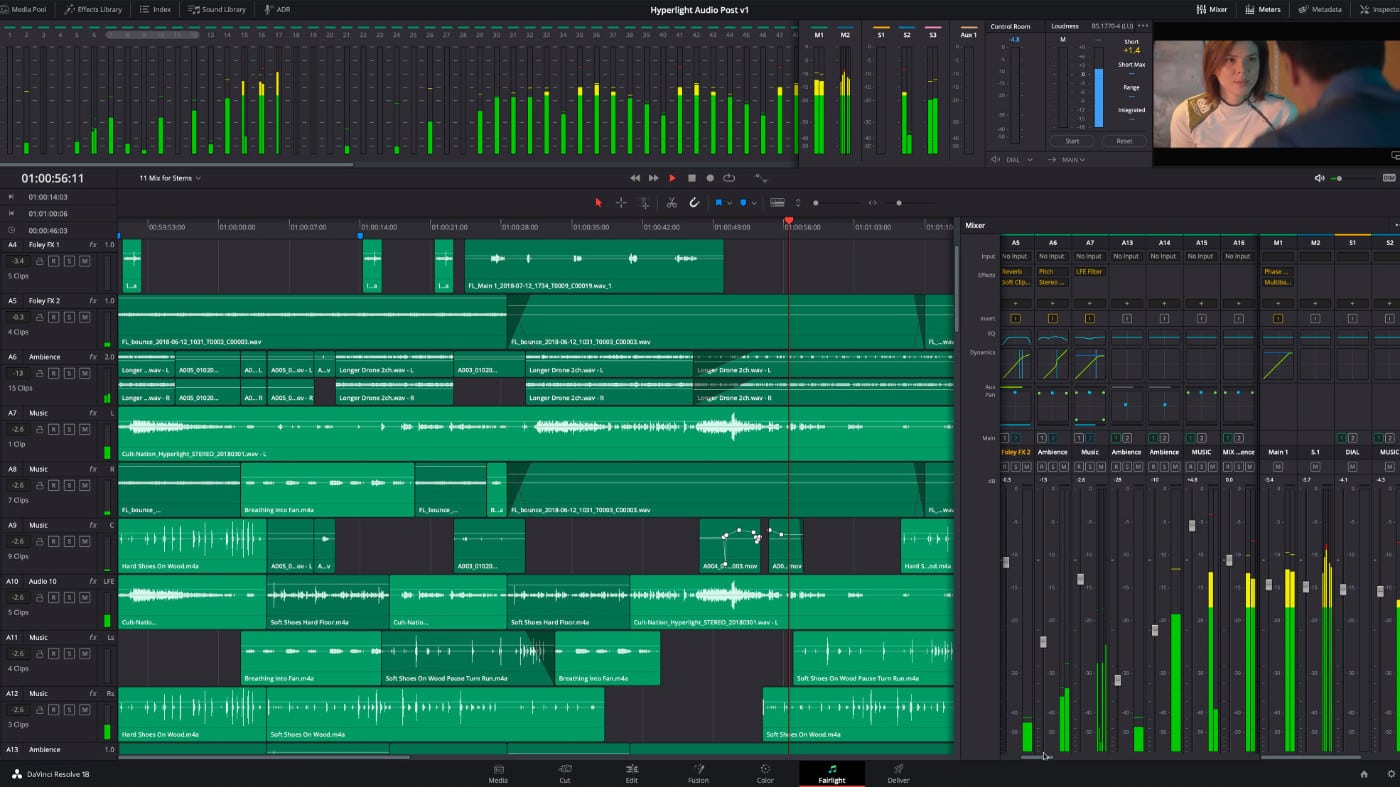
What is DaVinci Resolve Fairlight?
Fairlight has a long legacy in recording studios around the world and was used heavily in the 1980s by the likes of Kate Bush, Duran Duran, and Stevie Wonder.
Since that time, Fairlight has become a full-featured Digital Audio Workstation (or DAW, for short) designed to compete with the likes of Avid Pro Tools. In 2016 BlackMagic Design acquired Fairlight and released a free version of the software inside of DaVinci Resolve, the company’s flagship video editing suite. DaVinci Resolve contains all of Fairlight’s recording studio abilities.
How much does DaVinci Resolve Fairlight cost?
It is absolutely free, mostly. Most audio tools are available without limitation. Recording, editing, audio effects, and saving out final podcasts as a .MP4 or .WAV file can be done in the free edition of the software, known as DaVinci Resolve.
There is an optional paid version of the suite known as DaVinci Resolve Studio. The paid suite unlocks Dolby Atmos sound mixing tools and sampling rates higher than 48khz, as well as Netflix specific delivery tools. Specialized audio hardware such as a mixing console and editor are available for purchase to integrate with the software. For most users, the free version is perfectly suitable for a professional and hobbyist alike.
Getting started with DaVinci Resolve Fairlight
To get started, you’ll need to download the software from Blackmagic Design. Click on Products, DaVinci Resolve, and download. The free version is simply called DaVinci Resolve, they paid version is DaVinci Resolve Studio. Fill out the registration card and download. During the installation of the software, it is important to accept any security prompts that may appear on your Mac or PC. This is DaVinci asking permission to write temporary files such as sound waveforms and is required for the software to function properly.
For recording, you can use any microphone connected to your Mac, including the built-in webcam, a usb headset, a professional microphone, anything that your Mac can use, Fairlight can use as well. In my studio I have a simple dynamic vocal microphone that I found at a guitar shop connected to an audio interface.
Where projects are saved
DaVinci Resolve saves all projects in a central location called the project database. The Project Manager is where you access all your DaVinci Resolve projects. You do not save files to a folder on your computer the same way as with software like Premiere Pro or Adobe Audition. I’m going to start a new project to record my podcast. If you ever need to come back to the project manager, select Menubar > File > Project Manager. To see the audio tools needed for our podcast, click the Fairlight button found on the bottom of the screen.
Starting a session
This is the Fairlight page and at first glance, it’s a little overwhelming. Don’t worry, once you understand where panels are located it will feel familiar quickly.
The first step in recording a podcast is to create a Timeline. A timeline is where all our sounds, music, and editing will take place. To create a timeline, open the Media Pool panel found in the upper left corner. The Media Pool is a giant folder to save our work and manage files such as voice over and music clips.
Click on the Media Pool panel, and go Menubar > File > New Timeline or, Command N. I’ll name this My Podcast.

Import music
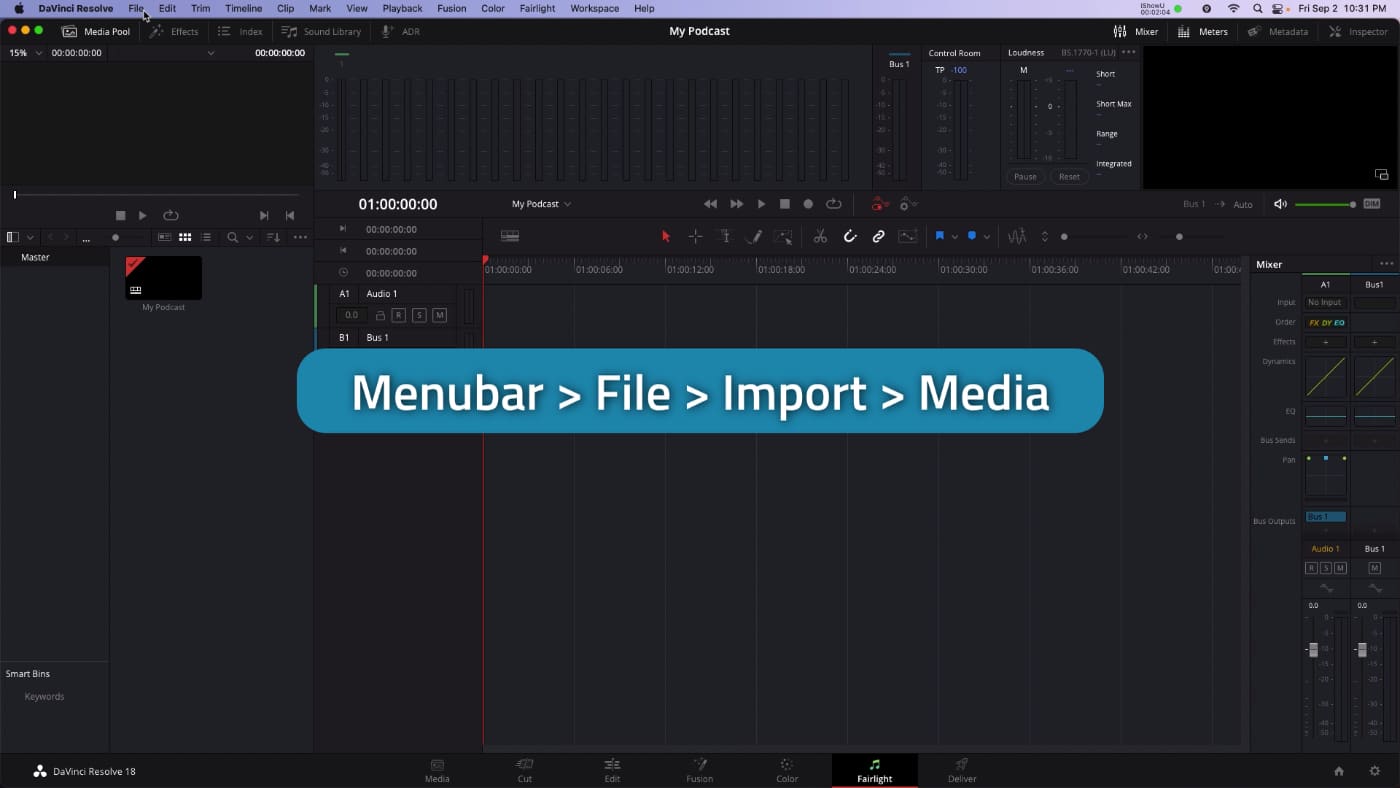
I have a piece of stock music I want to use for an intro for the podcast. To import music, click on the Media Pool, and select Menubar > File > Import > Media, or Command + I.
Navigate to where the music is saved on your system. Drag the music from the Media Pool into the Timeline, to see and edit the music.
First, this track is way too loud. You might be tempted to grab a volume fader and turn it down. A more accurate tool is the Inspector. To change the volume using the Inspector, click on the music track in the timeline, and open the Inspector panel found in the top right corner.
Listen to the timeline by pressing spacebar and turn the Volume down in the Inspector until the loudness bars are between -10 and -15 decibels.
Edit music
Listening through this music, I don’t want to use the first section right off the top. This breakdown part way through the song sounds much better. Use the horizontal zoom bar to get closer on the sound waveform and position the playhead as close to the beat as possible without going over it. I’m going to click the scissors icon to split this sound file into two pieces, to isolate the section of music I’m interested in. To clear out the old bit, click on the left side and press delete on the keyboard. Notice how a gap is left on the timeline? We don’t want to leave a gap so I’m going to undo, with command zee, and try again holding Shift and delete.
Record a voice over
It’s time to record a voice over. To record a voice over, create a new audio track for the voice over to be recorded onto. Right click in the tracks panel inside the timeline, or, hold control on your keyboard and click your trackpad. Choose Add Track > Mono.
This confuses some newcomers to the world of audio, why a mono track? The answer is, you only have one microphone. So, even though your podcast will be made in stereo, your microphone is a mono source.
Now is a good time to organize your tracks. Double click on the track name, such as Audio 1 and type in a more accurate name such as “Music”, and “VO”.
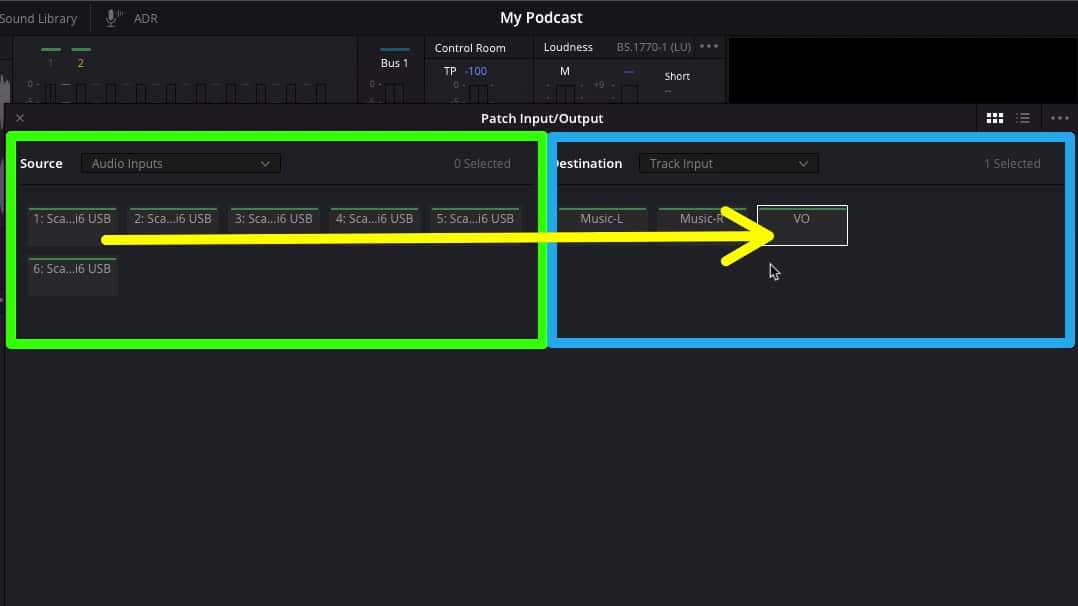
I have to patch my microphone to the track before I record. As I mentioned before, anything microphone, headset, or webcam connected to my Mac or PC can be used in Fairlight. In the Mixer panel in the middle right of the screen, look for the voice over track. Click the panel that reads “No Input” and you’ll see an options panel labeled input.
The patch interface displays audio sources (such as your microphone) on the left, and audio tracks (where we are going to record) on the right. Single click the mouse to highlight both the source and destination and choose: patch.
On the audio track that contains my music, you can see three buttons. R, for record, S, for solo, and M, for mute. Right now, I do not want to hear any music, so I can record my voice over, so I will press M on this panel to temporarily turn off the music.
On the audio track that will contain the voiceover, press R to arm for recording. In addition, I like to mute the VO track as well, so that I don’t hear myself while I’m talking. To do this, press M as well.
When recording voice overs it’s helpful to type out a script before recording, even if you end up improvising during recording, having a clear plan helps with clarity. If you fumble a line, take a deep breath and start over from the top of the sentence.
Automation
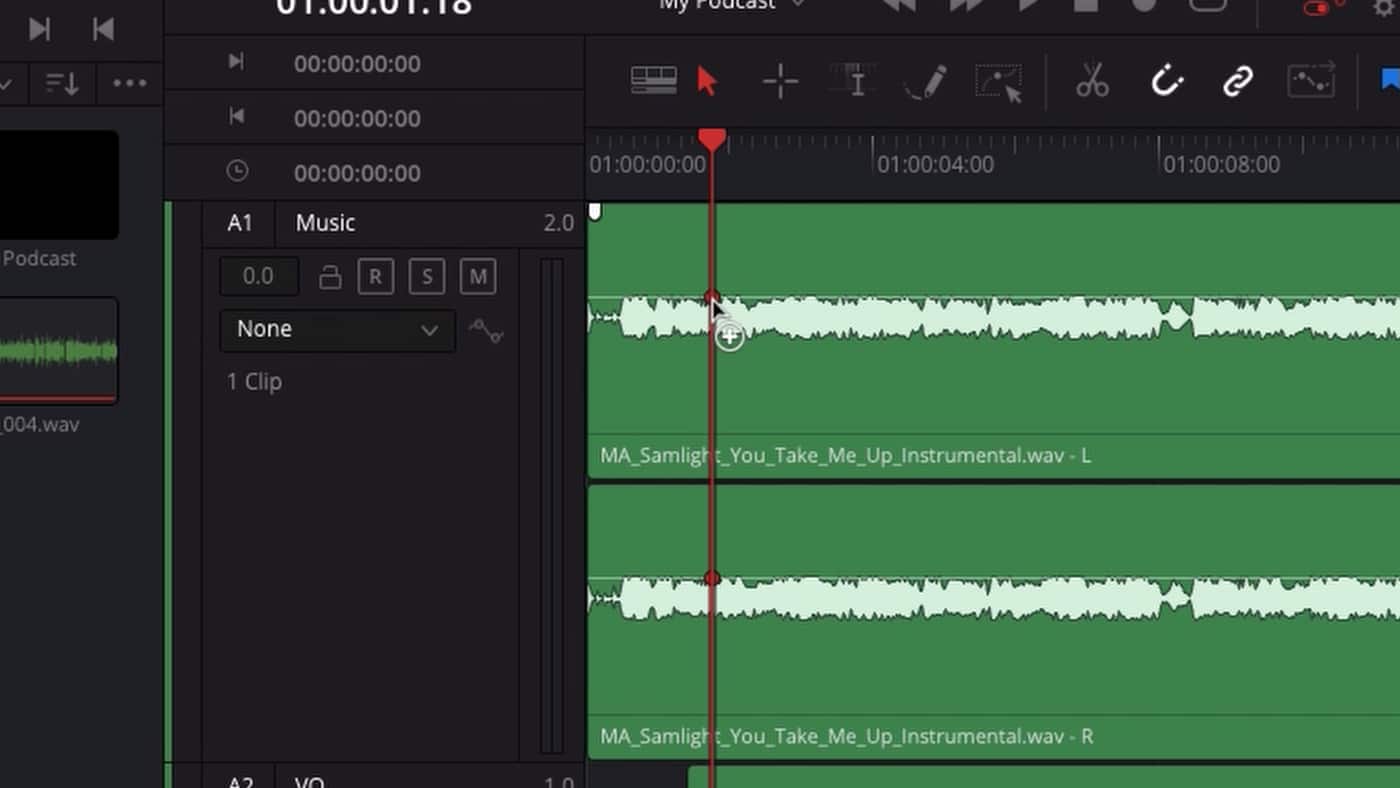
The music starts off great, but is still too loud when my voice over kicks in. Keyframes can be added to control the loudness of music over time.
To add a keyframe, drag your playhead to where the volume needs to change. Hold option on the keyboard and look for a circular + icon in the track. Click to add a keyframe. Now, move a second earlier in the timeline, and hold option and click to add another keyframe.
The overall volume can be changed between these two events by clicking and dragging the keyframes up and down.
Exporting
To save out a completed project, head over to the Deliver page. Here is where all saving options are available.
In the presets panel along the top, scroll over to the right and choose “Audio Only”. From there, we have to check out the Audio settings panel. This is where you’re going to decide if you are looking for WAVE, MP3, or MP4.
In general, WAVE is the highest quality but the largest file size. MP4 is commonly used for podcast delivery, as well as iTunes mastering. MP3 is the most commonly used format, but is also the lowest quality. I’m going to choose MP4.
A few more steps: we have to set a location on the Mac or PC for the file to be saved to, by clicking Browse. And we have to name the file. This last bit is slightly confusing, to start the saving process, this setting needs to be added to a queue.
Select Add to Render Queue along the bottom, and then start render from the render queue. It’s a little weird that we have to use the render queue even though there is only one export.
Troubleshooting: I can’t hear audio
One very commonly asked question is: why can’t I hear audio in DaVinci?
It’s important to double check the system audio settings if you have any issues. DaVinci can see any audio device on your Mac or PC and most times, the software is pointing to the wrong thing.
To check audio settings select Menubar > DaVinci Resolve > Preferences > System > Video and Audio I/O. Input device will show you microphones available on the system, and output device is your speakers or headphones you’d like to use. If you do change anything here, you’ll want to restart the software to ensure the changes are in effect.
One last tip
One last thing that I absolutely love about this software is that you can have multiple episodes of your podcast inside a single project.
Just step over to Fairlight and choose File > New > Timeline, and name your next episode. You can even copy and paste music cues between the timelines which saves a lot of time compared to some other audio editors out there.
And this is just scratching the surface, there is a lot more to Fairlight and DaVinci Resolve to explore. Do you have any tips on how to use Fairlight? Or have a question about anything I covered, feel free to let me know in the comments section, I’d love to hear about it.






THanks for this, it was very useful. I had da vinci already but I downloaded it for video but had barely used it yet. Meanwhile I was working on getting a podcast going for our nonprofit. I Didn’t have a lot of tools and started by using Audacity because I have no budget for this. But I found myself getting frustrated with its limitations. I’m used to more sophisticated DAWs. Then I remembered that Da Vinic Resolve acutally had a separate audio editing feature and it occurred to me that it might do a better job for me. I did a search online to get some pointers and up popped your article and video. Thanks so much! I confess that while you were setting up your mic I got stuck because mine wasn’t showing up. So Idid another search to get a quick answer. I figured it was a settings thing, which it was. I notice that you kind of cover that at the end of your video, so that’s good, but I wanted the answer then and there so I could follow along. It all worked out and your presentaion was clear and to the point. Noe I have the basics for navigating Resolve, I can see that it has good functionality and standard functions, so I can probably firgure out the rest for myself. Much appreciated!
Thanks Natalie! I appreciate the feedback.