 1-800-275-4576
OWC Mercury Helios 5S
Support Manual
Introduction
1.1 System Requirements
Operating System & Hardware
Works with any Thunderbolt 5 | Thunderbolt 4 | Thunderbolt 3 (Mac Only) | USB4 equipped:
- Mac: macOS 14.x or later
- Thunderbolt 5 requires macOS 15.3.x or later
- Thunderbolt 3 requires macOS 15.x or later
- Intel based systems require macOS 15.x or later
- PC: Windows 11 or later
- Chromebook: current Chrome OS version recommended
Supported Cards
- Mechanical: x16 PCIe slot
- Bandwidth: xPCIe 4.0 x4
- Dimensions: supports cards up to half-length | full-height | double-width
- Cards with drivers must be Thunderbolt-aware
- GPUs are not supported
- Cards that require more than 75W are not supported
1.2 Package Contents
- (1) OWC Mercury Helios 5S
- (1) 0.7M Thunderbolt 5 cable
- (1) 90W External Power Supply
- (1) 1.8M Power Cable (3-Prong IEC 05)
- (1) Getting Started Insert
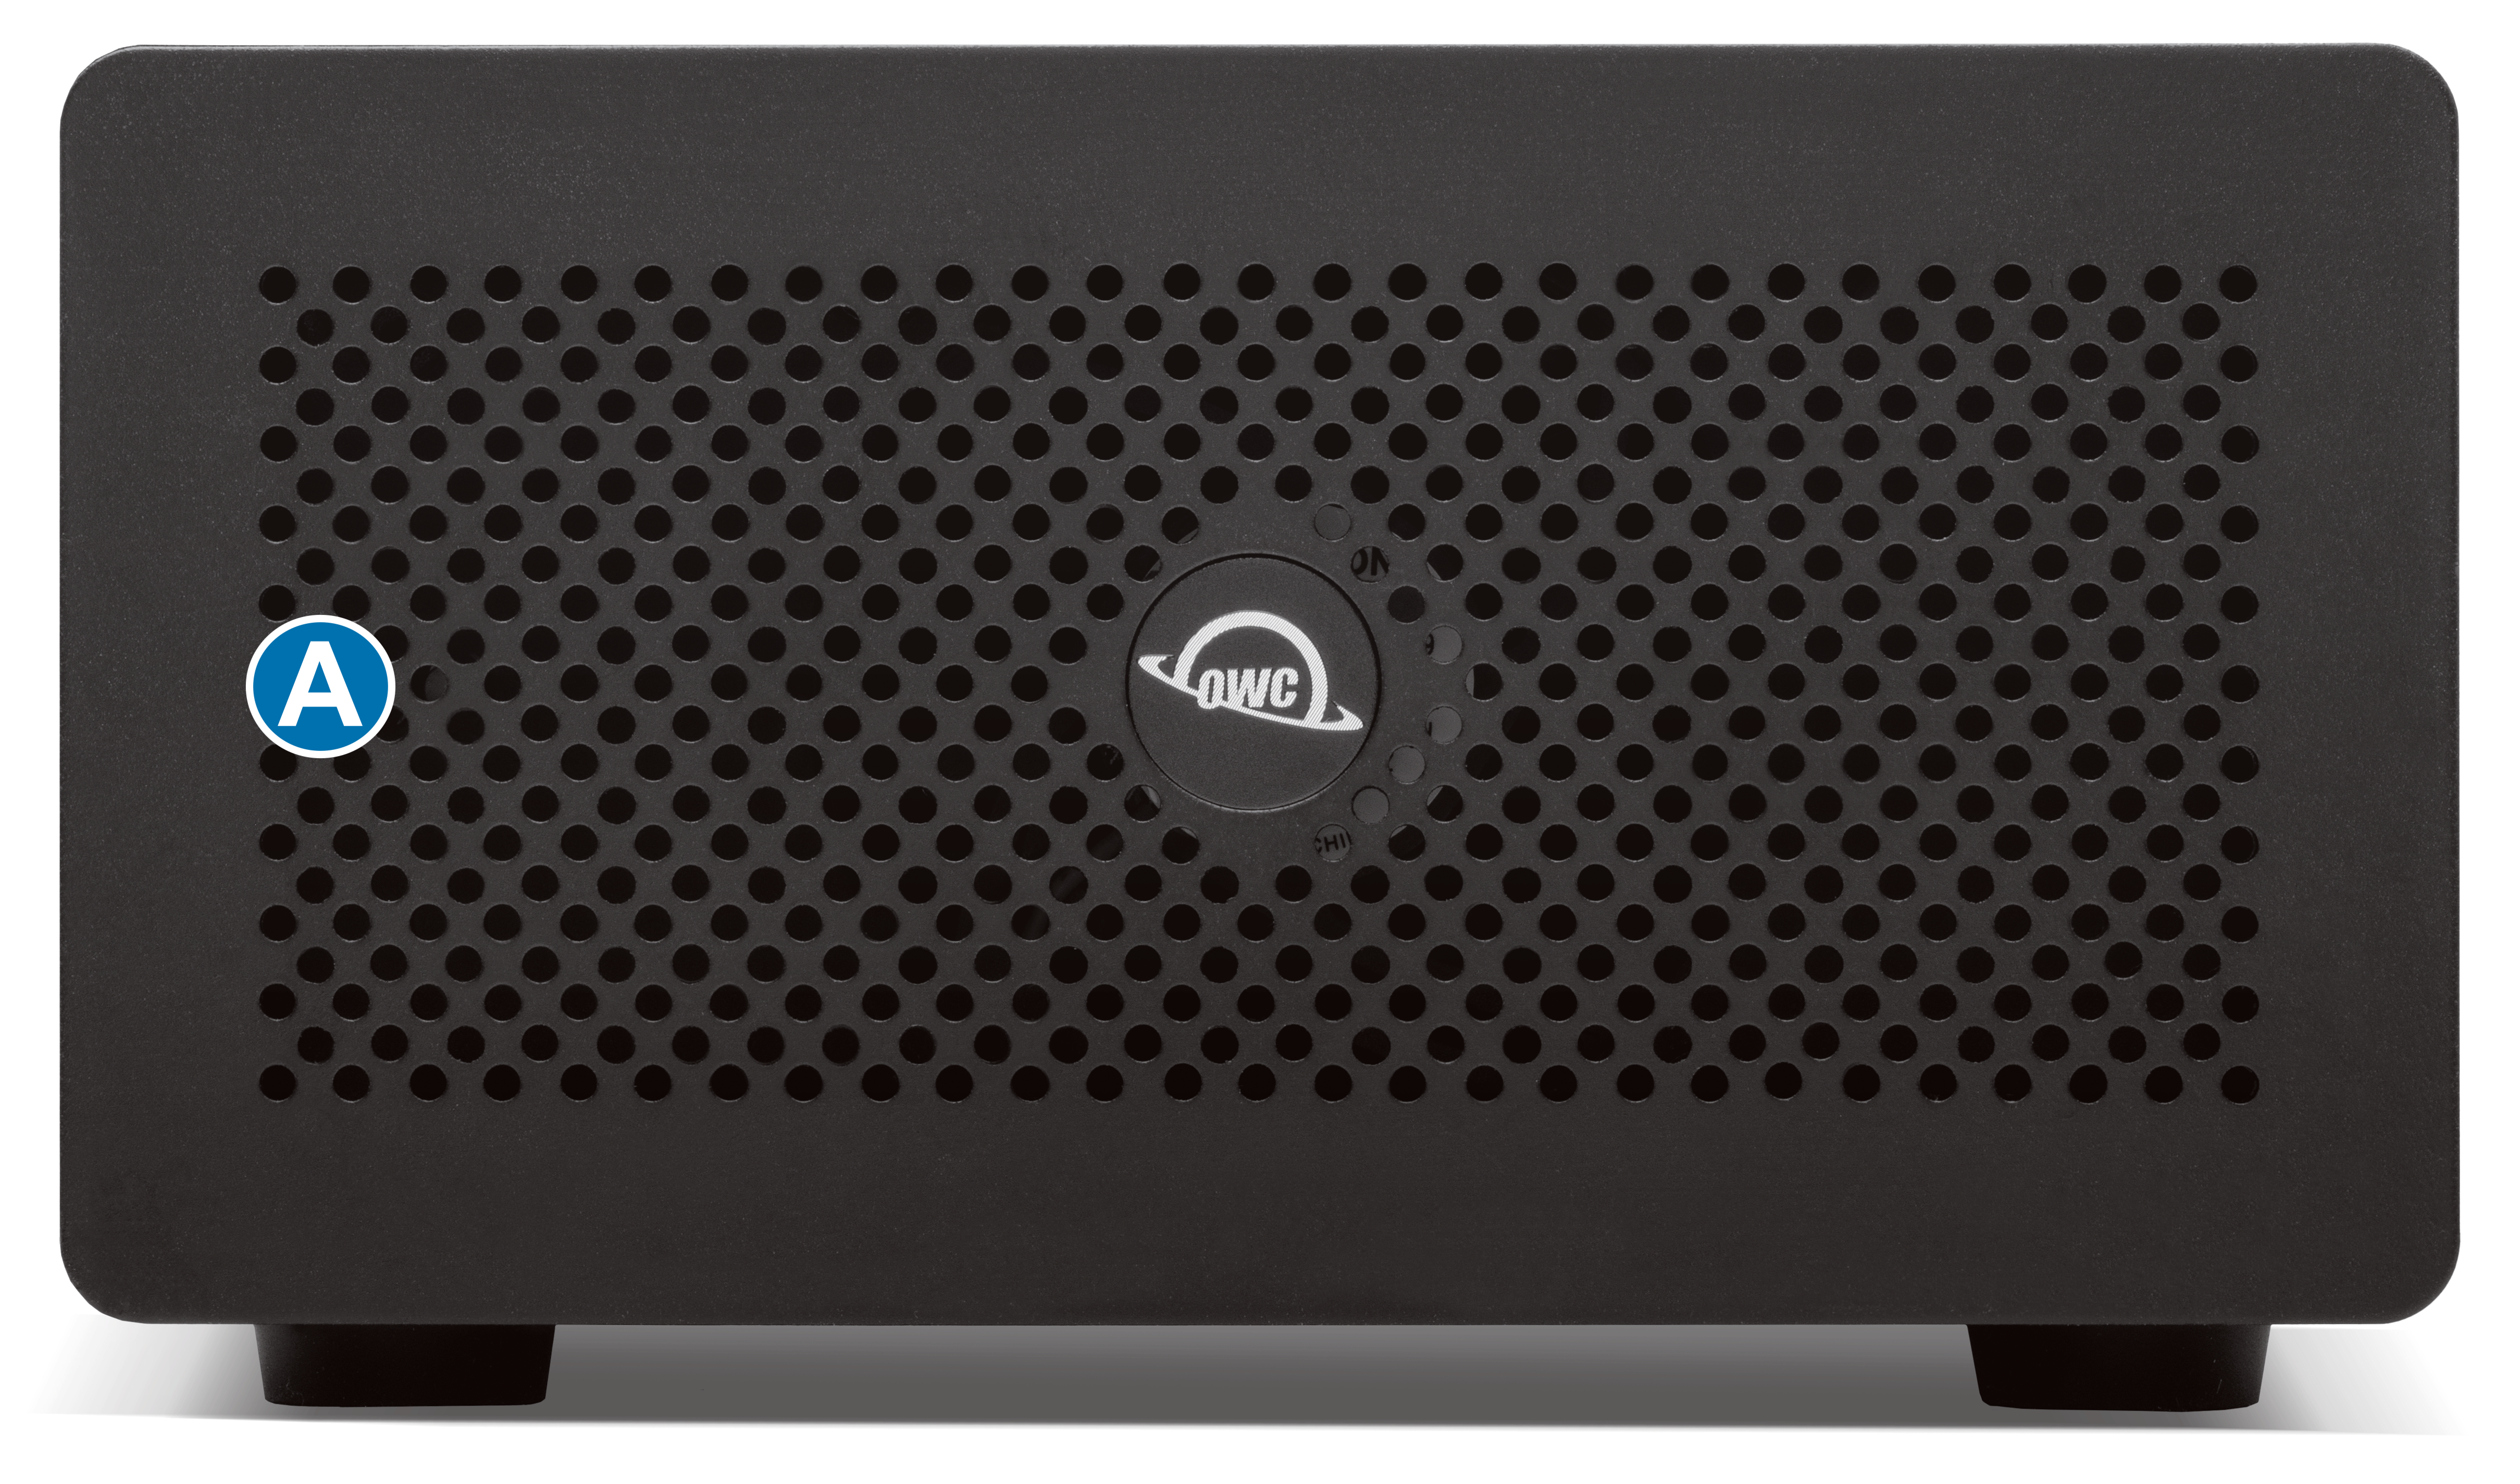
1.3 Front View
A. Status LED -
- Power w/ Data Connection = Solid Blue
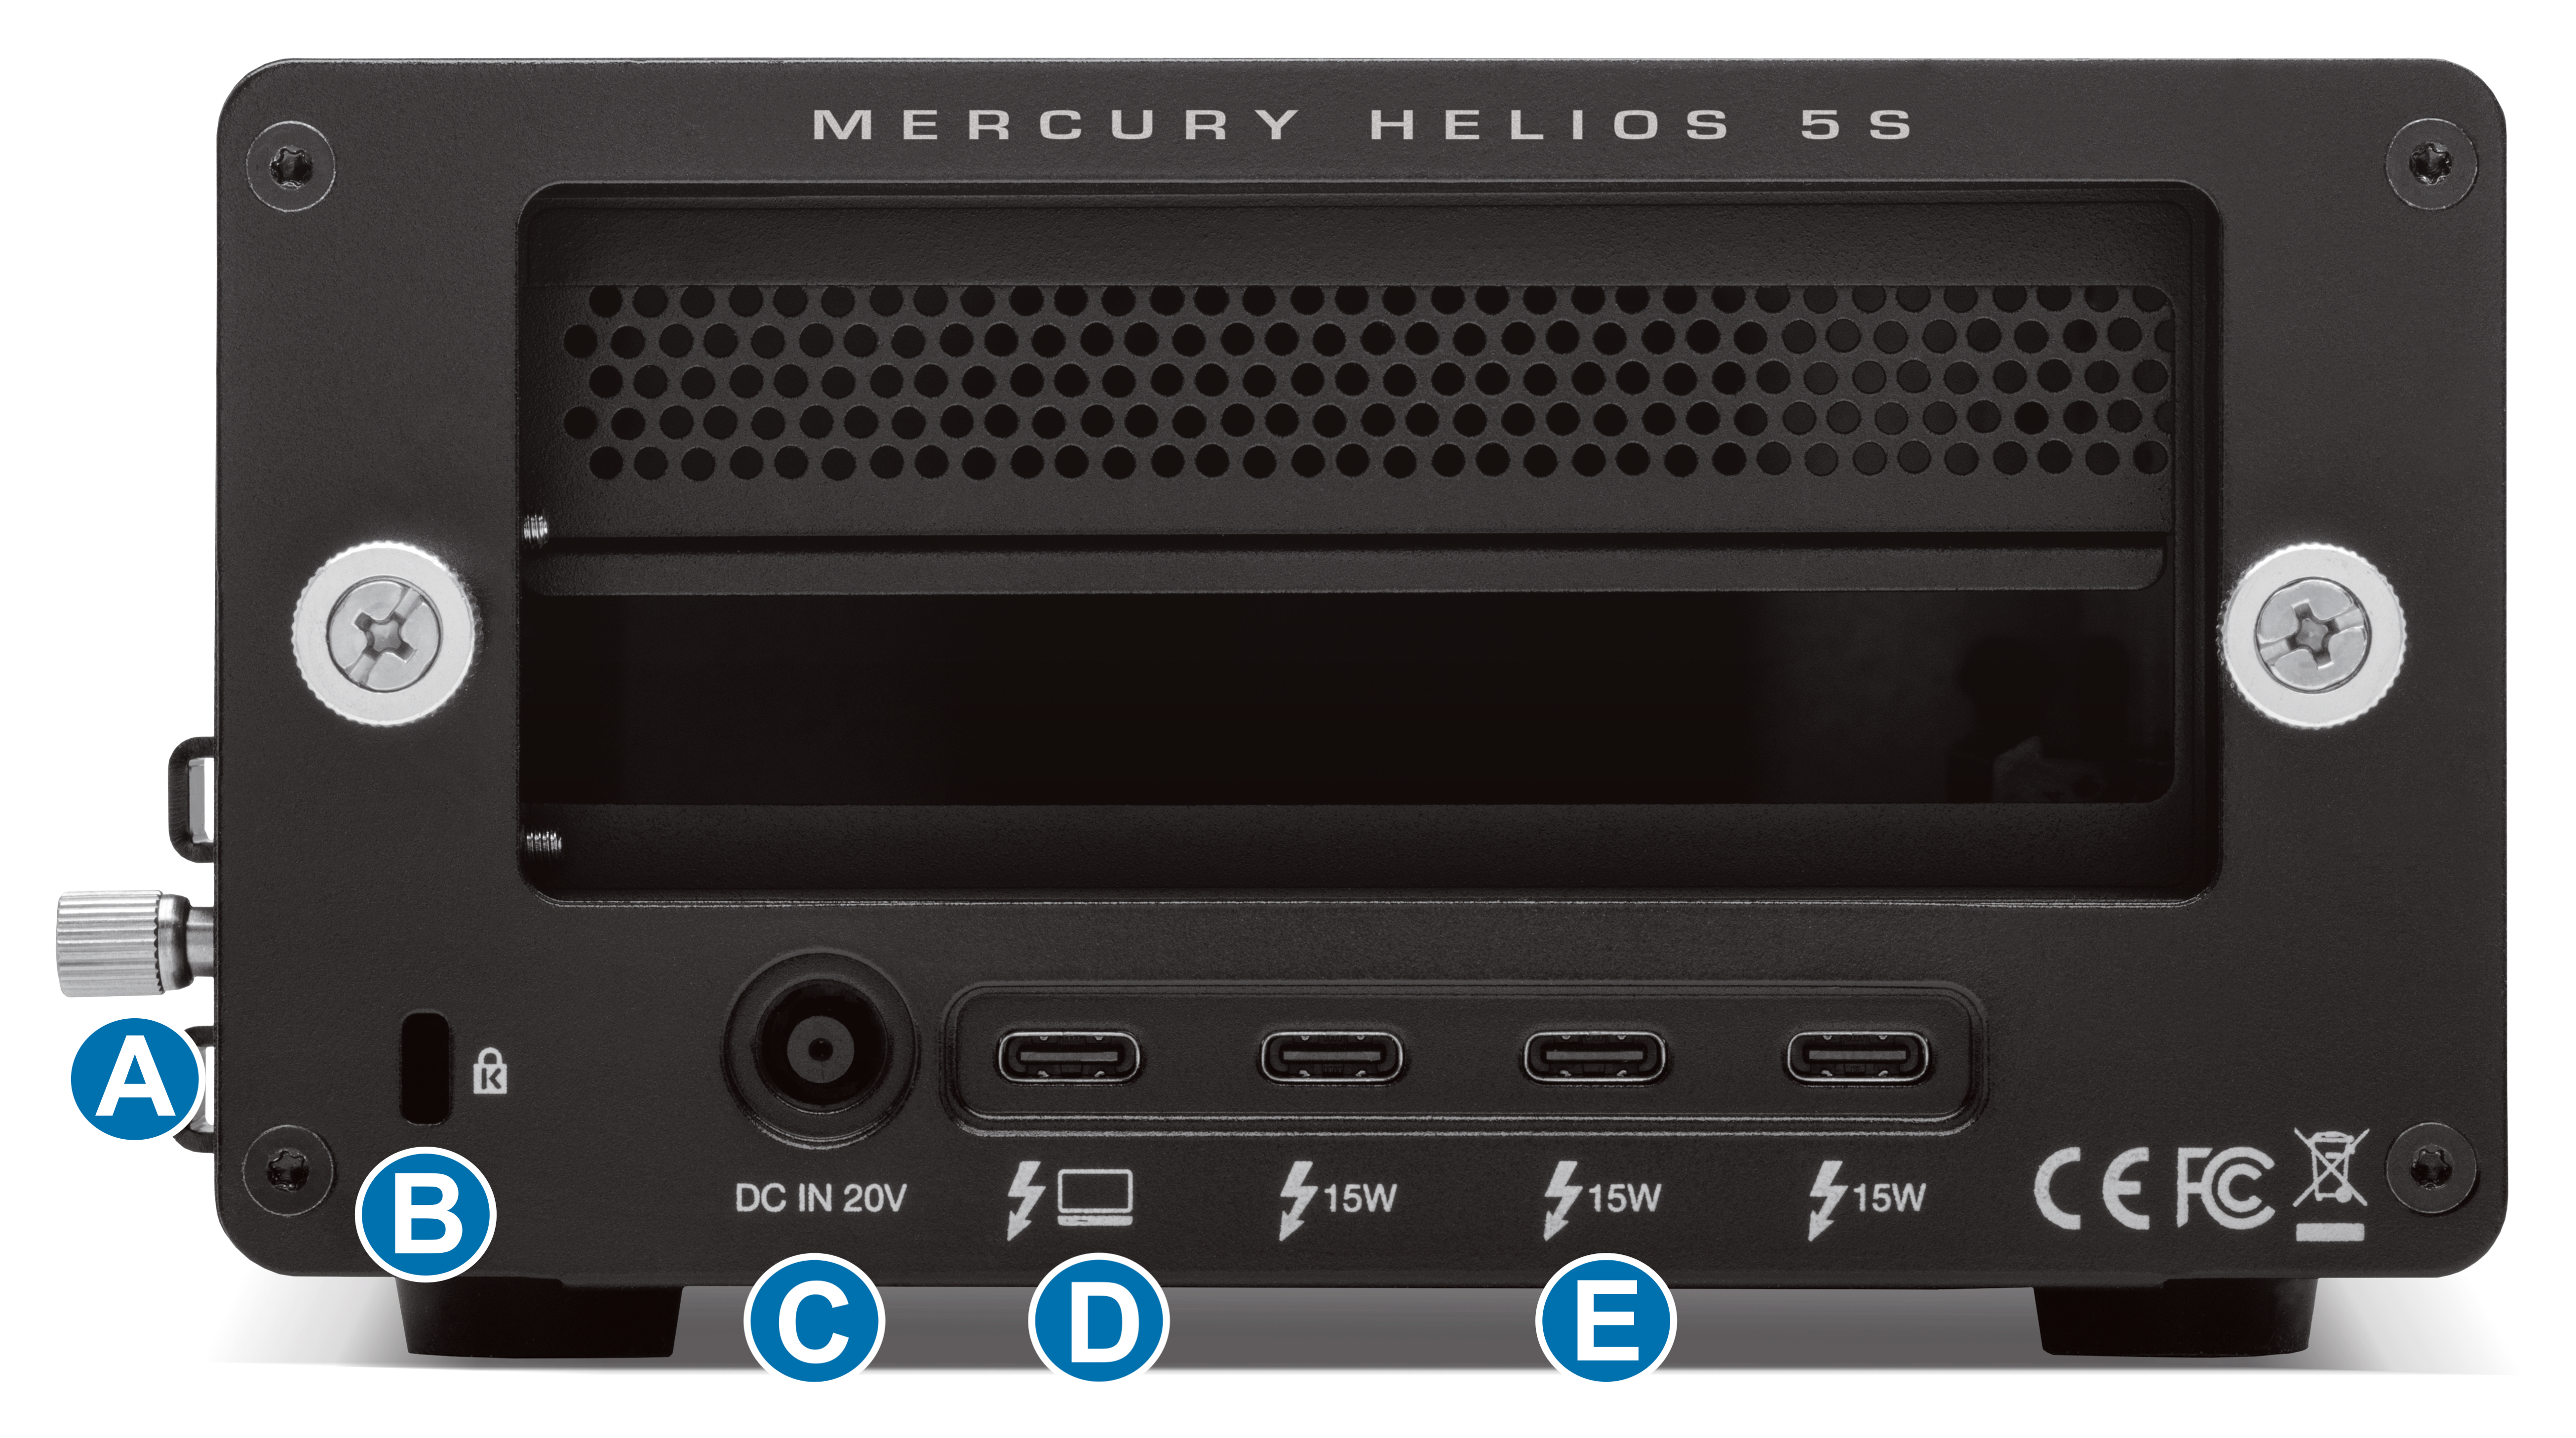
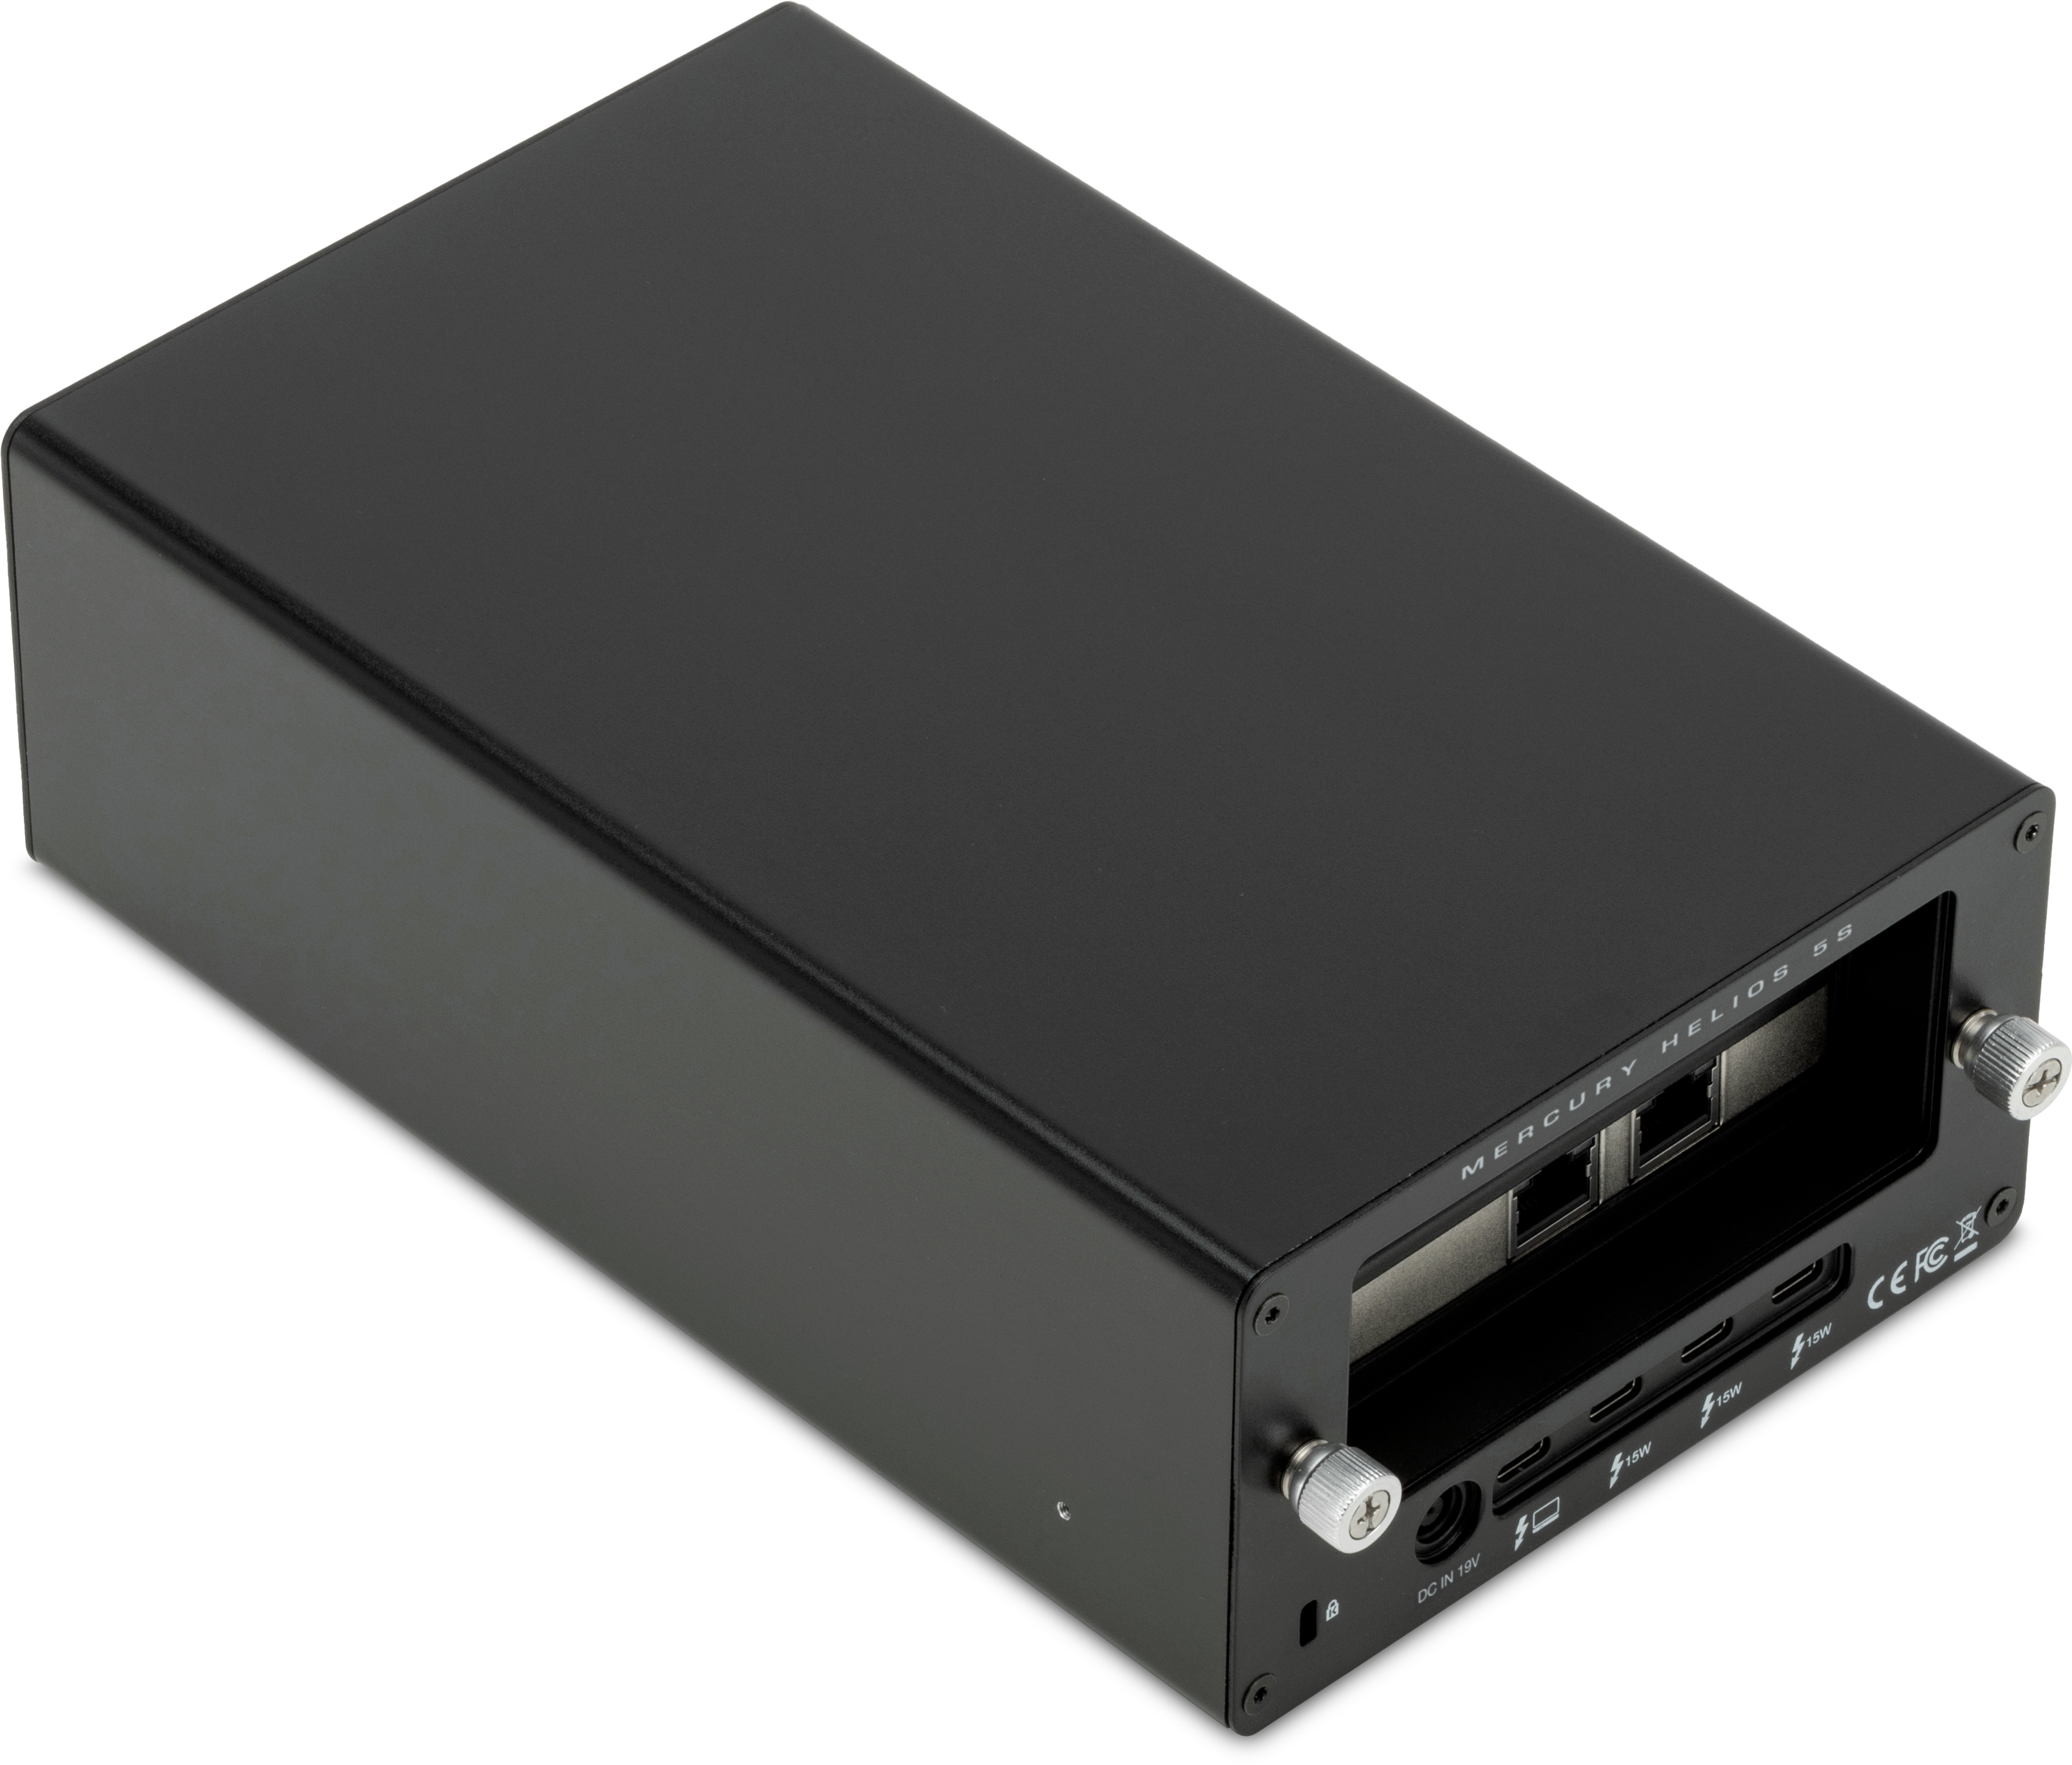
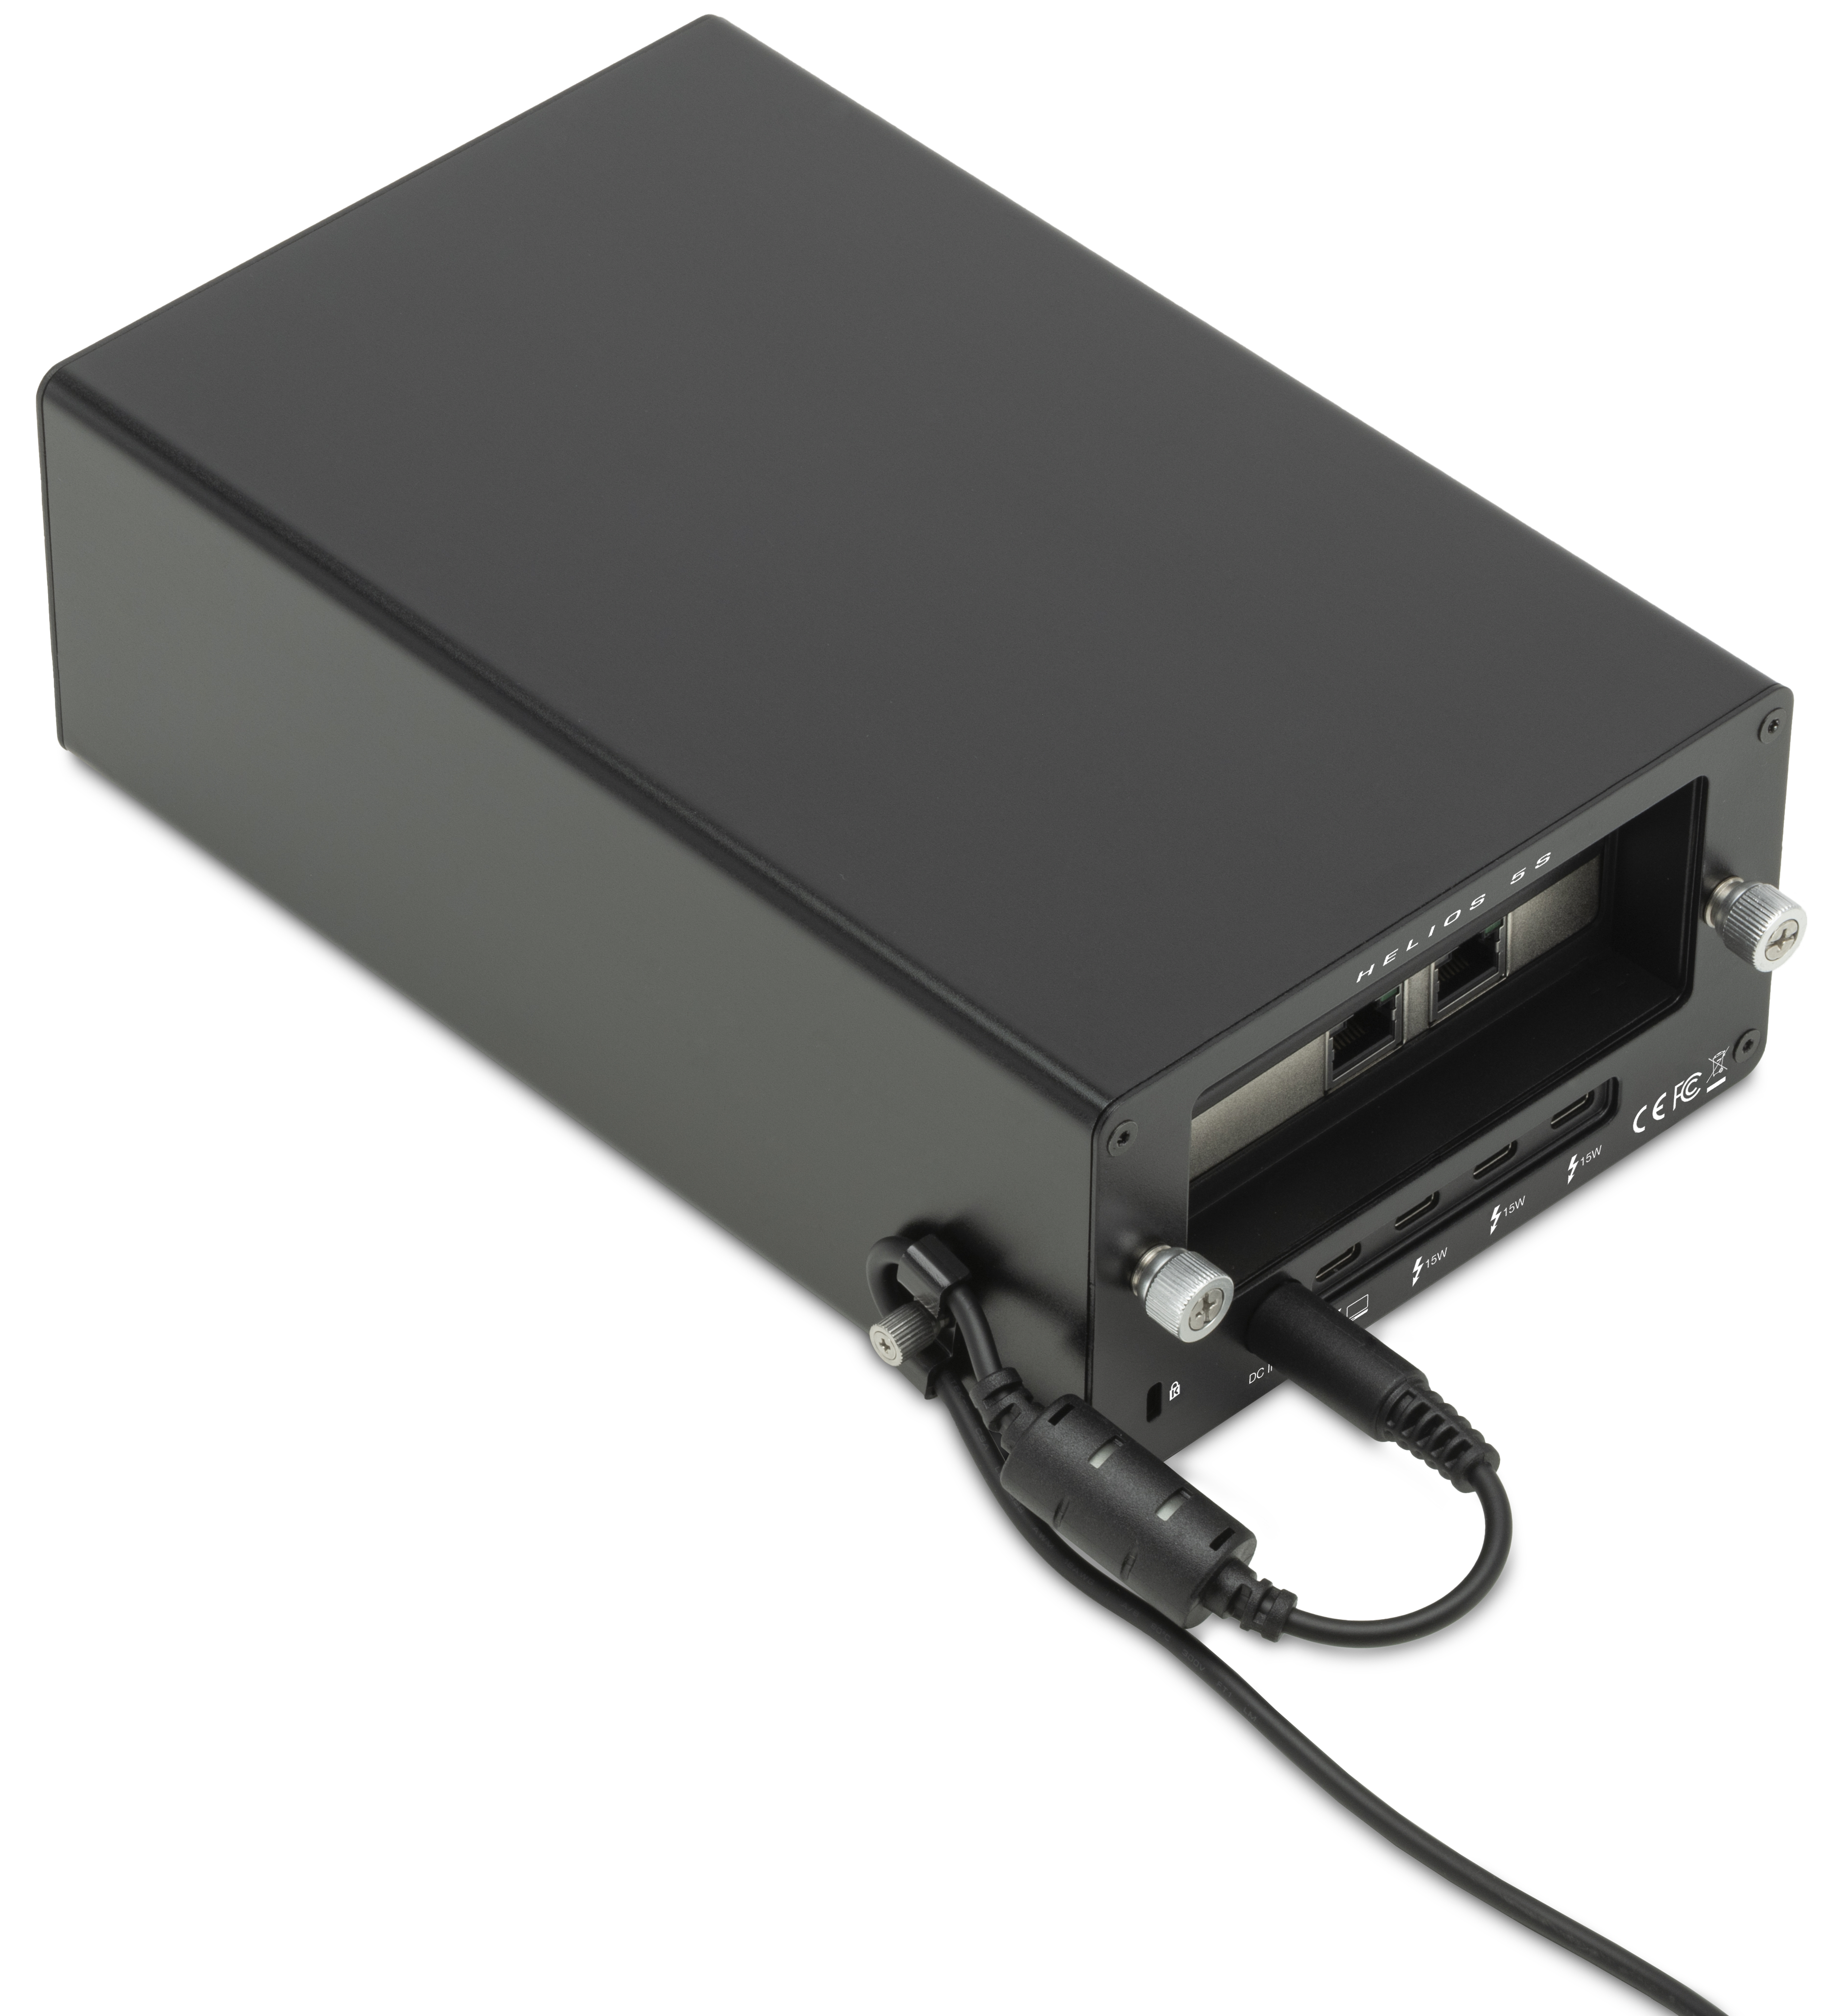
1.4 Rear View
A. (1) Power Cable Clamp – Secure power cable slack.
B. (1) Kensington Security slot – Attach a Kensington Security lock.
C. (1) DC IN 20V Power Port - Connect barrel 12V power cable to power the device.
D. (1) Thunderbolt 5 Host Port – Connect to Thunderbolt host. Up to 80Gb/s bi-directional data speed and up to 120Gb/s display bandwidth.
E. (3) 15W Thunderbolt 5 Ports – Up to 80Gb/s bi-directional data speed and up to 120Gb/s display bandwidth.
Getting Started
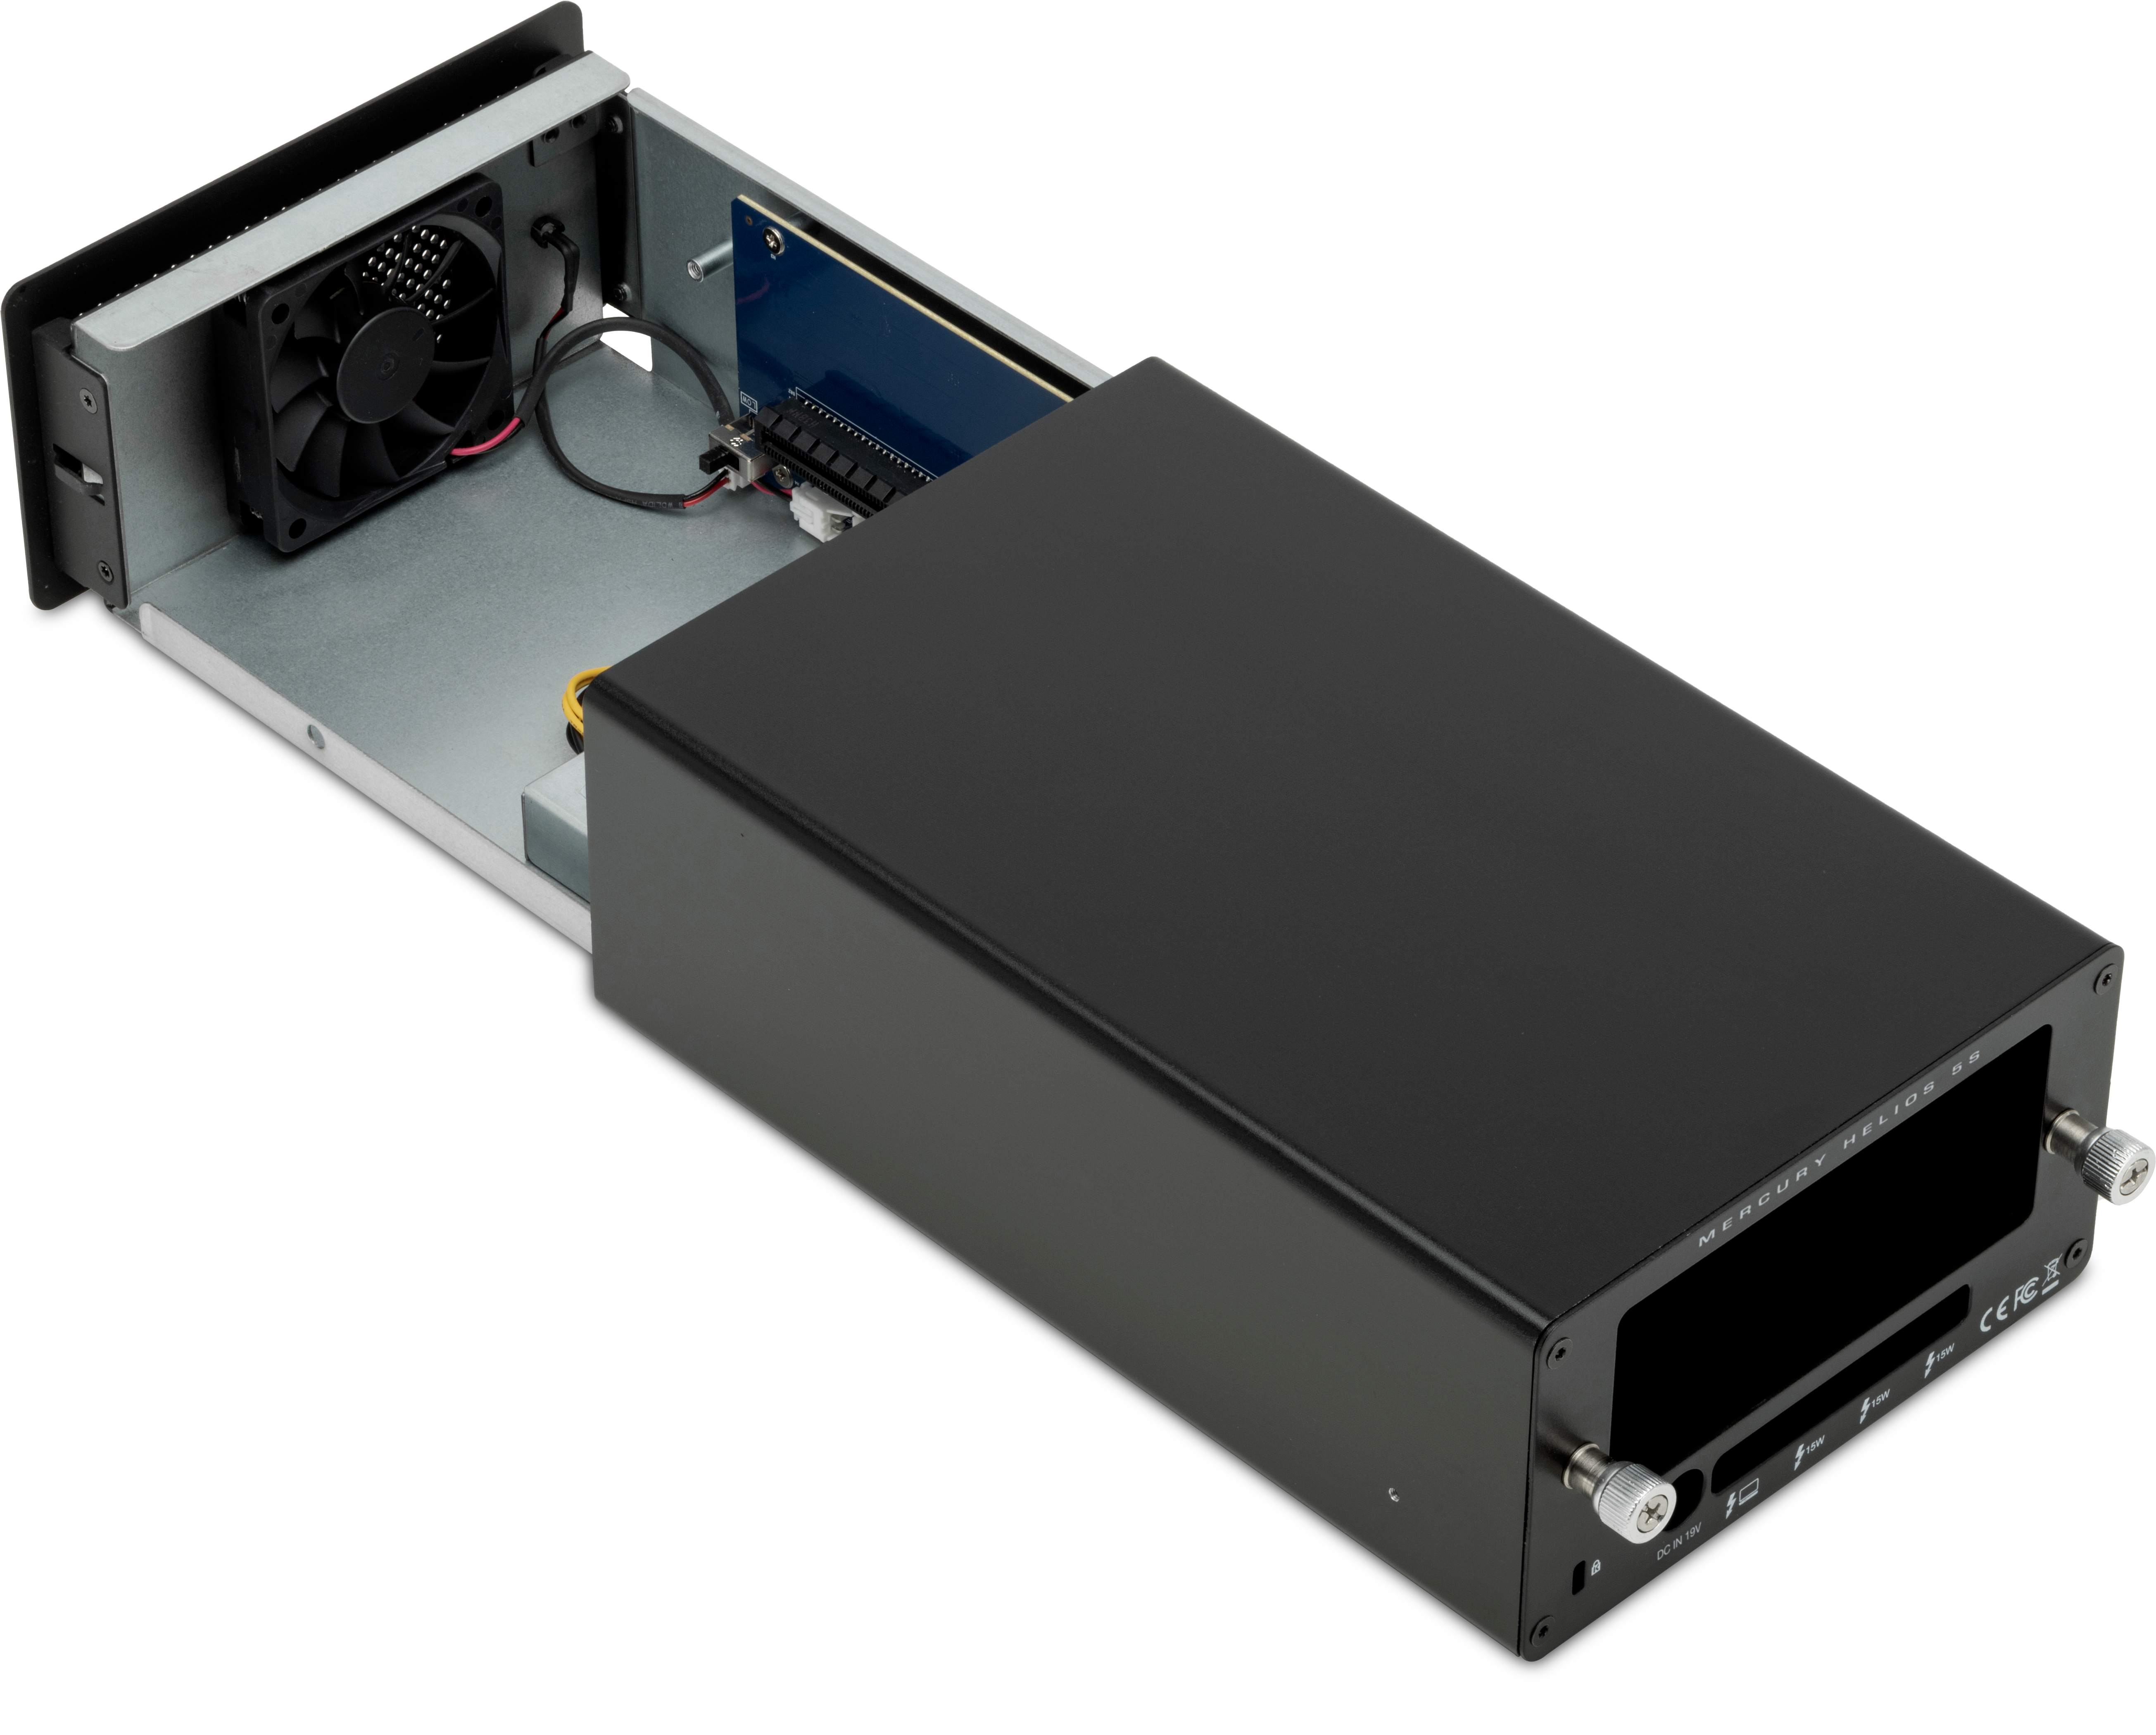
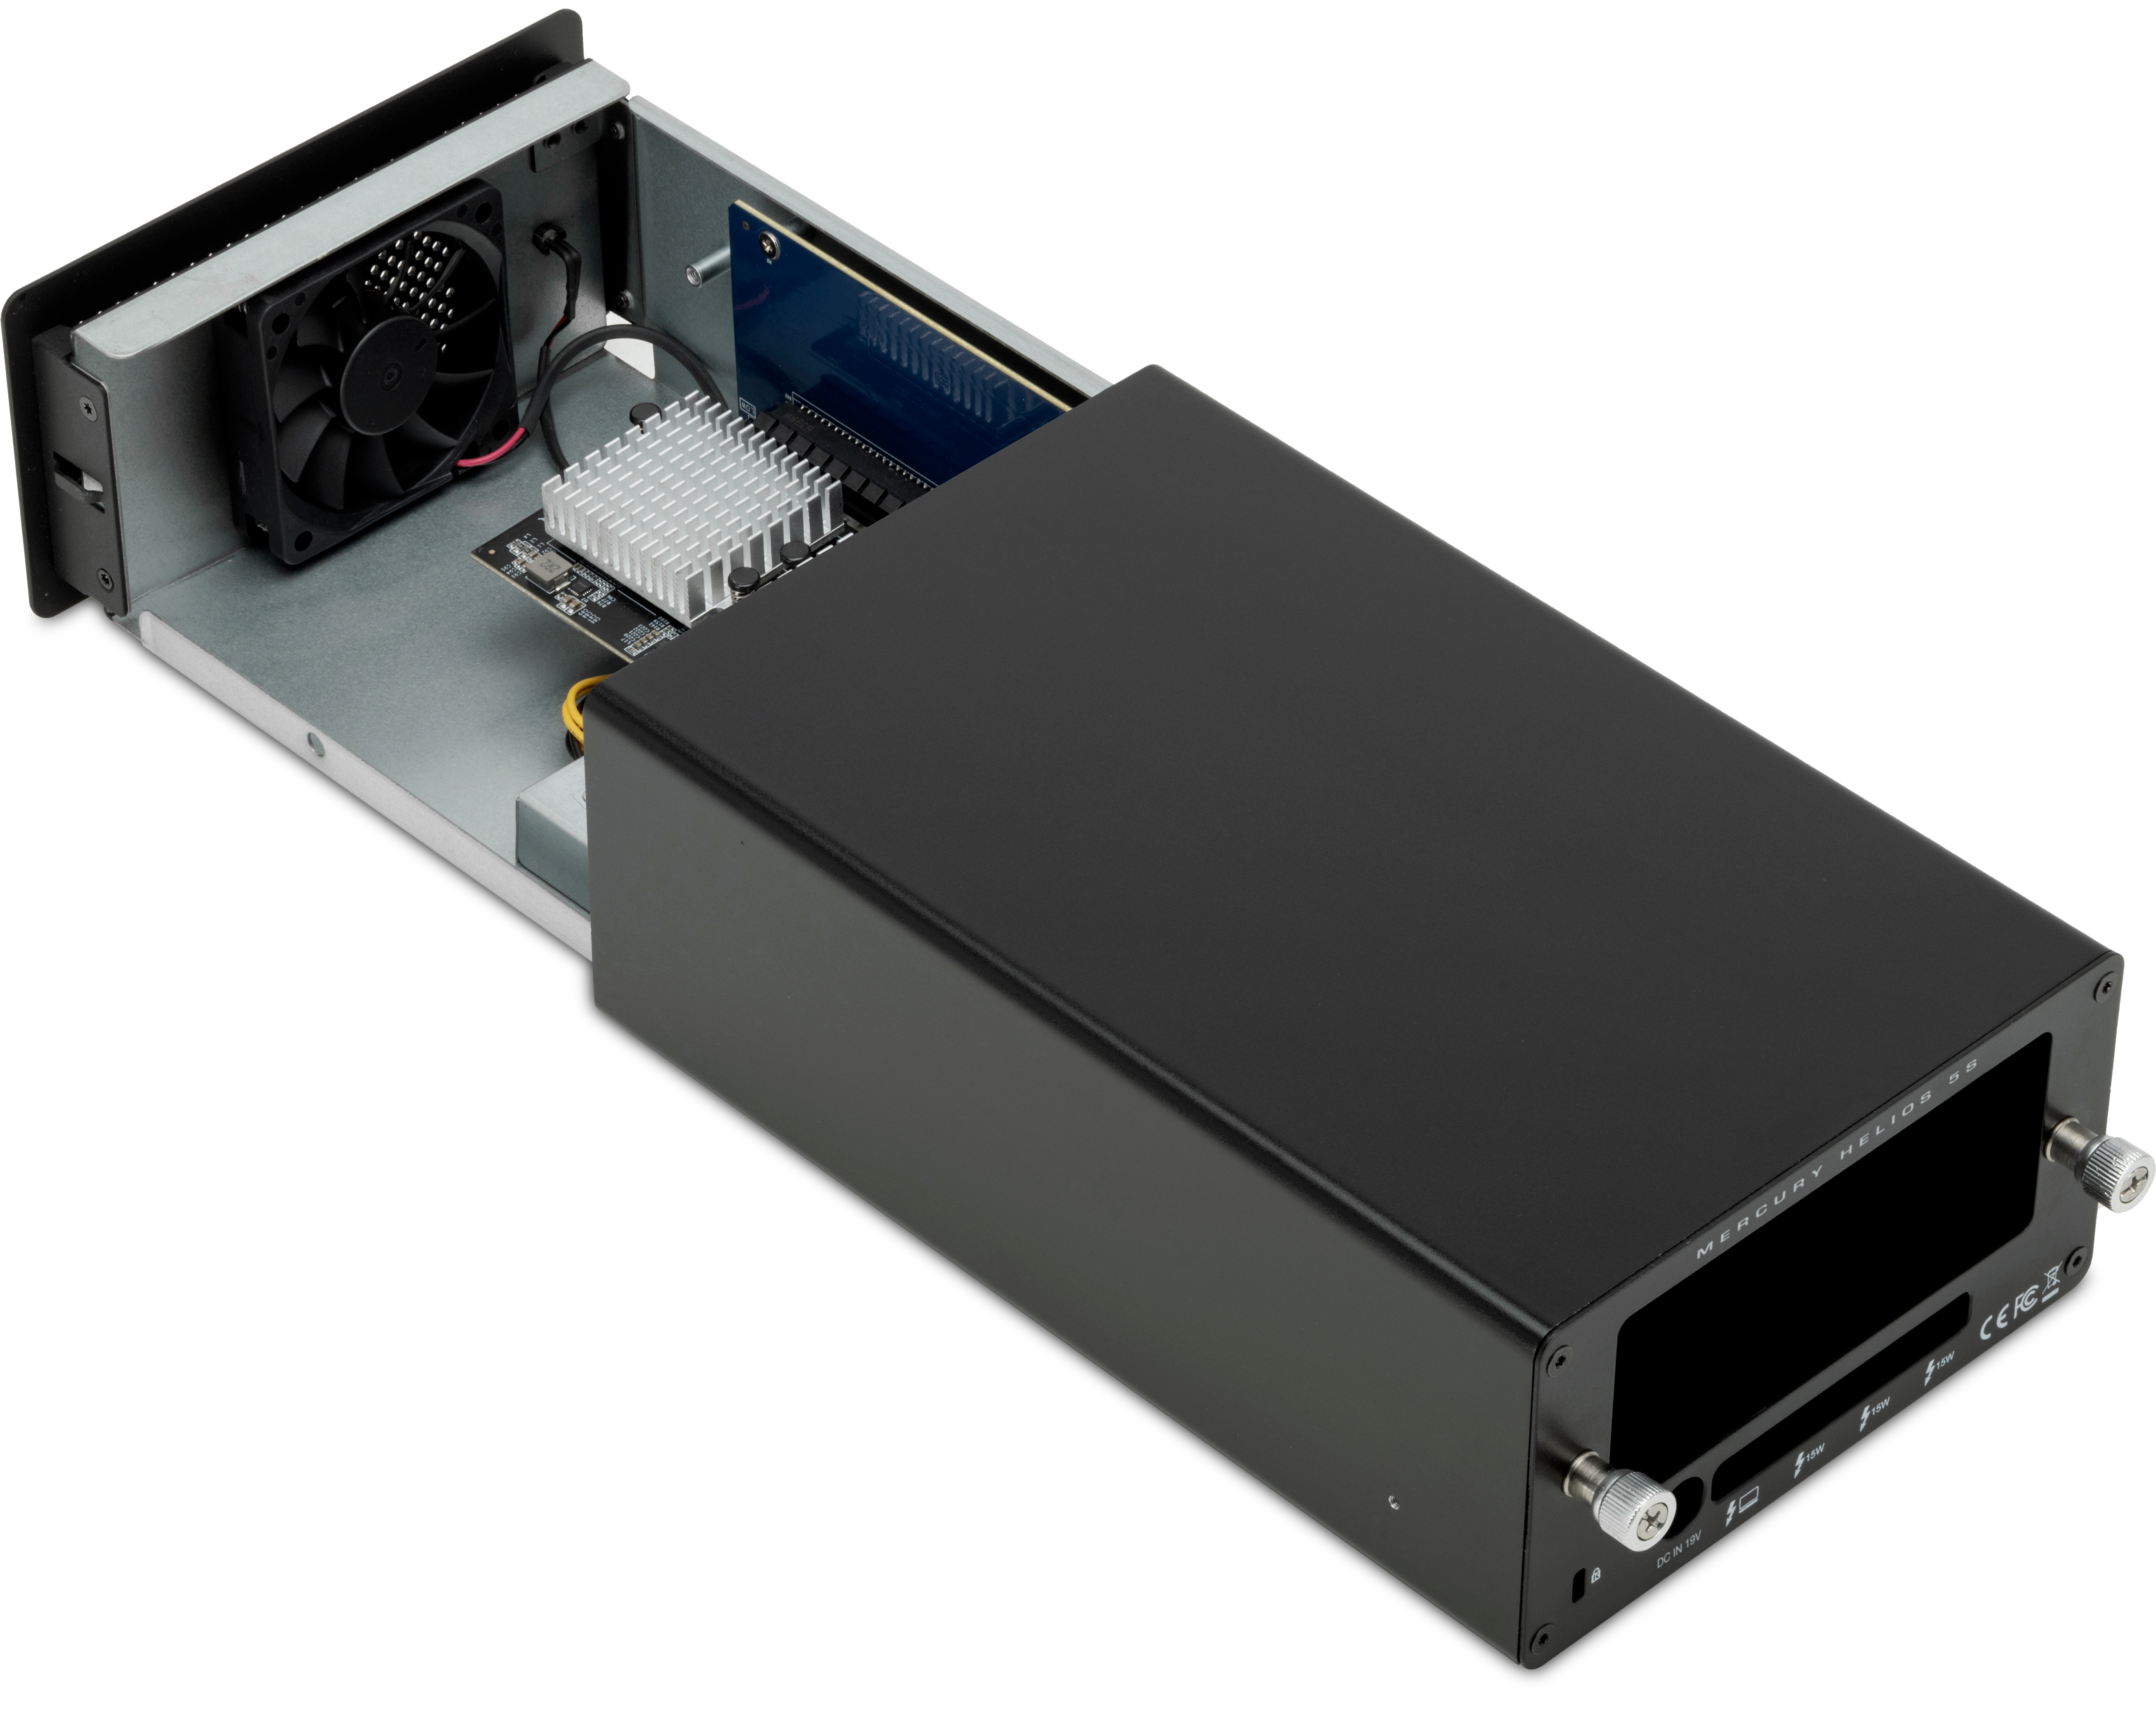
2.1 Device Assembly
- This section describes the process of installing a PCIe card into the OWC Mercury Helios 5S.
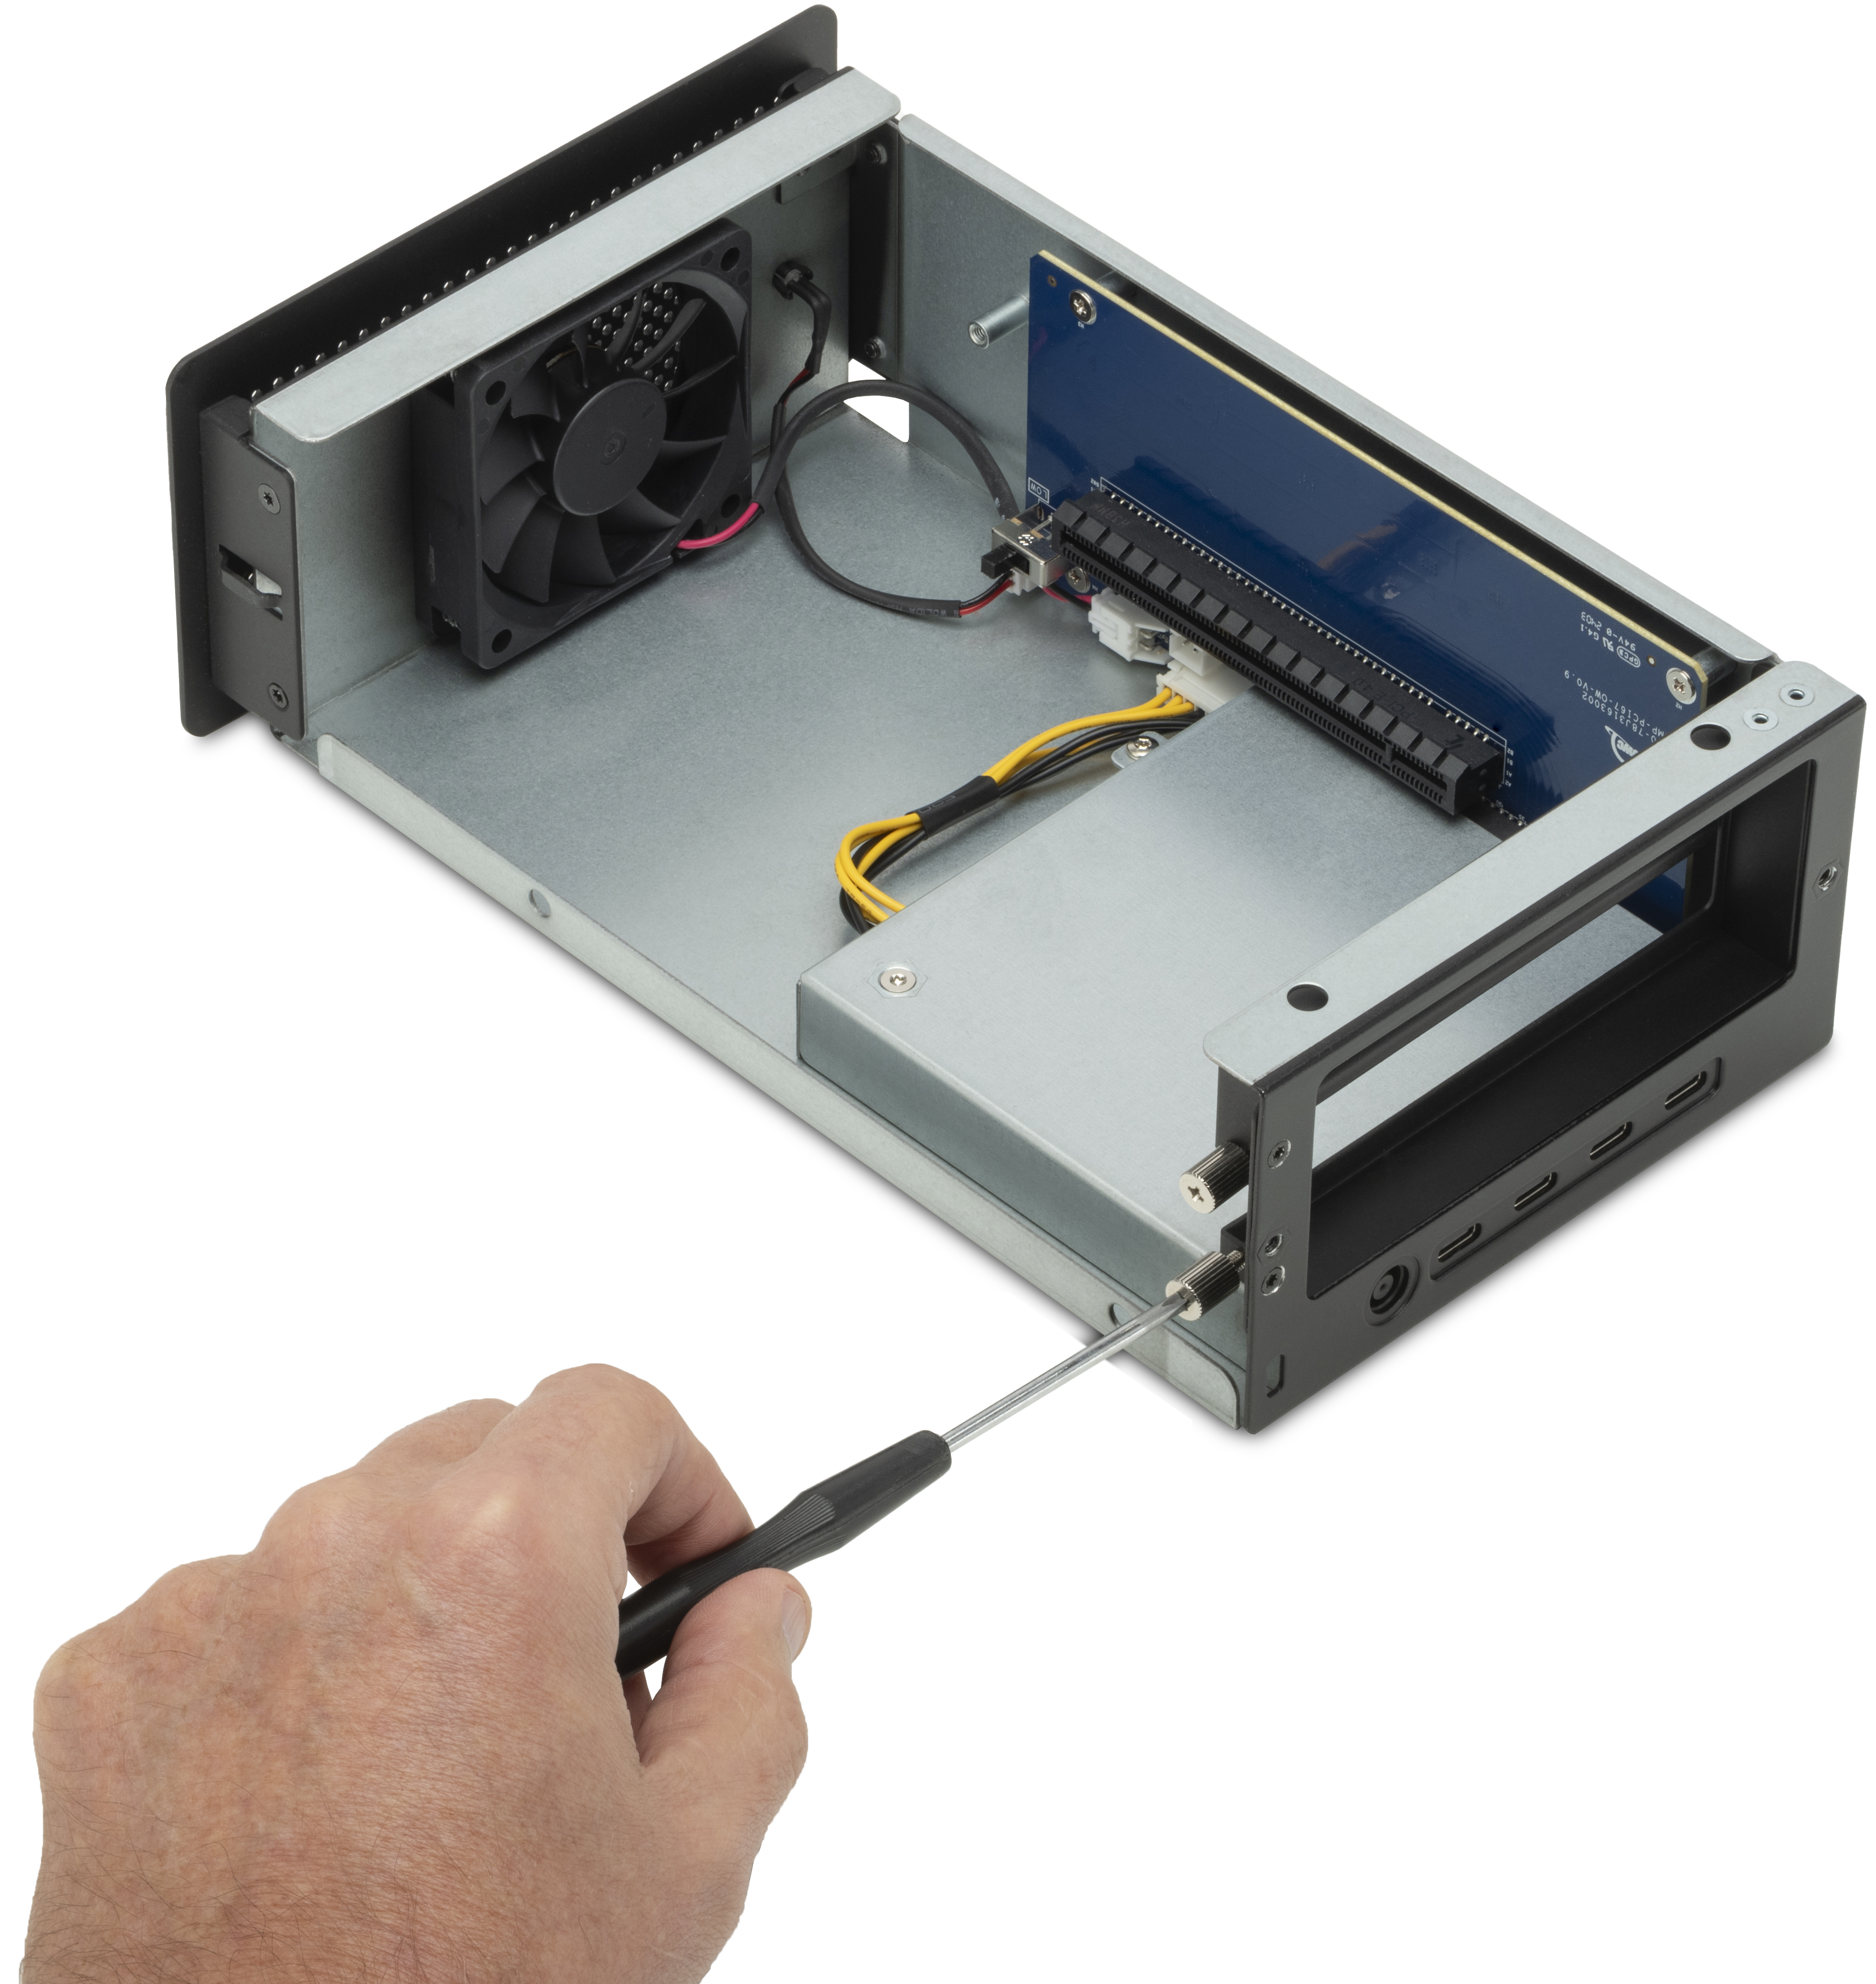
1. Loosen the thumbscrews on the rear until they spin freely. These are captive screws that cannot be removed.
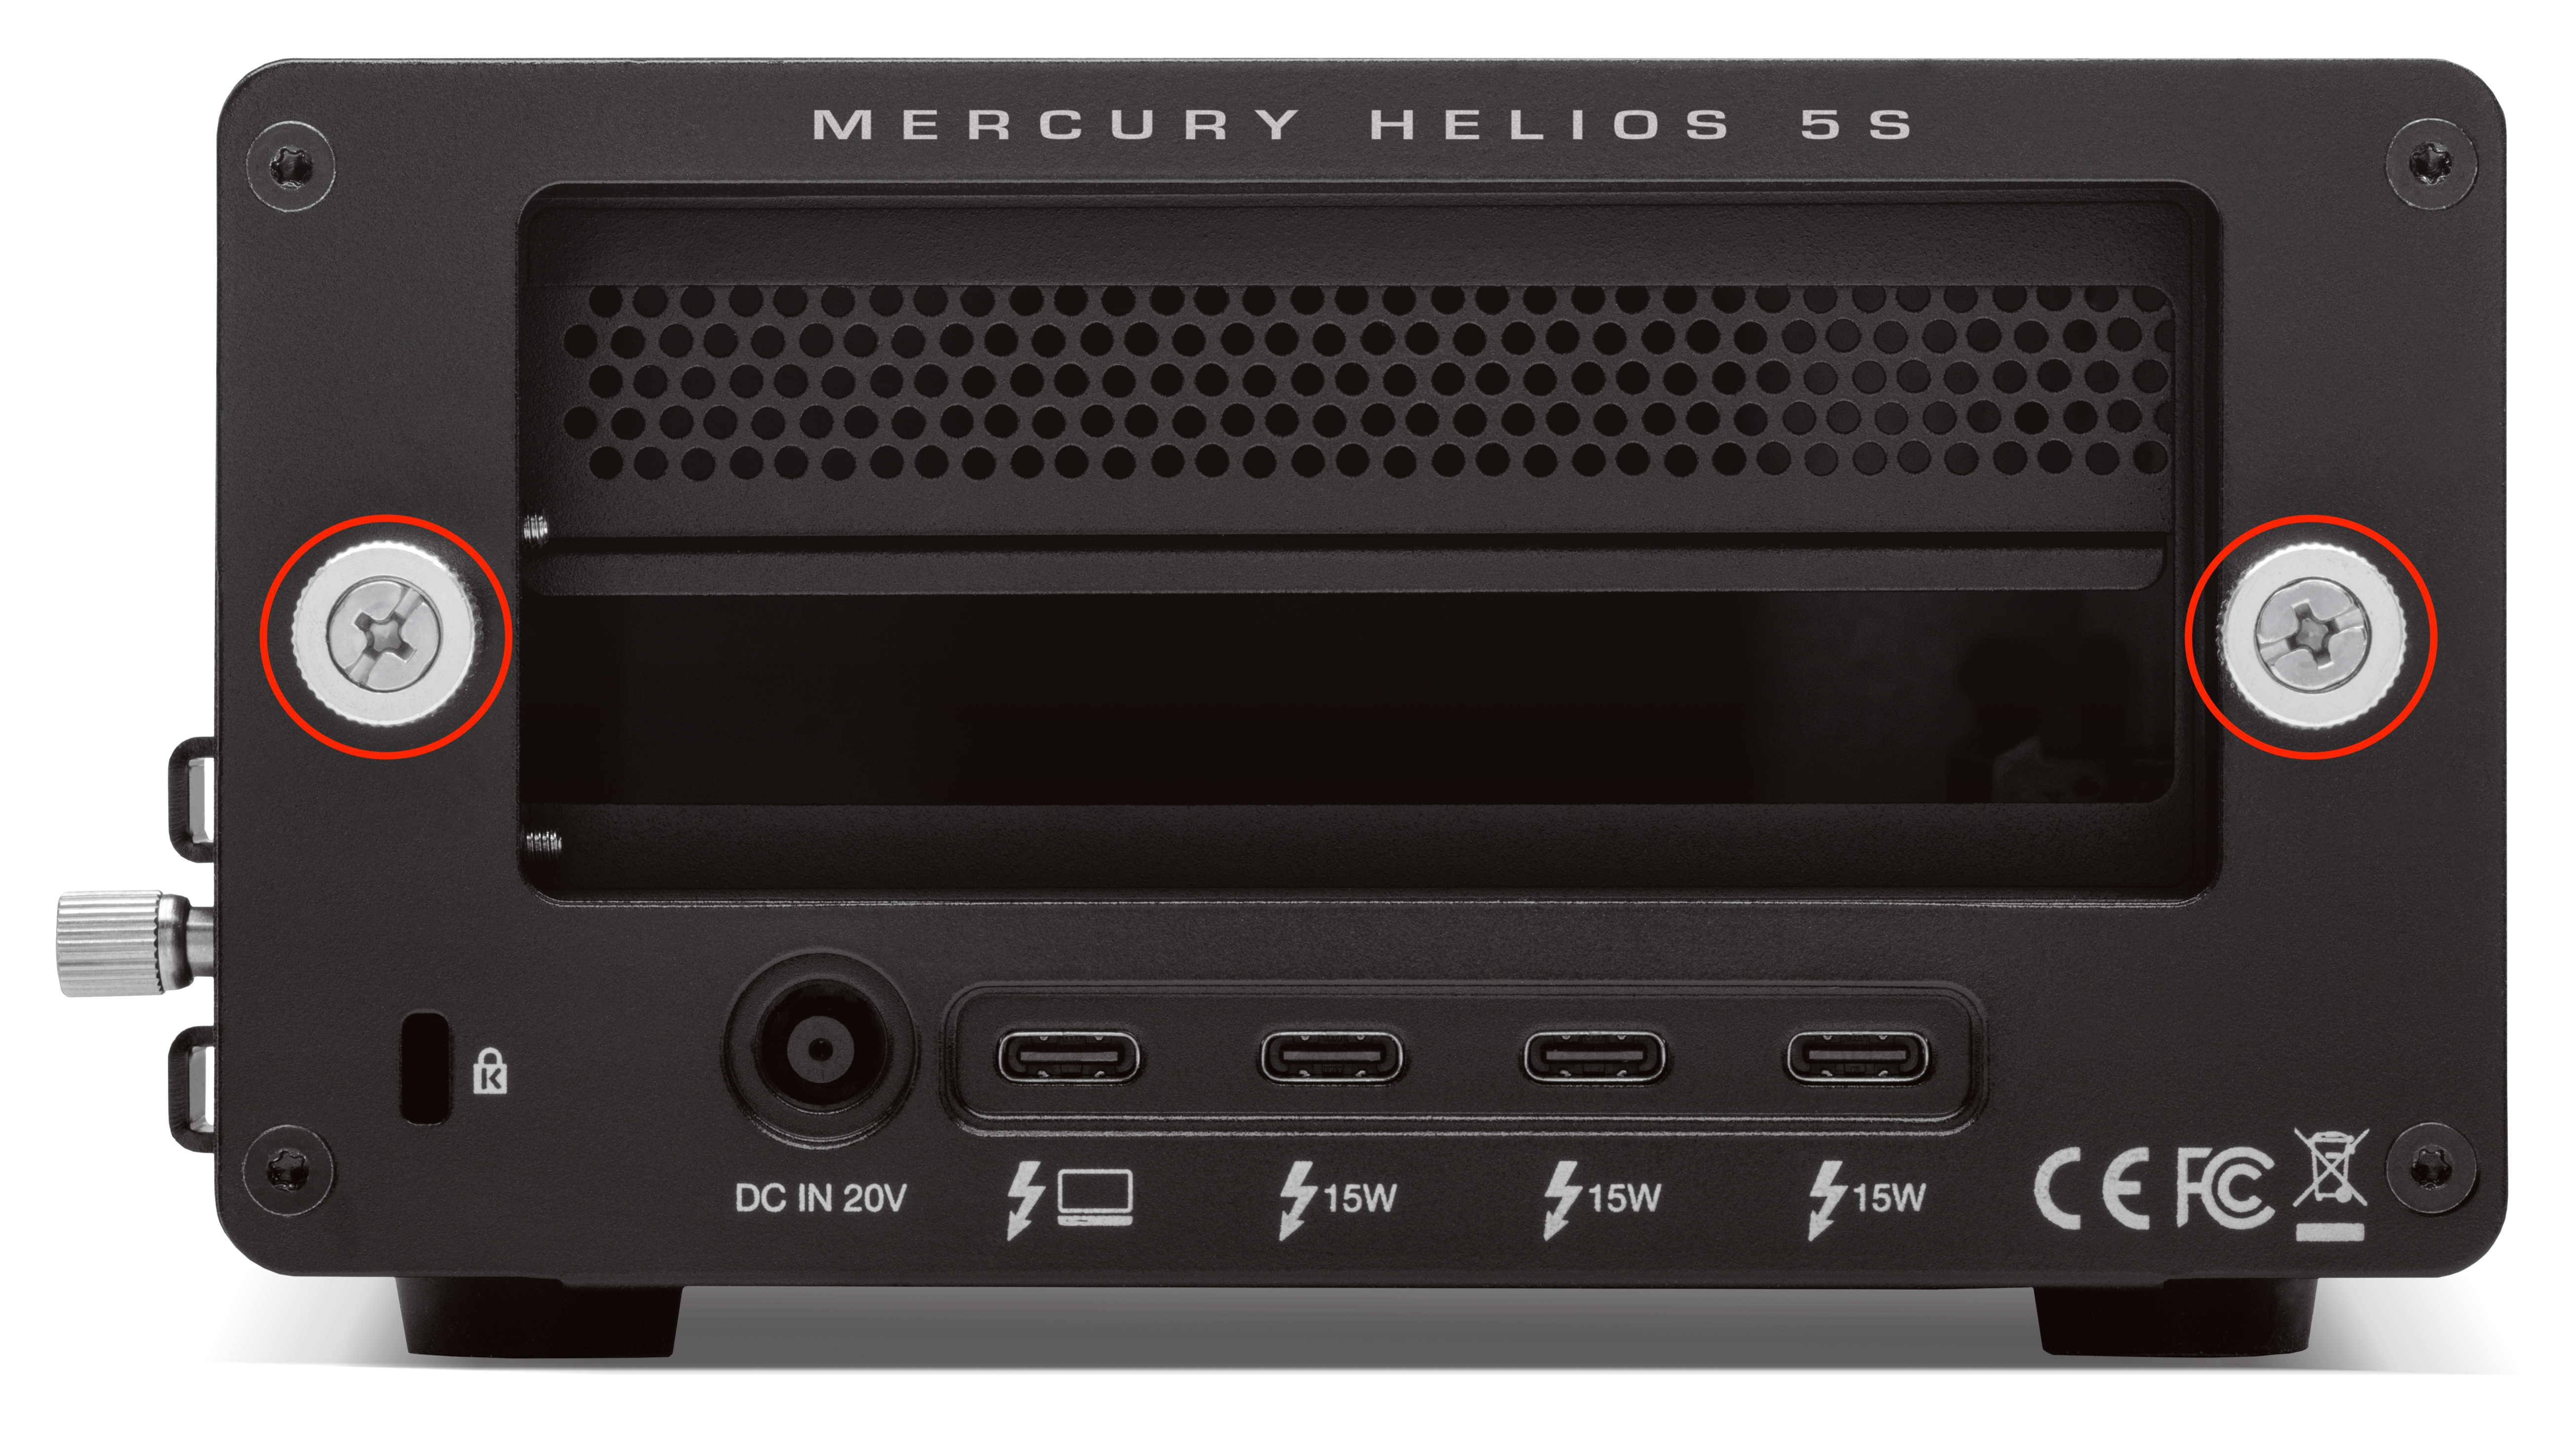
2. Grip the front grill and pull to separate the inner-chassis so that it slides out of the outer-chassis.
- NOTE: An internal switch is available that allows the fan speed to be adjusted. Changing the fan speed before installing a PCIe card is recommended. Please review Section 3.1 "Adjusting Fan Speed" for more details.
3. Loosen and remove the thumb screw used to secure the PCIe card’s bracket to the inner-chassis.
- NOTE: If you are using a double-width card, please remove the additional thumb-screw and bracket cover as well.
4. Align the PCle connector on the card with the PCle slot of the OWC Helios 5S. Press the card into the slot to complete the connection.
- NOTE: If there is resistance, do not force the card into the slot. Remove it, re-align the card's connector and try again.
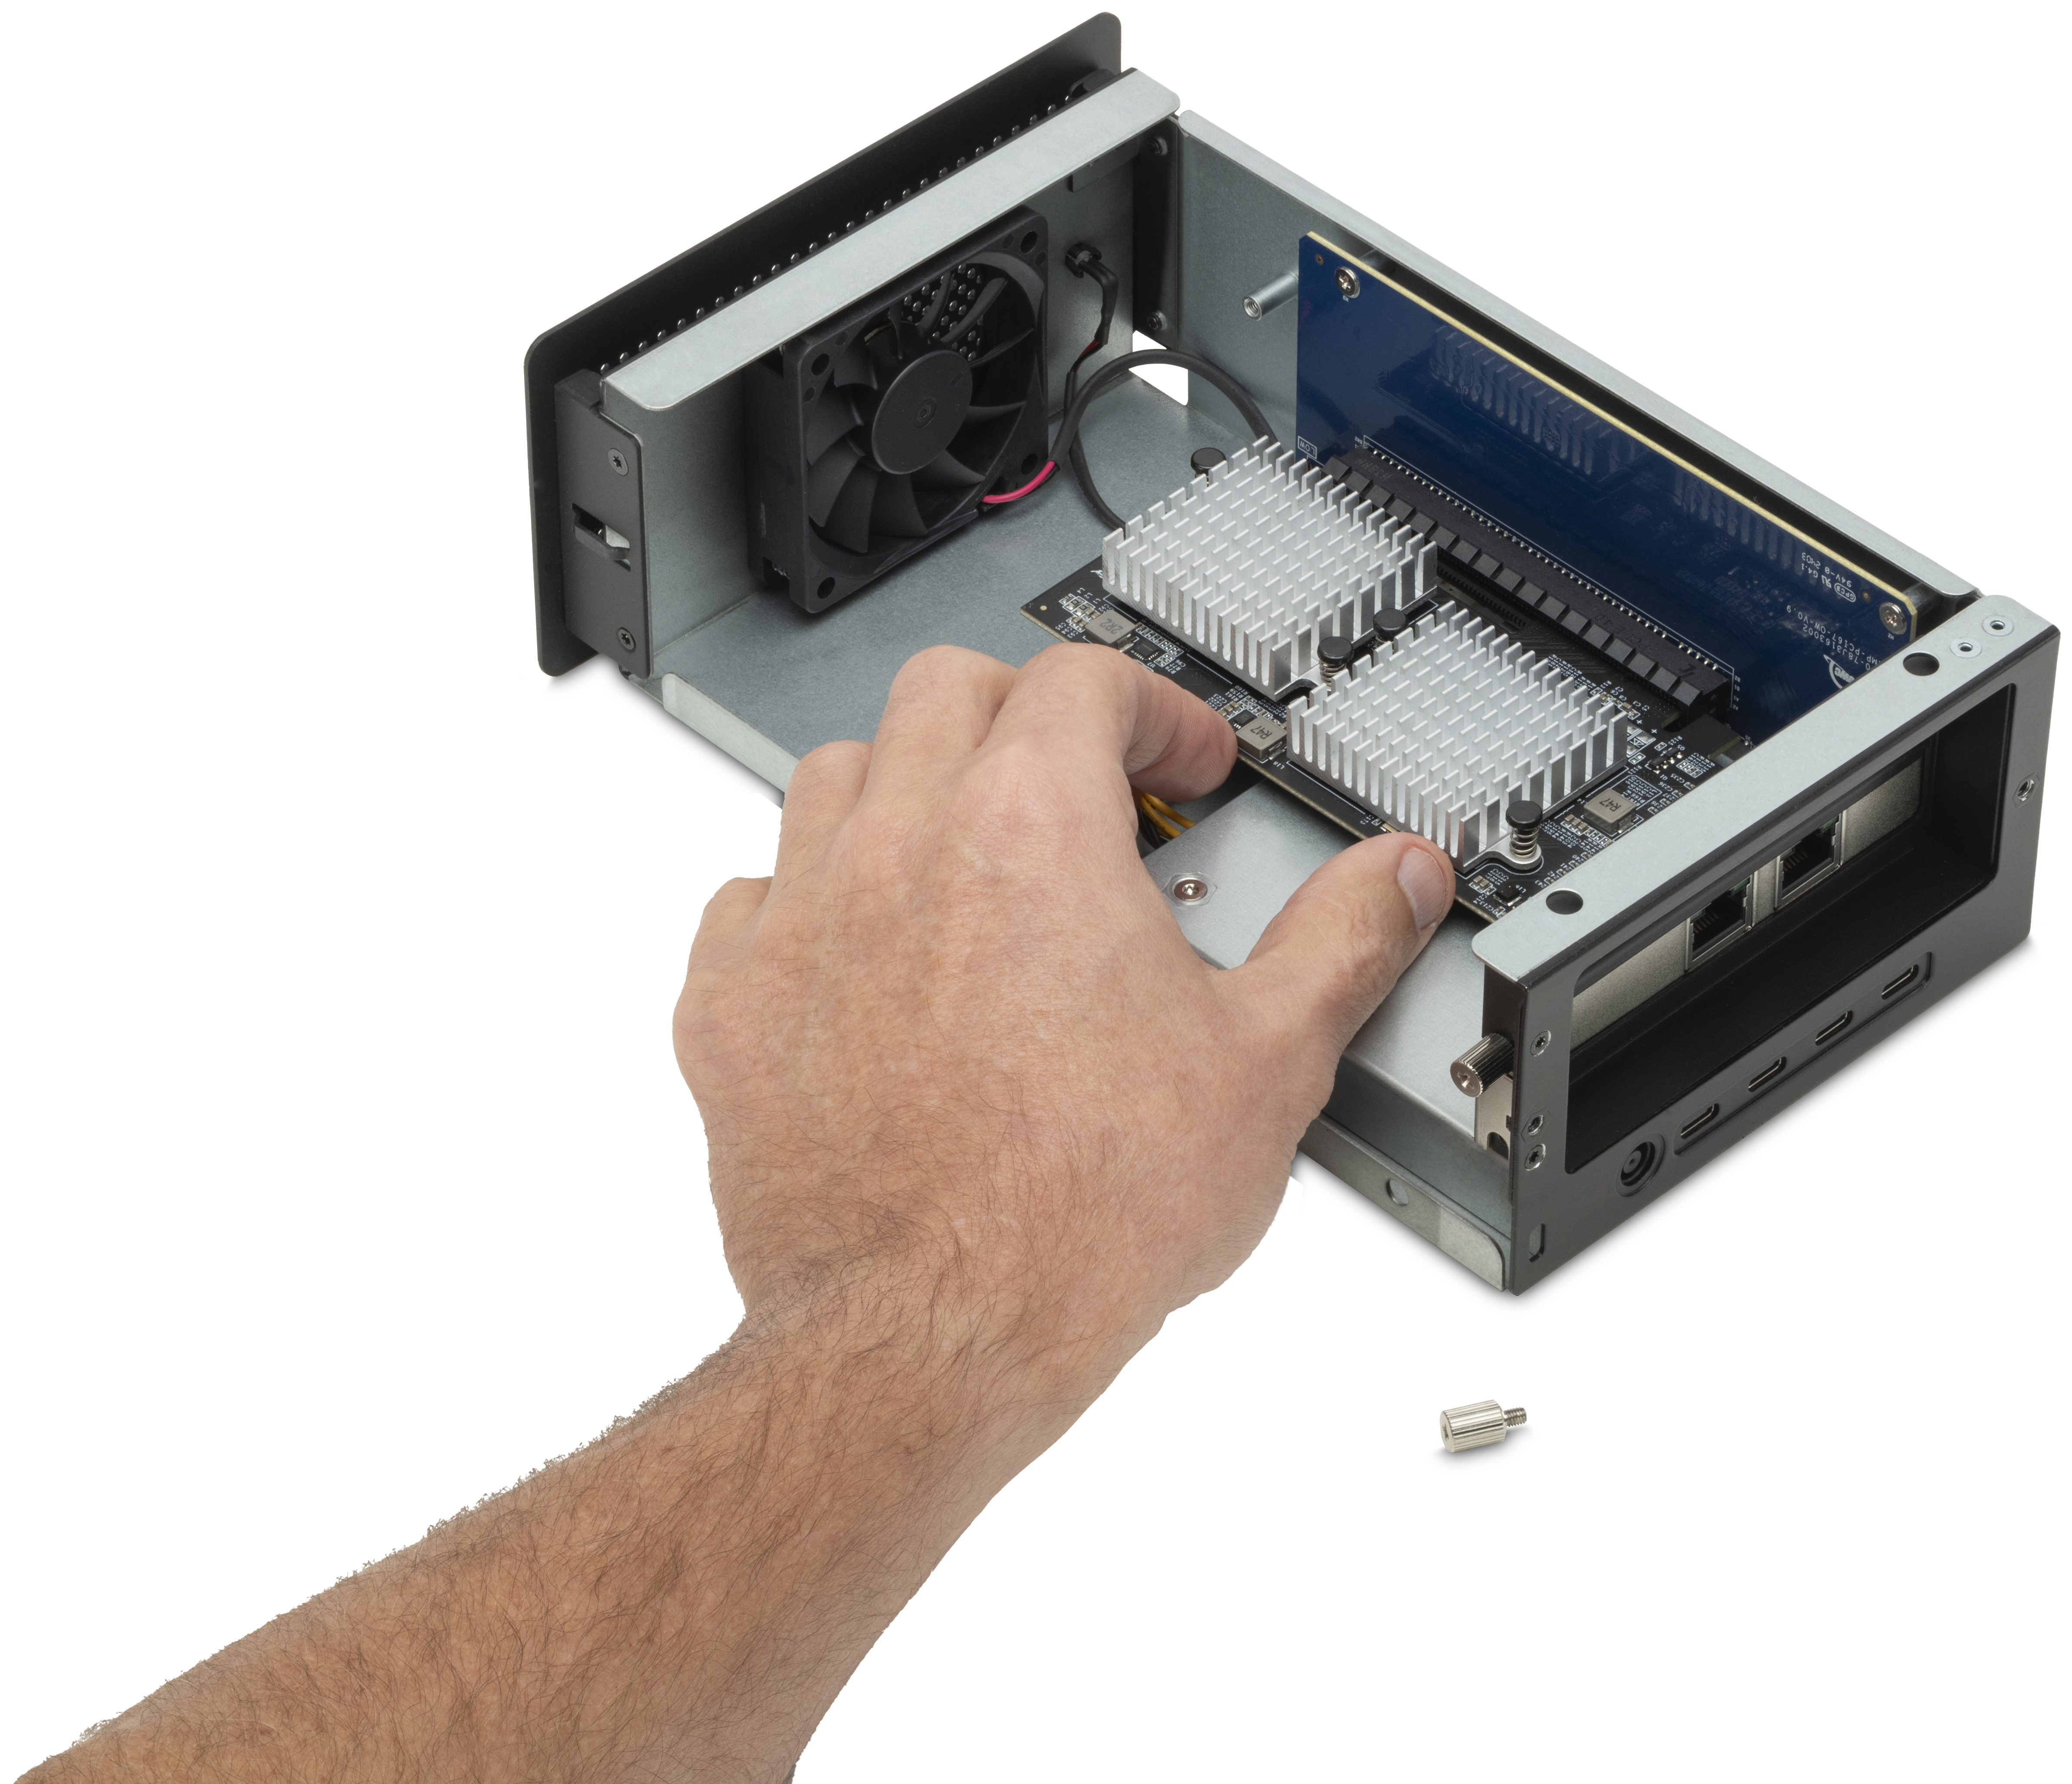
5. Use the thumb screw(s) removed earlier to secure the PCIe card bracket to the Mercury Helios 5S.
- NOTE: The PCIe bracket will sit flush with the opening on the back of the inner-chassis.
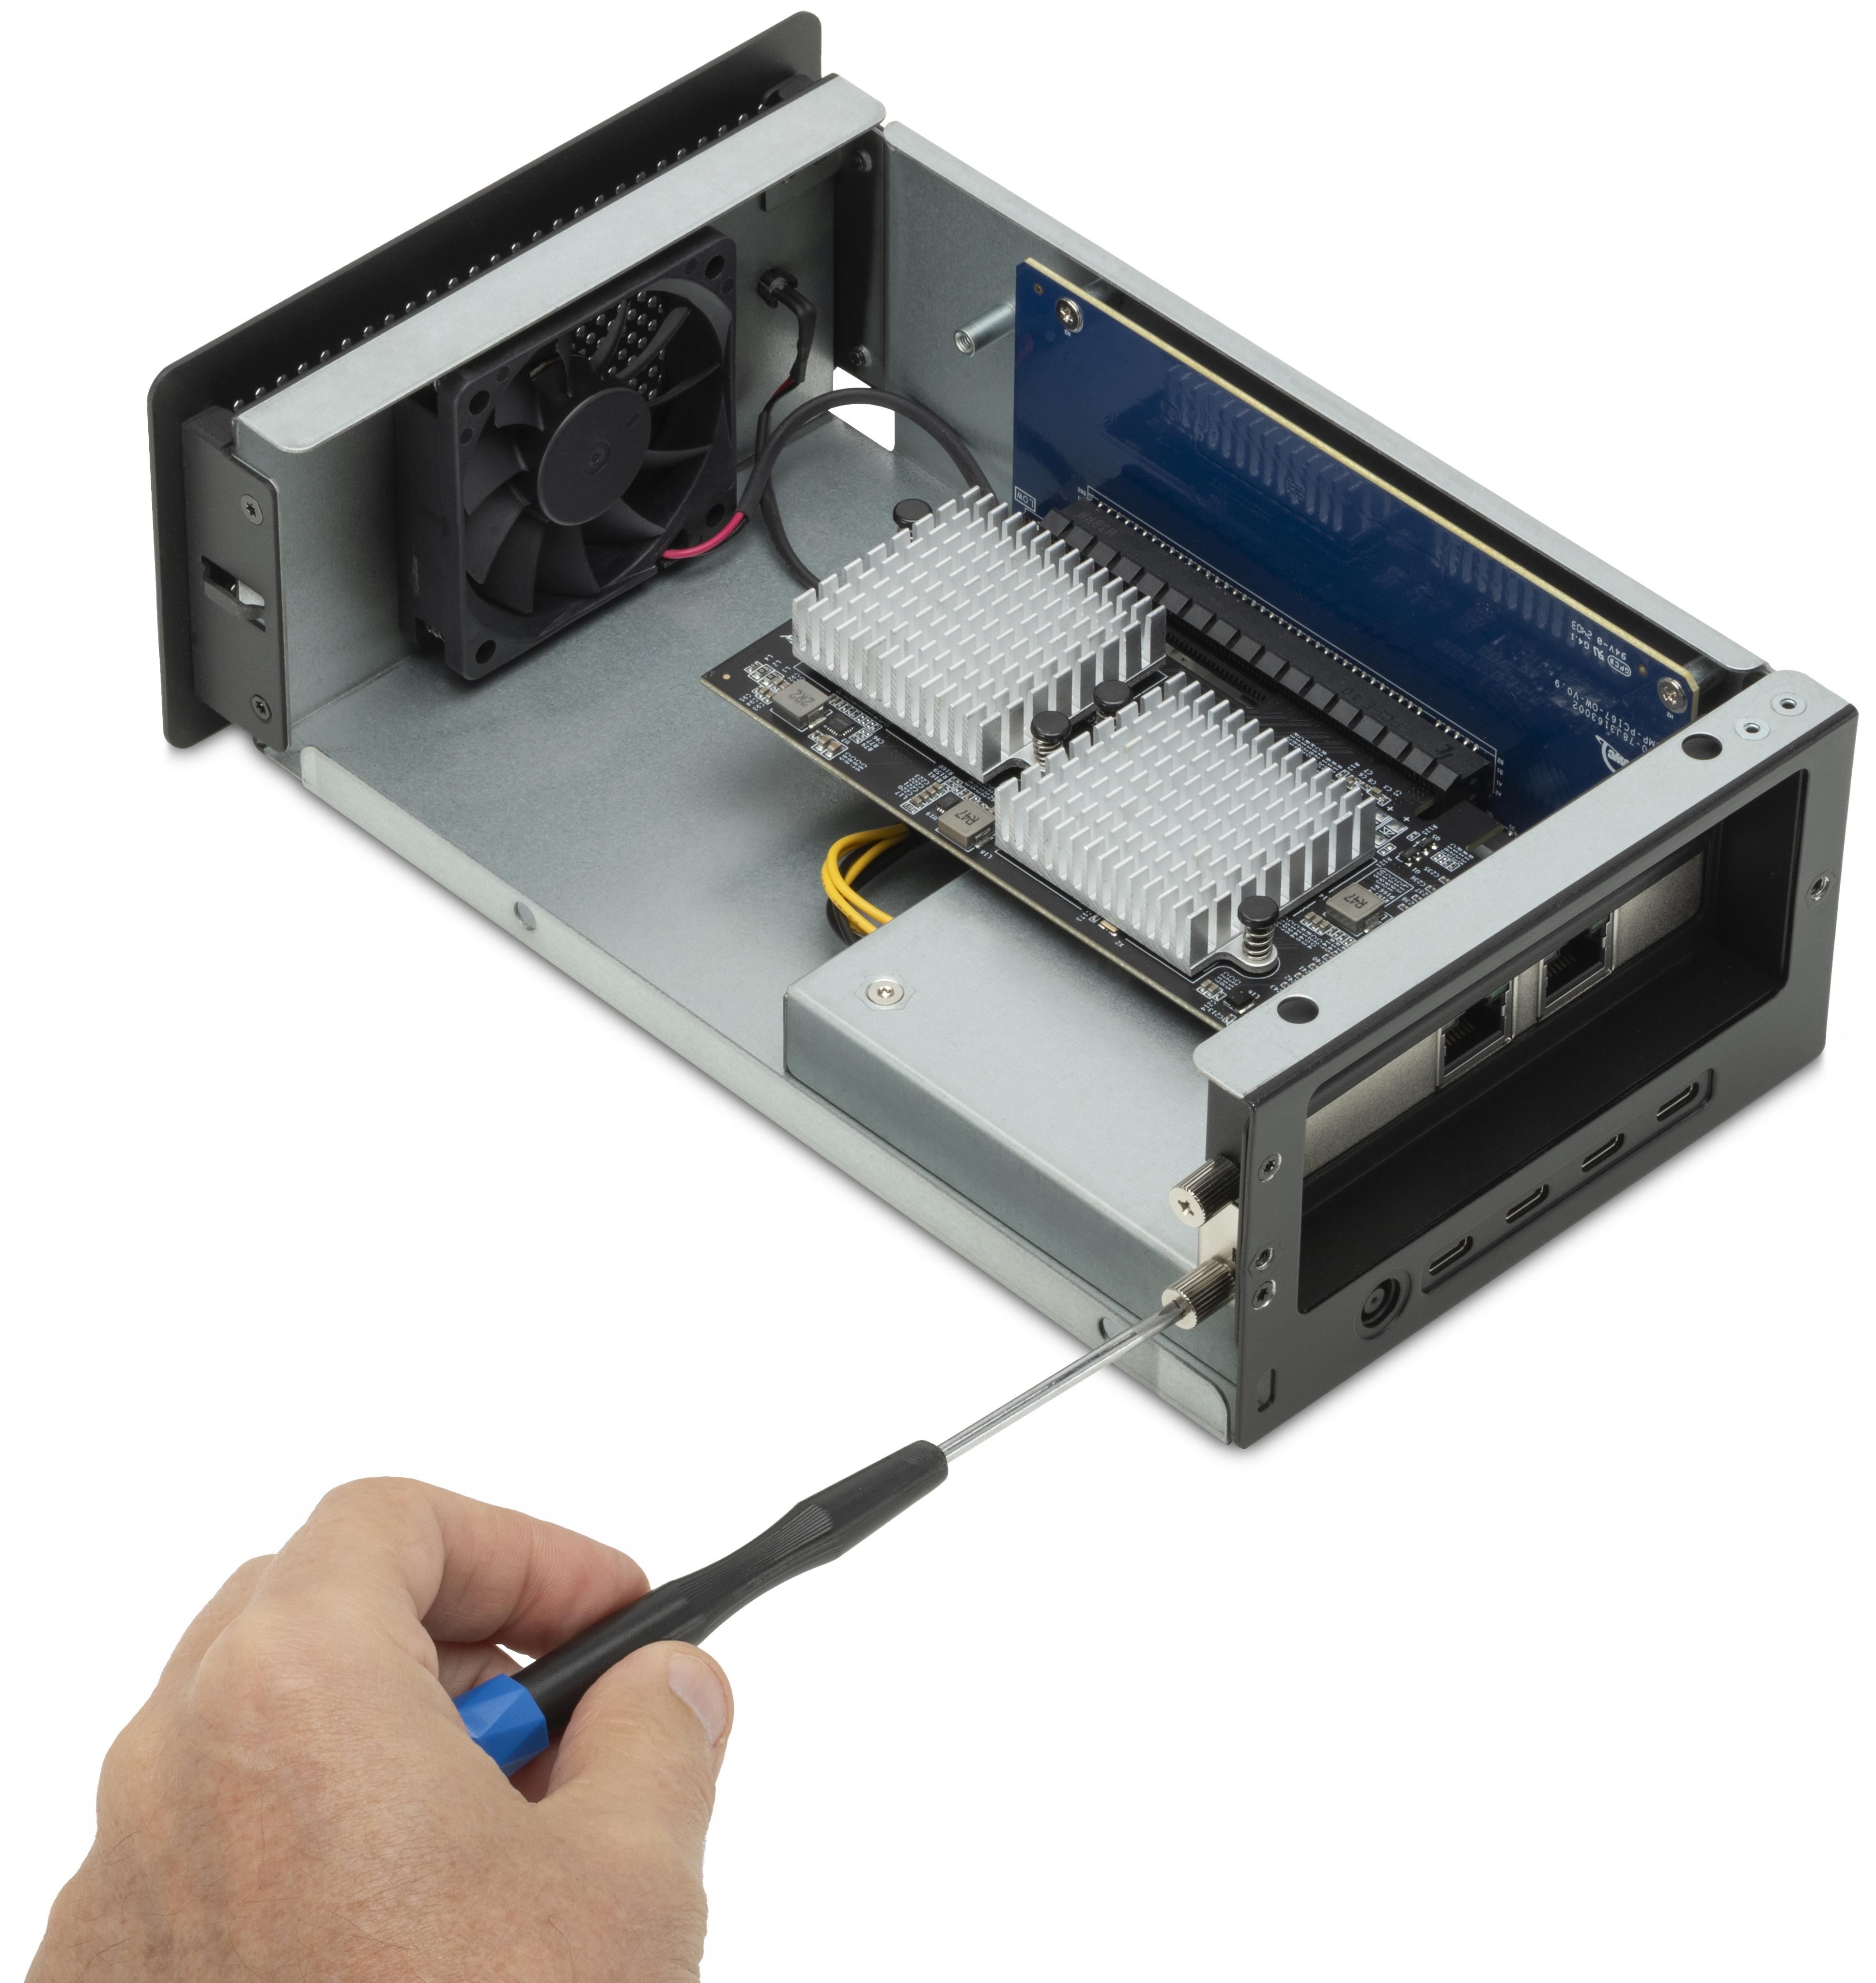
6. Slide the inner-chassis back into the outer-chassis. Ensure the inner-chassis if facing the correct direction (PCIe card ports in the rear).
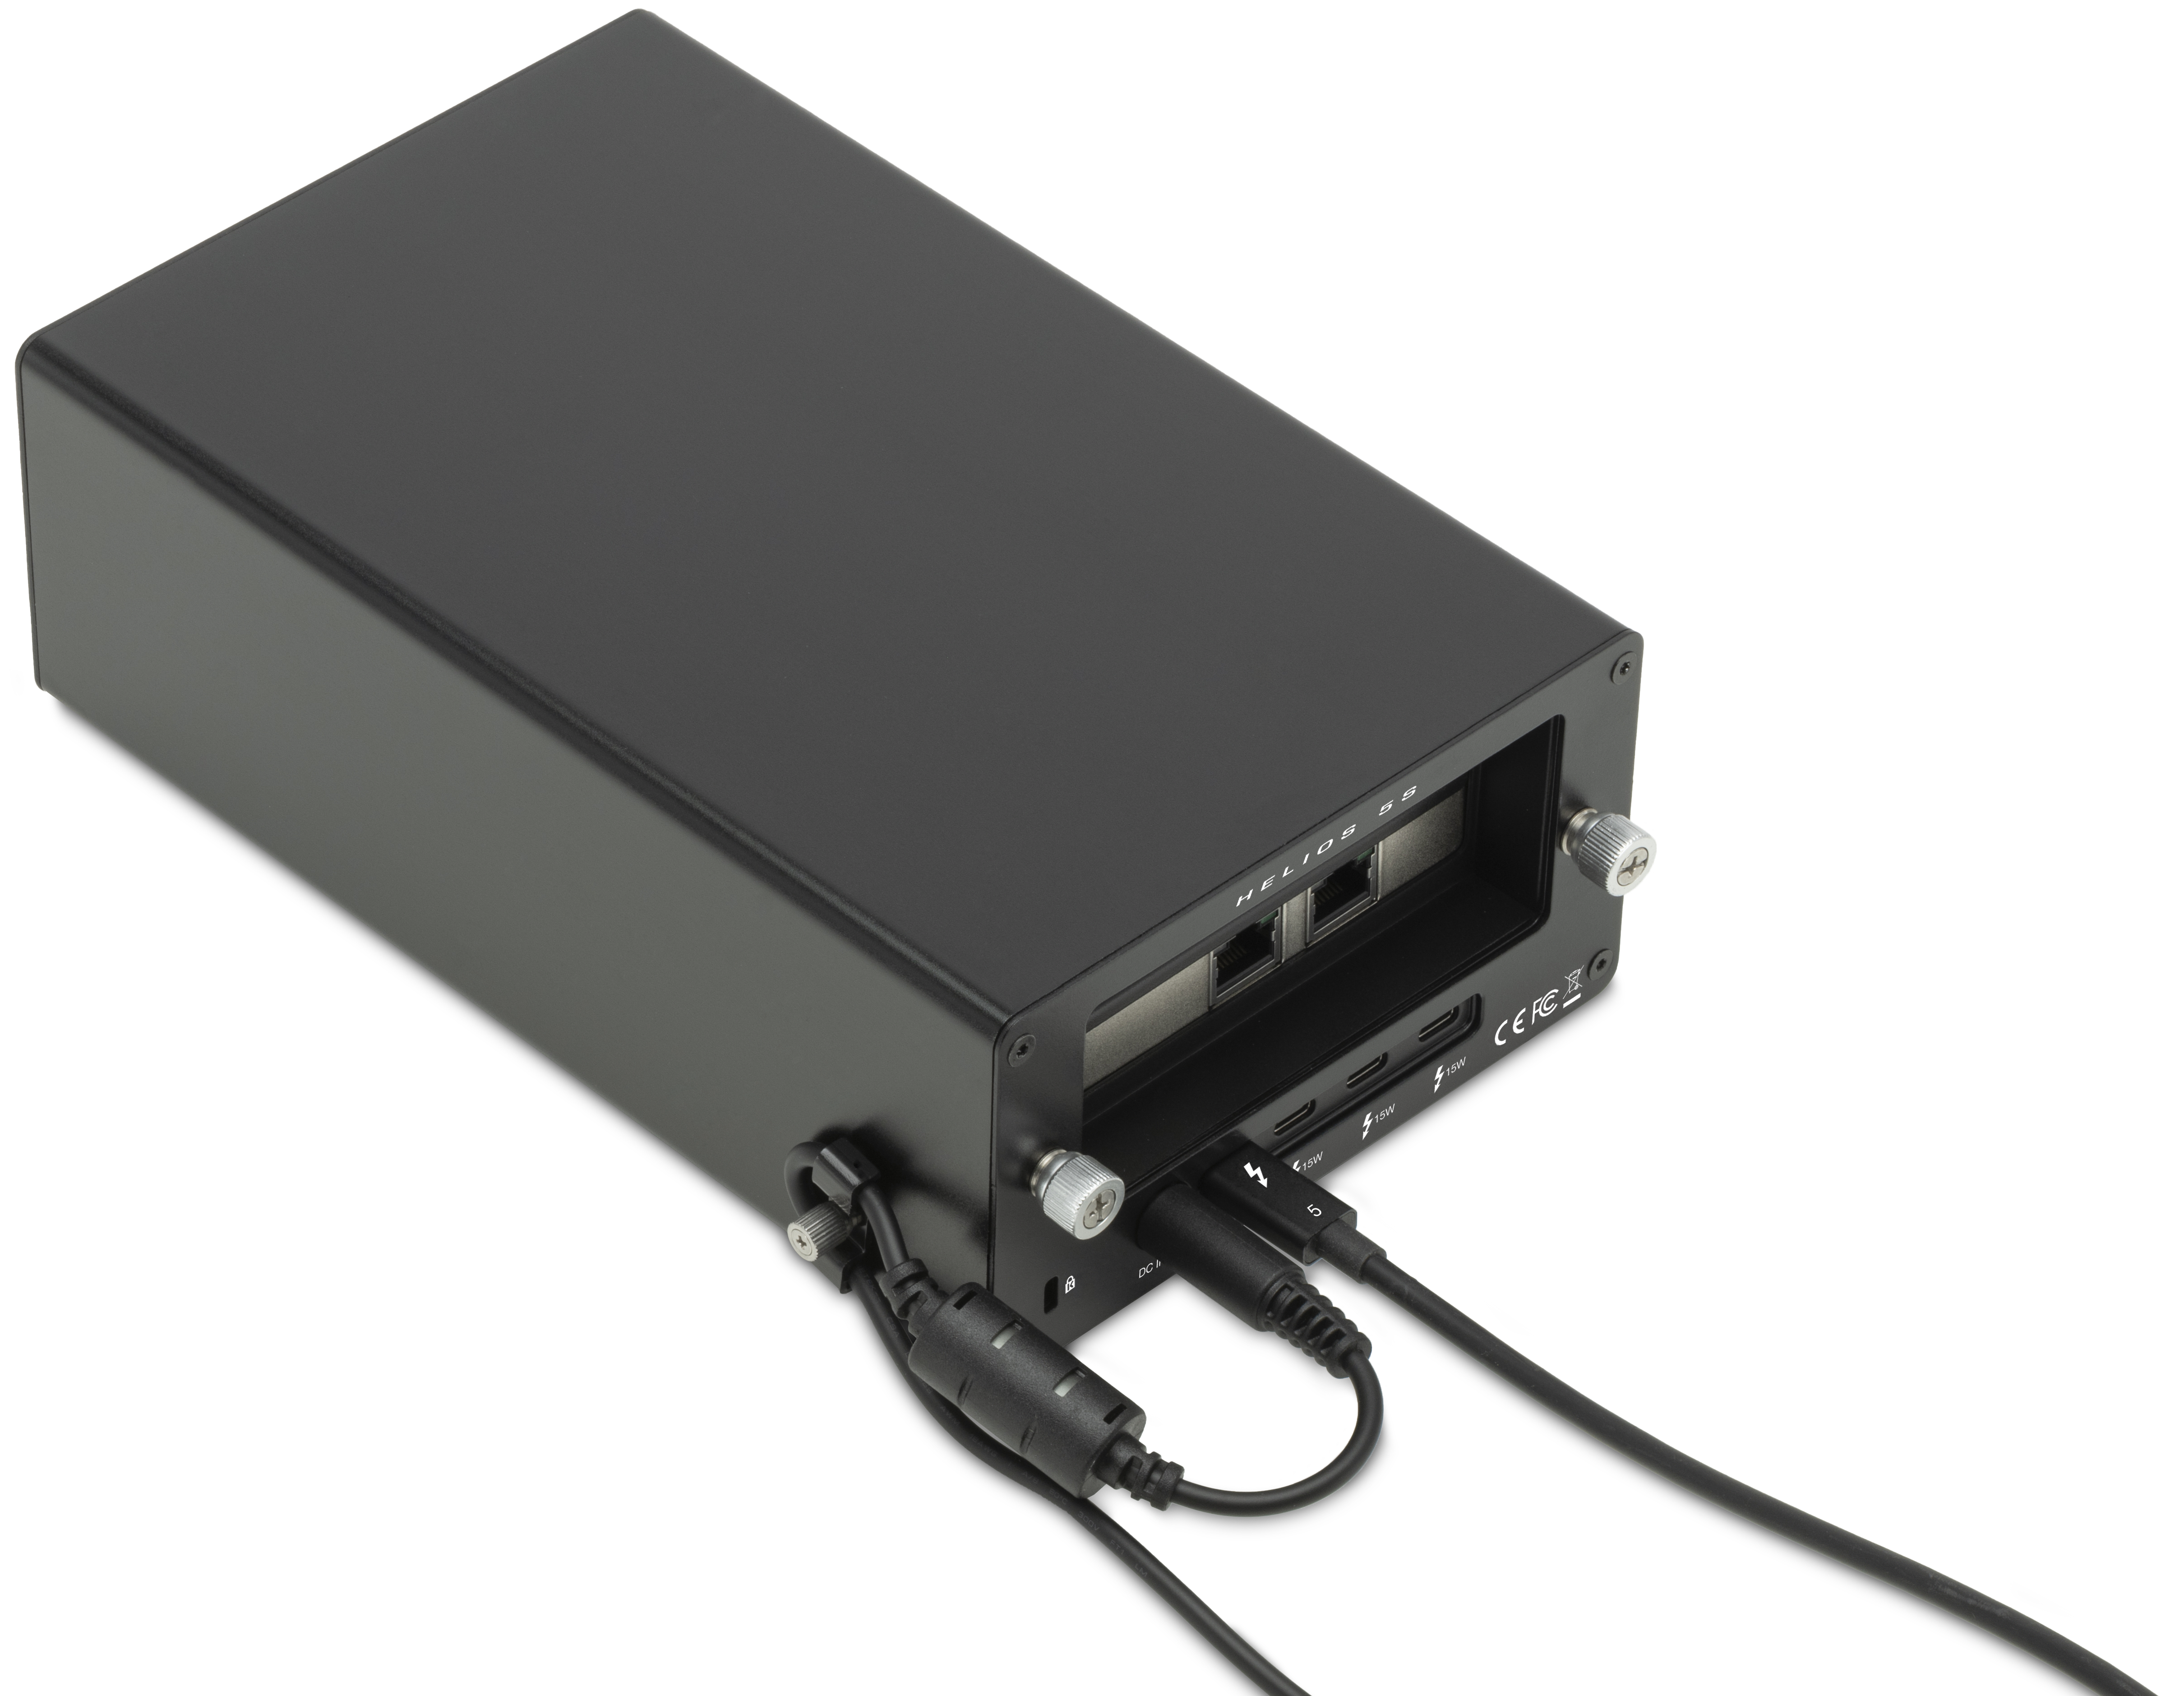
7. Secure the chassis together by tighten the thumbscrews on the rear panel. Press each screw in toward the enclosure, then twist clockwise while still applying pressure. Keep twisting until resistance increases.
8. Connect the external power supply and cable. Plug the power cable into the OWC Mercury Helios 5S DC IN power port located on the back. Connect the power supply into a power outlet.
- NOTE: A Power Cable Clamp is available to help safely secure the power supply cable. See Section 2.2 "Power Cable Clamp".
9. Connect the included Thunderbolt cable into the Thunderbolt 5 Host Port located on the back and into a compatible system. The Status LED will illuminate a solid blue.
10. (Optional) Install any required drivers for the PCIe card. Drivers should be obtainable through the PCIe card manufacture website.
2.2 Power Cable Clamp
1. Loosen the thumb screw securing the Power Cable Clamp.
- Power Cable Clamp may come separate from the device in a baggie.
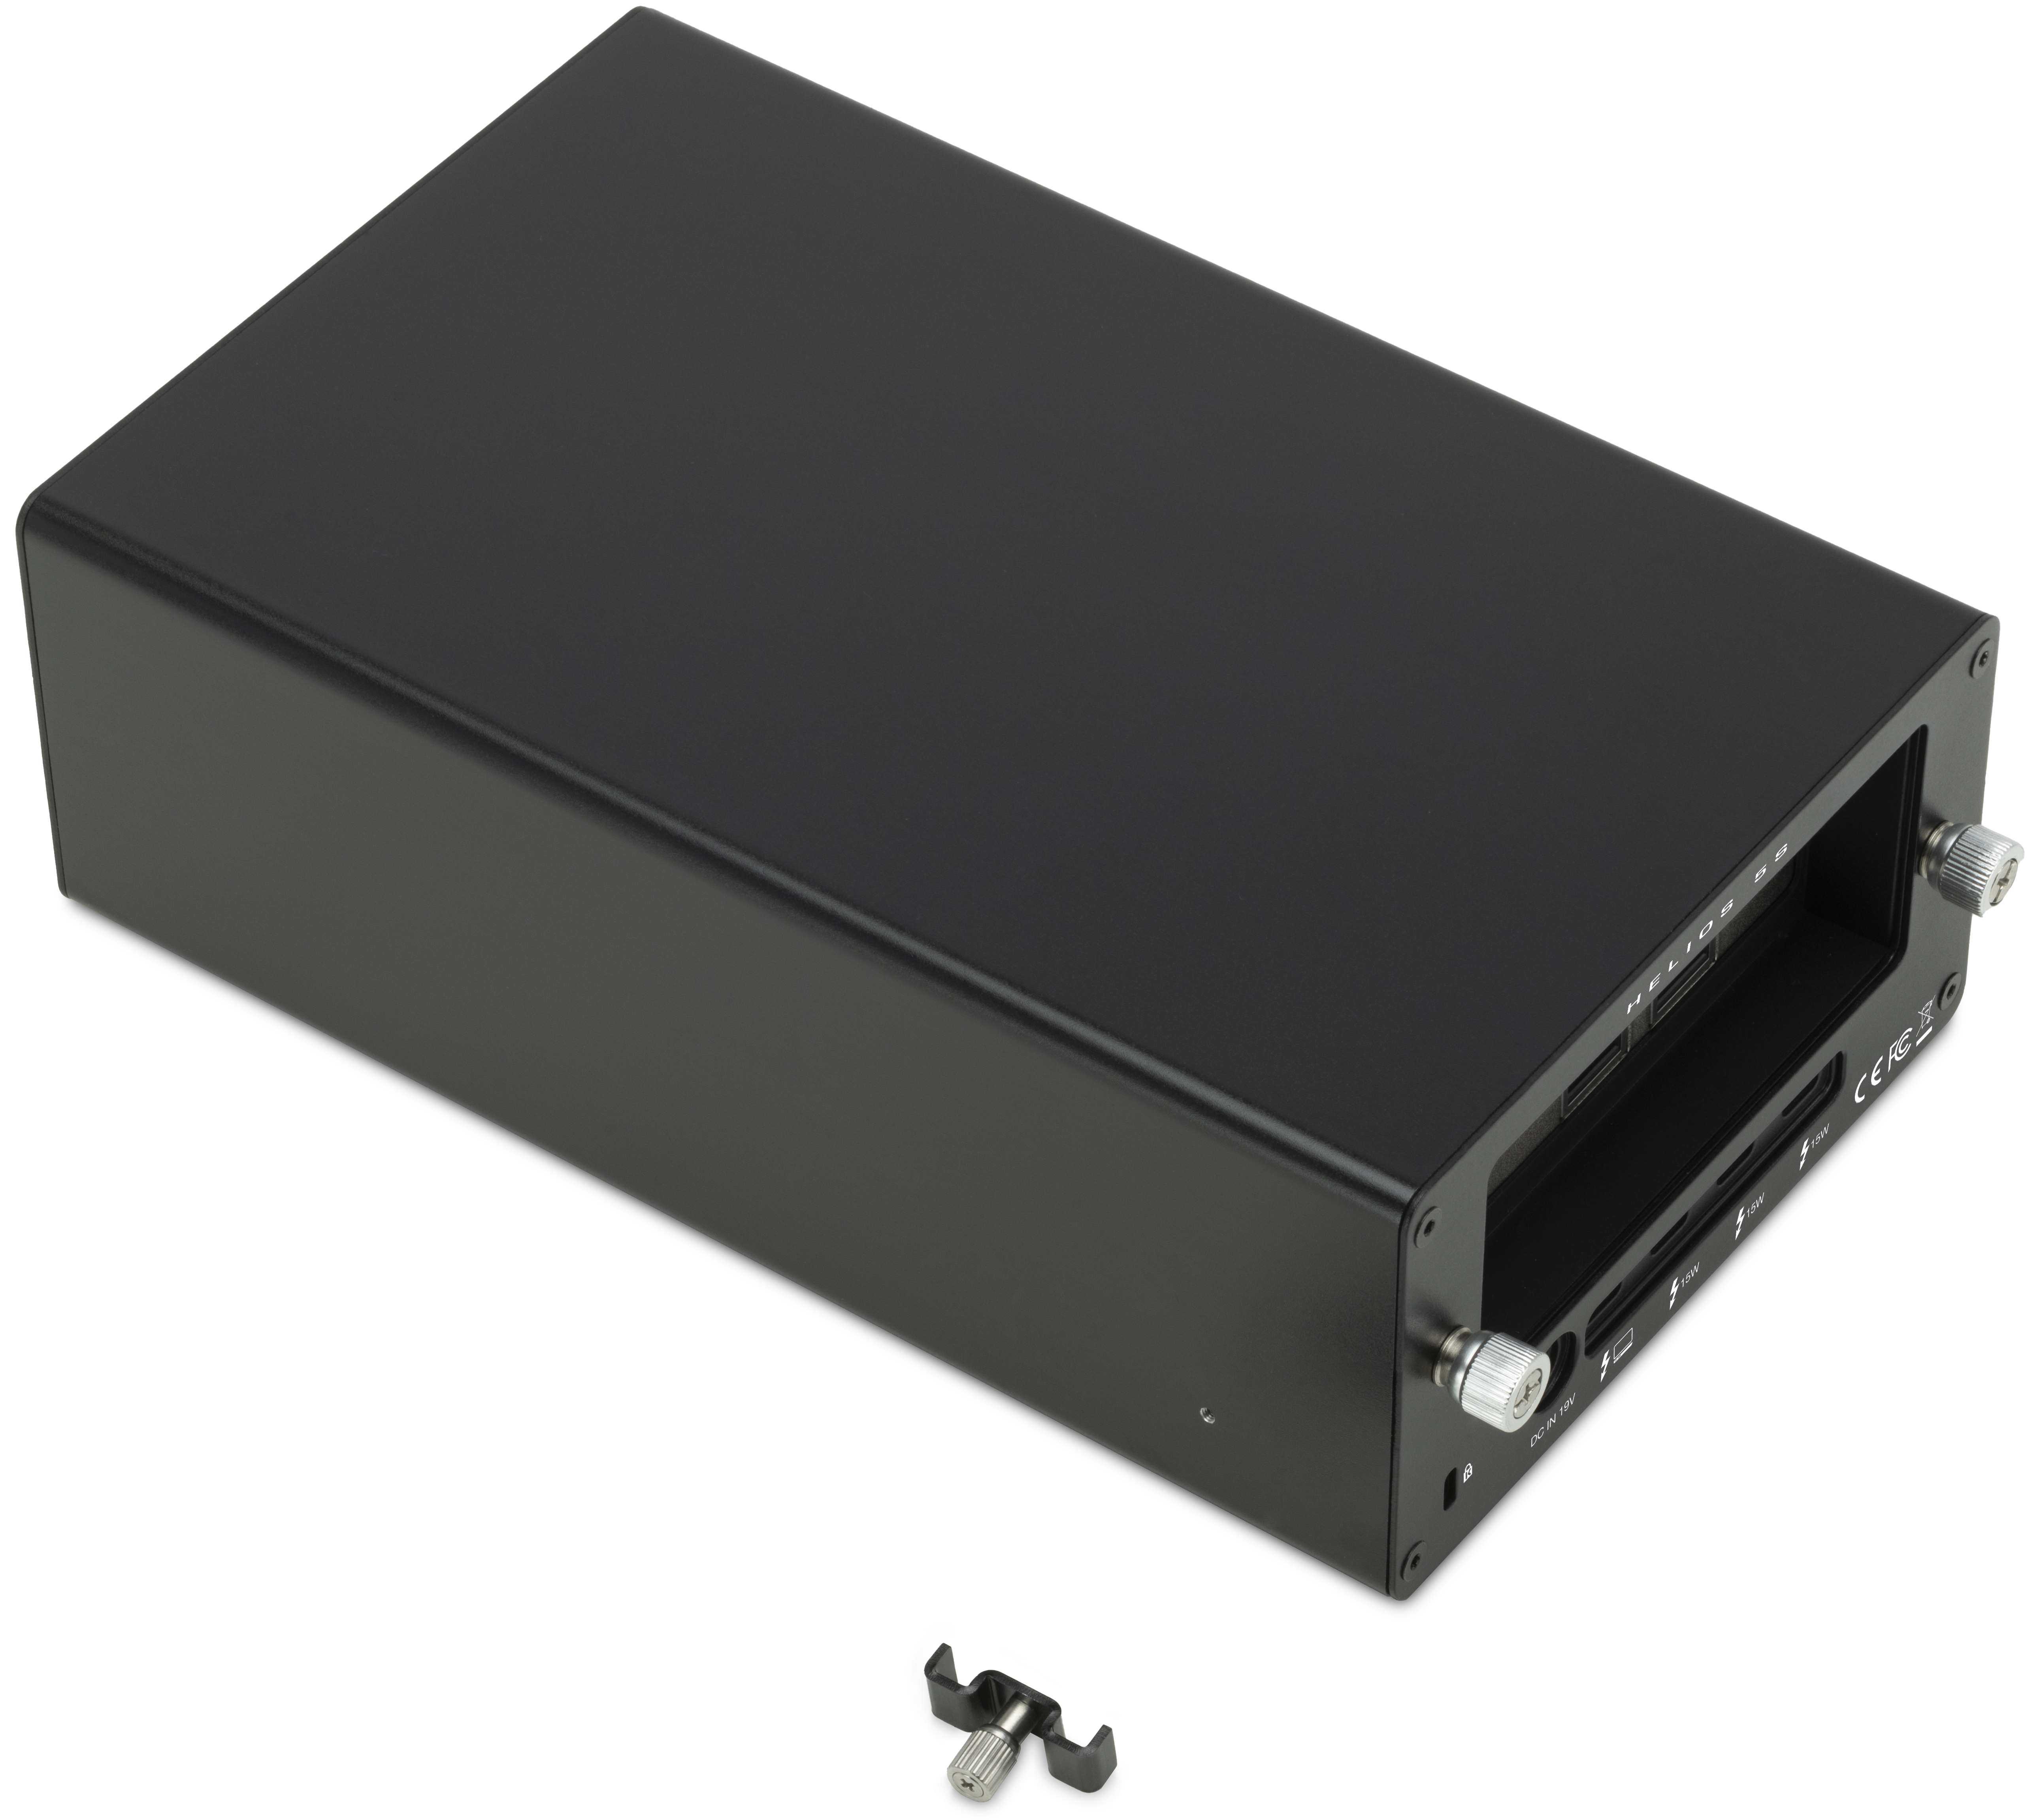
2. Loop and feed the power cable slack through the loosened clamp.
3. Tighten the thumb screw to secure the Power Cable Clamp.
Device Management
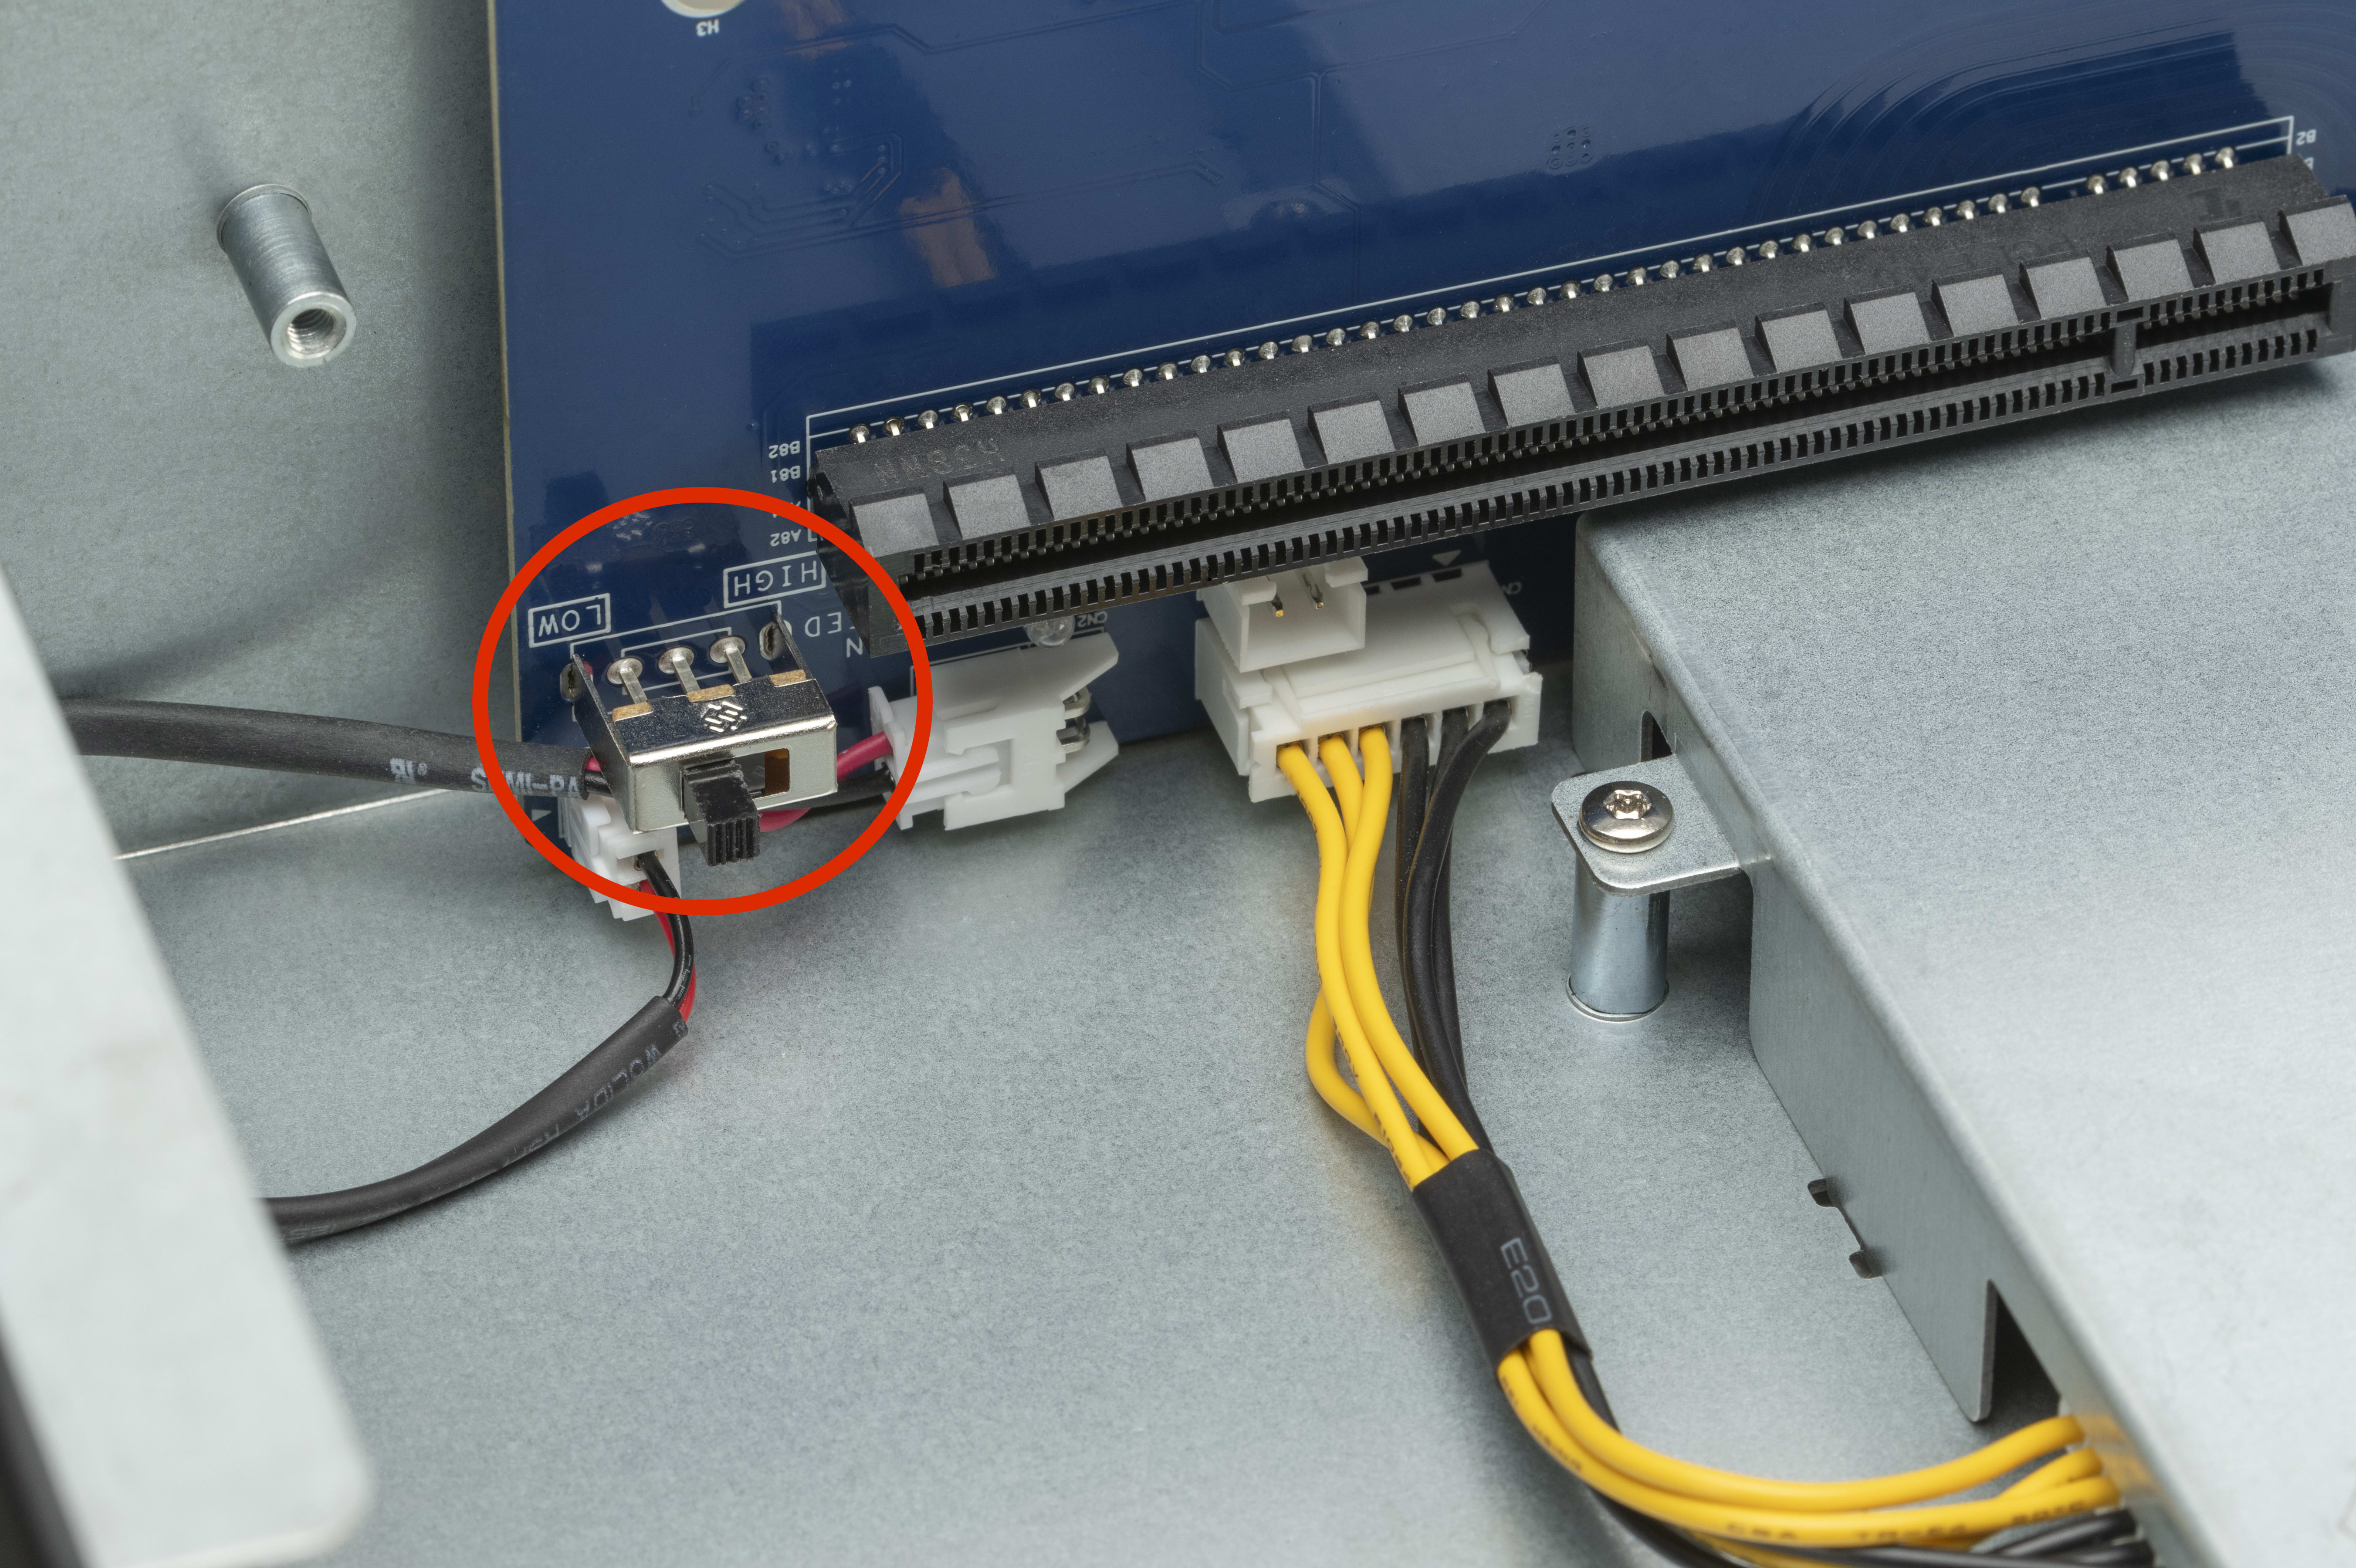
3.1 Adjusting Fan Speed
- The OWC Mercury Helios 5S contains an internal switch that allows the fan speed to be adjusted between ‘Low’ or ‘High’.
- The default fan setting is ‘Low’.
- NOTE: Changing the fan speed before installing a PCIe card is recommended. Installed cards can make it more difficult to reach the fan switch.
- Adjusting the fan speed to 'High' may be needed when using PCIe cards that generate a sizable amount of heat.
- Storage cards with multiple NVMe drives, dual 10GbE network interface cards, or enterprise grade RAID controllers are a few examples that would benefit from adjusting the fan speed to ‘High’.
- NOTE: A faint high frequency noise emitting from the fan may occur when using the 'Low' fan speed setting in conjunction with a low powered PCIe card. Adjusting the fan to 'High' should cease the noise.
1. Loosen the thumbscrews on the rear until they spin freely. These are captive screws that cannot be removed.
2. Turn the OWC Mercury Helios 5S on its side. Grip the front grill and pull to separate the inner-chassis so that it slides out of the outer-chassis.
3. Toggle the fan switch to the desired speed of High or Low.
4. Slide the inner-chassis back into the outer-chassis. Ensure the inner-chassis if facing the correct direction (PCIe card ports in the rear).
5. Secure the chassis together by tighten the thumbscrews on the rear panel. Press each screw in toward the enclosure, then twist clockwise while still applying pressure. Keep twisting until resistance increases.
3.2 Usage Notes
- Host charging is not supported.
- GPUs are not supported.
- Cards with drivers must be Thunderbolt-aware.
- Cards that require more than 75W are not supported.
- Understanding PCIe Card Requirements support article.
- Adjusting the fan speed to 'High' may be needed when using PCIe cards that generate a sizable amount of heat.
- Storage cards with multiple NVMe drives, dual 10GbE network interface cards, or enterprise grade RAID controllers are a few examples that would benefit from adjusting the fan speed to ‘High’.
- NOTE: A faint high frequency noise emitting from the fan may occur when using the 'Low' fan speed setting in conjunction with a low powered PCIe card. Adjusting the fan to 'High' should cease the noise.
- The raised edges of the OWC Mercury Helios 5S chassis, surrounding the rear Thunderbolt ports, may obstruct thicker USB-C cable/device connections and prevent a secure attachment. The OWC Envoy Pro mini is an example of a USB-C device that is obstructed due to thickness.
- An extension cable, like the 0.5M OWC USB-C Extension Cable (available separately), will allow thicker cable/device connections by extending them away from the raised edges of the rear Thunderbolt ports.
- Thunderbolt 5 is capable of supporting up to three displays from a single computer host port dependent on the host computer's capability. This includes up to three 8K displays @ 60Hz, or two 8K displays @ 120Hz. Presently Apple has only enabled support for a maximum of up to two native displays per connected Apple Mac Thunderbolt host port. Software driver based technologies, such as DisplayLink (as supported by the OWC USB-C Dual HDMI 4K Display Adapter), may enable additional display support.
- Please review the Apple silicon External Display Support support article for more details regarding how many displays can be connected to an Apple silicon Mac system.
- Displays that do not have Display Stream Compression (DSC) will experience lower refresh rates.
Support Resources
4.1 Troubleshooting
- If your computer does not recognize the OWC Mercury Helios 5S when it is connected:
- Verify the Thunderbolt cable is securely connected between the OWC Mercury Helios 5S and computer.
- Connect the OWC Mercury Helios 5S and computer with a different Thunderbolt cable.
- Connect the OWC Mercury Helios 5S to a different computer.
- High powered PCIe cards generate more heat than low powered PCIe cards. Higher temperatures may impact device and PCIe card performance. Changing the fan speed from 'Low' to 'High', see Section 3.1 "Adjusting Fan Speed" for more details, can resolve performance and functionality issues.
- We are very sorry If issues continue to occur. Please know that OWC support is here to help. Contact information for our support can be found in section 4.4 "Contacting Support". Please have your serial number ready which is located on the bottom of the OWC Mercury Helios 5S and printed on the original packaging.
4.2 Online Resources
Support Articles:
Product Pages:
Support Guide Pages:
4.3 About Data Backup
Any data loss or corruption while using the OWC Mercury Helios 5S is the sole responsibility of the user, and under no circumstances may OWC, its parent, partners, affiliates, officers, employees, or agents be held liable for loss of the use of data including compensation of any kind or recovery of the data.
4.4 Contacting Support
4.5 About This Manual
The images and descriptions may vary slightly between this manual and the unit shipped. Functions and features may change depending on the firmware version. The latest product details and warranty information can be found on the product web page. OWC’s Limited Warranty is not transferable and
General Use Precautions
- To avoid damage, do not expose the device to temperatures outside the following ranges:
- Environmental (Operating)
- Temperature (ºF): 41º — 95º
- Temperature (ºC): 5º — 35º
- Environmental (Non-Operating)
- Temperature (ºF): -4º — 140º
- Temperature (ºC): -20º — 60º
- Environmental (Operating)
- Always unplug the device from the electrical outlet if there is a risk of lightning or if it will be unused for an extended period-of-time. Otherwise, there is an increased risk of electrical shock, short-circuiting, or fire.
- Protect your device from excessive exposure to dust during use or storage. Dust can build up inside the device, increasing the risk of electrical shock, short-circuiting, or fire.
- Do not block any ventilation openings on the device. These help to keep the device cool during operation. Blocking the ventilation openings may increase the risk of electrical shock, short-circuiting, or fire.
Safety Precautions
- Use proper anti-static precautions when handling this device. Failure to do so can increase the risk of electrical shock or short-circuiting.
- Never expose your device to rain, or use it near water, or in damp wet conditions. Never place objects containing liquids on the device, as they may spill everywhere and into the openings. This will increase the risk of electrical shock, short-circuiting, fire, or personal injury.
- To avoid any risk of electrical shock, short-circuiting, fire, or dangerous emissions, never insert any metallic object into the device.
- Please cease use of the device and contact OWC Support if it appears to be malfunctioning.
Terms & Conditions of Sale
Warranty
The OWC Mercury Helios 5S has a 3 Year OWC Limited Warranty. For up-to-date product and warranty information, please visit the product web page.
Changes
The material in this document is for information purposes only and subject to change without notice. While reasonable efforts have been made in the preparation of this document to assure its accuracy, OWC, its parent, partners, affiliates, officers, employees, and agents assume no liability resulting from errors or omissions in this document, or from the use of the information contained herein. OWC reserves the right to make changes or revisions in the product design or the product manual without reservation and without obligation to notify any person of such revisions and changes.
FCC Statement
Warning! Modifications not authorized by the manufacturer may void the user’s authority to operate this device.
NOTE: This equipment has been tested and found to comply with the limits for a Class B digital device, pursuant to Part 15 of the FCC Rules. These limits are designed to provide reasonable protection against harmful interference in a residential installation. This equipment generates, uses and can radiate radio frequency energy and, if not installed and used in accordance with the instructions, may cause harmful interference to radio communications. However, there is no guarantee that interference will not occur in a particular installation. If this equipment does cause harmful interference with radio or television reception, which can be determined by turning the equipment off and on, the user is encouraged to try to correct the interference by one or more of the following measures:
- Reorient or relocate the receiving antenna.
- Increase the separation between the equipment and receiver.
- Connect the equipment to an outlet on a circuit different from that to which the receiver is connected.
Copyrights And Trademarks
No part of this publication may be reproduced, stored in a retrieval system, or transmitted in any form or by any means, electronic, mechanical, photocopying, recording or otherwise, without the prior written consent of OWC.
© 2025 Other World Computing, Inc. All rights reserved. OWC, the OWC logo, SoftRAID, and the SoftRAID logo are trademarks of New Concepts Development Corporation, registered in the U.S. and/or other countries. Helios is a trademark of Other World Computing, Inc. Mac and macOS are trademarks of Apple Inc. registered in the U.S. and in other countries. Thunderbolt and the Thunderbolt logo are trademarks of Intel Corporation or its subsidiaries in the U.S. and/or other countries. Microsoft and Windows are either registered trademarks or trademarks of Microsoft Corporation in the United States and/or other countries. Other marks may be the trademark or registered trademark property of their owners.
Free Support Chat
Our free award-winning support team is ready to answer all of your questions. Technical support is available Monday - Friday: 9AM - 6PM. Customer Support & Sales is available Monday - Friday: 9AM - 6PM. Support is unavailable on U.S. Federal holidays. Talk to a human today.