Created on: August 21, 2020
Last updated: April 19, 2022
Please note that for some PCs, laptops in particular, the default USB power management settings in Windows 10 may cause a number of unexpected behaviors with USB devices, including:
- Devices which are idle for a few minutes may spontaneously power down at intervals different from what are expected, based Power & Sleep settings.
- Devices which are working normally and then are disconnected, may not work if they are immediately re-connected (on either available USB port).
- In some cases allowing the PC to sleep and then wake up may cause both USB ports to become inactive, whether or not anything is initially connected.
A temporarily workaround to these issues is to disconnect the dock and then reconnect it to the host, however, with a bit of searching in the Windows Device Manager, a more permanent solution is available.
While the location of the required settings can vary by computer type, start with the following approach.
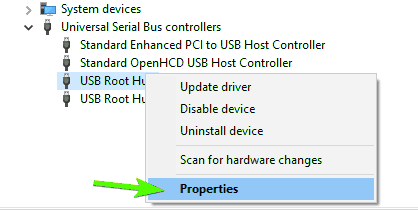
- Launch the Device Manager from the Start Menu (either by typing the name or navigating to it).
- Look for the branch called "Universal Serial Bus controllers" and open it to reveal the sub-items.
- Look for the sub-items called USB Root Hub. Note that they may be labeled by USB port type such as "(USB 3.0)". Some PCs may have two separate 'root hub' items for this product (one for the USB 3.0 port and one for the USB 2.0 port), while others may control both from a single 'root hub' item. In addition, depending on the PC's hardware and what else is connected, there may be more than one of each 'root hub' type that you have to check. To verify for a given item, right-click and select 'Properties' (example below).
- Within each listing (under the 'General' tab), you are looking for an indication that the active item is associated with the Thunderbolt 3 mini Dock.
- Once you've found the applicable item(s), look for the "Power Management" tab (item 1 below). Within that, find the item that says "Allow the computer to turn off this device to save power" and uncheck it (item 2 below).
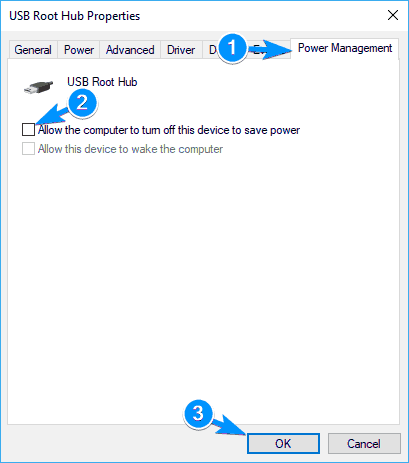
- Click 'OK' (item 3 above) when you're finished.
The good news is once you've navigated your way through these items and deactivated the applicable power setting, you should not need to do so again unless you reinstall Windows. Note also that OWC is working on a simpler solution to this issue. More information will be provided at a later date.
 1-800-275-4576