During April, the Rocket Yard focuses on the importance of backups to an overall data security plan. Previously, we discussed how to use the Time Machine app built into OS X to easily and quickly begin backing up data on your Mac, as well as online cloud backup services and their importance to a redundant backup strategy. Last week, we delved into bootable backups as a way to get your Mac up and running quickly in the case of a primary drive failure. Today we’re going to talk about three ways to back up the other part of your Apple ecosystem — the iOS devices.
iCloud Backup
The first, easiest, and perhaps most widely-used way to back up an iOS device is to use the built-in backup function. When enabled through Settings > iCloud > Backup, the iPhone, iPod touch or iPad is backed up to iCloud when it is logged into iCloud, plugged in, locked (meaning that it is at the Lock Screen and not in use), and connected to a Wi-Fi network (see image below). This usually means that the device is backed up nightly when it’s plugged in for charging.
iCloud Backup automatically backs up account information, any documents created and saved on an iOS device, Health data, Home configuration, and settings. This makes it extremely simple to restore data and apps to a device if it needs to be reset for any reason, and it’s useful when moving to a new device. During the iOS setup process, one of the questions asked is if the user wishes to set up a “new device” or restore from a backup. Selecting a saved backup from iCloud ensures that settings and data are restored to the new device, and that all apps begin reloading to their familiar locations on the device home screens.
To use iCloud Backup, it’s necessary to have an iCloud account. Those who have just one or two iOS devices may be able to get away with using the free 5GB of storage provided by Apple. With storage needs greater than 5GB, there are other options — 50GB of storage for $0.99 a month, 200GB of storage for $2.99 a month, and 1TB of storage for $9.99 a month.
iTunes Backup
For those who don’t want the possible expense of iCloud storage or who want total control over where their iOS data is stored, iTunes can be used to back up iOS devices on any Mac or PC. All that is required is a Lightning or 30-pin Dock Connector cable depending on which model of iOS device is being backed up. Plug that cable into any available USB port on the Mac or PC, then follow these simple steps.
1) Launch iTunes
2) Connect the iOS device to the computer using the Lightning or Dock Connector cable
3) Any content purchased downloaded from the iTunes or App Store on the iOS device should be transferred to the Mac or PC. This is done by selecting File > Devices > Transfer Purchases from the menu bar (see image below). On PCs, a File menu may not be visible, in which case holding down the Control and B keys simultaneously should help. Allow the purchased content to finish transferring to the Mac or PC.
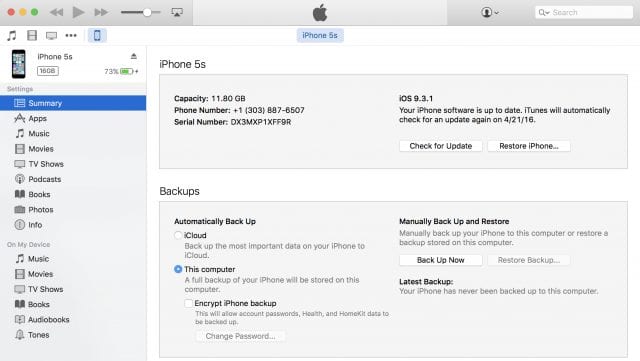
4) To back up Health and Activity data from the iOS device or a connected Apple Watch, it’s necessary to encrypt the data. Select “This Computer” and then check the “Encrypt Data” box (see image below). A password may be required if asked for one, be sure to make it memorable because the backup will not be accessible without the password.
5) If no Health or Activity data needs to be backed up, step 4 can be ignored. Click Back Up Now, and the backup begins. Once again, if a File menu doesn’t appear on for PC users, holding down Control-B should fix the problem.
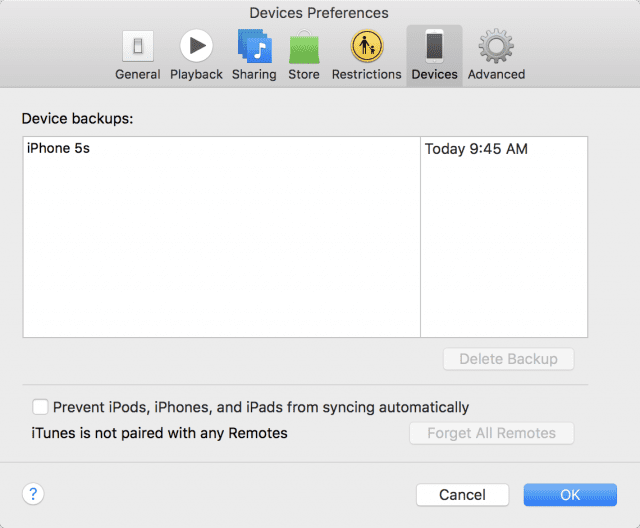
6) Once the backup is done, check to make sure that it was completed successfully. Open iTunes Preferences and click on the Devices button. The name of the device that was backed up should be visible along with the data and time of the backup (see image below). If the backup was encrypted, a lock icon appears to the right of the device name.
Backup to an iOS Flash Drive
The final method of backing up an iOS device doesn’t do a true backup — in other words, it backs up documents, photos, and some other data, but does not back up settings, Health data, home configuration or other important items. However, it’s extremely useful for backing up photos and video shot with the iOS device’s camera when there’s no Wi-Fi network or computer available. iOS Flash Drives are available from a number of manufacturers, and MacSales.com sells one of the best — the Leef iBridge (see image below). It’s available in 16GB, 32GB and 64GB capacities.
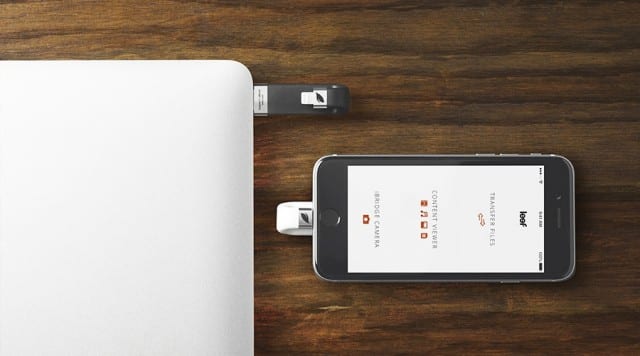
The Leef iBridge works with a free companion iOS app that displays what’s available to back up onto the iBridge and then offers a fast and easy, one tap way to move files from the iOS device to the iBridge. Once the data is stored on the flash drive, it can be disconnected and used to transfer data to a computer or another iOS device.
I use a Leef iBridge when traveling; I transfer all of my DSLR images to my iPad Pro, then make a backup onto the iBridge. It’s just one more way of ensuring that those photographic memories are safe.
iOS devices travel with us everywhere and contain a lot of personal information and media. iOS backups are easy to do, and are critical for restoring devices when they’re reset or when transferring data to a newer device. Be sure to make backing up your iOS devices a part of your overall backup plan.


