![]() Trash on the Mac is quite similar to its real-world analogue — anything that you place into the trash can remains there until you “take out the trash”. In the real world, you eventually empty a trash can into a larger can that will be picked up and end up in a recycling plant or landfill. On the Mac, emptying the Trash deletes the files that have been placed in that virtual trash can. While the real world trash can may start smelling bad after a few days to give you an olfactory reminder to dump the trash, there’s no such reminder on the Mac. Fortunately, macOS Sierra provides a way to automatically “empty the trash” for you.
Trash on the Mac is quite similar to its real-world analogue — anything that you place into the trash can remains there until you “take out the trash”. In the real world, you eventually empty a trash can into a larger can that will be picked up and end up in a recycling plant or landfill. On the Mac, emptying the Trash deletes the files that have been placed in that virtual trash can. While the real world trash can may start smelling bad after a few days to give you an olfactory reminder to dump the trash, there’s no such reminder on the Mac. Fortunately, macOS Sierra provides a way to automatically “empty the trash” for you.
Related article: Skip ‘Taking Out the Trash’ When Deleting Files
Many people are good about emptying the Mac Trash, but others? When I was working as an Apple Consultants Network member, it surprised me how many clients rarely or never emptied the Trash. There were even a few clients with the opinion that the Trash was a great place to store documents…to whom I brought up the point that a real trash can wouldn’t be the best place to store credit cards, tax returns, and other personal documents.
Since the files placed in Trash are not deleted until the Trash is “emptied”, leaving those items in the Trash means you’re not recovering any space on your hard drive or SSD. It’s quite important to empty the Trash, especially on MacBook models that have limited storage. Now let’s see how easy it is to set up the Trash to automatically delete files after 30 days.

How to Auto-Empty Trash
1) In the Finder, go to the Finder menu and select Preferences
2) Click on the Advanced tab
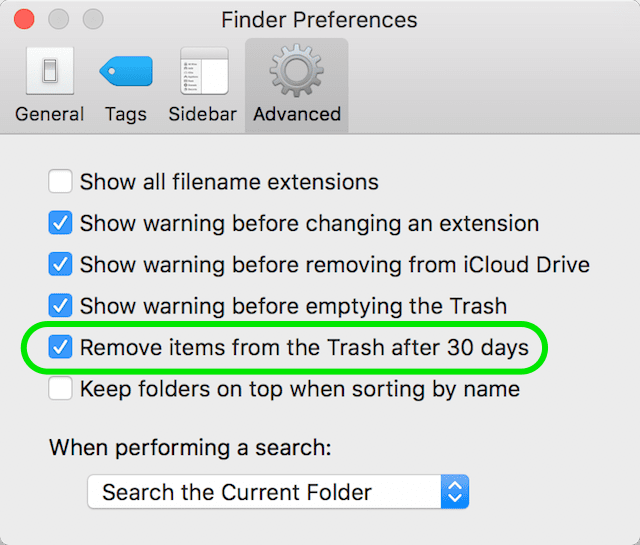
3) Check the box for “Remove items from the Trash after 30 days” (see image above)
4) Exit Preferences
Now, each file sent to the Trash starts a 30-day countdown to self-deletion. To clarify, not all files are deleted 30 days after you turn on auto-empty. As individual files reach 30 days past the time they were put into Trash, they’re deleted.
To turn off this feature, uncheck the “Remove items from the Trash after 30 days” box. Note that you can still manually empty the Trash; this just ensures that if you do happen to forget, those items are sent to the rubbish heap of history after a month.
The Photos App and “Recently Deleted”
The Photos app — both on macOS and iOS — has its own version of the auto-empty capability. When you delete a photo or video, that file goes into a “recently deleted” album where it can take up to 40 days to finally disappear. The idea is that you may realize that you’ve accidentally deleted a once-in-a-lifetime photo or video, and you can then recover the file. In Photos on the Mac, simply go to the left sidebar under “Albums” and find the Recently Deleted album. Click on it, and you’ll see every photo or video you’ve deleted in the last 4o days or so.
Related: Creative Recycling of Dead Hard Drives
Since the Recently Deleted album is synced through iCloud to iOS devices, just deleting a large file — say a 4K video shot on an iPhone — doesn’t really take it off of your device. If you’re running low on storage space on an iOS device, it’s possible to speed up the process by actually getting rid of those files. Think of this as emptying the “recently deleted” trash.
In the Photos app on the Mac, enter the Recently Deleted album, make sure to recover any photos or videos that you did not mean to delete permanently, then click the Delete All button in the upper right corner of the Photos window (see image below). You’ll be asked if you wish to remove those items permanently; click OK to do the deed.

On iOS devices, enter the Recently Deleted album, tap the Select button, then select all of the photos or videos you wish to delete. Tap the trash button, then tap OK to verify that you do wish to remove those media files permanently.
iMovie and Render Files
Another trash can you can empty to open up storage space on a Mac is in iMovie. To start with, individual movies that have been created and saved into your Theater can be highlighted with a click, then Deleted with a press of the Delete button on your keyboard or by selecting Delete from the Mark menu. Since movies stored in the Theater are synced through iCloud, you’re asked whether you wish to delete the movie everywhere or just from iCloud (see image below).

In addition, Mac users who do a lot of video editing with iMovie may find that they are running low on space on devices with minimal storage. It’s possible to delete render files from your open libraries, which frees up a lot of storage space. This is done by selecting Preferences from the iMovie menu, then clicking the Delete button next to Render Files (see image below).

Render files are used by iMovie to speed up exportation of a video to a standard format; deleting them will slow down the actual rendering of a video, so it’s best to wait until after you’ve exported the video to delete the render files.


I like the new tips and things you tel us, but I am not a hasty upgrader. I use 10.9.5 because I like it and some programs I use prefer it. So all the new tips for the newer, stupider Mac OSes are useless to me, and serve as a warning abotu how much control and preferences I will lose if I ever upgrade! I stayed with 10.6.8 until I got a new iMac at the end of 2015, or I’d still be using Mountain Lion!
These instructions must be strictly for the Sierra OS; my El Capitan version does not have that 30-day option. In fact, it has only the three listed directly above your circled item.