![]() [Update 08/22/2018: macOS Mojave Kills Back to My Mac Network Feature]
[Update 08/22/2018: macOS Mojave Kills Back to My Mac Network Feature]
Have you ever been away from your home or office Mac and suddenly realized that you a) left it on when you meant to shut it down, b) tried to run a report or access a system only available from that machine, or c) want to grab a file that you haven’t yet moved to the cloud? Today we’ll take a look at three ways to remotely access a Mac, something that can save you from making an unnecessary trip as we near Earth Day 2017.
Back to My Mac
Back to My Mac is a feature of iCloud that lets you access a network of Mac computers — or just one — from another Mac. If you just need files or folders from the remote Mac, you can drag them to your local Mac. Need to control that remote Mac as if you were sitting right in front of it? Back to My Mac gives you a way to use your local keyboard and mouse or trackpad to launch apps and edit documents on the remote machine.
The best thing about Back to My Mac? There’s no price tag on this solution — it’s part of iCloud and macOS. You’ll just need two or more Macs using the same iCloud account (OS X Lion 10.7.5 or later), an AirPort base station or another Wi-Fi router that supports UPnP or NAT-PMP, AirPort Utility 6.3 or later, a fairly fast Internet connection, and a firewall that allows remote connections. For those who work in offices, be sure to ask permission to use Back to My Mac and check with your network administrator to find out if the firewall will support Back to My Mac connections.
Here’s how to set up Back to My Mac on the Mac(s) you wish to access:
1) Launch System Preferences, then click iCloud
2) Sign into iCloud if you haven’t already done so
3) Select Back to My Mac from the list of iCloud services (see image below)
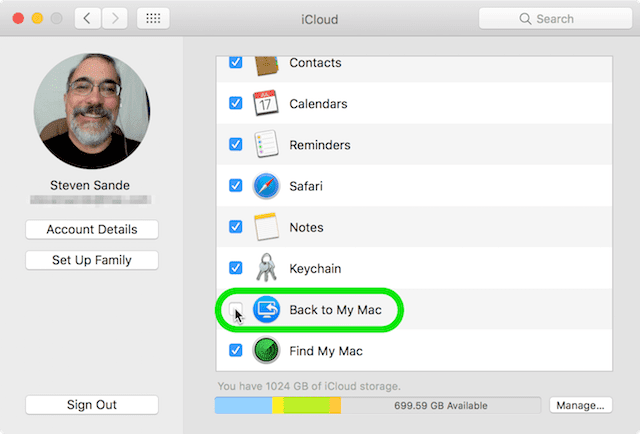
4) You may be asked to follow some setup instructions. If so, be sure to follow those instructions precisely.
5) Apple has a published set of security options that are good to follow when setting up Back to My Mac.
6) Note that you can also set up an AirPort base station with an attached hard disk drive or a Time Capsule for remote access using Back to My Mac. To do this from a Mac on the same network as the AirPort base station, launch AirPort Utility (in the Utilities folder inside the Applications folder), select the AirPort or Time Capsule, and then click Edit. Log into the base station with your base station password (not your iCloud or Mac password), then select the Base Station tab. In the Back to My Mac section, click the + (plus sign) button, then enter the Apple ID and password you’ll use with Back to My Mac. When a green status indicator appears, Back to My Mac is turned on. Click Update to save your changes on the base station.
Now, from your Mac, gaining access to the remote Mac or AirPort base station is a snap.
1) From the Finder menu, choose Preferences, then click the Sidebar tab
2) In the Shared section, make sure that Back to My Mac is checked
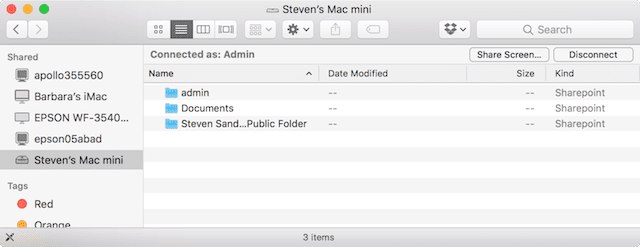
3) Open a Finder window and look for the Shared section in the sidebar (see image above). Sometimes the shared computers or base stations are hidden; if so, place your cursor over the word “Shared” and click the Show button that appears.
4) Select the remote Mac or base station you want to access, then click Connect As. To control the remote device, select the Mac and click the Share Screen button:
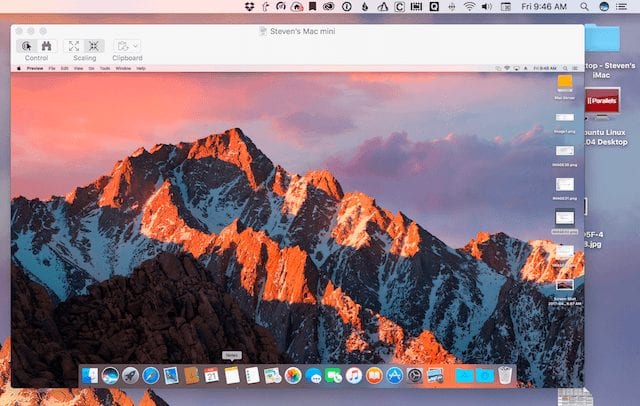
As you can see from the image above, a set of control buttons is available in the pane directly above the shared screen. Clicking the Control button allows full control of the device, or you can simply view the remote screen by clicking the “binoculars” button. The next set of buttons shows the remote Mac desktop in its full size (left button) or scaled to fit the window on your local Mac. Finally, the Clipboard button provides a way to get or send data from or to a clipboard that is shared between the remote and local Macs.
When your Back to My Mac session is complete, simply close the window for the remote Mac by clicking the “red dot” (close button) in the upper left corner of the window.
Apple Remote Desktop
Back to My Mac is perfect for situations where you may have one or two Macs that you need to remotely access or control. For system administrators or support personnel, you may have dozens or hundreds of Macs that you could theoretically need access to. Apple has had an application called Apple Remote Desktop for many years that is useful for support.
Available in the Mac App Store for $79.99, Apple Remote Desktop has sadly been somewhat ignored in recent years and currently has a very low rating in the store’s reviews. Once set up, Apple Remote Desktop not only provides a way for support personnel to control remote Macs with a simple double-click of the computer name on a list of all available Macs, but also has features for creating inventories of those machines, performing remote updates and upgrades, and so on.
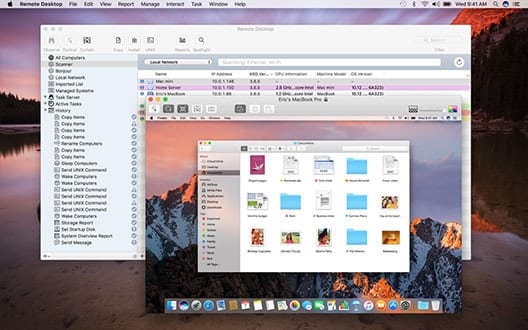
The screenshot above shows that Apple Remote Desktop uses a very similar interface to Back to My Mac when remotely accessing or controlling a Mac, although the way that the sharing sessions are started is quite different.
Parallels Access
The third method I’ll discuss today is Parallels Access, applications and service provided by the same company that makes the Parallels Desktop virtual machine environment. The best thing about Parallels Access is that once the client application is installed on the remote Mac, it can be accessed from just about any computer — and that means any device with a web browser or any iPhone, iPad or Android device.

The Parallels Access client can be set up to automatically launch when your Mac is rebooted, so any time the Mac is turned on, it’s available for remote access or control. Then using the free app on an iPhone or iPad (see image above) or a web browser logged into a Parallels account on the Parallels.com website (see screenshot below), simply use your Mac user name password to log onto the device.
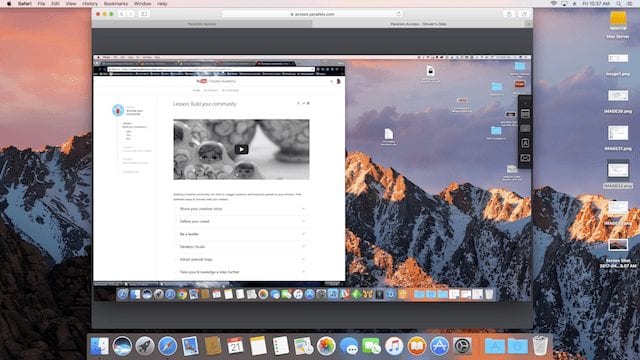
A Parallels Access account can be purchased for as little as $19.99 per year, which allows one user to connect to up to 5 computers from any number of mobile devices, and there are plans for businesses as well.
Note that there are a variety of other solutions available for accessing or controlling remote Macs. A search for VNC (Virtual Node Controller) on the Mac App Store shows a variety of applications that can be used. I’ve chosen these three methods as they provide a cross-section of the remote access and control solutions that are available.
Back to My Mac is free and very useful for those who may have a desktop Mac at one location and would like to use a MacBook to access it. Apple Remote Desktop is targeted towards those who are system administrators or support personnel, although the application seems to have been abandoned by Apple. Parallels Access is very useful from almost any type of mobile device or even just a web browser.
If there’s a remote access and control solution that you prefer, please let other readers of the Rocket Yard know about it in the comments section below.


Thanks
I use TeamViewer to remotely update my mothers Mac. For personal use it is free
Can you print both locally and remotely when using back to my mac?
Great article – thx!
Remote access technology has opened a new discipline of computer support. PC support provided through remote technology is quick, reliable, and secure. Some of the remote software applications worth mentioning are remote phone access, laptop access and so on. All these can be delivered to you by darkwebsolutions dot co, visit their website today
Thank you so much. Made my day!
Nice article, thank you!
TeamViewer works great for cross-platform access and remote control when I’m not on the same network as the other computer.
“(Remote access of a 27-inch 5K Retina display iMac from an iPhone 7s)”
I want to know more about this mysterious iPhone! ;)
You can easily control MAC computers remotely using tools like on premise R-HUB remote support servers. It works on MAC, Windows, Android, iOS etc.
In Mac OS you can simply start an app called “Screen Sharing” – it is located in the /System/Library/CoreServices/Applications folder of your Mac and is so far my favorite solution to do remote support. Just enter the remote users iCloud ID/email and it will start connecting to the remote computer once that has been approved on the remote side.
It is also the tool Apple support uses when you speak to them. Not sure why this got forgotten in this article.
Hi, Chris –
Thanks for sharing that tip. I honestly had no idea that was in the Core Services Apps folder, but that’s an incredibly easy way to connect to someone else.
Steve
Screen Sharing is good when the target machine is manned. Not so good for unattended situations I believe.
Can Apple Remote access allow me to connect to moms computer in another state when she needs help? Is back to my mac a better solution? If so, how can I get us both on the same iCloud account to access her macs?
ARD is designed to do exactly that.
Can you explain how you add a remote Mac to ARD? I have ARD and I can’t find any way to connect to a Mac on a remote network.
I use Team Viewer for that exact purpose (fixing my mom’s computer)!
I highly recommend Jump Desktop available in the Mac App Store and from the developer’s site. Very stable, rock solid. Allows me to access an office full of macs and PCs from phone, iPad, or my home iMac or my laptop when traveling. Highly recommended!
Screens Connect to get at your Mac from an iPad or iPhone is a great solution as well.
TeamViewer works fine. Use it in Mac, PC, and Linux. I can access all three from my iPhone or iPad. Free for non commercial (personal) use.
Do you think I’d be able to test a third-party VPN on Mac if I connect from a Windows PC to a remote Mac through TeamViewer?
Logmein.com works fine too.
Splashtop Personal is wonderful. You can install the streamer on Mac and Windows machines (the remote access server) and then use the client to access those machines from just about any computer or device. It is a paid service, but well worth it. The service is $16.99 year to access from anywhere and there is a small charge for the iPad app. Well worth it if you want seamless access to multiple machines from multiple machines.
Real VNC does not require yearly subscription and fir home use (one mac) can be accessed by nearly any device- iPhone, Mac laptop, windows machine without any hiccups. I use it all the time and it is rock solid.
Thanks for this, but you never mentioned other ways like Virtual VPN using Team Viewer?
Great information. Thanks!
Hi…For older Macs I use Schnitz Remote lite…Port Map, and Chicken of the VNC.
Google has a Remote Extension For Chrome.
TeamViewer works well also…John
Thanks for the tips.
I also use TeamViewer, without any trouble. And it is free for personal use.