![]() [Update 01/31/18: macOS Server Will Lose Many Services this Spring: Here Are Alternatives]
[Update 01/31/18: macOS Server Will Lose Many Services this Spring: Here Are Alternatives]
[Update] Find the entire macOS Server series here!
After a brief hiatus, we’re back with the next part of the Rocket Yard’s server series. In Part 1, we introduce readers to what a server is, what kind of Mac is best suited as a server, how to acquire macOS Server, and how to install it. Part 2 describes getting an Internet identity, acquiring a static IP address, giving the server a host name and domain name, setting up DNS, and getting a signed server certificate. In this article, we set up the local infrastructure — configuring our local router to pass requests to various services on our server, turning on Open Directory to begin adding users to our server, and providing and checking service access over the Internet.
Configuring the local network
Regardless of what company you use to get your Internet service, there’s a router or cable modem that supplies various services to your network. Among these are:
DHCP (Dynamic Host Configuration Protocol) – distributes IP addresses to the computers and other devices on the network
NAT (Network Address Translation) – the router keeps track of what device on the internal network made a connection outside of the network and returns responses to the originator
Port Forwarding – the router sends specific TCP/UDP ports (i.e., TCP port 25 for SMTP (email), TCP/UDP port 53 for DHCP) to specific internal network addresses
Firewall – most routers supplied by ISPs use NAT and Port Forwarding to act as a network firewall
There are three common router setups that are used in businesses or homes. The first consists of a cable or DSL modem provided by an ISP that serves as the router for your local network. In this case, you’re using the ISP’s router as the Wi-Fi router for your home or business, and it supplies the services listed above.
The second setup involves using an Apple AirPort Extreme Base Station to supply the Wi-Fi service to your home or office. In this case, the Internet connection is directly connected to the AirPort without any intervening router. What’s great about this particular setup is that macOS Server can control and administer the AirPort automatically. Server knows what services are enabled and what its internal IP address is, so it can configure port forwarding instantly.
The third setup is much more common that the second; there’s an ISP router providing the connection to the Internet with a cable connecting it to an AirPort Extreme. In this case, the ISP router needs to be put into “bridge mode”. While I won’t get into the details on how to do this due to the variety of available ISPs, your ISP can usually supply instructions on how to do this. What this does is to essentially eliminate a “double NAT”, where IP addresses are translated twice before making it to or from your internal network devices.
Regardless of the setup you’re using, the following steps should be followed to make network services setup a lot easier:
1) Reserve an IP address for your server in the DHCP service. What this will do is ensure that your server is always at the same IP address on your internal network, even after a restart of the server or router.
2) Set up port forwarding to the server’s reserved IP address. Think about the Internet services you plan to use with your server, then set up port forwarding for those services. Apple has a great support article that outlines what ports are used by Apple products.
3) To limit certain services to specific network addresses, create address groups in the Server app. This step is a bit beyond the scope of this introductory look at macOS Server, so at this time we won’t provide details on how to do this. However, this can be useful if you wish to let only certain people — say, managers — access a particular service.
Since the combinations of router setups is so large, we won’t get into the individual setup for each example. However, if you do have an AirPort Extreme Base Station and wish to allow the server to control it, you need to make sure that the router is in “DHCP and NAT” mode, the server and AirPort are on the same subnet of your network, and the AirPort and Server must be on the same wired network (note that I did not say “wireless”). All of these changes can be made in the AirPort Utility, found on any Mac in the Utilities folder. If it still doesn’t show up, be sure to shut down the Server app, then restart it.
Open Directory service
Setting up macOS Server for just one person is usually overkill, unless your sole reason for doing so is to familiarize yourself with server administration and setup. In many small businesses and even home situations, you will have multiple users and need a way to create user accounts on the server so that those users can take advantage of services like email, VPN, FTP, calendar, and so on.
Server uses a directory service called Open Directory that manages users and groups for all of the services. Before starting Open Directory, you’ll need:
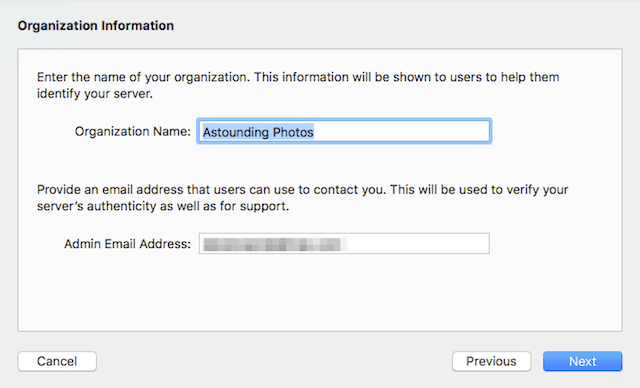
Organization name – this name assists users in recognizing the Open Directory server
Admin Email Address – this address is used by users to get support, and to also supply authenticity to your Open Directory server with a familiar email
To start with, click on the Open Directory icon under Advanced in the macOS Server sidebar, then click the button in the top right corner of the screen to turn on Open Directory. The following window appears (screenshot below):
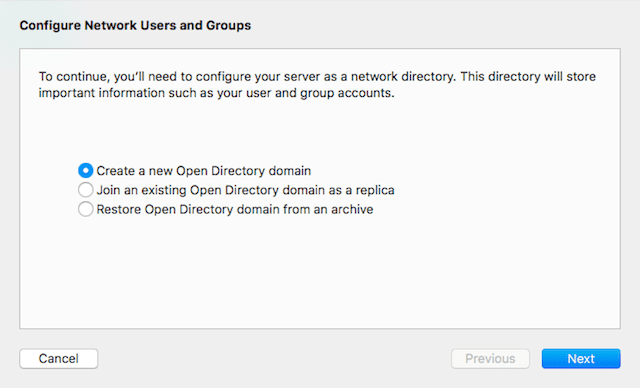
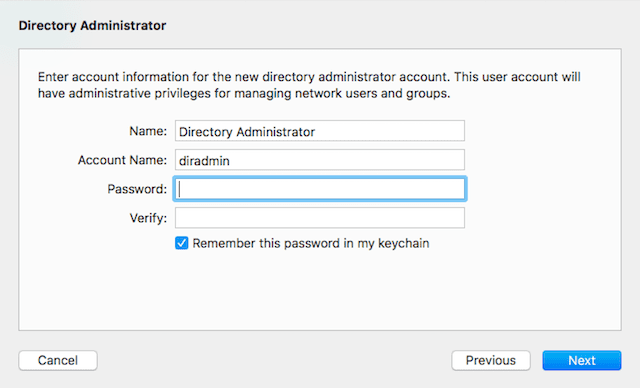
We wish to create a new Open Directory domain, so click the Next button. We need to set up our Directory Administrator, which can either be the server administrator or another user. Here we’ll keep the default name — Directory Administrator — and account name “diradmin”. Enter and verify a password, then click the Next button (screenshot below):
Here’s where we will enter our Organization Name — in our example it will be “Astounding Photos” — and an email address for the administrator (see screenshot below):
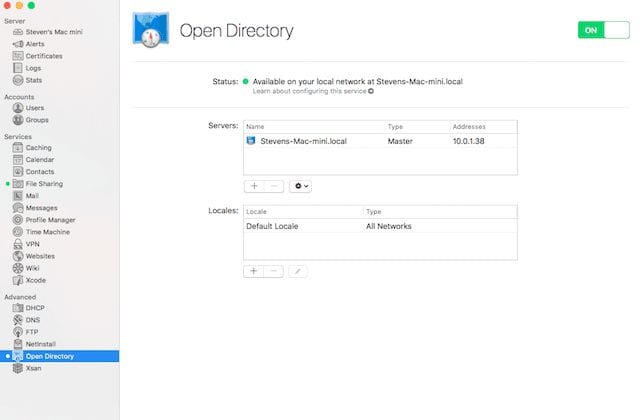
Click the Next button. A confirmation window appears — check all of the information that was entered to make sure it’s correct, then click the Set Up button. This action creates an Open Directory master – this master directory can work with other departmental or organizational directories. Note that on slower, older Mac minis, creating the Open Directory master can take some time. Once Open Directory is running, a green dot appears next to the Open Directory service in the macOS Server sidebar indicating that it’s running, and a window similar to that seen below appears (see screenshot below):
Creating User Accounts and Groups
Now it’s time to set up accounts for the users who will take advantage of the services on our server. We can also set up groups, which are users that are grouped for access to a particular service (for example, all email users) or by organization (for example, “the marketing department”). To add users, select Users in the Server app sidebar. Initially, all you’ll see will be the admin account, as it is the only user that has been identified to Server. At the bottom of the Users screen is the familiar plus sign ( + ) — click on it, and a window used to set up a new user opens (see screenshot below):
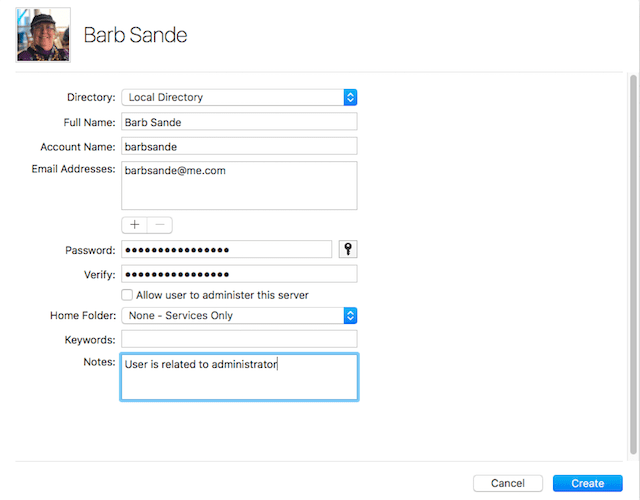
Enter the user’s full name, an account name (one is created by default that is the users first and last name (and middle initial if used) joined together. Next, add at least one email address for that individual. This can be changed later when you set up Mail as a service on your server, but for the purpose of this example, we’ll just use an existing email address. Enter an initial password for the user and verify it — note that by clicking on the “key” button next to the password field, you can use Password Assistant to create a password for the user.
Next, decide whether or not you wish for this user to administer the server. For organizations, only trained IT personnel are usually allowed this access. The next step involves deciding where the user’s Home Folder will be located. This sets up a folder for this user on the server, meaning that the items normally in the user folder on a Mac are then stored on the server. If you’d prefer to have the user folders on the individual Macs, then select None – Services Only from the pop-up menu. If you do want to store the user’s information on the server, then select Local Only. For that user, you can also choose to limit a particular user’s disk usage to a certain amount by checking the appropriate check box and selecting a storage amount.
Finally, you can associate keywords with a user — like “videographer” or “marketing” — that assist in finding users. This can be useful in large organizations. Notes can also be associated with a user; while consulting, I used this field to capture data about a user for support purposes. Last but not least, a photo can be associated with each user for visual identification. Add the photo by clicking on the placeholder image, selecting Edit Picture, and then selecting an image file or taking a picture of the user. Once all fields are filled in, click “Create” to add the user and they’ll appear in the list of users.
As mentioned, Groups are used to define things like all users in an organizational construct (such as “marketing” or “engineering”), or that have something in common. For example, if your organization is large enough to have many administrators, you can create a separate administrator group that has special rights, privileges and services associated with it. Creating a group is simple. Click on Groups in the Server app sidebar. Initially, this should be blank as no groups are created by default. To add a group, click the plus sign icon on the bottom of the Groups window.
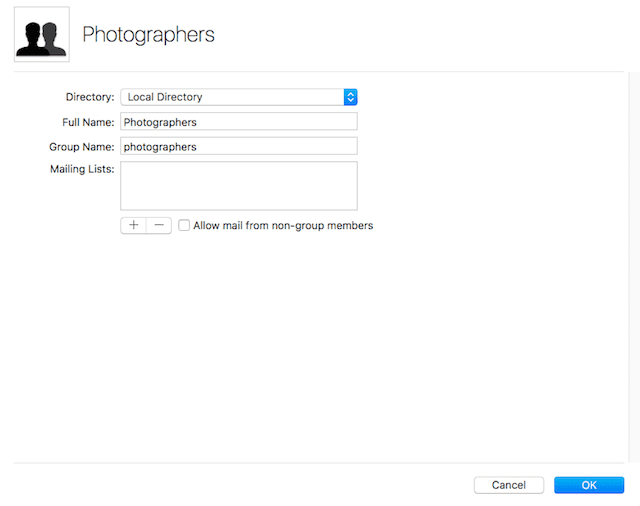
Choose the directory you wish to use; in this example, I chose “Local Directory” which is the default name of the Open Directory we created earlier. Type a name for the group (“Photographers” in this example), and a Group Name will be created for you — you can change that Group Name if it’s not acceptable to you. Finally, you can add mailing lists that this group is automatically on — since we haven’t set up the Mail service yet, we’ll pass on this for now. Click the OK button to create the Group.
Now in the Groups window we’ll see the group we just created. Right-click the group name to select it, and pull up a context-sensitive menu, then select “Edit Group”. As you can see in the screenshot below, the Photographers Group screen has changed a bit:
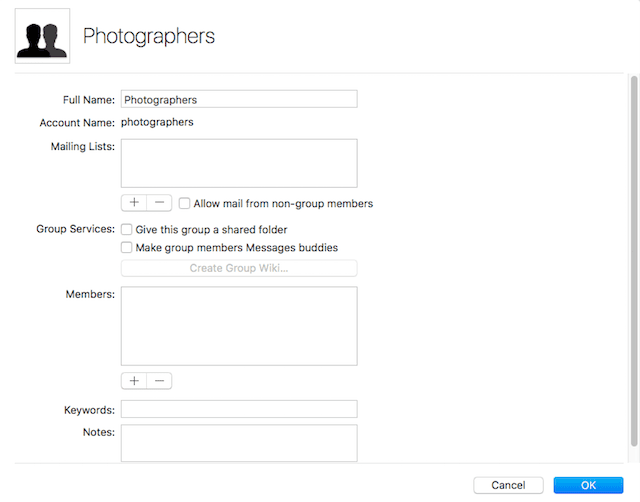
Now we can add a shared folder that this group can use by checking the appropriate check box, and even make any member of the group a Messages buddy. Later on when we turn on the Wiki service, this group can even edit and add content to their own Wiki, a great resource for any users with a combined interest as they can share their knowledge.
To add a member to the group, click the plus sign below the Members field. An entry field appears in the Members field; start typing the name of a user and their User information appears. Click on that user to add them to the group. Continue to do this as needed until you’ve added your initial complement of users. Now click OK to add those users to the group. To verify that the user is in a group, go to Users, double-click the user’s name, and then look at the Groups field, where you’ll see all of the groups that the user is a member of.
In the next installment of this series, we’ll set up several services for our users to take advantage of.


Hi, thank you for the details artivle! I was wondering, when you install a macos server in An existing iMac environment, with 5 existing iMacs with already their own Apple ID, how can we match those Apple id’s or iMac accounts with the open directory users we create?