The version of Safari included with macOS High Sierra brings new and significant abilities to customize how it works with each website you visit. You may have already read about Safari’s new ability to block user tracking by websites, or its new ability to prevent video from auto-playing. But Safari rolls out a whole new way to work with websites, putting you in control and allowing for quite a bit of customization in your viewing.
Safari 11, the version included with macOS High Sierra, has a number of new features, including advanced methods of preventing user tracking (Intelligent Tracking Prevention). But in this Rocket Yard Guide, we’re going to look at Safari’s new ability to customize how a website looks and performs on a site-by-site basis. It’s a powerful tool that can help you tame the wild web.
Website customization works on two main levels; you can define how all websites will be handled, and you can specify how individual websites will be managed. When the two are in conflict, the settings for a specific website override those set for all websites.
A simple example is that you may set all websites to never auto-play audio or video content, but then configure your favorite video service to allow auto-play. When you browse the web, you should never encounter a website that auto-plays sound or video, until you land on the sites where you’ve specifically allowed auto-play to work.
Safari Website Customization
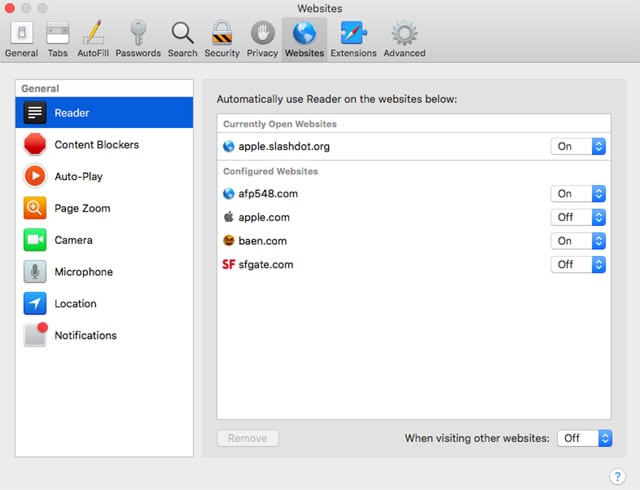
Safari supports a number of customization controls for each website you visit, giving you a great deal of flexibility in how a website behaves. With Safari 11, there are eight specific items you can control for each website you visit:
Reader is a way for Safari to strip out unnecessary elements of the webpage and just display the main content. Reader will usually strip out embedded video, most ads, and sponsored links, leaving just the main section of the webpage.
Earlier versions of Safari required you to manually select Reader mode whenever you visited a website, but with Safari 11 and later, you can assign websites to automatically open in Reader mode.
Content Blockers have been part of Safari for a while; they were originally designed to prevent those annoying popup or pop-under windows. The newest version of the content blocker goes much further, providing a reasonable ad blocking mechanism as well as the ability to manage the settings on a website-by-website basis.
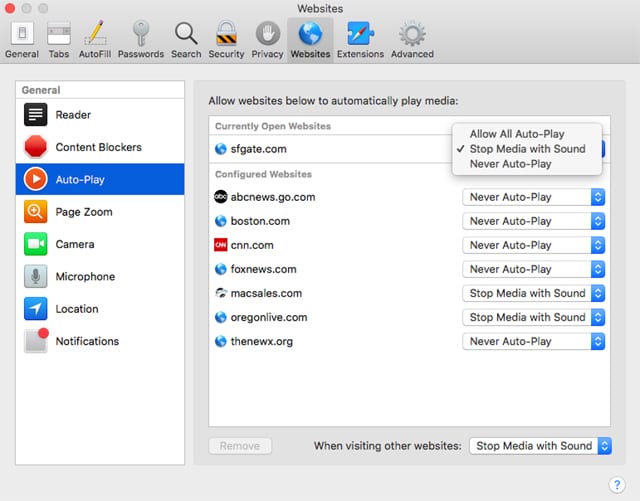
Auto-Play helps you control websites that love to start playing embedded audio and video content as soon as you land on the page. Auto-Play puts you in control of how audio and video content on a website are delivered to you.
You can allow content to start playing on its own, as the website intended, or you can take control and put a stop to the automatic running of audio and video, which can be a bit annoying, especially when you have multiple websites open.
Like all of Safari’s website management settings, you can control auto-play on a site-by-site basis, allowing all auto play, preventing audio, preventing video, or preventing both.
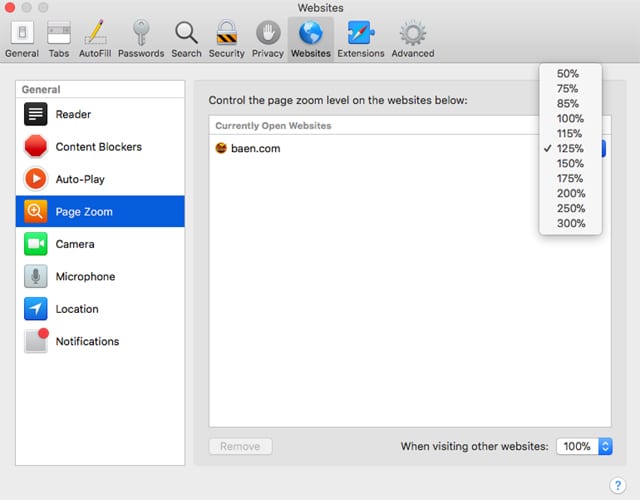
Page Zoom lets you set a zoom level for websites that are fond of using small type or thumbnails, or even for sites that have huge images that force you to zoom out to see the whole image. Page Zoom can be set for zoom rates from 50% to 300% on a site-by-site basis.
Camera allows you to specify whether a website can make use of your Mac’s camera. You can allow a website to access your Mac’s camera always, never, or have the site ask each time. Settings are on a website-by-website basis.
Microphone performs a similar task to Camera, allowing you to control which websites can make use of your Mac’s microphone.
Location services have been part of the Mac for a while. Now with Safari 11 and later, Apple has expanded the granularity so that you can specify which websites are allowed to use location services, as opposed to previous Mac versions, where the only options for the Safari app were to turn location services on or off.
Notifications center already allowed you to enable or disable notifications delivered via Safari, but the addition of Notifications to Safari’s Websites preferences rounds up all those websites that want to send you notifications into one convenient place for easier management.
Configuring Websites
Generally speaking, all website configurations are applied via Safari’s preferences, though there’s another method to make quick changes to a website you’re viewing. We’ll show you the Safari preference method, as it’s the best way to manage all of the websites you routinely come across in your travels. At the end of this guide, we’ll show you how to check the configuration for the website you’re currently viewing, and make quick changes when needed.
Let’s get started by launching the version of Safari that comes with macOS High Sierra or later.
Browse to a favorite website. We want to start with a website loaded up in Safari so we can easily view the various website settings.
From the Safari menu, select Preferences.
In the preferences toolbar, select the Websites icon.
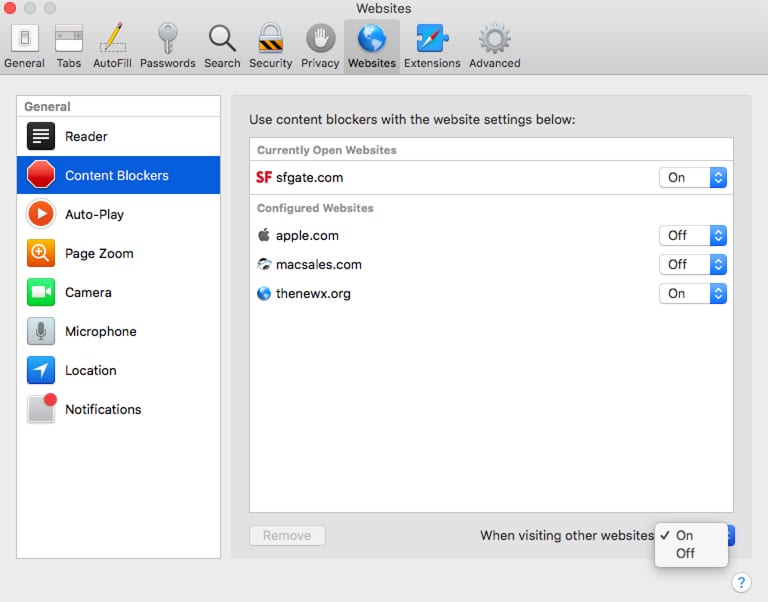
The Websites preferences will be divided into two main panes. The left-hand sidebar contains the various customization types you can employ; the main pane displays the websites that the customization applies to.
Select a customization to manage from the left-hand pane. In the center pane, you’ll see the currently open websites listed at the top, and previously configured websites listed just below.
Each website will have a dropdown menu that allows you to pick the customization options you wish to apply. Customization is applied across an entire website, and not to individual pages that make up a website. You can change the customization options at any time, though we’ve noticed that sometimes you need to reload the website for the changes to take effect.
The available options for each customization type are:
- Reader: On or Off
- Content Blocker: On or Off
- Auto-Play: Allow All Auto-Play, Stop Media with Sound, Never Auto-Play
- Page Zoom: Zoom rates of 50%, 75%, 85%, 100%, 115%, 125%, 150%, 175%, 200%, 250%, and 300%.
- Camera: Ask, Deny, Allow
- Microphone: Ask, Deny, Allow
- Location: Ask, Deny, Allow
- Notification: Allow, Deny
Global Settings
You may notice that for most of the customization types that you can set, there’s an option in the bottom right corner of the center pane to set the customization option “When visiting other websites.” The options will be the same as the ones for the customization selected in the sidebar.
Global settings are a powerful way to control how websites you rarely visit, or new ones you stumble upon, will be viewed within Safari. If you decide after visiting a new site that you want to change the settings, you can do so for the current site without changing the global settings, leaving your preferences intact for other new sites you visit.
Viewing and Changing Website Preferences From the URL
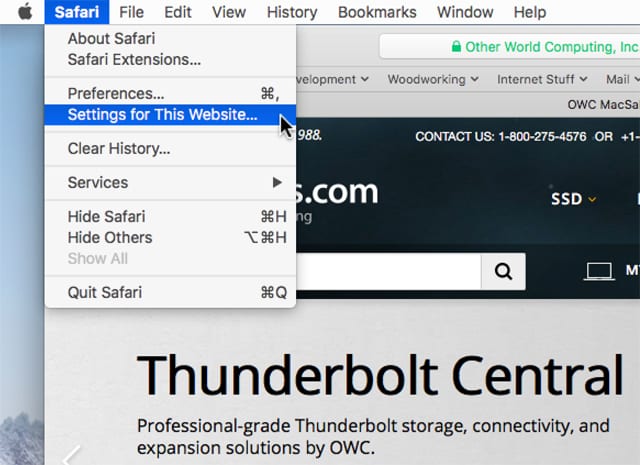
As mentioned earlier, there’s another way to view the current settings for a website you’re visiting without having to open the Safari preferences. Instead, use the Safari menu, and select “Settings for this Website.”
After a moment, the current settings will be displayed in a pane that becomes visible just below the URL field. You can use this pane to view, as well as make alterations to, the current settings. Changes you make in this pane only affect the website you’re currently viewing.
Just the Beginning
Safari’s site-by-site customization options bring new control, letting you dictate how a website behaves when invited onto your Mac. I suspect over time we’ll see additional customization options added, as well as refinements to the original eight we covered here.
If you have a suggestion for additional customization options in Safari for the website-by-website feature, let us know in the Comments below.


Hello
The above article is very helpful, however, I’m trying to remove some of the listed sites under my tabs Reader, content blockers, Auto-play, etc but the Remove button is greyed out. How do I remove the listed websites ?
Many thanks
My content blocking list disappeared. It was working fairly well and then I used “Cookie” and didn’t know I had to uncheck “website preferences” otherwise it deleted them with the cookies.
Anyone know how I get it back?
So its starting to catch up to Firefox w user chosen AddOns.
The ‘Quit Safari’ option is greyed out. How do I get it active again.
Command-Q is the general purpose “Quit current application” command.
Command-W will close the current tab.