Our Backup Month series continues today with a primer on incremental and offsite backups, an important part of any backup plan for home or business users. In the past, we’ve talked about the 3-2-1 approach to backups, which means that to achieve almost perfect backup coverage for any situation, a user should have a primary local backup, a secondary bootable incremental backup, and a third offsite backup. For Mac users, primary backups are easily accomplished with the help of Time Machine, the backup utility built into macOS that makes backups as simple as connecting external storage to the computer. Today we’ll look at incremental backup techniques and offsite backups.
Incremental Backups
Incremental backups are usually done with a backup utility that provides a way to create a bootable clone of a Mac. Once that initial clone is complete, an incremental backup is done — usually just once each night when the machine is most likely idle — to capture each day’s changes. That way, the most data that can be lost if the internal drive fails is limited to one day or usually only a few hours.
There are two apps that stand out in the Mac world for doing incremental backups: Carbon Copy Cloner and SuperDuper. Both will create that all-important initial bootable clone of a Mac, then run a scheduled incremental backup at least once a day.
Offsite Backups
The reason for offsite backups is simple: if your home or business is destroyed by a disaster, your data is still safe since a copy of it is stored in a different location. I like to think of offsite backups as coming in four flavors:
1) Physical storage swaps. This is perhaps the least expensive method of doing an offsite backup, although it does have other costs involved. What I mean by physical storage swaps is that a backup device is taken to a nearby offsite location and swapped out with a second, identical device. For example, imagine using an OWC Mercury Elite Pro drive to back up data from an office Mac. Each night on the way home from the office, an employee unplugs the drive and takes it home. The next morning, that person takes an identical OWC Mercury Elite Pro to the office and connects it to the office Mac where it continues to do backups. There’s a one-day old backup at an offsite location, and a new backup being performed at the office. Each day, this process is repeated.
There are some downsides to this method. People tend to forget to swap the storage devices, the devices can be damaged in transit, and security at the offsite location may not be as good as it is at the primary site. On the plus side, the cost is low, as there are no ongoing service fees and all that’s required to accomplish this is to purchase two of whatever drive is used.
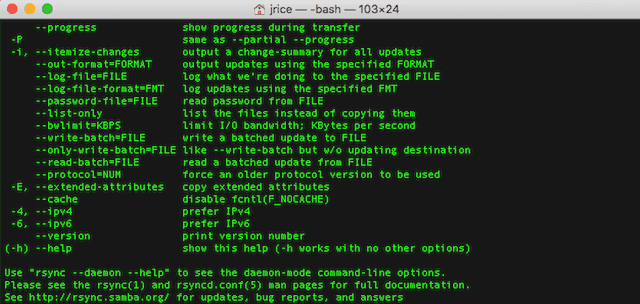
2) Syncing local and remote drives. When we talk about syncing drives, we mean that a utility is used to make sure that each and every file and folder on one drive is replicated on another remote drive. In its most simple form, the rsync function can be used from Terminal to synchronize two directories or complete drives between a local Mac and a remote Mac that has been mounted through the Finder’s Go > Connect to Server function. To get more information about rsync and its capabilities, you can either type rsync -h at the Terminal prompt or check out this Wikipedia article.

Syncing local and remote drives can be useful for having exact copies of drives in two locations. However, it is highly dependent on network stability and speed, and if you’re syncing large capacity drives or RAID arrays it can be slow.
3) Live offsite backup through the cloud. Here, I’m referring to having document folders stored on a cloud drive that is updated whenever the original folders (on a local Mac) are updated. There’s an Apple service that works perfectly for this: iCloud Drive. Set up iCloud Drive through the iCloud System Preference pane and it’s possible to have Desktop and Documents folders, app folders (both built-in Apple apps and third-party apps), and even System Preferences backed up continually to iCloud. This can be a relatively inexpensive way to back up large amounts of data, with Apple charging only $9.99 monthly for 2TB of storage space.
Other services such as Dropbox ($9.99 monthly for 1TB), Google Drive ($9.99 monthly for 1TB), and Microsoft OneDrive ($69.99 annually for 1TB, includes subscription to Office 365 Personal) are equally useful for live offsite backup.
4) Offsite backup services. There are a number of very well-regarded services that back up everything on your Mac, encrypted and ready for any situation that may arise with your computer. These services generally provide unlimited storage on a subscription basis, and backups are done during idle time on your Mac. Some well-known providers include Backblaze, Carbonite, and CrashPlan.
One issue with offsite backup services is that it can take a while for your initial backup to occur (for example, my iMac took almost a month to back up to Backblaze). Some services provide a drive that you “fill” with a clone of your Mac, then send to the service to copy your data to the servers. This makes the initial backup quite fast.
Recovery of individual lost files is generally quite fast with offsite backup services, but recovering a complete drive is time consuming if done online. However, most services can also let you purchase a drive that will be filled with your backup and sent to you via overnight express for fast recovery of data.
It may seem excessively redundant to have three levels of backups, but following a 3-2-1 backup strategy can ensure that your data is recoverable from almost any situation. If you’re only using a Time Machine backup to a local drive, you’re missing the additional safety of a bootable incremental backup and an offsite backup.


A+ grade for this highly useful article. I wish you had mentioned existing external cloud vendor remedies should their business fail or must close down for any reason. How certain can readers be their data will be made available to them by a failed cloud backup services vendor?