Owning a new Mac is a great feeling — it’s the fastest it’s ever going to be, there are no scratches or dings on the computer, and you have what seems like an unlimited amount of storage space. Fast forward a few months or years, and you may start finding that you’re running out of storage. For those of you with Macs that can be easily upgraded with a new internal drive from OWC, your solution may be to purchase and install a drive with more capacity. But what if you have something like an older MacBook Air with very limited storage — 64GB — that is much more difficult to upgrade? In this article, we’ll show some simple ways to free up storage space on your Mac.
How Much Storage Is Being Used?
The first thing you’ll want to do is find out how much storage is being used on your Mac, and for what purposes. One way to start looking is to click the Apple menu, then select About This Mac. Click on the Storage tab, and System Information displays how much storage each attached drive contains. Below, you see that I have a lot of space available on my 2 TB Fusion Drive, a 4 TB backup drive that’s about 2/3 full, and an install disk that’s wide open.
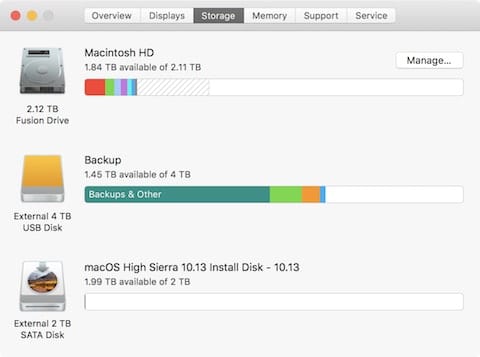
While hovering your cursor above the various colors and shades listed under each drive capacity shows the type of files taking up space, you may find that some of the labels don’t make sense — for example, the red area on the Macintosh HD shows that I have 115.26 GB of iOS files. That sounds like something I may be able to get rid of, but I’ll need to know what they’re used for.
To get a better idea of how storage space is being used, click the Manage… button that’s located to the right of the drive icon. This initially shows a list of how much space is being used for various things and a set of recommendations like “Store in iCloud”, “Optimize Storage”, “Empty Trash Automatically”, and “Reduce Clutter”. While you can click those recommendation buttons to save some storage space, it’s more instructive to look at the list of apps or files in the left sidebar of this window to see what’s taking up an unusual amount of space.
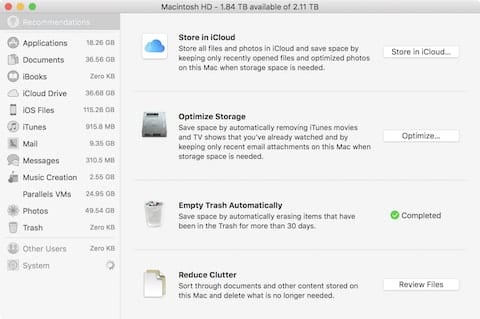
As you can see in the screenshot above, iOS Files, Photos, Documents and Parallels VMs (virtual machines) take up the majority of the space on my iMac. Clicking each one of the listed items tells me what’s actually being stored. In the screenshot below, clicking on iOS Files shows that “device backups and software updates” are being stored. Sounds like a place where I might be able to clean up some files.
Likewise, clicking on Documents displayed a list of files that are stored in various places on my Mac. I was surprised to find a number of large disk image (.dmg) files in my Downloads folder, all of which were app installers that I could easily delete. Doing so cleared up about 2 GB of storage. That’s not much, but if my Mac had only 64 GB of storage like some of the original MacBook Airs, that 2 GB is significant.
iOS Files
Have you owned iOS devices for years? If you ever backed up your iPhone or iPad to your Mac, or used iTunes to search for and install iOS apps, then your Mac is probably using a lot of space to hold old iOS backups and copies of all of your iOS apps.
Things have changed in the iOS world. Backups are best done using the iCloud Backup facility that’s easy to turn on in iOS by tapping launching Settings, then tapping Apple ID > iCloud, and finally scrolling down until you find iCloud Backup listed. Make sure it’s turned on, and your iPhone is backed up to iCloud each and every night over Wi-Fi.
Likewise, the iOS App Store is no longer available on your Mac in iTunes. Do you really need all of those app updates and backups on your Mac when they’re easily available with a tap on your iPhone or iPad? For me, it was easy to free up 115.26 GB of storage by deleting two iOS files (one for an iPhone named “Mesa Verde”, the other for an iPad named “Canyonlands”). To delete these files, simply move the cursor to the name of the iOS device and an “x” in a circle — indicating a delete button — appears. Click it, and you’re asked if you wish to remove the file as the removal cannot be undone. Click the “Remove” button that appears and the space is cleared immediately.
Photos
Your Photos Library contains all of the pictures you’ve taken and videos that you’ve synced with your Mac, so it can be huge. On Macs with limited storage, it may be impossible to store the full Photos Library! Fortunately, there’s a solution to this dilemma: iCloud Photo Library.
When you enable iCloud Photo Library in the Photos app by selecting Photos > Preferences > iCloud, then checking the iCloud Photo Library checkbox, your entire library is uploaded to iCloud (see screenshot below). This has several benefits: your precious photos and videos are backed up to the cloud, and those photos and videos are accessible from every Apple device you own and through iCloud.com.

My Photos Library holds 51,802 photos and 510 videos, yet I can view all of those photos on my iPhone or iPad if I wish — both devices with storage that’s much more limited than on my Mac. Fortunately, iCloud Photo Library only stores “thumbnails” — smaller, lower-resolution versions of the originals — on the devices to optimize storage space on all of my devices. When I wish to look at a full-resolution photo or see a 4K video I shot with my iPhone, it’s downloaded from iCloud to my devices in the best available resolution.
It’s possible to store your originals in full resolution on your Mac if you have enough space, but choosing to Optimize Mac Storage makes it possible to save a lot of space. That can be very important on laptops with limited storage.
iTunes
Have you ever purchased a movie, TV show or podcast to watch or listen to on your Mac? If so, you may be taking up a lot of storage with those files. Clicking iTunes on the list of storage requirements displays any movies, TV shows or podcasts that are taking up space, and once again they can be deleted by clicking the “x” in a circle delete button.
Documents
System Information provides three ways of looking at the documents stored on your Mac, all of which may point out files that can be deleted or archived to an external drive. Click on Documents, and you’ll see (screenshot below) that it lists Large Files, Downloads, and File Browser.
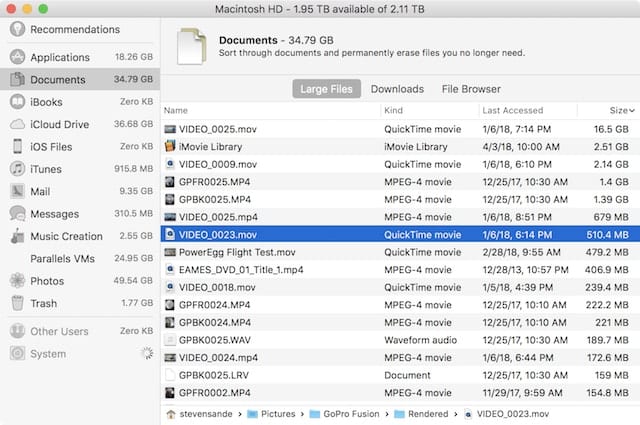
Large Files is probably the most useful tab, as it can quickly point out single files that are taking up massive amounts of storage. For example, there’s one QuickTime movie at the top of my list that chews up a whopping 16.5 GB! There’s a reason for that: it’s a high-resolution virtual reality movie I shot.
The Downloads tab shows all items that are in your Downloads folder, and they’re listed by how long they’ve been in the folder. The list can also be sorted by kind (PNG image, PDF document and so on…), by the date the file was last accessed, and by size. My Downloads folder tends to accumulate PNG images and JPGs for screenshots, and I rarely delete them.
Sadly, System Information only allows one document at a time to be deleted, so if you find that you have hundreds of files to get rid of, open your Downloads folder, highlight all of the files you wish to delete, and then delete them all at once.
What About The System Folder?
The Mac System doesn’t take up as much space as it used to, but on occasion, users find that it has grown to the point that it’s taking up entirely too much storage. You may note when you have the System Information window open that it does not show a storage requirement for System — it often just displays the progress “spinning gear” icon. A better way to see what’s in the System folder is to use a third-party application like OmniDiskSweeper, which is free to download from The Omni Group.
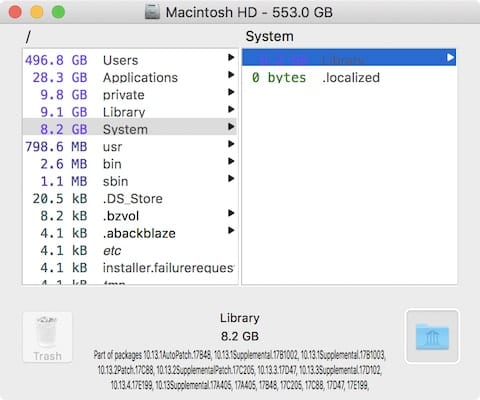
As you can see in the screenshot above from OmniDiskSweeper, the System folder isn’t taking up a lot of space — just 8.2 GB. If your System folder has grown to the point that it’s gigantic, then you probably want to take a look in there with this tool to see what’s chewing up storage.
Common issues that can cause your System Folder to swell include apps that are writing a lot of log files that are not being deleted, and beta versions of macOS that sometimes cause available space to be incorrectly reported. For the former issue, it’s a good idea to use a utility like the free OnyX to go through and delete log files on a regular schedule. The latter problem can be avoided by not installing beta software on your primary Mac — instead, use a test or virtual machine to try out the beta.
If you do encounter the “growing System File” issue, it may be time to re-install macOS. The best way to do this is to back up everything, then do a clean install. Once your files are restored from your backup, you have an operating system that is as clean as the one you’d get with a new Mac.



I bought my MacBook at my first college year. It companied me all the time through my college years. So the full storage thing really bothered me. Lots of solutions have I tried. Then I got iMyMac Mac Cleaner to help me do all the cleaning things like storage space, junk files and duplicate files. For tech novice like me, a comprehensive solution to do Mac cleaning could not only save my time but also free me messing my Mac by mistakenly pressing the wrong button.
Backing up to iCloud is graet for city-slickers, but many patys of Australia have no dedicated Internet or mobile phone service. The Internet is only available via slow connection down long, unreliable copper cables of the old POTS network.
Being able to download app updates to iTunes during occasional trips to town was a great help. Apple, with its changes to iTunes, has mindlessly forgotten about users in isolated places. Thanks for nothing.
It would have been nice if this article specified what OS this applies to, and provide alternatives for versions of the OS that don’t match these instructions. For example, El Capitan does not have a Manage button on the Storage screen, so how do we see what’s there?
Clean install. Are you nuts. Only hold out on that one unless you OS becomes very unstable. it takes me two weeks to put a computer back together from this and i’m often rebuying software at great cost.
This tip isn’t much of a tip. Use sym links with an old HDD or better still get a good external SDD and offload everything to that from you prime disk. You can literally free up millions of gigs in no time.
The tips are good … many people may not know about the “new” features or options.
One good thing about the “cloud” is that if you or someone has to do a “clean” install, much of the work can be automated, via the cloud.
—
They are a pain though! That is why I like Carbon Copy Cloner (CCC).
I had Symantec installed on my mac because of work (it’s their mac) and I discovered 40GB of virus definitions in my /library/application support/ folder. I also found a lot of folders in there from apps I no longer use that I had deleted, like the Quake4 demo from 2008 :)
Quake4 “demo”? That is definitely critical software for testing network latency and system performance!
Most of the storage memory on my MacBook Air is taken up by “other”. What is that and how do I get rid of it?
The article by Steve is excellent but I had implemented all these tips in the past and still had 200+GB of extra “stuff” on the internal SSD and was getting the dreaded running out of space warning. After searching through several online forums discussing this issue of stuff filling up the main drive in Mac OS X, I ran across a reference to a program called DaisyDisk. Several users indicated they had used the program to locate files eating up a ton of space on their drives.
I secured a copy of the program and after about 5 minutes located ~130GB of files inside ~/Library from an old cloud backup service I had stopped using over a year ago. I also located an old Drafts.mbox file inside Mail that was something over 30GB. With deletion of these plus a few other old files, I am back down to 230GB on a 500GB SSD.
I have no affiliation to DaisyDisk other than a satisfied user, but if you are not into music or photos and still wondering why your internal SSD on your Mac is shrinking, this might be an alternative to doing a clean install.
I second Wayne’s recommendation of DaisyDisk. It’s spectactular for seeing what’s using up your disk space. It’s available on the Mac App Store, but you’d be better off getting it directly from the developer at daisydiskapp.com . They have a free demo available there as well. Highly recommended.
Before I found DaisyDisk, I used to use a program called GrandPerspective. It’s another graphical display of your disk usage that gives you more detail at a glance than DaisyDisk. Free on SourceForge at grandperspectiv.sourceforge.net .
You know what Apple needs to do? A Milk Crate app for iTunes.
First, iTunes would give me the ability to manually select an album I have in iTunes and select “archive this album to an external destination…”; I would then select an external drive/folder and iTunes would compress the album then move it to my target.
Second, it would scan my library and make suggestions; “you’ve not listened to [this album] by [this artist] in [xx amount of time]. Would you like to archive it?” and etc.
Third — and the biggest part for me — it would say, “this album, along with 8 kajillion others, is available via your subscription to Apple Music — would you like to archive your ripped version to save [xx] MB of space?”
The need for a larger drive for me comes primarily from the need for a lot of iTunes storage. I’ve been using iTunes since day one and have a lifelong library of CDs and music ripped to it. Even after some preliminary cleanup, I still have nearly 300GB of music.
I’ve spoken with others who have twice that much, and often that’s what keeps them from getting a new Mac (i.e., they want a MacBook in a certain price range but it doesn’t have enough storage).
I know OWC is all about internal upgrades and external drives — always offering the best that can be had — but I still think the Milk Crate concept has merit.
Some day, Apple will figure out its “Music” and media. I did love SoundJam and early iTunes, back in the day – it was simple and powerful….
Apple has not do much (constructive) with it since – except to clutter – or fustercluck it up.
The SoundJam guys ended up being bought by Apple in 2000 – was the basis for iTunes. I really preferred SoundJam. It was a great program.