 The Mac Photos app is a handy way to organize all of your photos and videos in one app, but what if you want to have access to all of the original files? Sure, you can go into Photos, click on an image, and drag it to the Desktop or Downloads folder to work on it, but that’s not a helpful solution if you want to work on a lot of the master image files. (Related: How to Combine Multiple Photos Libraries Into a Single Library)
The Photos app stores all of your images in a “Photos Library.photoslibrary” package file. In this article, I’ll show how you can open the package file, find the Master folder, and then create a shortcut in the Finder window sidebar.
Creating a Shortcut to the Master Image Files
1) Click and hold on the smiling Finder icon on left side of the Dock, then select New Finder Window from the pop-up menu.
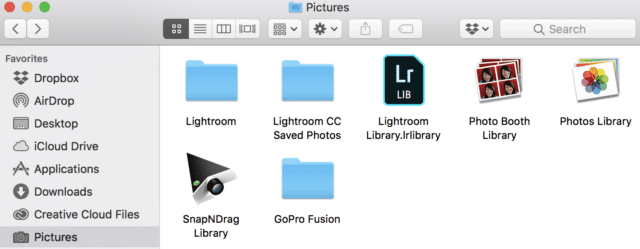
2) You should see a “Pictures” shortcut in the Finder Favorites in the left sidebar. Clicking this takes you to the Pictures folder, which contains folders and library package files from the image-related apps on your Mac. On my Mac, for instance, you can see libraries from Lightroom, Photo Booth, Photos, and a screenshot app called SnapNDrag Pro (see image below):
If your Finder sidebar doesn’t include a Pictures folder, you can navigate to that folder in the Finder by selecting Go > Go To Folder… from the menu bar, typing ~/Pictures/ into the search field, then pressing Return.
3) Locate the Photos Library file, which has the Photos logo on it. You can see that file in the screenshot above.
4) Right-click (or control-click) on the Photos Library file, then select “Show Package Contents” from the menu. The Finder window should now show something similar to the screenshot below:
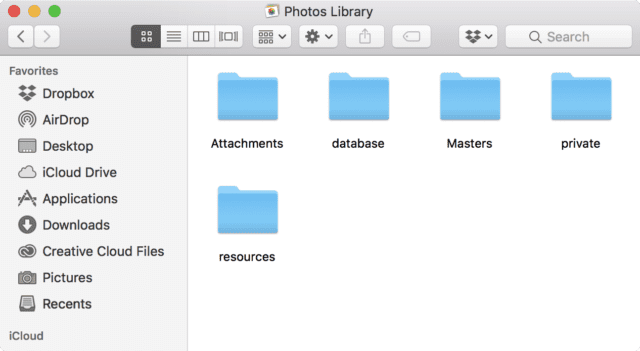
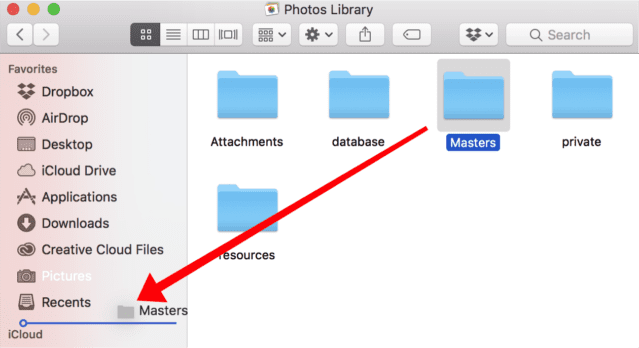
5) Now drag and drop the Masters folder into the Finder window sidebar in the Favorites section. This places an alias to the Photos library Masters file that is visible in any Finder window.
6) Close the Photos Library package by clicking the red “close” button in the upper left corner of the window, or use the Command – W keyboard shortcut.
Now clicking on the Masters item in the sidebar takes you to the master image files from the Photos app. These are the original full resolution files that are imported into Photos from your iPhone, SD cards, or other sources (see screenshot below).
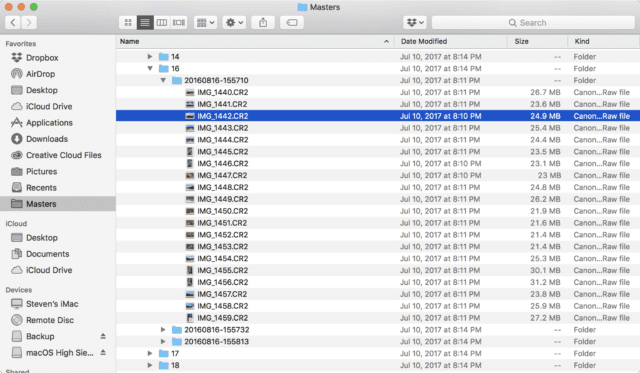
If you ever decide that you don’t want the Masters shortcut in the Finder Favorites, just drag and drop it from the sidebar to remove it.




The name of the “Masters” folder has now changed to “Originals”
Steve I don’t have the masters folder in my photo library section . How do I put it there ?
There’s no master folder in my photos library.photoslibrary :( I can’t find it.
Hi Steve – thanks for putting together this guide. I accidentally dragged and dropped the yearly files from the Master folder rather than the Master folder itself. How can I move the files back to the Master/original folder? I tried a couple of times and it only allows me to drop them into the Photos Library package.
Thanks
In Mac OS Mojave and older, the Masters folder contains unmodified original photos. The photos that have been edited are in Resources > Media > Version. Also, in Catalina and Big Sur, there is no Masters folder. Unmodified originals can be found in Originals folder.
Masters and Originals folders store photos in a weird sub-folder hierarchy, which makes it hard to find specific photos. There’s a third party app (Photos Takeout, http://www.photostakeout.com) for exporting albums as folders. You can also use File > Export command in Photos app, but that’ll only export selected photos – not multiple albums at a time.
The files in the Photos Master folder were empty. Is there another place to find the original images?
Masters folder is empty if you have iCloud Photos enabled. This uploads the photos to iCloud and, if you have selected “Optimize Mac Storage”, removes them from the Mac. BTW, the Masters folder is only in Mojave and older versions. The Photos database structure has changed with Catalina.
Thank you, thank you! I am having so much hassle locating originals across 5 macs with libraries I’m trying to consolidate. This was a huge help. Now if I can just find the 2 years of photos that one of them hid from a Samsung phone ….
very good.
Got as far as typing ~/Pictures/ seeing a lot of photos, after entering on library, not finding the logo. I am not far enough to find missing albums with a couple of folders,
Thanks for this – although it looks like there is a problem with MacOS Catalina removing this option for the master file folder. Right now I cannot access my photos pre-update. Any idea how this has changed since Catalina?
Thanks!
Ryan
If you haven’t done so yet, read through our article and the comments from Photos in macOS Catalina. You may find something useful there!
VERY HELPFUL INFO. THANK YOU
How does this help? Whaddya do? Memorize all those numbers?