macOS 10.14 Mojave has arrived. To get you excited about Mojave’s features and capabilities, the Rocket Yard has been offering peeks at some of the features we’re most interested in. Today, we’re highlighting Finder Quick Actions, a new way to quickly edit files without the need to launch the apps associated with them.
Enabling Quick Actions
With a powerful new feature like Quick Actions, it wouldn’t be “Mac-like” if Apple made it hard to use. All you’ll need to do is open a Finder window, then select View > Show Preview (keyboard shortcut: Shift-Command-P). In earlier versions of macOS, Preview displays a sidebar with a small preview of a file along with its size, creation, modification, and last opened dates, and the ability to add tags.
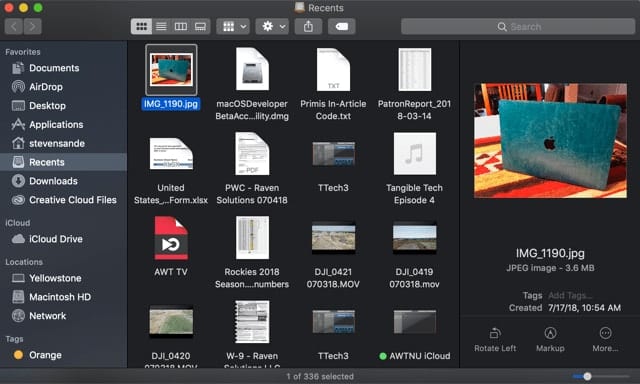
In macOS Mojave, Quick Actions are added below the preview of the selected file in the sidebar (see screenshot below). The actions will vary depending on the file and the app used to edit it. By the way, these screenshots show macOS Mojave’s new Dark mode.
Quick Actions for Images
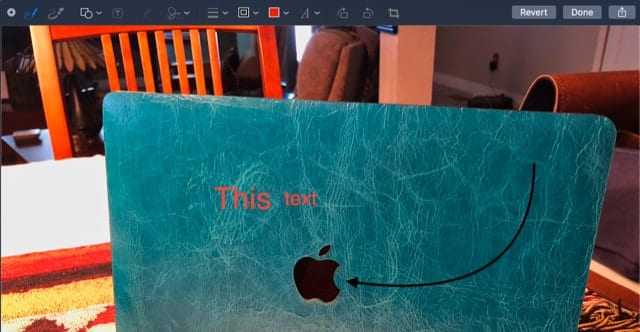
Using the Quick Actions available in macOS Mojave, there’s no longer a need to launch Preview or other image editing apps to perform common tasks. For most images — .png, .jpg, and so on — selecting a file in the Preview pane displays Rotate Left and Markup. Rotate Left flips the image 90° counterclockwise, while Markup displays a new Quick Look window that shows a very complete selection of tools for marking up images.
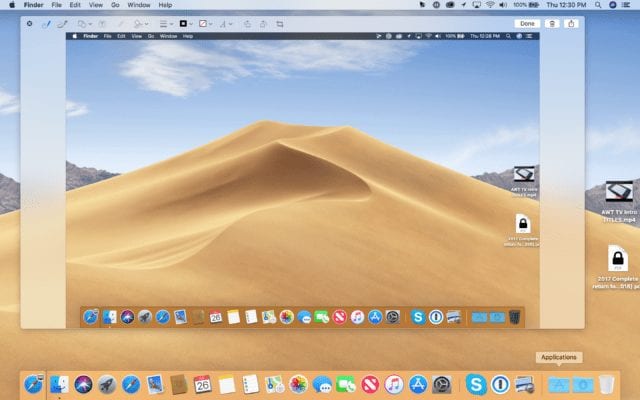
Whether you want to draw on an image, add text, add a shape or arrow, or even add a signature, the tools are available (see screenshot below).
One handy feature is the ability to create a PDF file with multiple images in it. By selecting two or more images, the Markup button changes to a Create PDF button that turns those images into a single PDF document. That’s kind of a nice way to send images in one big file.
Quick Actions for Video and Audio Files
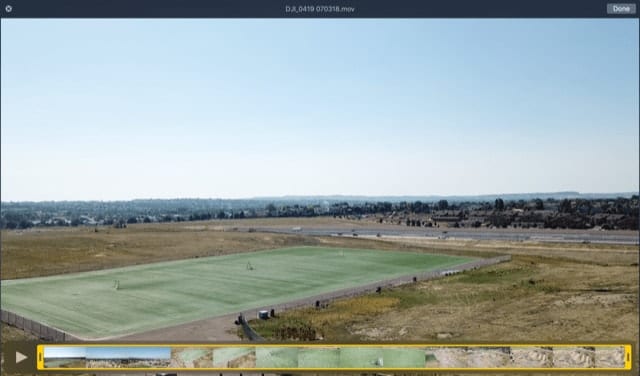
Quick Actions change based on the file type, so when a video or audio file is selected in the Finder, Markup disappears and is replaced by Trim. Click Trim, and a new Quick Look window appears showing an editing ribbon for trimming the beginning and end of the file (see screenshot below).
An Example Creating Custom Quick Actions
The real beauty of Quick Actions in macOS Mojave is that those who are familiar with the macOS Automator app can use the two together to create completely custom Quick Actions. As an example, we’ll create an image resize that takes a photo of any size and resizes it to a width of 640 pixels.
1) Launch Automator from the Applications folder
2) Click New Document
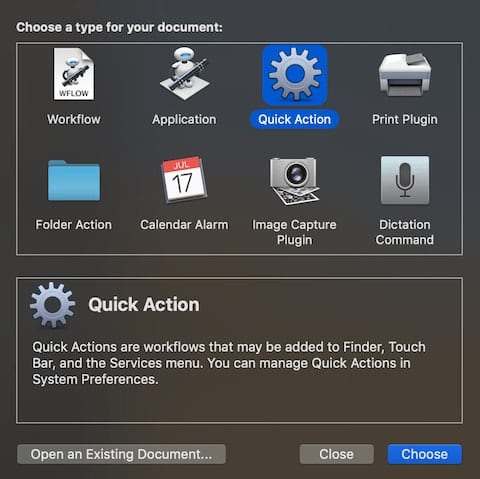
3) Select Quick Action
Quick Action is a new option in macOS Mojave to create workflows that work in the Finder Preview pane (for Quick Options), the Services menu and also on the MacBook Pro Touch Bar.
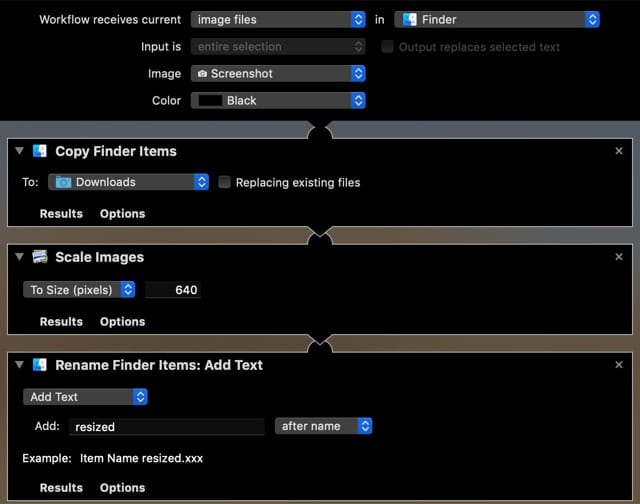
4) Select Photos and the Scale Images action from the Actions library. A dialog appears that states “This action will change the image files passed into it. Would you like to add a Copy Finder Items action so that the copies are changed and your originals are preserved?”. This will keep our originals from being resized, so click the Add button.
5) So your scaled images don’t clutter up the Mac desktop, click the To: drop-down menu and select Downloads. This places our copied images into the Downloads folder.
6) Under Scale Images, select To Size (pixels) and type in 640 as the number.
7) Now select Files & Folders > Rename Finder Items from the Actions list. Once again, a dialog will ask if you wish to add a Copy Finder Items action. Since this is already being done, click the Don’t Add button.
8) We just want to add some text to the file name to show that it has been resized. Select Add Text from the Rename Finder Items drop-down menu and then type ” resized” (without the quotes) into the Add field. This turns something like “Image 041.jpg” to “Image 041 resized.jpg”.
9) This Quick Action only works with image files, so at the top of the Automation, select “Image files” in “Finder” from the “Service receives selected….” picker. It’s also possible to select an icon to represent your Quick Action; I selected the “screenshot” icon, which looks like a camera.
10) We need to save this action, so select File > Save… and give the action an appropriate name like “Resize to 640”. Here’s what the Quick Action looks like:
Now when you’re in the Finder, right-clicking an image file displays a menu, with one of the bottom items (where Services used to be listed) being “Resize to 640”. Selecting Quick Actions from that menu doesn’t show the action, nor will it appear below the preview in the Preview pane.
Customizing Quick Actions
In this section, we’ll make sure that “Resize to 640” is added to the list of Quick Actions so it’s more easily accessible.
1) Launch System Preferences from the Dock or > System Preferences
2) Click on Extensions
3) Click “Finder” and verify that “Resize to 640” is enabled (the checkbox is checked)
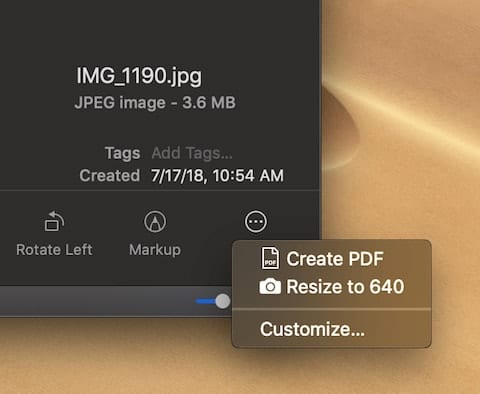
While this doesn’t add the “Resize to 640” button to the Preview pane, it does change the Create PDF button to a More… button. Clicking that More… button displays our “Resize to 640” Quick Action (see screenshot below):
Between Quick Actions in macOS Mojave and the new Siri shortcuts in iOS 12, Apple is giving its customers a key to much more power and customization.






Thanks for this. I resize a lot of images for uploading to real estate web sites and this is perfect.
Someone tried to send me an email with a large number of attachments. The email on her system was returned because it was too large. Is there anything I can do to receive emails with a large number of attachments.
Thanks, but these is an issue with Mac OS resize, you have no control on the quality. Same resize in photoshop gives me much better quality for a smaller file size.
There is a quick action for converting .jpeg and other image files to .pdf. Is there an easy way to create a quick action to convert .docx files to .pdf files within the finder without having to open up Office every time and “Save as PDF.” This would be extremely helpful if this capability was for word files as well.
tried it and works fine,thanks for the lesson, any more?