As part of our continuing research into the features of macOS 10.14 Mojave, we recently showed you how to use Quick Actions, a new feature that allows users to work on many file types without launching the default app and also has a connection to Automator for creating custom Quick Actions. Today we’re going to highlight another Mojave improvement – the screenshot tool.
Invoking the Screenshot Toolbar
In the past, Mac users could use Command-Shift-3 to take a screenshot of the entire screen or Command-Shift-4 to capture a specific area of the screen. Those shortcuts are still available in macOS Mojave, but a new shortcut — Command-Shift-5 — displays all screens and recording options in a transparent floating toolbar (see screenshot below):
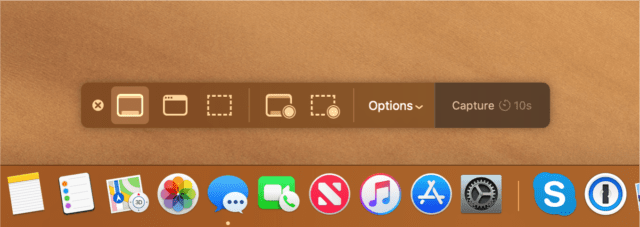
Once the toolbar is available, there are a number of ways to capture a Mac screen. From left to right on the image above, those are:
- Capture Entire Screen (as a PNG image file)
- Capture Selected Window
- Capture a Selected Area
- Record Entire Screen (as a video)
- Record Selected Area
Screenshot Tool Options
Clicking on the Options button on the Screenshot Toolbar reveals a menu with a number of options for where to save the screenshot or video, the defaults being the Desktop, Documents folder, Clipboard, Mail, Messages and Preview. Clicking Other Location… allows the user to select another location to save those files. In the screenshot of the menu below, the Downloads folder has been added to the Save to location list:
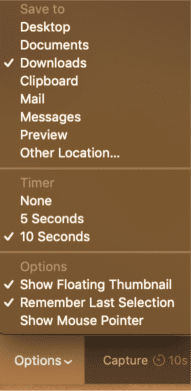
Next, the user has the option to time a screenshot. The shot can be captured immediately, in 5 seconds, or in 10 second. The timed screenshots are helpful if you need to capture an image of a menu, for example. While counting down, the Capture button appears on the screen showing the remaining time until the screenshot is taken.
The final three options are Show Floating Thumbnail, Remember Last Selection, and Show Mouse Pointer. Show Floating Thumbnail makes macOS Mojave screenshots act similar to iOS 11 screenshots. Once the screenshot is taken, it hovers in the lower left of the Mac screen and can be acted upon. Click on the thumbnail, and it expands on the screen showing a complete set of markup tools (see screenshot below):
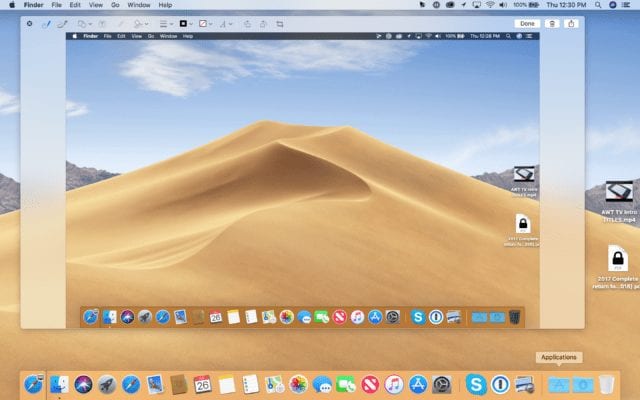
The selection of markup items is very complete (from left to right in the screenshot below):

- Draw with pen
- Draw with thick pen
- Add shape (including lines and arrows with Bezier curve points)
- Add text
- Highlight (only available on PDFs)
- Add signature
- Change line type and thickness
- Select drawing color
- Select text color
- Select typeface, style, color and justification
- Rotate 90° clockwise
- Rotate 90° counterclockwise
- Crop the image
On the far right of the expanded thumbnail (not visible in the screenshot of the markup tools) are three options: Done (which saves the file as marked up), a trash can for deleting the screenshot, and a share button for immediately sending the image through Mail, Messages, and AirDrop or adding it to Notes or Photos.
Capturing Screen Videos
Capturing screen videos with the new screenshot tool in macOS Mojave is also simple and quite useful if you want to show someone how to do something. To do so, the user invokes the screenshot toolbar with the Command-Option-5 shortcut, then clicks one of the two video capture buttons.
As noted earlier in this post, the user has the choice to capture video just from one small selection on the Mac screen or from the entire screen. Once the recording begins, a small “stop” button appears in the menu bar. Click that, at the recording appears as a thumbnail. Click the thumbnail, and a tool for trimming the video clip appears. Like screenshots, the videos can be shared immediately through a standard share sheet. Here’s a downsized version of a screen video just to give you an idea of what they look like:
Don’t Forget the Touch Bar
Have a MacBook Pro with Touch Bar? Don’t forget that the Screenshot Toolbar also appears on the Touch Bar for easy access (see screenshot below):
The Bottom Line
Anyone who needs to either write technical documentation or create training videos about Mac apps is going to love the new screenshot tools in Mojave. The tools make it much easier to capture, edit, and share both screenshots and videos.






When I click on the floating preview, I get an iPhone option and the screenshot displays on my iPhone. I don’t see an option to save the screenshot on my iPhone, however. Not sure the purpose of it being on my iPhone if I can’t save it.
Like the succinct style but need a trouble shooting section! I’ve tried the feature on my Mac and the Markup tools don’t work???? Greyed out, VERY FRUSTRATING. I’ve been trolling internet for hours trying to find out why. All I find is how to use it and how wonderful it is…I’m certainly not finding it so
Thank you for the opportunity to comment.
Heather
I’m just replying to this because, like Heather, I’ve also been ‘trolling’ the internet for an answer. Relatable comment!
Well explained – I guess I’m gonna be using the new Screen Record facility often…
thanks a lot!