![]() One of the marquee features of the new iPhone Xs and Xs Max smartphones is the camera. Although it appears to be the same 12 megapixel dual-lens camera featured in last year’s iPhone X, the camera is aided by a more powerful image signal processor, a neural engine built into the phone’s A12 Bionic system-on-a chip that is capable of running 5 trillion operations per second, and sophisticated algorithms that all add up to much better photos. A standout feature of the iPhone Xs is Depth Control, which we will explain and show you how to use in this article.
One of the marquee features of the new iPhone Xs and Xs Max smartphones is the camera. Although it appears to be the same 12 megapixel dual-lens camera featured in last year’s iPhone X, the camera is aided by a more powerful image signal processor, a neural engine built into the phone’s A12 Bionic system-on-a chip that is capable of running 5 trillion operations per second, and sophisticated algorithms that all add up to much better photos. A standout feature of the iPhone Xs is Depth Control, which we will explain and show you how to use in this article.
What is Depth Control?
Depth Control works as part of Portrait Mode on the iPhone Xs. Newcomers to the iPhone Xs may not know about Portrait Mode, which turns so-so photos of people (or inanimate objects as well) into images that appear to have been taken with a digital SLR camera with an expensive lens and studio lighting. One of the key features of Portrait Mode is the use of bokeh, which is defined as “the aesthetic quality of the blur produced in the out-of-focus parts of an image produced by a lens”
In other words, by blurring the background of an image of a person or thing, the eyes tend to focus on the primary subject of the photo and the blurred background tends to be aesthetically pleasing to humans. Apple was able to synthesize the effect of bokeh through the use of depth mapping — determining algorithmically where parts of the image are in relation to the camera lens and then blurring items that are determined to be behind the primary subject.
By adding lighting features (natural light, studio light, contour light, stage light and stage light monochrome), iPhones with Portrait Mode are able to imitate DSLR cameras with studio lighting — all through the use of computational photography. What’s computational photography? It’s defined on Wikipedia as “digital image capture and processing techniques that use digital computation instead of optical processes”.
Depth Control takes this one step further by allowing the photographer to adjust the amount of bokeh after a photo has been taken. Perhaps a Portrait Mode photo looks a bit “fake” with the blurred background — no problem, as Depth Control lets the photographer dial in a lesser aperture (up to f/16) for a longer focal length so that items in the background come into sharp focus. Conversely, setting a bigger aperture (down to f/1.4) increases the bokeh effect, blurring the background of an image even more.
Using Depth Control
Depth Control is only available with the iPhone Xs and Xs Max at this time. To begin using the feature, take a photo in Portrait Mode by selecting Portrait from the mode selector at the bottom of the Camera app screen (see screenshot below). When Portrait is selected, the photographer can also choose any one of the lighting selections as well and sees what the photo will look like with bokeh and lighting in real time.
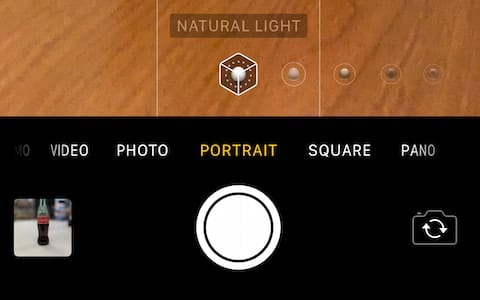
Take the photo in Portrait Mode, then launch the Photos app and select the image. Next, tap the Edit button, and two controls appear. Depth Control appears as an f-stop slider at the bottom of the image, and the lighting controls that appear in the Camera app are also visible on the image.
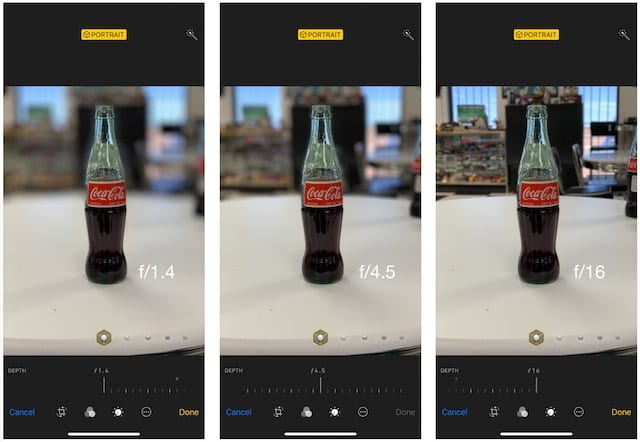
Swiping the f-stop slider to the right decreases the focal ratio down to a minimum of f/1.4. This has the effect of increasing the amount of background blur. Swiping to the left increases the focal ratio up to a maximum of f/16, which has the effect of decreasing and even eliminating the blur. The series of screenshots below demonstrate using Depth Control on the same Portrait Mode photo at f/1.4, f/4.5 and f/16:
How Depth Control Can Fix A Portrait Mode Failure
Portrait Mode is a fairly impressive photographic effect, but it doesn’t always work properly. For example, subjects with a non-distinct edge — furry animals, people with balding heads, or portraits of people wearing glasses — can result in photos that either blur parts of the image that should be sharp or keep sections that should be blurred in perfect focus.
For example, take a look at the leftmost photo in the screenshot series above. In the f/1.4 (maximum bokeh) setting, the glass appears to have disappeared on the left side of the label on the bottle. That can happen with pictures of people as well, causing odd “divots” in their heads!
I’ve found that in those cases, it’s handy to use Depth Control to reduce the bokeh to a level that reduces the “mistakes” or even remove the bokeh to show a photo that’s in focus across the image. That’s what has been done in the rightmost image in the series above — with a tight aperture of f/16, there’s very little bokeh in the background and the bottle looks more natural.
Anyone who has purchased a new iPhone Xs or iPhone Xs Max should consider learning how to use both Portrait Mode and Depth Control. These tools are another way to improve your iPhone photography — before or after the photo has been taken.





I don’t seem to have the fstop slider on my camera in portrait mode, or in my edit photos options. I have an iPhone X. Does anyone else have this issue?
Any chance you can use portrait mode to focus on a background object?
Bokeh apple
the depth feature needs to be applicable to all modes, not just portrait!
I have some lovely bokeh effects on my old SLR photos, but didn’t have a clue that my iPhone 10 could do the same. –Thanks for the clue!