 Trackpads are the default pointing device on Apple’s notebook lineup, and the Magic Trackpad (at right) is a popular accessory for desktop Macs. Most Mac users almost intuitively know how to use their trackpad for simple gestures like clicking, dragging, zooming in or out of photos, and so on, but may not know about the other gestures that are available or how to customize those gestures to their liking. Today we’ll show you a number of “hidden” trackpad gestures in macOS Mojave and how those gestures can be enabled, disabled, or otherwise customized to your liking.
For the purposes of this article, we’ll be using an Apple Magic Trackpad, which uses identical gestures to those found on the trackpads on MacBooks.
Trackpad Preferences
Your key to customizing trackpad gestures is the Trackpad preferences pane in System Preferences. Launch System Preferences from the Dock or from Apple () menu > System Preferences…, then click on Trackpad.
The first tab of the Trackpad preferences is used to customize Point & Click actions (see screenshot below).
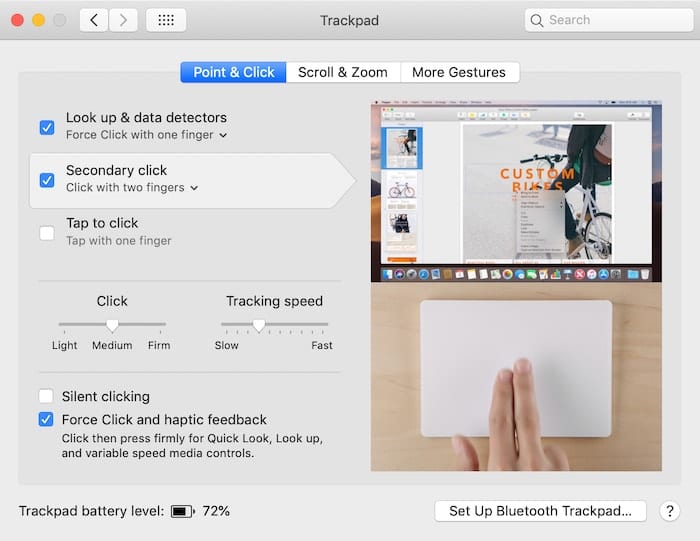
Look up & data detectors
Look up & data detectors lets you do some pretty cool things. By default, if you force click (click, then press firmly on the trackpad) with one finger on any word or a data detector (items such as appointments and addresses that have a small disclosure triangle next to them), a pop-up window appears that displays more information.
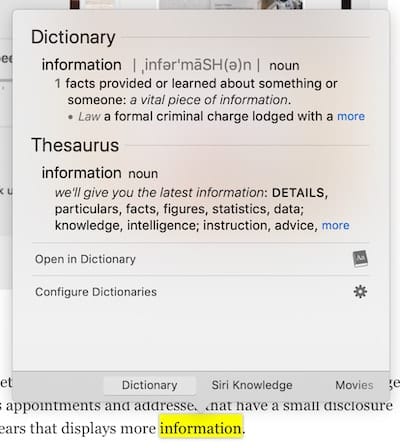
For example, in the screenshot above I force-clicked the word “information”, which displayed a dictionary definition of the word. Notice that there are other sources of data about the force-clicked word, such as Siri Knowledge, Movies with the word “information” in them, and so on.
Looking at the first image (titled “Trackpad Point & Click Preferences”), you’ll notice two things about each entry on this screen:
1) There’s a checkbox if you wish to enable (checked) or disable (unchecked) a trackpad function.
2) There may be a disclosure triangle (looks like ˇ ) below the entry. This means that you have extra choices for setting up the trackpad.
If we wish to disable one of these trackpad functions, we can just uncheck the box in front of the function in the list. To see what other gestures are available for a specific function, click on the disclosure triangle and a pop-up menu displays the other gestures (see screenshot below):
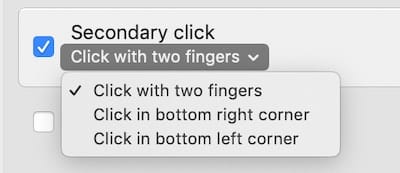
In the case, a secondary click (right click) defaults to a click with two fingers. The other possibilities are to click in the bottom right corner of the trackpad or click in the bottom left corner. Selecting one of the options from the pop-up changes the setting for the trackpad.
Tap to click
By default, tap to click is disabled. Like using a mouse, many people want to “click” the trackpad and feel the feedback to know that they’ve made a click. However, enabling tap to click makes the Mac act more like an iOS device — just tapping on the trackpad with a finger instead of “pushing” makes a click.
Click and Tracking Speed Settings
You can customize the force required for a click as well as the speed at which the cursor moves across your Mac display when you’re moving your finger on top of the trackpad with the next control (see screenshot below).

Silent Clicking
I personally like hearing the sound of a click when I make one, but if it drives you bonkers, you can disable the sound by checking the Silent Clicking checkbox. Note that you may still hear a sound as the force of your finger is transmitted through the trackpad to surfaces below, but it’s much quieter than the audible click that trackpads default to.
Force Click and haptic feedback
Not a fan of Force Clicking? You can turn off Force Clicks and the haptic feedback (the tactile “push back” that you feel in your fingertips) by unchecking this checkbox. Note that doing so also disables any trackpad features that are using a Force Click, such as look up and data detectors.
The next tab on the Trackpad preference pane is for Scroll & Zoom actions (see screenshot below).
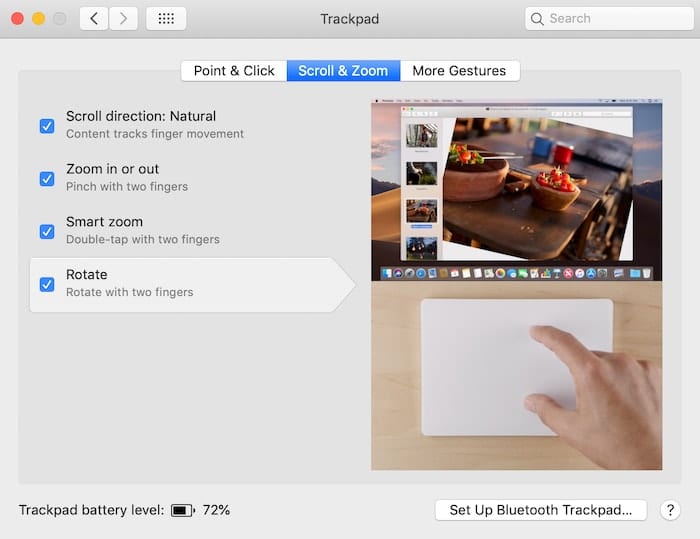
Scroll Direction: Natural
Most people are now accustomed to having scrollable windows scroll up when you move two fingers down on a trackpad (that is, the information on the screen moves downwards), but others may be used to having a different scroll direction. Keeping Scroll Direction: Natural checked means that content on the screen tracks your finger movements, while unchecking this causes content on the screen to in the opposite direction of your two-finger swipes.
Zoom in or out
Those who like a closer view of photos or small print on the screen can, by default, do a “reverse pinch” gesture with the thumb and forefinger to zoom in or a “pinch” gesture to zoom back out. Should you find yourself accidentally making this gesture on the trackpad and unnecessarily zooming in and out on windows, you can uncheck the Zoom in or out checkbox to disable the feature.
Smart Zoom
Another way to zoom in and out on items is through the use of Smart Zoom. By default, this is enabled and is done by double-tapping with two fingers. Once again, Smart Zoom can be disabled by unchecking the check box.
Rotate
Did you know that you can rotate images and objects on the Mac screen with a two finger rotation gesture the same way you can on an iOS device? This works in Preview, when cropping/rotating in Photos, and in some other apps. The gesture is enabled by default and can be disabled by unchecking the check box.
More Gestures
By now, you probably get the picture — check a box to enable a trackpad function, uncheck it to disable it, click on the disclosure triangle (if available) to see more options for the gesture. Each of the gestures is demonstrated in the Trackpad preferences with a small movie that plays on the right side of the preference pane. As a result, we won’t go into each of the “More Gestures” selections that are available on the third tab of Trackpad preferences. The screenshot below shows all of these available gestures, many of which are set by default:
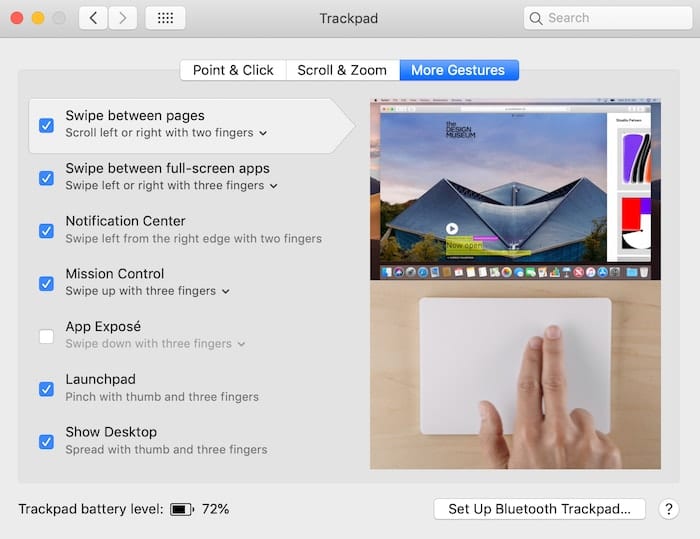
Most of the gestures that are set up for Apple’s Magic Trackpad and other third-party trackpads are rather intuitive. If you find that they’re confusing or you just don’t use them that often, you can certainly use the information in this article to change the gestures to your personal preference.


What about drag and drop; cannot find it anywhere in Mojave setting?
I stopped buying Magic Trackpads after the second stopped working for no particular reason.
I’m confused; I don’t see anything here unique to Mojave; what am I missing?
you are right. Gestures are in fact slower than before and less intuitive!