If you just upgraded to a new Mac, or used the clean install method to upgrade to macOS Catalina, chances are you’re going to need to copy information from your old Mac, or older Mac OS, to your upgraded Mac.
There are a number of ways to perform this task but by far the easiest is to use the Migration Assistant included with the Mac operating system. The Migration Assistant can transfer your applications, documents, computer settings, printer setups, and user accounts to your new or updated Mac.
The macOS Catalina version of the Migration Assistant hasn’t seen a lot of changes, at least not on the external interface of the app. If you’ve used the Migration Assistant in the past, you should be right at home with the newer version.
There are, however, a few tips we’re going to go over that may help you overcome any problems that could arise when moving information to your macOS Catalina-equipped Mac.
Ways to Use Migration Assistant
In this Rocket Yard guide we’re going to look at two of the possible ways to move the information to your new install of macOS Catalina. If you wish to migrate from an older Mac to a new Mac you just purchased, you’ll find detailed instructions in the guide:
Migration Assistant: The Easy Way to Transfer Your Data to a New Mac
The method we’re going to focus on involves directly connecting a startup drive, clone, or Time Machine drive to your Mac. The reason for concentrating on these two methods is to avoid some common issues that can occur when migrating data; slow or inconsistent network performance, or failure of the Migration Assistant to locate a network-connected drive (or Mac) to transfer data from.
Preparation Before Using the Migration Assistant
As we mentioned, this guide looks at transferring information from a directly connected storage device, and our preparation notes reflect that. Check the Migration Assistant link above for more detailed information about transferring data and files using network connections or Target Disk Mode.
Migration Assistant will work with a source drive running OS X Snow Leopard 10.6.8 or later. However, you should, if possible, update your source drive to the most current version of the Mac OS that the drive is currently using. As an example, macOS Sierra’s last minor version update was to macOS Sierra 10.12.6. Updating to the latest revision for the operating system helps to ensure that bugs, and issues that could affect data transfer, are reduced as much as possible.
Migration Assistant supports the following connection methods:
- FireWire, Thunderbolt, or USB 2 or later (USB 3.1 or later is preferred).
- Direct connection of drives that contain a valid Mac OS system or a Time Machine drive.
- Third-party apps should be updated before they’re migrated, to ensure you have a recent version.
- Drivers for third-party devices should be updated before migrating.
You should have a current backup before you begin the Migration Assistant process. The exception: if you just performed a clean install of the Mac OS and haven’t made any changes yet. In that case, as long as you still have the Mac OS Installer, you can skip the backup step. Make a note; this is one of the few times we have ever said, “Go ahead. Who needs a backup?”
Using Migration Assistant with a Startup Drive or Clone
If the source drive that contains the startup drive or clone is in an external enclosure, make sure it is adequately powered and plugged into your Mac.
If it’s housed on a partition on an internal drive, you should be all set.
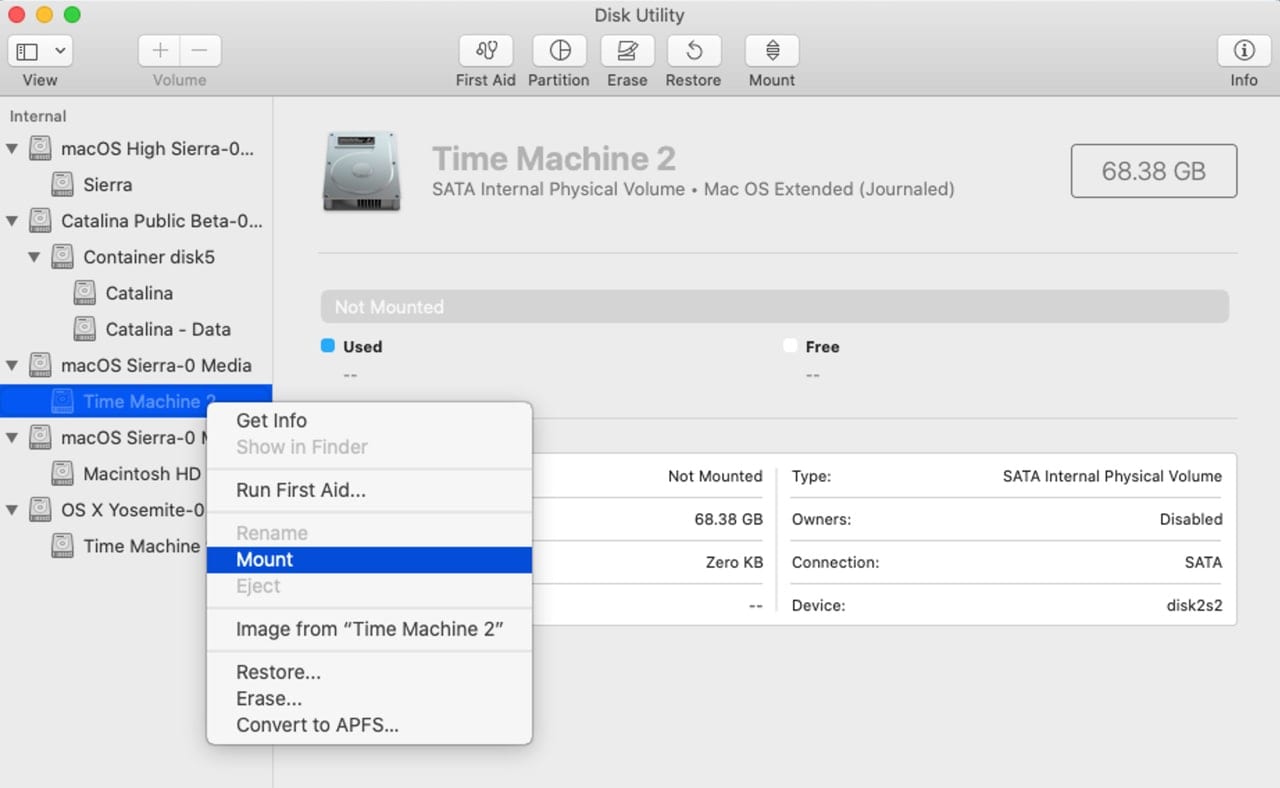
Make sure the source drive is mounted on your Mac’s Desktop. If it isn’t, try the following:
Launch Disk Utility, located at /Applications/Utilities.
Find the drive/volume/partition in Disk Utility’s sidebar.
Right-click the volume and select Mount from the popup window.
With the source volume mounted on your Mac, you’re ready to start the migration process.
Quit any currently running apps.
Launch Migration Assistant, located at /Applications/Utilities.
The Migration Assistant window will open with a brief description of what the app can do, and a warning that all other apps will be closed. Click the Continue button.
If asked, provide your administrator password and click OK.

All apps will close and Migration Assistant will provide three methods for moving information:
- From a Mac, Time Machine backup, or startup disk
- From a Windows PC
- To another Mac
Select “From a Mac, Time Machine backup, or startup disk” and then click the Continue button.
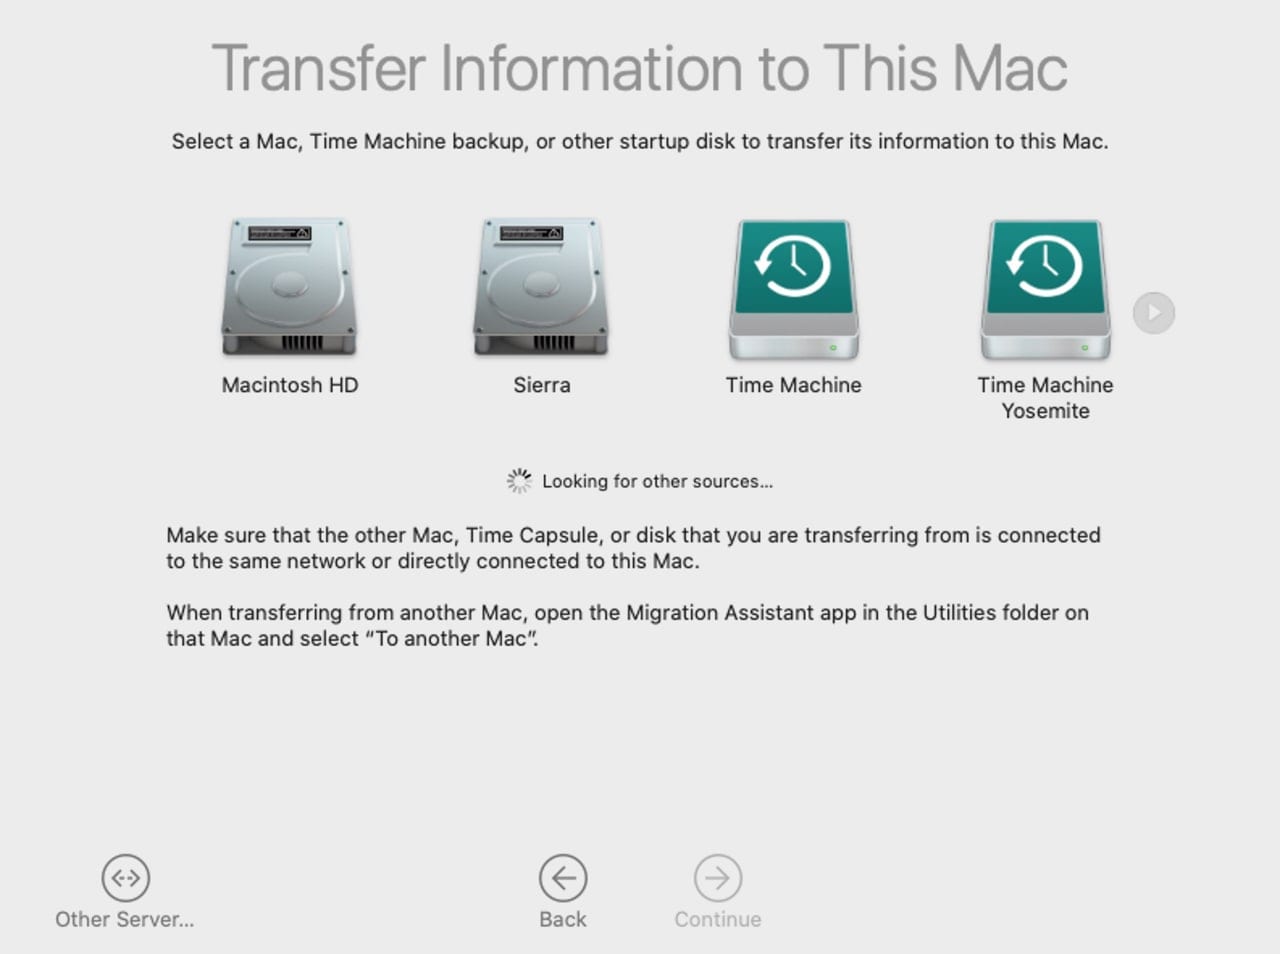
Migration Assistant will look for storage devices directly connected to your Mac, showing them as a row of icons along with the drive names. Migration Assistant will also continuously look for other sources it can use. Do not wait for the “Looking for other sources” to end.
Select the disk you wish to use as the source of information to move to your Mac, and then click the Continue button.
Migration Assistant will examine the selected source and display the items that can be transferred to your Mac. The list is dependent on the type of information on the source Mac, but you’re likely to see:
- Applications
- User Accounts – with each account including:
- Library
- Downloads
- Movies
- Pictures
- Public
- Trash
- Desktop
- Music
- Other data
- Other files and folders
- Computer & Network Settings – including the following:
- Computer
- Printer
- Network
A checkmark in the box associated with each item indicates that item will be copied to your Mac. An item with a disclosure triangle indicates there are sub-items you can choose to be included.
In some cases, you may see a yellow exclamation point next to an item. This indicates a conflict between the item on the source and an item on the current Mac. You can either deselect the item or allow the Migration Assistant to resolve the conflict for you. You’ll be guided through the resolution options if a conflict occurs.
After you’ve made the choices for which items to copy to your Mac, click the Continue button.
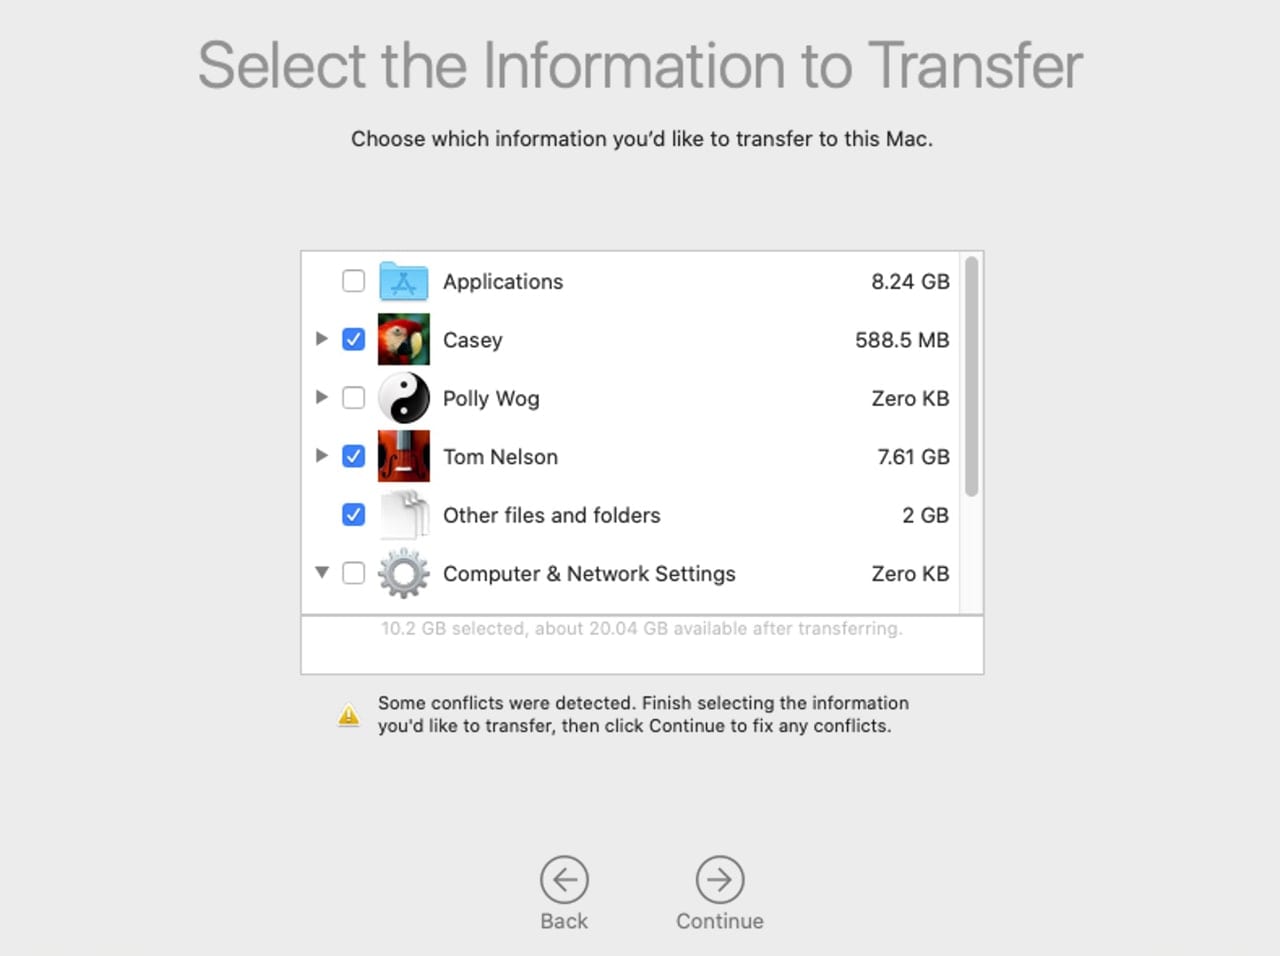
Tip: It’s usually safe to copy over user information, as well as Other files and folders. Applications and Computer & Network Settings can be problematic, especially if you performed a clean install of macOS Catalina because you had issues with the previous version of the Mac OS. Copying those items over may just copy the problem files to the new version of the OS. Instead, reinstall applications you need, and reconfigure any needed computer and network settings.
Migration Assistant may reset user passwords that are being moved. Be sure to make a note of any new passwords that are created; you will need them to log in to a specific account.
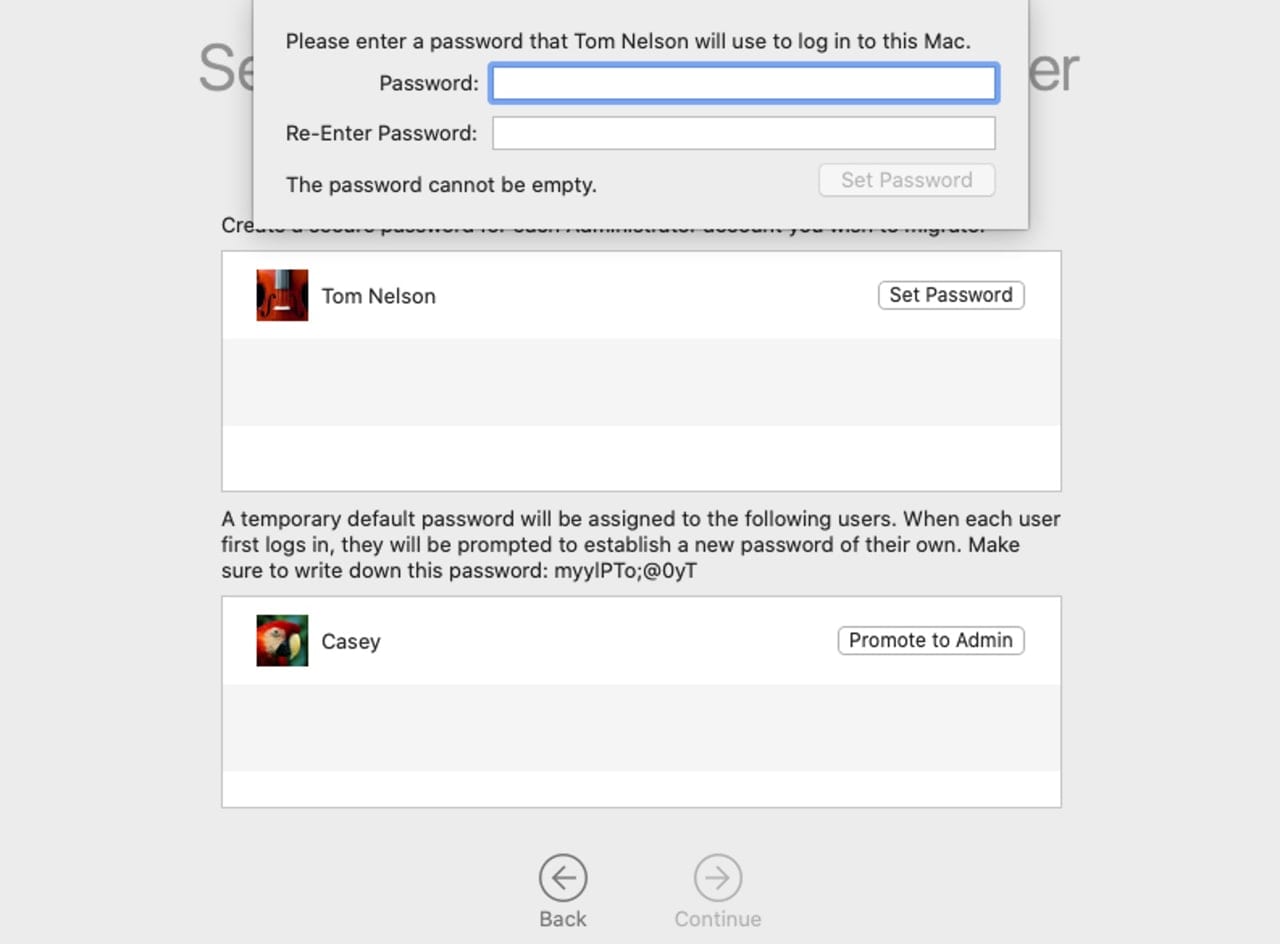
Migration Assistant will offer conflict resolution, if any exists. Follow the onscreen prompts to mitigate any issues. This usually involves deleting a user account or renaming a user account.
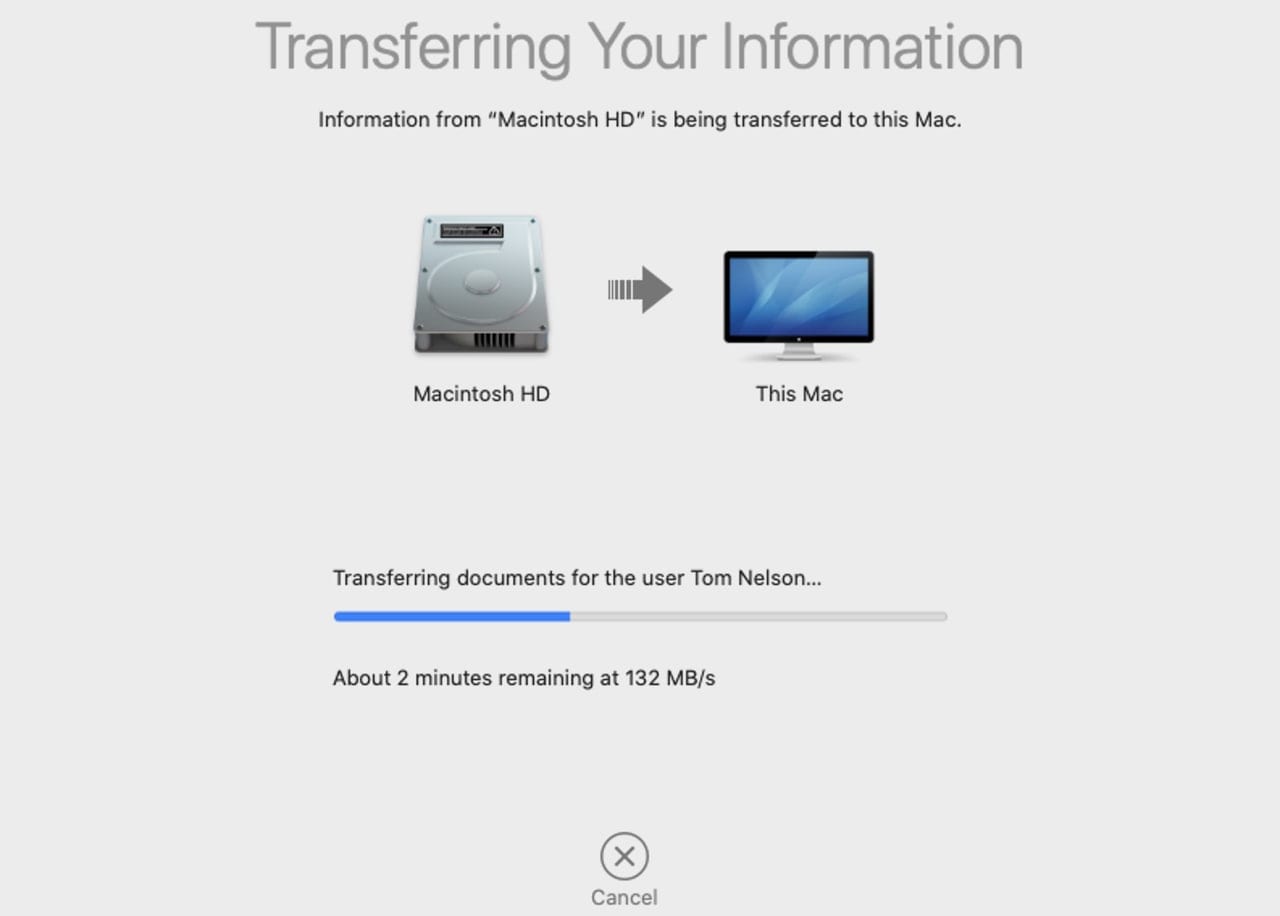
Migration Assistant will start the transfer process, and display a status bar to let you know how the process is going.
Once the transfer is complete, you’ll be able to click on the Quit button to leave Migration Assistant and log in to your Mac.
Using Migration Assistant with a Time Machine Drive
Transferring information from an older Mac or a previous OS version can also be performed using Time Machine. Using Time Machine has a number of advantages:
- You can bypass using a network connection or Target Disk Mode, which has been known to have transfer issues for some users. Instead, if the Time Machine drive is an external device, just connect the enclosure to your new Mac.
- If you have an external drive available, you can create a Time Machine backup of any Mac you have, and use Migration Assistant to transfer the information for you.
- And of course, if your Time Machine drive is internally housed on your Mac, you can use it for the Migration Assistant source, with no cables or network connection needed.
The actual process is nearly identical to the one outlined in Using Migration Assistant with a Startup Drive or Clone, found above.
The differences are as follows:
When selecting a source for the information to be transferred, be sure to select the Time Machine drive from the list.
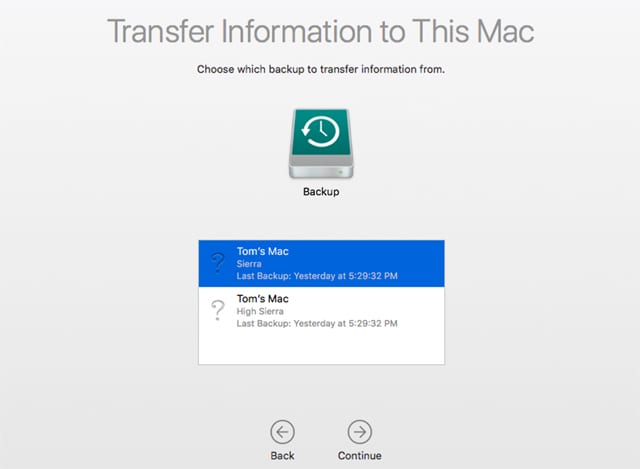
After you select the Time Machine drive, you’ll be asked to select which backup set on the Time Machine drive to use.
Warning: Time Machine drives can house backups from multiple Macs; make sure you select the correct backup set that belongs to the Mac you wish to migrate data from.
Make your selection, and click Continue.
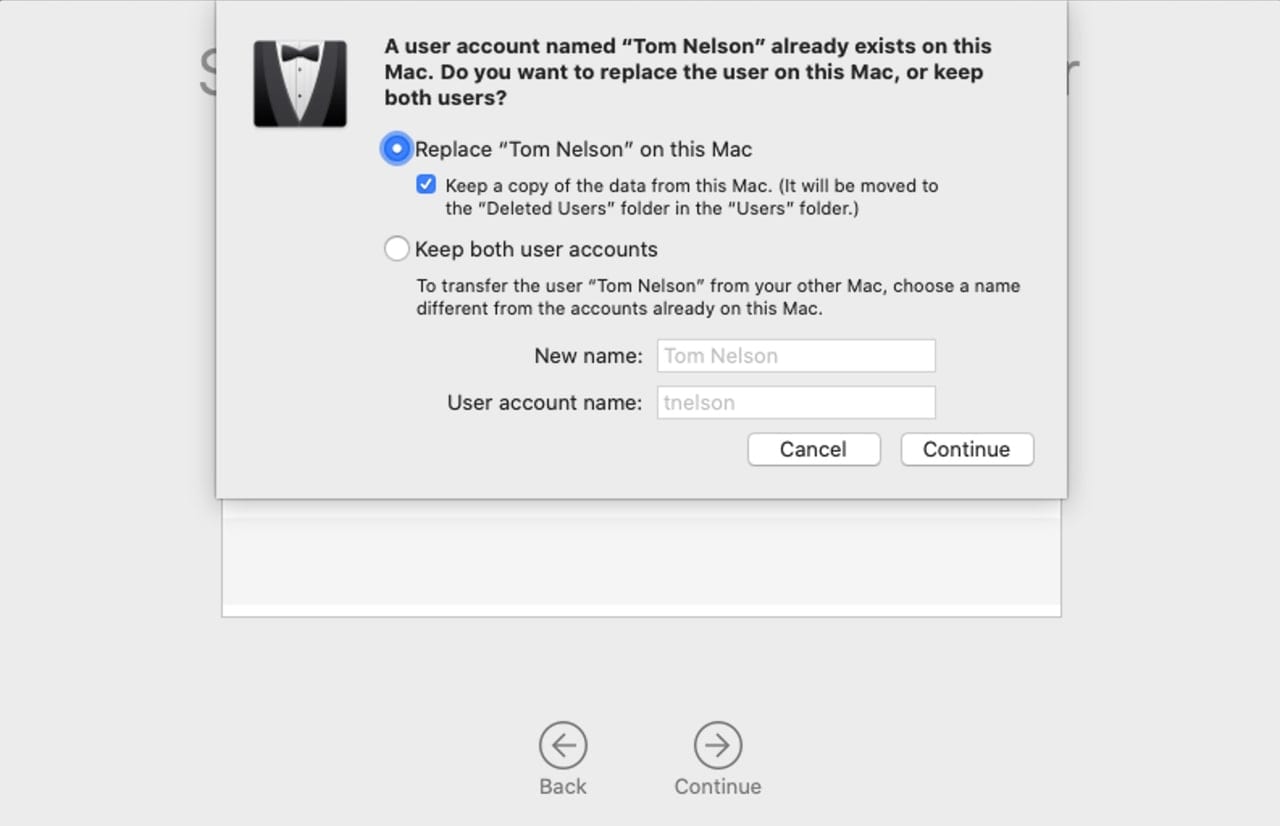
At this point you’ll perform the same steps as outlined above:
- Choose which items to transfer.
- Generate new passwords for user accounts if needed (be sure to write down the passwords; you’ll need them later).
- Resolve any conflicts.
- Transfer the actual information.
Incompatible Software
Migration Assistant will not move apps or services that are not compatible with macOS Catalina. At the end of the transfer process, Migration Assistant will display a list of apps that have not been migrated.
Make a note of the apps in the list, and contact their developers for an updated version.
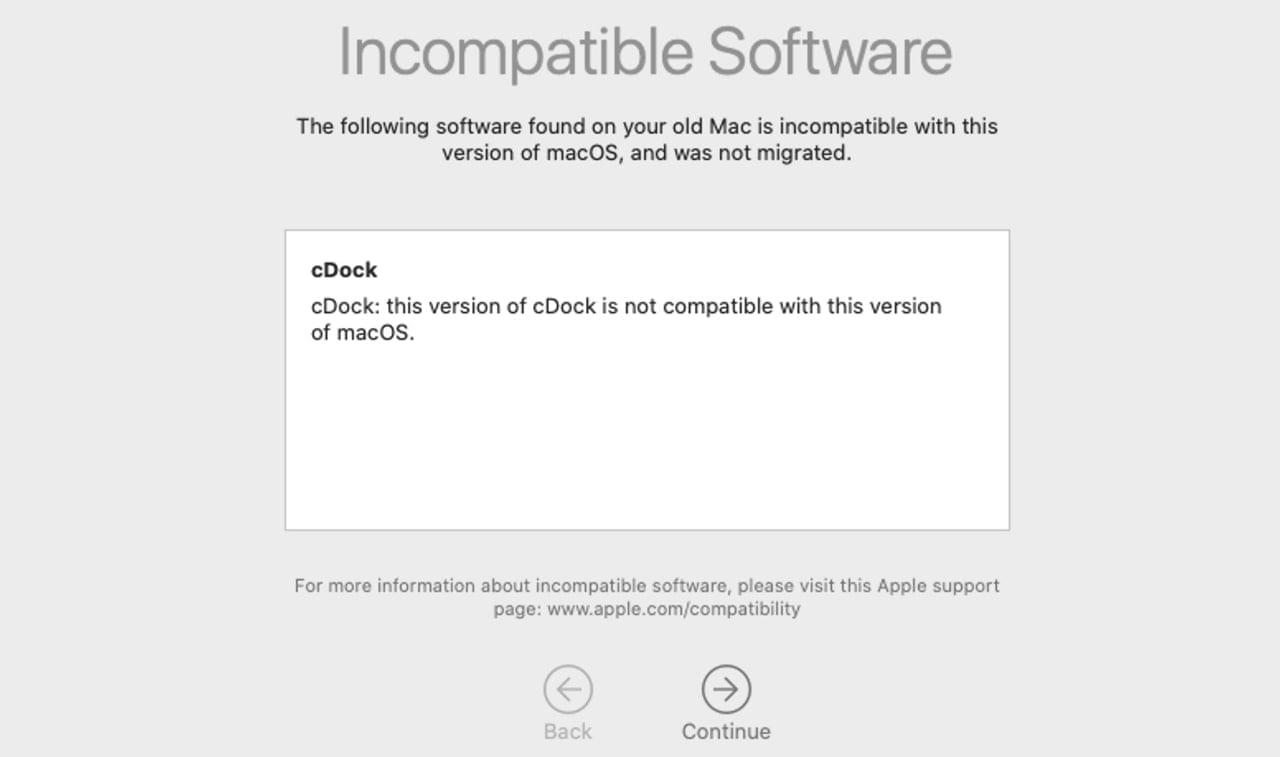
Note: Not all apps will have updates available. You will likely have some apps that will need to be replaced with equivalent products. It’s also possible to maintain a partition with the older version of the OS just for running the older apps. Another option is to use Parallels or another virtual machine environment to run an older version of the Mac OS concurrently with your new version. I use Parallels to run some games in OS X Yosemite that don’t run on later versions of the Mac OS.
Migration Assistant Secrets
These may not actually be secrets, but there’s a good chance these tips aren’t well known:
You can use Migration Assistant more than once, to consolidate users scattered across different Macs to a single new Mac. Just be careful not to copy any information other than the user data. Copying apps, or computer or network settings, from multiple Macs can cause issues later on.
Avoid Wi-Fi; although Apple says Migration Assistant has no issues using Wi-Fi as long as both Macs are on the same Wi-Fi network, it’s been a source of problems for many users. Problems include not being able to find the source Mac, or Migration Assistant losing the connection during file transfers.
If you can, choose one of the other connection options.
Troubleshooting Migration Assistant Issues
One of the two common issues encountered with Migration Assistant is the failure of the app to find the source device you’re trying to copy from. Usually this can be resolved by selecting another communication method:
- Replace Wi-Fi connection with wired Ethernet.
- Physically connect two Macs and use Target Disk Mode for the transfer.
- Use a clone, startup drive, or Time Machine drive connected directly to your Mac.
The other common problem is having Migration Assistant freeze or quit during the transfer process. This can happen when the source device is disconnected accidentally or a network connection has issues. It can also occur because of corrupt files or hardware issues on the source or destination.
The best way to fix this type of issue is to check the source and destination before running the Migration Assistant. You can use Disk Utility’s First Aid feature (or a similar app that can check and repair a drive) to verify that the drives involved in the migration are fully functional.
Recovering from a frozen Migration Assistant can be as easy as restarting the Mac and rerunning Migration Assistant; in the worst case, you may need to erase and reinstall the current version of the Mac OS.Have you run into Migration Assistant issues? Let us know the problems you encountered and how or if you were able to fix the issues.



Hi you say make sure the security codes match on the two macs but don’t say what to do if they don’t. For me they don’t.
How do you known if migration is frozen ir just processing if screen exhibits no changes occurring for an hour?
This is a bit Off Topic, but it seems like the kind of place where people would know the answer to my question.
Q: If an early 2009 iMac is upgraded to include 8G RAM and a more modern Intel Chip (say 9th Gen), then would it be able to run a more modern OS such as Catalina?
Unfortunately, Catalina can’t run on a 2009 iMac. Check here for a list of Catalina Compatible Macs.
Google install catelina on older Mac. Just successfully did it on my 2010 MacBook Pro.
Hi Jonathan, It’s not just the Processor Chip that allows compatibility with Mac OSX Catalina but the Graphics board that your Mac uses. Only certain models of Macs with certain graphics boards are compatible with Mac OSX Catalina. Also to run the newest OSX Big Sur your Mac would need to have a newer Metal capable Graphics board inside. Only some Macs dating back to 2012 came with Metal capable graphics boards and even though some models do have the correct kind of graphics board, they still may not be supported by the new Mac OSs. Officially Apple is only supporting some Macs models dating back to 2013 and 2014 at most.
Hi Jonathan L Gal here listed below is very useful link to information and the way to install Mac OS Catalina on many currently unsupported Macs: http://dosdude1.com/catalina/
I hope this helps you but it depends on your Mac model.
I’m using Migration Assistant to transfer about 1 TB of data from a 2015 MacBook Pro to a new one (mid-2020). For about 11 hours, the old computer’s stage is “Looking for applications and documents to transfer. . . .” The new one says, “Starting up. . . ” The blue bar that indicated activity on both is static. At the top of the screen, they both say data is being transferred. Is this what should be happening?
Did you ever figure this out? I’m re-living your experience!
Thanks!
Maybe the macOS Supplemental Update of today 10.14.6 helps?
This is take so long
I was never able to get thunderbolt in target disc mode to work.. I was finally able to get a time machine backup to work but I had to roll back to previous OS to do so
Have you tried looking at the article, macOS 101: How to Boot and Use a Mac in Target Disk Mode</a?
Many times..target disk mode always seemed to cause migration assistant to freeze during the process even though it looked as if it should be correct..ultimately I did solve it..just posting a a cautionary tale to others
Did you all figure this out?
Going from late ‘09 iMac with High Sierra to 2020 iMac right out of the box. Ethernet cable used
Migration assistant froze with 15 mins remaining – transferring applications.
I waited for a while – no joy – then unplugged and re-plugged in the ethernet cable.
This seems enough to ‘jump-start’ the program back to life.
Waiting now for the full migration.
Thank you, for your original post.
Keeps searching for more sources after identifying the PC that is the source for the migration. Freezes dock and all else. Have to restart. Switch off firewall but di not help.
I’m trying to use a USB3.1 SSD as my start up disk (as my 2017 iMac has become so slow it’s unusable). I installed the macOS and tried Migration Assist and it said it worked (I wanted all apps to move over- it took all night), but none of the apps moved over- all updated, etc. like Logic X 10.5xx, but none of the apps copied over- just the basic stuff
I did a Time Machine backup on one drive. I made a clone on another. Migration Assistant said I had about 25 hours left with the clone and then never budged. After 27 hours I gave up. I cannot get it to boot from the clone (because it is a WD drive?). Even a Time Machine transfer doesn’t work. Going into Disk Utility and hitting restore doesn’t work – it sees the drive, but restoring from it is not an option. I had to reinstall the OS.
The problem I am having is that Migration Assistant refuses to migrate the main user’s Home. There is a message that ‘This user’s home has been moved, and will not be copied.’ What is one supposed to do in this situation? Why does this message occur? The thing that Migration Assistant is refusing to copy is exactly the thing I need copied. I can find no explanation of this in Apple’s support pages.
Good afternoon,
i have been transferring via migration assistant from one iMac to another. When there were only about 5 minutes left to run the receiving iMac suddenly quit, showing on a black screen an apple logo and a line beneath. Just for a second, then the screen goes black again and so on. No way to restart. I used the power button at the back, and I cut off electricity. No help. What can I do?
I would be grateful for advice.
I am using migration assistant to transfer data from a 2 year old MacBook Air to a new MacBook Pro. I am not sure what operating system they are using. They are on the same network.
Everything went as it should according to instructions but I’m not sure data is being transferred. The old mac says transferring information – information is being transferred to your new Mac. But the bottom of screen says looking for apps and documents to transfer. It’s been in this state for 8 hours.
The new Mac says transferring your information – information from Trae’s MacBook Air is being transferred to this mac. All looks good except it also says starting up And there is not a time displayed on how long this will take. It’s said that forever. How do I really know if information is being transferred? What happens if I cancel or shut down? How long do I wait?
Are you doing this over Wi-fi? As the article mentioned above, Apple says Migration Assistant does support using wi-fi. But, it will be horrendously slow.
Also, you didn’t mention what size SSDs are involved here? I’m assuming a 2-yr-old MacBook Air is going to be a 1st Generation model with the big bezel? If so, I think those came with 128gb (standard) with options to upgrade to either 256g or 512gb. Even pushing 128gb over wifi is going to take a while.
Try and use a network dongle, if you have one, or perhaps some kind of a Thunderbolt 2 to Thunderbolt 3 adapter, if there is such an animal handy. That’s going to be a VERY fast speed.
Since this was a week ago, I’m hoping you figured it out already. If not, give Apple Support a call. They ARE actually working on Memorial Day, and there was zero wait time when I called them on a different issue.
Good luck!
I have the same problem. Did it work out for you. Mine says the same thing for several hours. I don’t know if it is transferring data or stuck or frozen. I’m using thunderbolt for transfer.
Did you resolve this? I am also transferring using Migration Assistant from my old MacBook Pro to a new one. Mine says the same thing transferring on one, starting up on the other. I am connect peer to peer with thunderbolt.
This is a very informative article, thanks. I migrated from a time machine external hard drive to my new macbook-Pro 16. I ended up with two users because I made some mistakes. This has resulted in some “quirky” behavior on the new machine. I don’t think I can merge users without compounding problems. Would it be a good idea to just reformat the new machine and do the migration again? How do I avoid having two users? Thanks
Shouldn’t there be some messages during a migration assistant transfer? No idea what’s happening after hours of a transfer.
I’m using migration assistant to transfer data from an old mac to a new Mac using wireless. They are both running Catalina and are on the same network.
Everything went as it should according to instructions but I’m not sure data is being transferred. The old mac says transferring information – information is being transferred to your new Mac. But the bottom of screen says looking for apps and documents to transfer. It’s been in this state for hours.
The new Mac says transferring your information – information from Michaels MacBook Air is being transferred to this mac. All looks good except it also says starting up about a minute remaining. It’s said that forever. How do I really know if information is being transferred?
I have a new iMac and am aiming to use My Passport for data migration. Ran First Aid on My Passport. Successful! But Migration Assistant will not recognize My Passport even though the new iMac itself recognizes it (I can see My Passport Drive on the desktop). Haven’t been able to get any further.
Hi! I have a very strange problem. I start the program and it all goes well for few seconds, then the screen changes to a login screen and after entering the password the program stucks. Anyone having that problem. Is there a way to fix?
I have the same problem, but still looking for fix.
There is a simple and working fix for this problem. You will need to delete the file (.AppleSetupDone) and the computer will start like brand new. Here is a tutorial how to do this(http://www.theinstructional.com/guides/how-to-re-run-the-os-x-setup-assistant). Then you follow the steps and recover from time machine normally. In this case the migration assistant works normally.
ineligible osx upgrade required.
100% useless migration tool from mac
I have a client with the same issue trying upgrade from a MBAir to MBPro over WiFi. (No USB3 port to support his TimeMachine drive)
ineligible osx upgrade required
I sent him to get a USBC to USB3 adapter and try without Wifi.
I had the same error. The old iMac was running Catalina, the new iMac was still on Mojave! Disappointed that the program writers couldn’t be bothered to be more informative, eg ‘I see your new machine is running Mojave but the old machine is running Catalina. Please update your new machine to Catalina’ As the program KNOWS which one has which (and has shown the unhelpful error message) this is a trivial addition to the program.
I’ve updated new iMac to Catalina but having terrible problems with Migration Assistant slowing down and stalling. What a crock. I’m not a newbie – been building and troubleshooting PCs for 30+ years, and been a Mac user for 11 years. Thus is my 3rd iMac.
Back in the beginning of September of 2017, I did a migration using Apple Migration Assistant (macOS 10.12 Sierra) from Mac mini fusion drive 1 TB to a new iMac with SSD 2 TB.
It seemed to work OK, but I was shocked to find that many items were missing and worst of all, no warning was issued. I noticed that by sheer chance, since the target had much less disk space used than the source disk after the migration.
Eventually I could do a migration of all stuff using SuperDuper! Simply, I cloned the source into the destination disk.
Last but not least, repair the directory of the disks with DiskWarrior to avoid even more issues (I did in the example above). That is why I am still in macOS Sierra until Apple releases documentation to rebuild the directory of APFS disks (safety net):
DiskWarrior 5.2 & Apple File System (APFS)
What’s in the works
The next major release of DiskWarrior will include the ability to rebuild APFS disks. Apple released a portion of the APFS format documentation in September of 2018 . Our developers are now waiting for the remaining portion of documentation to update DiskWarrior in order to safely rebuild Apple File System (APFS) disks.
https://www.alsoft.com/diskwarrior5apfs