Have you upgraded your iPhone or iPod touch to iOS 15? This is the second in a series of posts in which we’ll be exploring the new features of iOS 15. If you haven’t had the chance to do your software update, we have full instructions in the first article. Today’s post looks at the new features in the Maps app.
Overview of new Maps features
There’s a cool new interactive globe available in Maps, An enhanced 3D view for cities adds significant details like turn lanes, medians, bike lanes, and pedestrian crosswalks. As you’d expect, this works both on iPhone and in CarPlay.
Neighborhoods, elevation, commercial districts, buildings and more are also more detailed now. Road colors have changed and there are new labels, landmarks feature custom designs, and there’s a “moonlit” night mode.
Transit riders will find that they can find nearby stations more easily, and even pin their favorite lines. The app follows selected transit routes and notifies users when disembarkation is near.
A new walking directions view for big cities uses augmented reality. By holding up the iPhone, the Maps app generates an accurate position and delivers detailed walking instructions on an AR overlay.
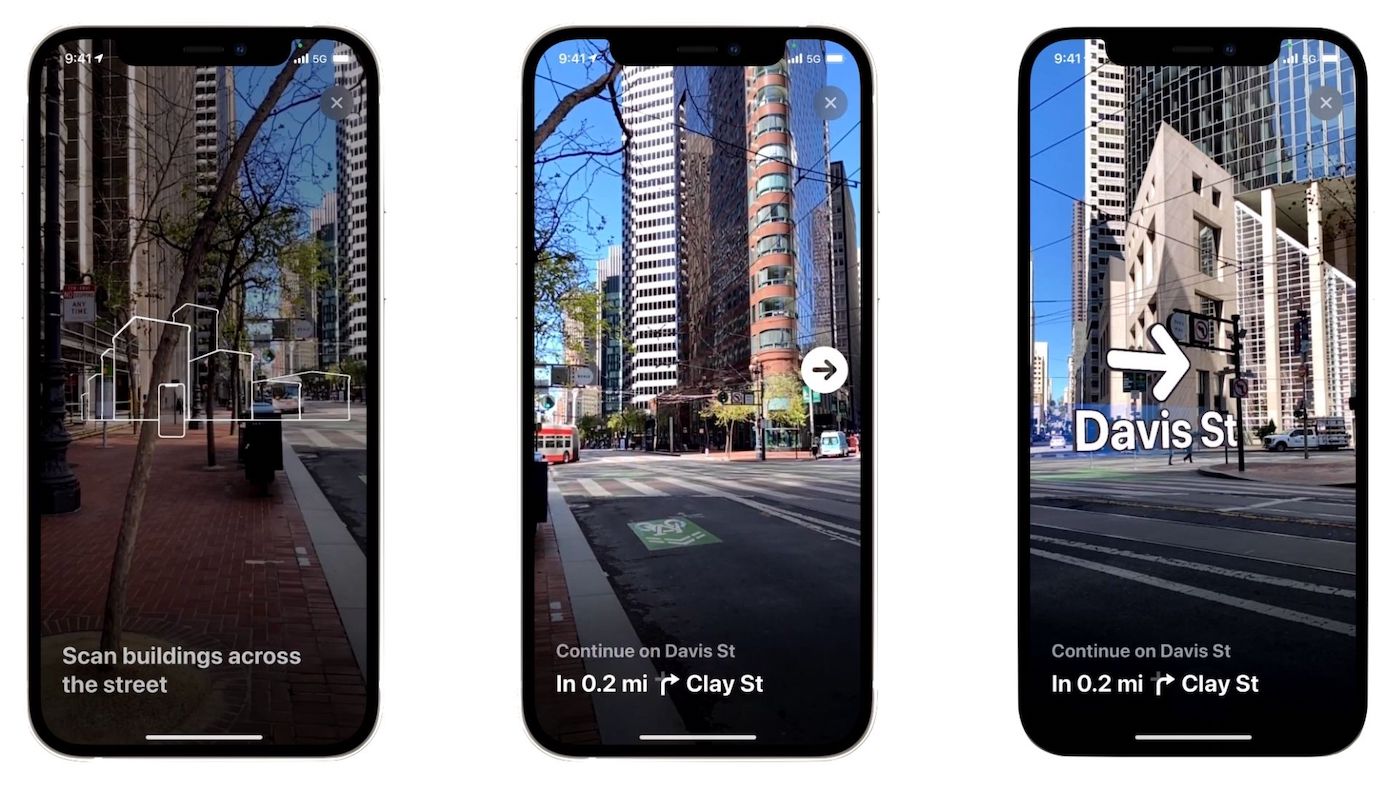
Want more info about businesses and other locations? Place cards are redesigned and are easier to use. A new Guides home shows curated information about new places.
Searching for locations now provides the opportunity to filter results by criteria like opening and closing time or type of cuisine. Search results automatically update when in motion, and common settings are in one easy-to-find location.
Interactive Globe
The new Interactive Globe in Maps is not only fun, but educational! Prior to iOS 15, zooming all the way out in Maps displayed a flat world map. Now the new globe view shows you a 3D view of Earth from space.
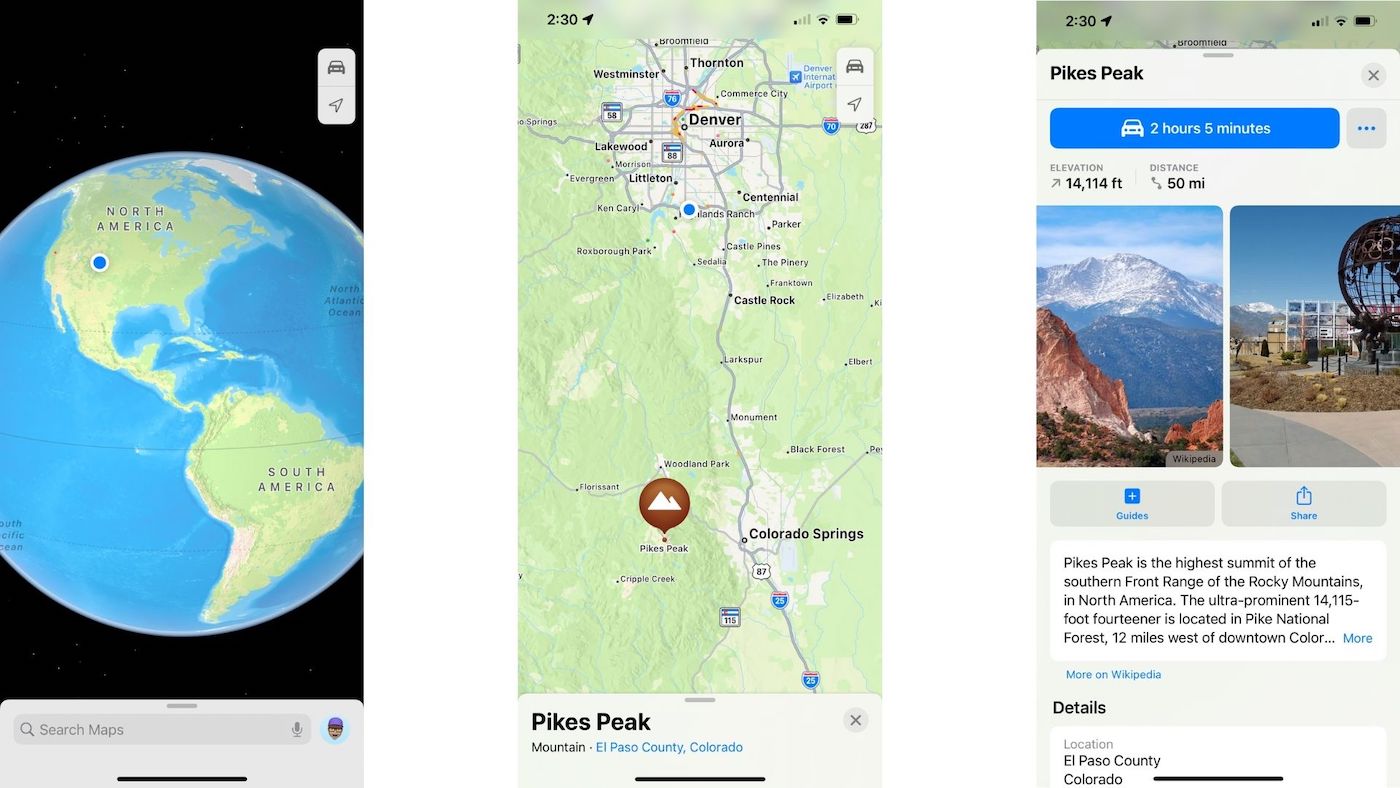
Once you’ve spun the world around a few time, use pinch gestures to dive into areas for details on deserts, forests, oceans, and mountain ranges. Zoom in even more to find a specific mountain or landmark, and it’s possible to tap a button for extra details.
Here I tapped Pike’s Peak in Colorado for more details, which included its elevation (14,114 feet), distance from my present location (50 miles), and driving instructions up to the top of the mountain. Hmmm, if I leave now, I can be to the top in 2 hours and 5 minutes.
Maps transit information
Maps details on major bus and rail lines in cities make it easier to get around with out a car. Departure times are listed, service delays are highlighted, and you can pin a favorite line to make it more discoverable in the app.
1 – Launch Maps, then swipe up the menu card located at the bottom of the map. Tap More next to Favorites.
2 – Scroll down to Siri Suggestions and tap the plus button ( + ) next to Nearby Transit to add it to Favorites.
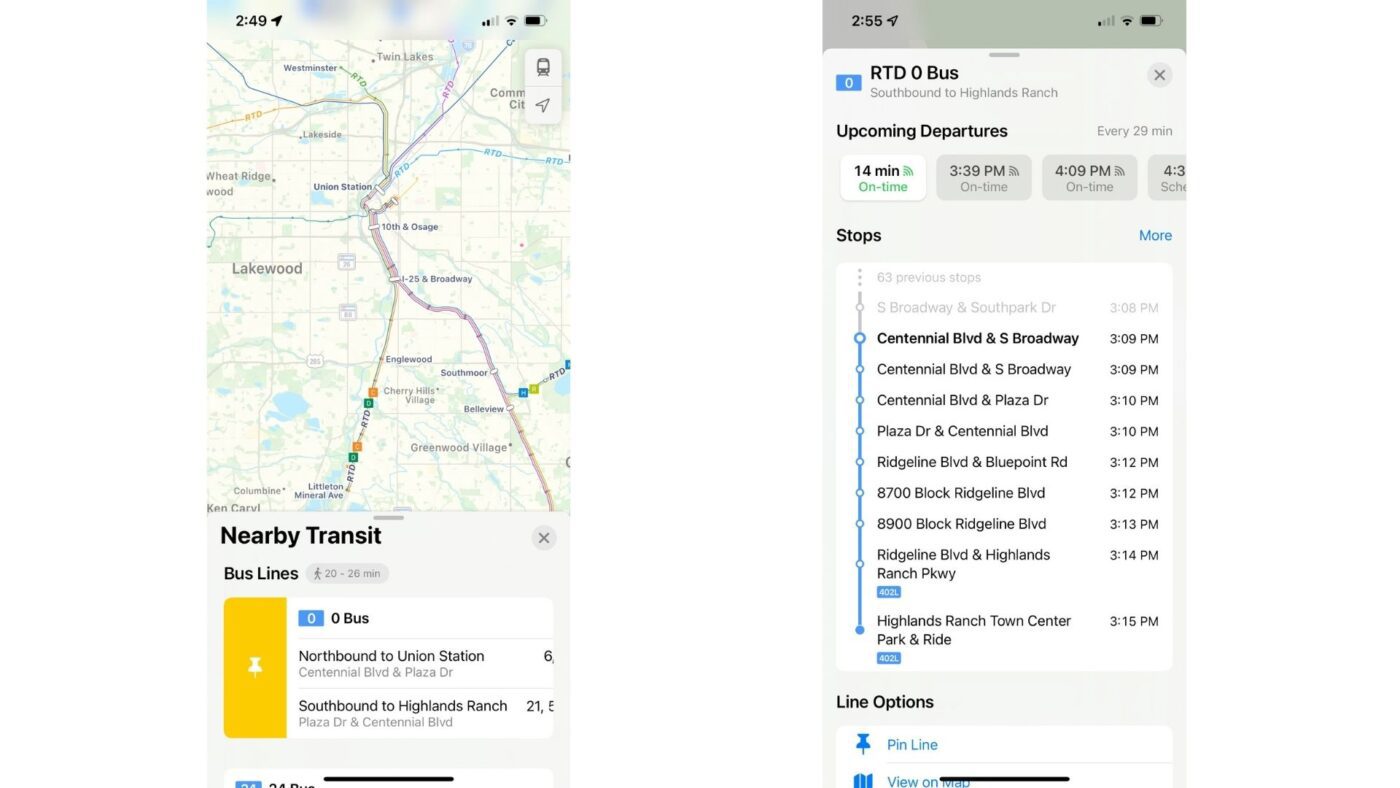
3 – Transit links are shown in a list by category. For example, if there are bus, commuter rail, and light rail lines within walking distance, you’ll see those lines and the next departures listed. If there are any delays, they’re shown in red and turn green once the delays are resolved.
In my case, the only transit option within walking distance consists of two bus lines.
Pin a transit route
There are two ways to pin a transit route to make it easier to find. First, return to the Nearby Transit menu and swipe right on a line. A yellow pin button appears; tap it to pin the line.
For the second method, scroll down to the bottom of the departures and stops view and tap the Pin Line button. Both of these methods of pinning a transit line are visible in the screenshot in the previous section.
Improved user settings in Maps
Apple added an account area in Maps to let users fine-tune preferences for direction mode, toll and highway avoidance, transit, and so on.
At the bottom of the Maps display next to Search Maps is a circle containing either your initials or any image you’ve saved for yourself. A small menu appears with buttons for Favorites, Guides, Reports, and Preferences.
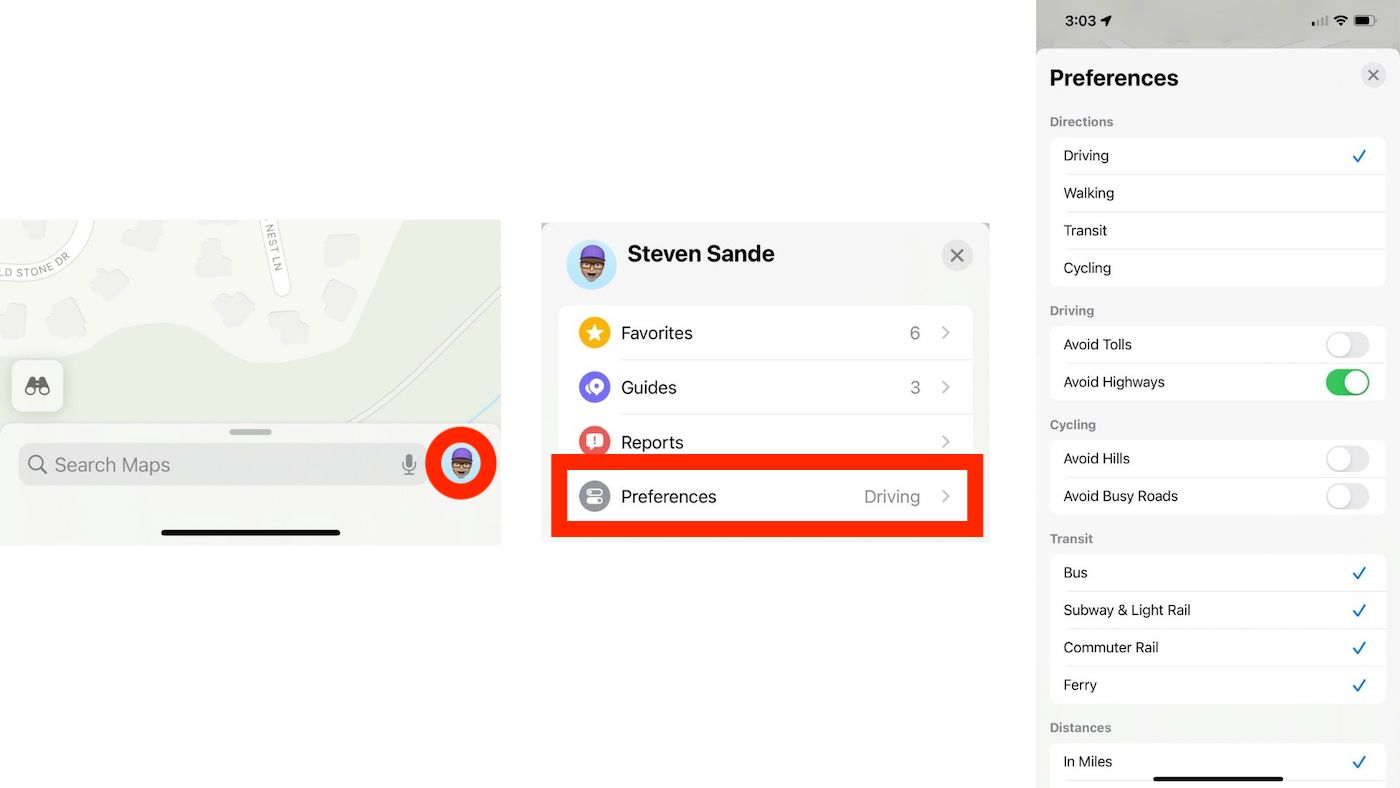
Tap Preferences and a detailed submenu appears. The settings are all in one location now: you can set your preference to Cycling directions in that’s the way you roll, and even tell Maps that you want to avoid hills and busy roads while you’re two-wheeling.
In my landlocked location in Colorado, it was a natural to take Ferry off of my modes of transportation…
Set departure or arrival times for driving directions
Google Maps has had an advantage of Apple Maps for quite a while in that it allows you to get estimated travel times before a trip. Now it’s possible to set either a departure time — and get an idea of when you’ll arrive — or arrival time — and see when you should leave.
Here’s how it works:
1 – Enter your destination into the Apple Maps search field and tap Search.
2 – On the search result that appears, tap Directions.
3 – Tap the car button (far left) to select driving directions
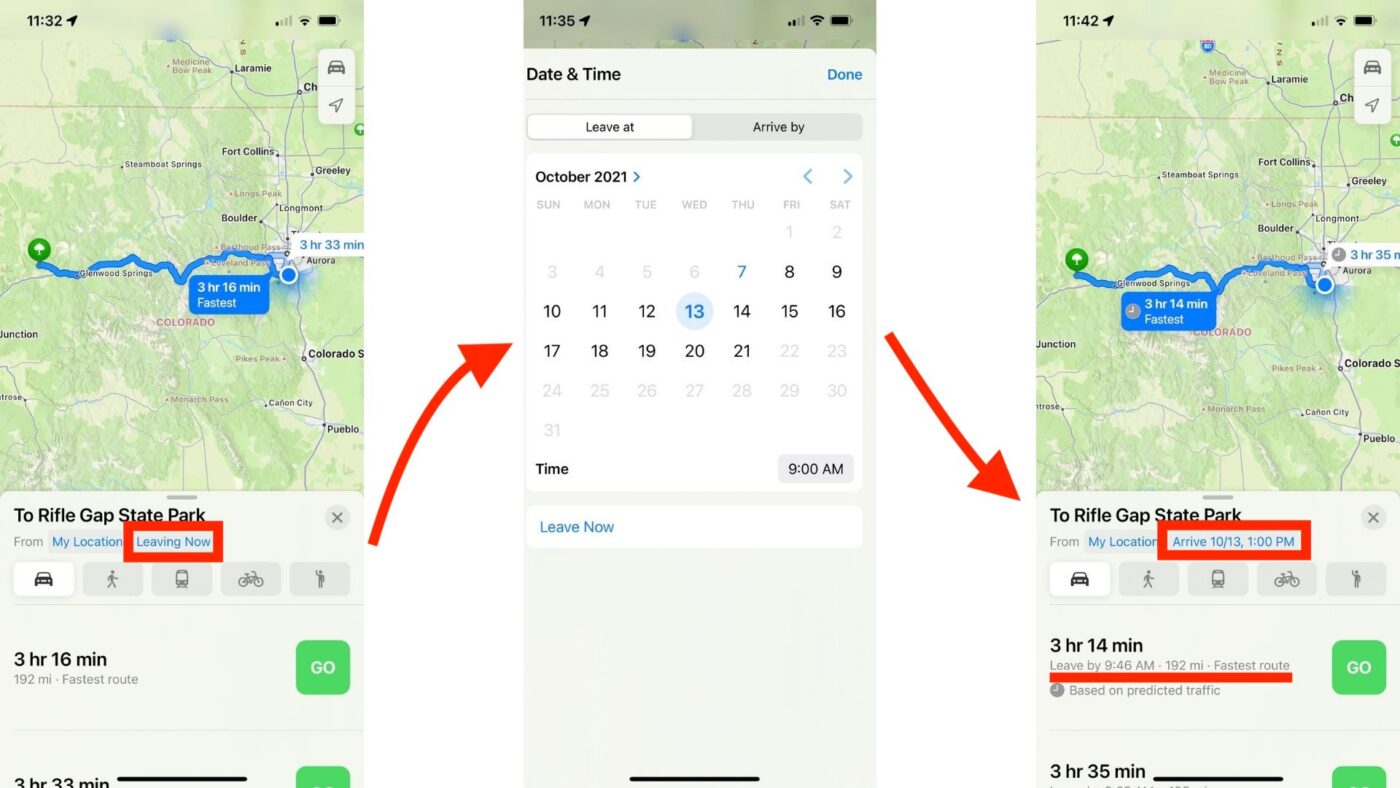
4 – Tap “Leaving Now”
5 – On the screen that appears, tap the date and time that you wish to depart your location, then tap the Done button at the top. You’ll get a travel time based on predicted traffic (left image above)
6 – Want to know what time to leave based on the time you wish to arrive at your destination? On the Date & Time screen, tap the “Arrive by” tab. Enter the time and date for your arrival, then tap Done. The directions now show what time you’ll need to leave (underlined in right image).
Sadly, this doesn’t include the ability to add a stop on your trip! iOS 16, perhaps?
Filtering search results
Searching in Maps is improved in iOS 15, with the ability to filter search results by things like cuisine, whether or not a restaurant offers takeout, and whether the location is open or not.
1 – In Maps, open the map view to a location you wish to search. Tap the search bar at the bottom of the map.
2 – In the search pane that appears, scroll down slightly to the “Find Nearby” section. Tap on a category you’re interested in, like Restaurants.
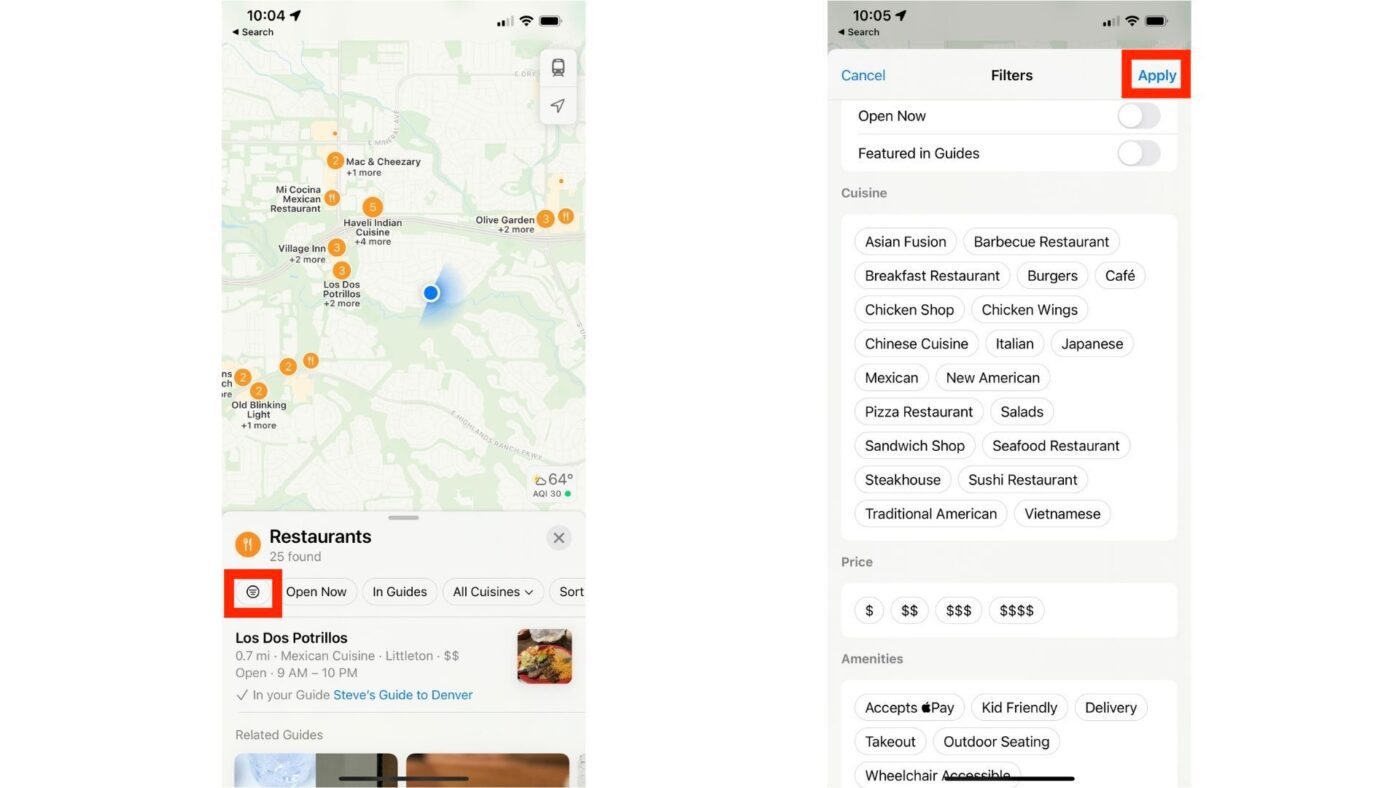
3 – Just below the number of locations found in the area is a list that can be swiped, starting with a filter button and followed by “Open Now”, “In Guides”, “All Cuisines” and so on.
4 – Tap the filter button and you can select any number of filters from the list. I especially like the fact that you can find locations that accept Apple Pay.
5 – Once you’ve selected the items that are most applicable in your situation (for example “Open Now”, “Italian”, “Barbecue”, “$$” and “Accepts Apple Pay”) tap the Apply button to see the filtered list of locations.
Stay tuned for more
The Maps app has become much more useful and easier to use in iOS 15. Visit The Rocket Yard frequently for even more ways to enjoy the power of the new operating system on your iPhone.


