Here is the fifth in a series of short video tutorials that will help you learn how to unlock new abilities on your macOS. Today we cover Shutter Encoder.
Converting media with Shutter Encoder
Shutter Encoder is one of my favorite tools as a professional media creator.. It’s an open-source tool available free of charge, although the author asks for a donation.
Shutter Encoder is a GUI (Graphical User Interface) layered over the top of FFmpeg. FFmpeg is a command-line interface (CLI) tool used for batch conversion by every site you use to publish your video, such as YouTube, Instagram, and Facebook. Working with a GUI like Shutter Encoder makes FFmpeg much easier to use.
With support for more than 50 types of adjustments/conversions, Shutter Encoder should cover most of your video-handling needs.
Here are three examples to give you an idea of Shutter Encoder’s flexibility.
Selecting a snippet of a long Zoom video
Let’s say I want to send a little snippet from a long Zoom recording to my brother, but I want to do it through email. That means it has to be small file, 10-20 MB or less.
I don’t want to re-encode it, because Zoom videos are already low bit rate. But I do want to trim it so I’m sending only a small segment.
To begin, I drag the video file to Shutter Encoder’s list window. From the Choose Function Menu, I choose “Cut without re-encoding.”
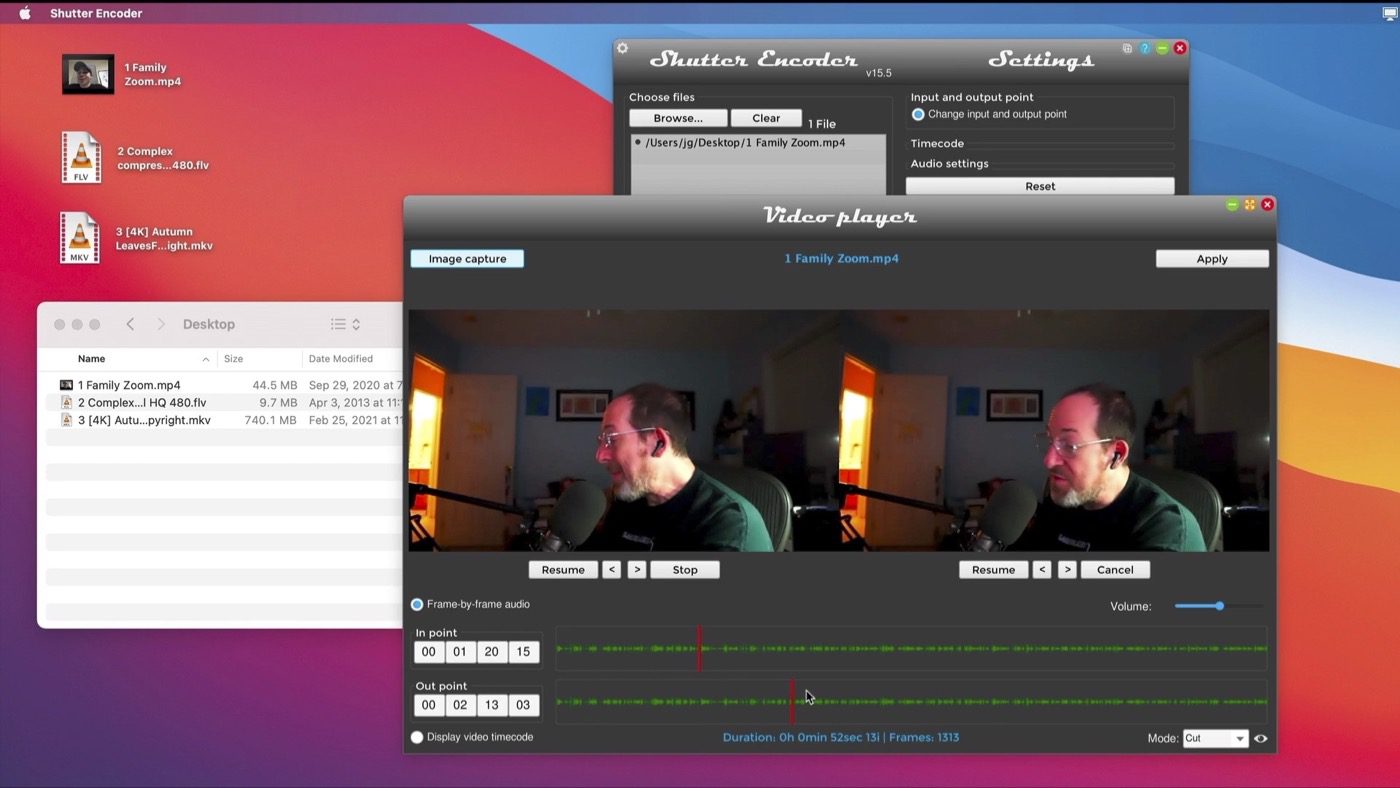
Next, I’ll choose “Change my input and output point” on the right side of the Shutter Encoder UI. This enables me to pick the start and end of the snippet.
Shutter Encoder shows a warning that it cuts only on keyframes. Web-based video is so heavily compressed that not all the frames have all the picture information that comprises the image, relying instead on reference frames to complete the image. That’s how some video files can be super-small. Shutter Encoder will automatically look for the nearest complete frame, ensuring that when you pick the start/endpoints, they’ll be on full frames.
To set my in and outpoints, I scrub with my mouse to find the beginning and end of the section I want, then I hit Apply.
Finally, I’ll choose Start Function, which is required to initiate any process.
Shutter create the snippet I want based on the endpoints I specified, saving the video as a standalone file with _Cut added to the filename.
Converting old Flash video with Rewrap
I have some old Flash video files, and I want to rewrap them. Mobile devices can’t play FLV.
FLV, MKV, MOV, and MP4 are all containers; they hold your compressed video files. Hardware devices can’t play everything —they’re limited, unlike a computer. Sadly, the method of FLV conversion described below works only on Flash video files, not interactive Flash games.
To begin, drag the FLV into Shutter Encoder.
From the Choose function menu, choose Rewrap. Since I want to rewrap this Flash video as MP4, I’ll pick “to mp4” to have the video copied inside an MP4 file.
A quick note about the video: Everything is compressed to a particular flavor called a codec. If you want to know what type of codec is inside any file, you can right-click on the file in Shutter Encoder’s file list and pick information. (Yes, it’s misspelled, due to being translated from French.)
The most important line is the Video Format. In this case, it’s AVC, which is also known as H.264. You can google any codec that shows up here to find out more about it.
Now that it’s been rewrapped as MP4, I can put it on a mobile device or use it on my Mac. Quicklook (spacebar) works too.
Converting an MKV file for editing
MKV files are “Matroska Video” files. It’s an open-source container. No cameras shoot in this format or output files to it, but loads of screen recorders use it, like OBS. Unfortunately, it’s not a great container for editing.
For example, have a 4K MKV clip I want to use that’s in the public domain. It’s five minutes long, and I want to work with it in a video editing tool like Final Cut Pro, which doesn’t support MKV.
This time, when I put it into Shutter Encoder’s file list, I’ll choose the function to convert to Apple ProRes.
ProRes files are wonderful to edit with, because they require very little CPU strength. They have worked well on computers from 10+ years ago.
ProRes files will be much larger than a compressed source file like MKV, so I’m only going to take a small piece of that 5-minute video. To grab a snippet of the file, I’ll select new endpoints for the section I want using the steps outlined above for the Zoom video.
This conversion took longer than the other methods, as the computer had to encode the video. The original 5-minute MKV file was 760MB. Although I converted only 20 seconds of the original file, my ProRes section is more than 2GB. But when I’m ready to edit the file, it’ll decode fast and work smoothly on any editing system.
Finally, as mentioned earlier, Shutter Encoder supports more than 50 conversion options. Convert your audio to AIFF or MP3 files. Extract audio from a video file. Rip DVDs and Blu-ray media for your personal use. You can even download videos from popular websites.
This tool supersedes other tools in my toolbox for conversion. I now use Shutter Encoder rather than Handbrake or VLC player. And this donationware, open-source tool gets rapid, frequent upgrades.
It’s a Swiss Army knife of conversion!


I did not see any way of redoing (recover from reset) adjustments to images.
Just wondering if there is one that may not be evident?
It is NOT free of charge. You can’t download it without “donating” $10. That means it costs $10—NOT FREE.
Rick – So I just went and tested it. It does download, without donating. :D
If you’re having problems, I’m happy to help – reach out to me directly.
And technically it’s donationware, which means not free. But when you click on any of the versions+donate, the installer downloads to your machine, runs, never nags you. Just asks for the donation on the initial download.
This person (I believe) is using some GPL3 elements, meaning he can ask for a donation, but cannot commercially charge for the work.
And of course, if you find the tool useful, you might consider donating.