If you are the proud owner of a new Mac, congratulations! If this is your first Mac, it will take some time to get used to it, especially if you are making the switch over from a PC (like I did!).
In this blog designed for macOS beginners, we’ll cover the key initial set-up steps and share our picks for the top 10 tips and tricks for new Mac users, just like you!
Getting started with macOS
First, let’s start with the basics (for the newbies)…
macOS is the operating system designed by Apple that powers every Mac. Many devices use macOS including but not limited to iPad, iPhone, Apple Watch, and AirPods. macOS is known for its security, reliability, and advanced technology — and furthermore, for being user-friendly (a big win for new users!).
If you’re coming to the Mac as a life-long Windows user, or maybe you’ve just been away from the platform for a few years, there are tons of amazing videos on YouTube that you can check out for reacquainting yourself with macOS. This video provides a great snapshot of all the UX/UI choices that make a Mac a Mac.
And this video provides a great starting point for anyone who is switching over from Windows and is worried about losing some of the great productivity-boosting features of that platform like Window-snapping and the power of Windows Alt-Tab.
Setting up your device
The following are a few key steps you’ll want to take when initially setting up your Mac:
- Set up your Apple ID: You will first need to create an Apple ID and Apple ID password (unless you already have one from another Apple device). This will allow you to connect to iCloud on all your devices so you can share contacts, photos, calendars, and more.
- Set up your email: Apple’s Mail app is located in the Dock of your Mac and can connect to almost any email service.
- Connect your printer: To connect your printer, open System Settings > Printers & Scanners > Add Printer, Scanner, or Fax and select your device.
Top 10 tips & tricks for macOS beginners
You won’t become a power user overnight, but by learning these tips and tricks you’ll be well on your way!
1. Back up your device.

You can back up your Mac with Time Machine, a built-in feature that allows you to restore your Mac from a Time Machine backup if you ever delete or can’t access files. The cool thing about Time Machine is that it automatically backs up your machine and it allows you restore specific backups. For instance: Say there’s a version of a file with a specific wording or image that you changed at a specific date. With Time Machine, you can browse back to that file and restore it from the specific time you know it looked the way you want.
2. Use the Help menu.
The Help menu is located in the menu bar and will bring up a search field, table of contents, shortcuts, and other helpful tips. It’s pretty powerful too. Just about any question you may have about your Mac, your Mac can help get you an answer for.
3. Click the Apple menu.
The Apple menu is located in the top-left corner of your screen and provides access to System Settings, the App Store, documents, and more. It’s one of the more distinctive features of a Mac and clicking it is still the beginning to many a tutorial.
4. Visit the Mac App Store.
Just as it does on an iPhone or iPad, the App Store provides a convenient way to download software for your Mac, using the same Apple ID and password you use for Music and iPhone apps.
BONUS TIP: By default macOS is set to only allow downloads from the Mac App Store. But let’s say your favorite browser is Firefox or Chrome? Those aren’t in the Mac Store, so what are you supposed to do? Thankfully, you can go into the Mac’s settings and turn this setting off.
To do so in macOS Ventura: Click the Apple menu > Click System Settings > In the app that appears, click Privacy & Security in the left sidebar > Scroll down to the Security section of the right pane > Click the dropdown menu next to “Allow apps downloaded from” and select “App Store and identified developers.” You’ll then need to enter your password to confirm the change.
BONUS BONUS TIP: You’ll notice that the option isn’t to allow “all apps.” It’s to download apps from identified developers. This includes big developers like Google and Firefox, but maybe there’s a utility that you’re trying to install that macOS won’t allow even with this setting on. In those cases, you’ll simply head back to System Settings > Privacy & Security > Security and you should see mention of the app you tried to install. You’ll see a button labeled “Open Anyway.” Clicking that button should allow you to install the app. Any other questions you have should be answered in this support doc from Apple.
5. Use Spotlight!
Spotlight is located in your Mac’s menu bar and is the built-in search bar for all of macOS. It helps you quickly find things on your computer like documents, apps, contacts, and more. To open Spotlight, you can click the magnifying glass in the menu bar, or you can press Command + Space on your keyboard. This keyboard shortcut quickly becomes the primary way a lot of Mac users interact with their computer because no matter if you’re trying to launch an app or search a question in Google, it’s the quickest way to get where you’re going.
6. Get to know the Finder.
The Finder is the home of the macOS file system. But there are lots of design differences that set it apart from the Windows File explorer. Many of these are design choices that give you more visual information on the folders and file types you’re browsing. A lot of the Finder’s power lies in its customizability. Check out our full article on Finder customization right here.
BONUS TIP: One of the coolest features in Finder is Quick Look. Quick Look gives you an instant preview of a file by selecting the file with a single click and then pressing the Space Bar. For instance, if you select a Word document or a photo and Quick Look it, you’ll immediately see a preview of that doc or image as if you had opened Word, Pages, or Photos. But Quick Look opens it in a fraction of a second and doesn’t require you to open or close an app when all you wanted was to confirm a file.
7. Use Mission Control to stay organized.
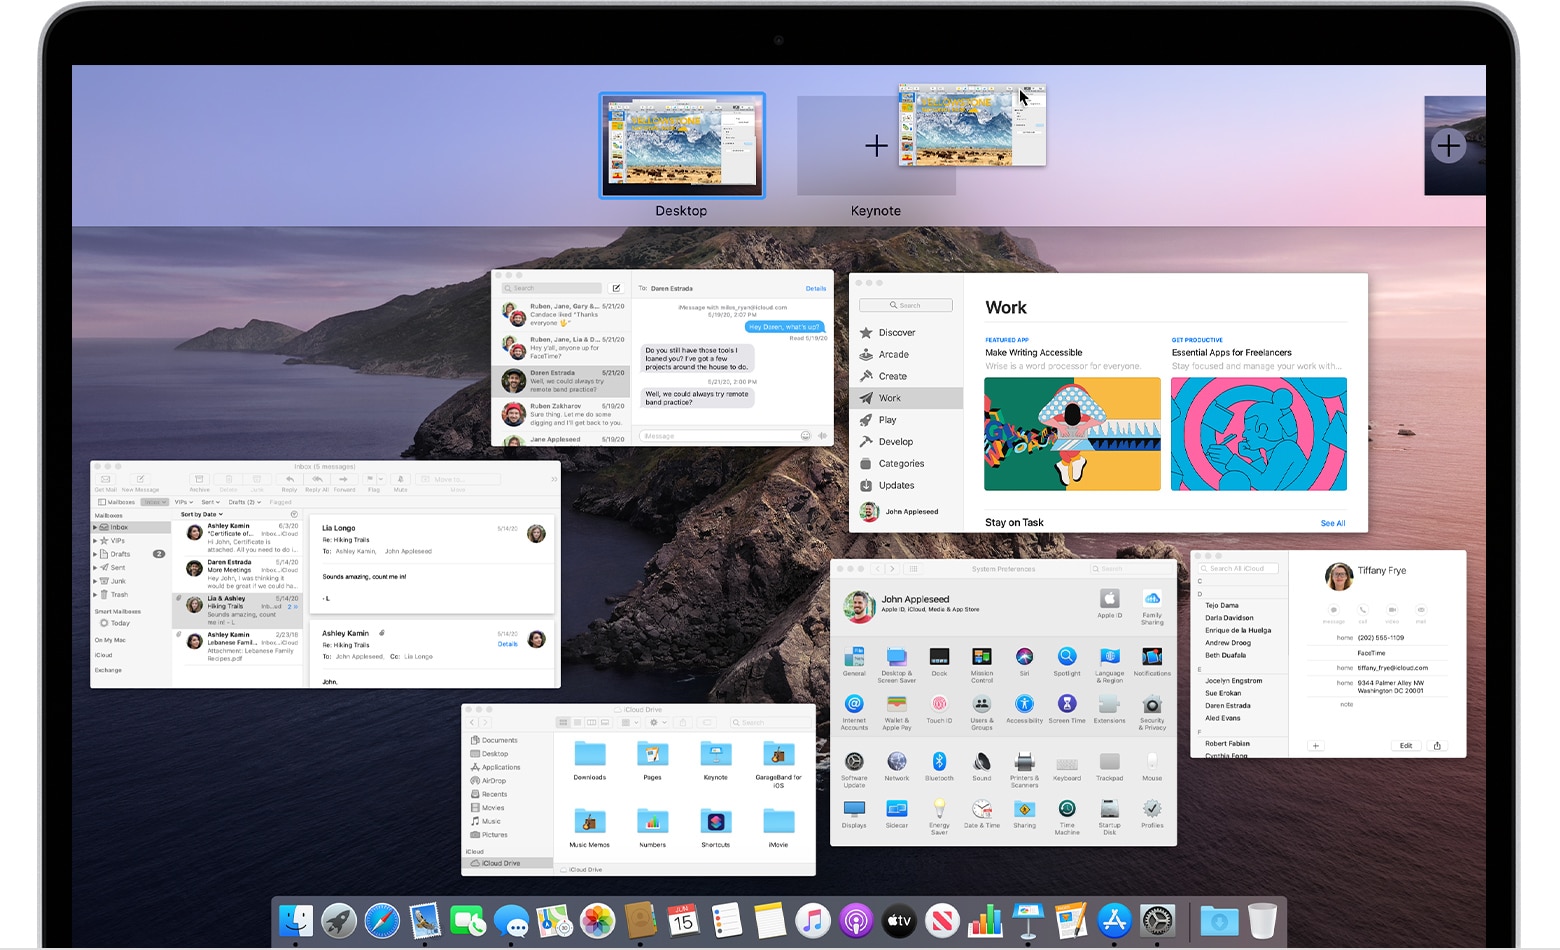
Mission Control is the latest evolution of app, window, and desktop organization in macOS. Sometimes the desktop can get pretty cluttered, so opening Mission Control gives you a birdseye view of your entire Mac by exploding all that clutter visually. It reveals all of your open apps, all of those apps’ open windows, and it shows you in which Spaces they’re open in.
To open Mission Control:
- Swipe up with three or four fingers on your trackpad, or double-tap the surface of your Magic Mouse with two fingers.
- Open the Mission Control app, found in your Applications folder of the Finder.
- Press the Mission Control key
 on your Apple keyboard or Touch Bar.
Once you open Mission Control you’ll see a bar at the top containing previews of a single or multiple desktops. These are your Mac’s Spaces. Spaces is the macOS term for virtual desktops. To add a Space, you can click the plus button on the right side of the screen. When you open a new Space you can move open windows to it by simply dragging them to that open Space. Or you can create a new Space entirely dedicated to one app by dragging a window or app into an open area of the Spaces bar.

8. Customize the Dock.
The Dock sits at the bottom of the Mac’s screen — you can tailor the Dock to show you the apps you regularly use and want to see. By default, certain apps are shown on the Dock. To remove them simply click and drag the app away from the dock and keep your touchpad or mouse button held down. After you hold, you’ll the word Remove appear and when you let go, the icon will be removed from the Dock.
To add an icon to your Dock, Open the app then click and drag the icon where you’d like it to appear—making sure it is to the left of the little divider line that separates items in the dock and those that were recently used—mand it will remain in the dock.

9. Learn the Mac keyboard shortcuts.
There are many Mac keyboard shortcuts on the Apple interface for menus such as File and Edit, printing, and more. We mentioned Command + Space to open Spotlight earlier and another one of my favorite shortcuts is Command + Shift + 3 which allows you to take a fast screenshot of your entire screen. And Command + Shift + 4 brings up a crosshair pointer that allows you to select a specific part of the screen to screenshot.
Here is Apple’s full support document on the platform’s keyboard shortcuts for reference.
And here’s a guide from Macworld that surfaces the shortcuts you need to know.
10. Open apps on startup.
If you start each day by opening up the same apps, then you should set up your Mac so that those apps open automatically at startup. Open System Preferences > Users & Groups, select your username, and click Login Items. Then check the boxes for the apps you want to auto-open.
Wrapping up
We hope this guide provides you with some helpful tools for getting started with your Mac. Once you get acclimated to macOS, you’ll love being able to work seamlessly with your other Apple devices.
If you do still need to work with Windows, don’t fret. macOS makes it easy for you to transfer your files, photos, and other data from a Windows PC to your Mac. You can also run Microsoft Office natively on your Mac, and you can even run Windows. WIN-WIN!
For more advanced tips and tricks, be sure to also check out: The Top 10 macOS Tips and Tricks Every User Should Know.


