Up to 20TB!
As discussed in my previous article, hard drive speed becomes progressively slower as capacity utilization of the drive increases, with the drive speed ultimately being cut in half by the time the drive is full.
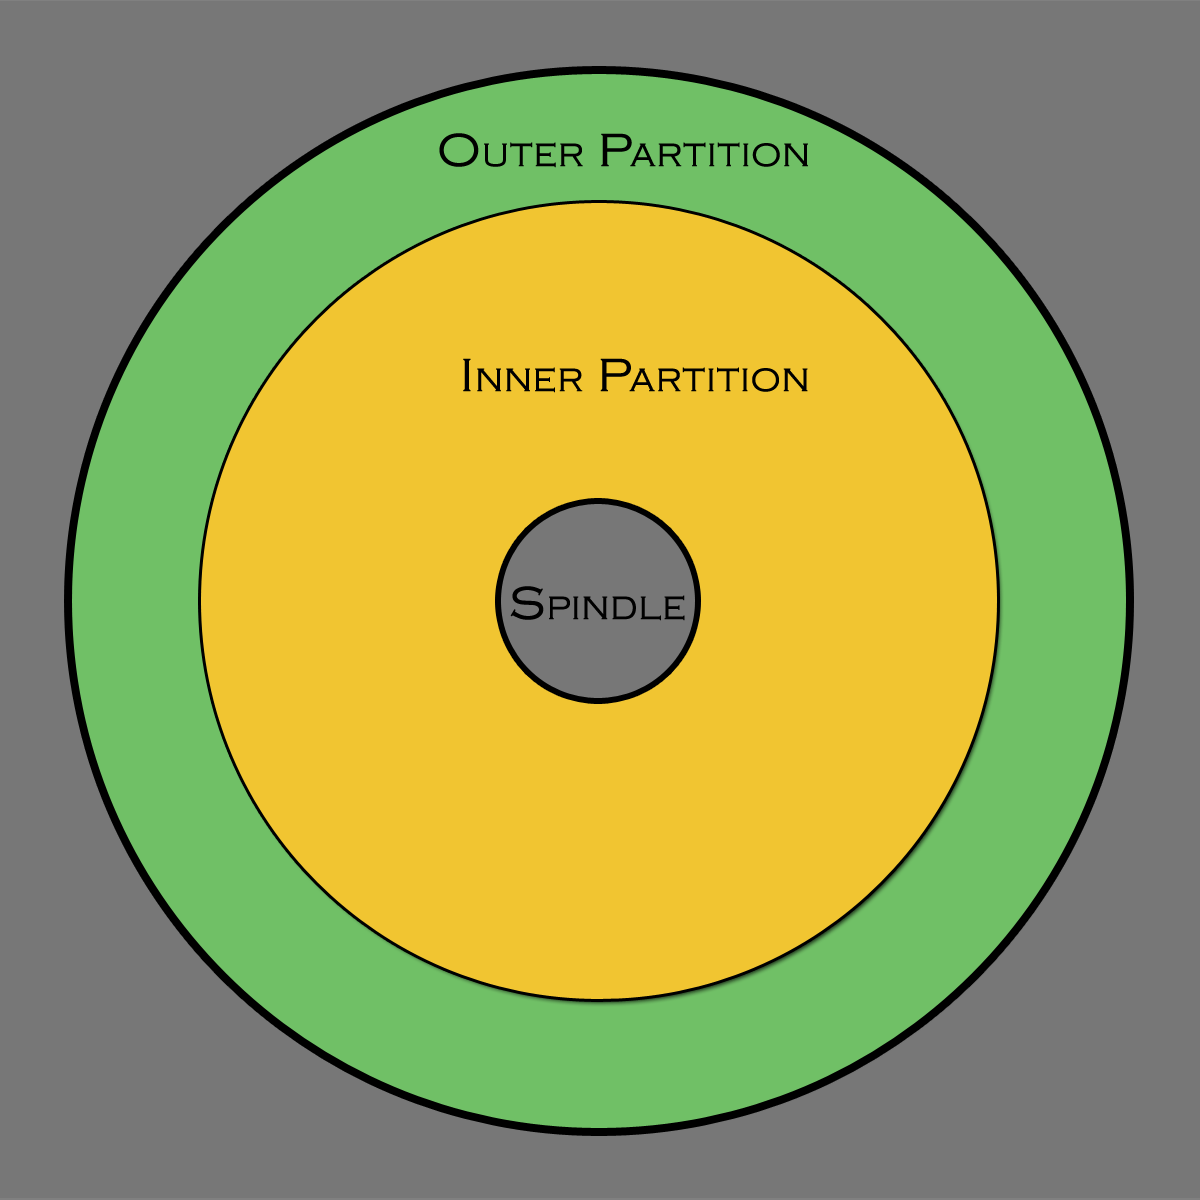
As discussed, one way to address the speed issue when you don’t need to use the full capacity is to partition the drive—essentially excluding and not using the slowest part of the drive. This is highly effective in guaranteeing a minimum speed and higher average speed—at the cost of using only a portion of the capacity e.g. 1/2 or 2/3 or 3/4 of the drive. For example, you could create a 14TB volume on a 20TB drive and ignore the remaining 6TB.
But what if you anticipate needing most or all of the capacity over the next few years. It would sure be nice to be working on the fastest part of the drive over that time, not the slowest part. A difference of 1.5X to 2X faster is a Big Deal on a hard drive since they are terribly slow compared to SSDs.
Guaranteeing the slowest speed on a new hard drive
Most people use the SLOW guarantee for the worst possible performance when adding new files to a hard drive:
1. Copy Existing Stuff over to the new drive.
2. Start using the drive for New Stuff.
Since your Existing Stuff now occupies the fastest portion of the drive, the New Stuff then goes onto the slowest part of the drive. And gets slower and slower as more is added, trending towards half-speed.
For example, an existing 11TB is copied onto a 20TB hard drive. The fastest 11TB is now occupied. The slowest 9TB remains and this is where new files will go. No fun!
Since Existing Stuff is likely to be more archival in nature, drive speed is wasted on the stuff you’ll rarely if ever touch, e.g. all the photos or videos you shot over the past 10 years. The smart move is to instead use the fastest part of the drive for new photos and videos!
How to guarantee the FASTEST speed on a new hard drive
This requires slightly more setup work. In essence, we’ll be reserving the fastest portion of the drive for new files.
This is done by creating placeholder files. It differs from the method above by adding steps #1 and #3:
1. Create placeholder files to occupy an amount equal to the fastest portion of the drive.
2. Copy the Existing Stuff over to the new drive.
3. Delete the placeholder files (trash the dummy files and empty the trash).
4. Start using the drive for new stuff.
For example, with a new 20TB hard drive and 11TB of Existing Stuff, create 9TB of placeholder files. Don’t worry about creating too many placeholder files, since you can always delete a few of them prior to step #2.
The Manual Method: Copy/duplicate folders of large files
Note: Do NOT use APFS when formatting hard drives. Use Mac OS Extended (Journaled). Among other problems, Copy/Duplicate will not work to consume space with APFS, since Finder duplication will just make clones that do not occupy more space.
On the new/wiped drive, make a folder and fill it with some very large files. Duplicate these files to create a fairly large folder. Then duplicate this folder repeatedly until the desired amount of space is occupied.
Any method that can create these placeholder files can be used. For example, clone existing stuff into a dummy folder on the new drive. Very large files are fastest and best, e.g. 1GB in size but any reasonably large files will do.
When done, copy over your Existing Stuff. Finally, delete the placeholder files.
The Optimal Method: diglloydTools DiskTester
DiskTester is part of my software diglloydTools, available for purchase.
The commands shown below can be pasted directly into a Terminal window.
VolumeName is the name of the volume you have created eg the newly-erased hard drive—change it to whatever your chosen name is. Use a volume name without spaces and then you can paste the commands here in and everything just works. Otherwise, put quotes around the volume name as in “Volume Name With Spaces“.
fill-volume command
The disktester fill-volume command is the very best way to create dummy files and at the same time generate data for graphing the drive performance over its capacity, such as shown in Four 22TB Hard Drives. Which ought to be done with every new hard drive anyway, if only to detect drives with problems or inconsistent performance.
disktester fill-volume VolumeName
Filling and verifying a 22TB drive for performance characterization will take around 40 hours—20 hours to write the files and 20 hours to read them.
When done, delete as many of the highest-numbered files from the disktester-blobs folder as needed to free up space for Existing Stuff (higher number files were written last and are thus on an increasingly slower part of the drive). Then copy-over Existing Stuff. Finally, delete the disktester-blobs folder in its entirety to free up the fastest part of the drive.
create-files command
The disktester create-files command creates new files of the specified size and specified number of files.
disktester create-files –file-size 1G –num-files NUM VolumeName
For example, if you want 11TB (11000GB) of new files each 1G in size, you would create 11000 1GB files as follows:
disktester create-files –file-size 1G –num-files 11000 VolumeName
Don’t worry if you create too many since some can just be deleted.
When done, copy-over Existing Stuff. Then delete the disktester-blobs folder in its entirety to free up the fastest part of the drive.
Conclusions
With a little extra setup effort, you can guarantee that you are using the fastest part of any hard drive for all files to be added in the future. This results in 1.5X to 2X better speed improvement vs. doing it the usual way.
View hard drive wishlist for suggested drives. A great choice for example is the 20TB OWC Mercury Elite Pro.
See also:
Storing Important Data on the Boot Drive is Asking For Trouble — Always Make a Separate Volume
A Pro Photographer’s Guide to Fast Data Backup in the Field
The Best Drives and Smart Strategy for Safe, Secure and Consistent Mac Backups
Backup Best Practices: How to Make Fast Clone Backups on a Mac
What to Do Your When Mac’s Time Machine Says Its Backup Drive Is Full
Backup Best Practices: How to Use Time Machine Optimally With Other macOS Backups
…
Need help working through your computing or photography system design? Consult with Lloyd before you potentially buy too much or too little, and see my Mac wishlist of current models, first pondering whether refurbished or used Macs might do the job for you.

View all posts by Lloyd Chambers… Lloyd’s photo web site is diglloyd.com, computers is MacPerformanceGuide.com, cycling and health are found at WindInMyFace.com, software tools including disk testing and data integrity validation at diglloydTools.com. Patreon page.

Hasselblad X2D 100C + Hasselblad XCD 45mm f/3.5 @ 37mm equiv (45mm)
ENV: White Mountains, altitude 11850 ft / 3612 m, 58°F / 14°C