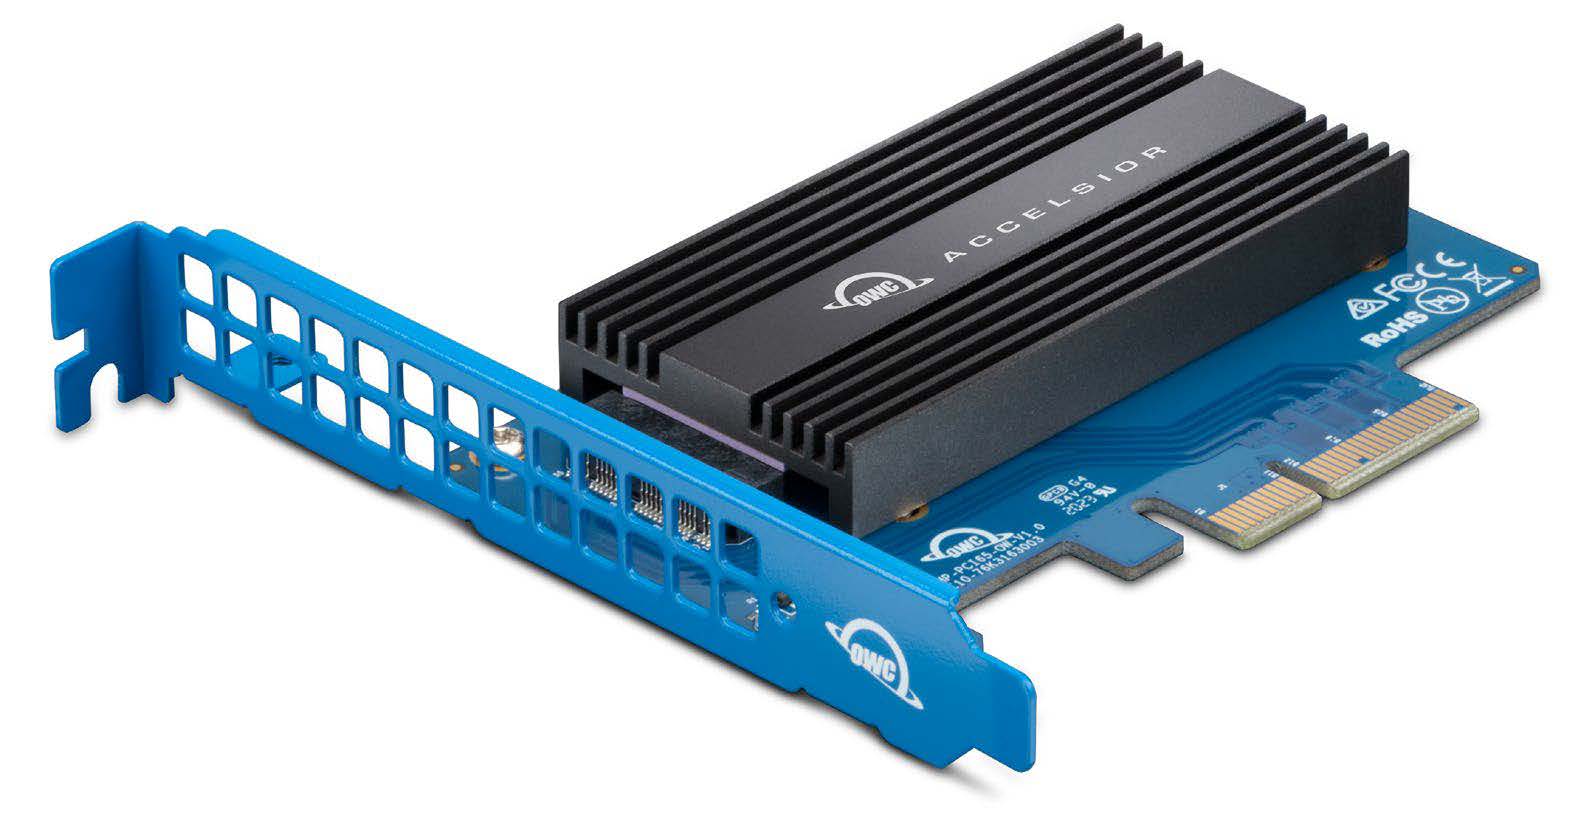
OWC Accelsior 1A
PCIe Adapter Card for Apple and OWC SSDs

Introduction
1.1 System Requirements
Operating System:
- Mac: macOS 10.13.6 or later
- PC: Windows 10 or later
Hardware:
- Mac or PC with compatible PCIe slot
- PCIe 3.0 or greater strongly recommended
- Lanes: x4 or greater strongly recommended
- Physical: x4 or greater required
- Recommended Thunderbolt 3 PCIe chassis
- OWC: Helios 3, Helios 3S, Helios FX series
- AKiTiO: Node, Node Duo, Node Lite, Node Pro, Node Titan
Driver:
- None required
Supported Apple SSDs:
- Late 2013-2015 MacBook Pro
- Mid 2013-2017 MacBook Air
- 2013 Mac Pro
- 2014 Mac mini
- Late 2013-2019 iMac
Supported OWC SSDs:
- Aura Pro X2
- Aura Pro X
- Aura N
1.2 Package Contents
- OWC Accelsior 1A
- Quick start guide
1.3 About This Manual
The images and descriptions may vary slightly between this manual and the unit shipped. Functions and features may change depending on the firmware version. The latest product details and warranty information can be found on the product web page. OWC’s Limited Warranty is not transferable and subject to limitations.
Safety Precautions
- Read this user guide carefully and follow the recommended steps for assembly.
- Use proper anti-static precautions while installing drives into this enclosure. Failure to do so can cause damage to your drive mechanisms and/or the enclosure.
- Do not attempt to disassemble or modify the device. To avoid any risk of electrical shock, fire, short-circuiting or dangerous emissions, never insert any metallic object into the device. If it appears to be malfunctioning, please contact technical support.
- Never expose your device to rain, or use it near water or in damp or wet conditions. Never place objects containing liquids on the drive, as they may spill into its openings. Doing so increases the risk of electrical shock, short-circuiting, fire or personal injury.
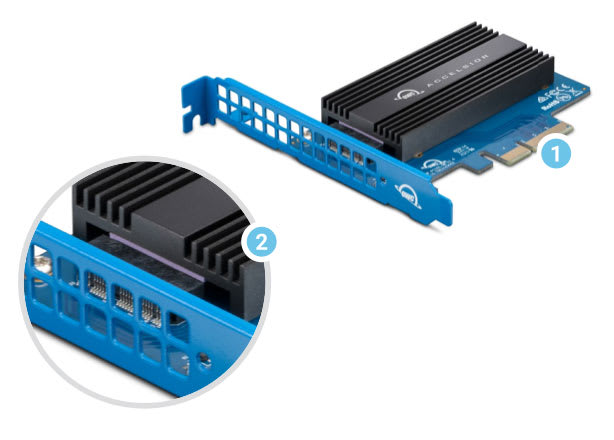
1.4 Side View
1. PCIe connector — align this part of the device with a compatible PCIe slot on the host computer or enclosure.

| LED | Power On | Disk Activity |
|---|---|---|
| Solid Green1 | Flashing Green |
1. Solid green may only apply to OWC SSD
Installation
2.1 Installing The SSD
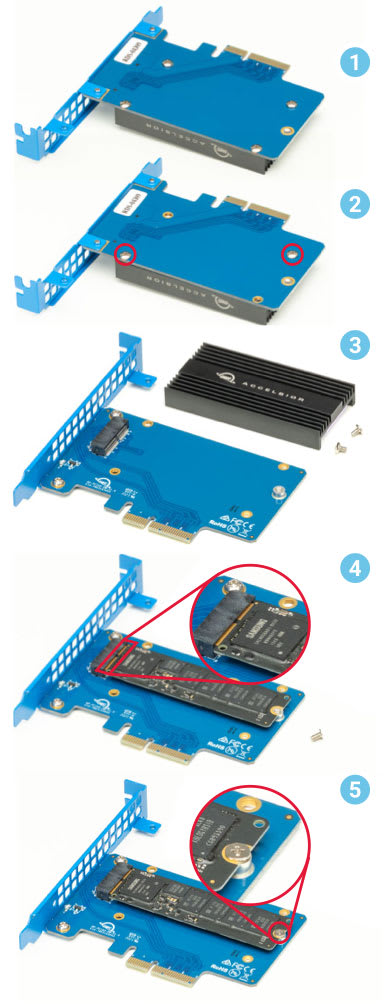
The steps below show how to install the SSD. Note that Steps 1-5 are the same for all drive types. Steps 6 and 7 are required only if your SSD does not include a heat sink. Contact OWC Support if you are unsure; our Support Team is happy to assist you with next steps
1. Remove the device from its packaging and set it on a flat work surface, heat sink facing down.
2. Remove the two highlighted screws and set them aside; this will detach the heat sink on the opposite side.
3. Turn the card over and set the heat sink aside.
4. Take the SSD (an Apple model is shown here) and align its connector with the slot on the PCBA, then insert the drive until fully seated. Minimal force is required; if the drive does not seat, don’t apply more force, instead remove the drive, re-align it and try again.
5. Use the flat-top screw from the included packet, to affix the drive to the post.

6. Place the heat sink (shown in 6a) near the edge of a table. With the PCIe card face down, align the four screw holes on the card (shown in 6b) with the corresponding ones on the heat sink. Then, rest the card on the heat sink. Note the bracket should rest over the edge of the work surface so that the heat sink and card are perfectly flat.
7. To complete the installation, re-affix the two screws that were removed in Step 2, and affix the two additional screws from the included packet, at the locations highlighted in image 6b.

2.2 Installing The Card In A Host Computer Or PCIE Enclosure
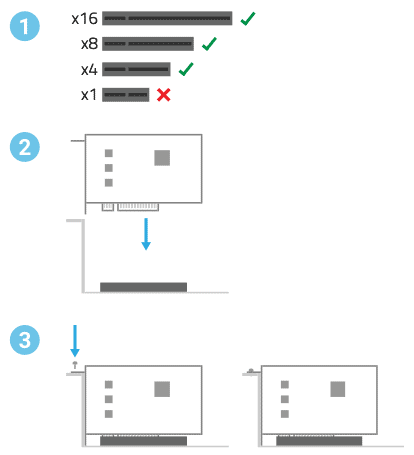
Please follow the steps below to install the Accelsior 1A PCIe SSD into a host computer or enclosure with a compatible PCIe slot. Note: this card is susceptible to invisible damage if not protected during installation. For proper grounding, we recommend using a grounding strap. Work in a clean, static-free area, and avoid wearing clothing that retains static charges. Please visit this URL for more information: www.owc.com/support/anti-static
1. Disconnect all power and powered devices from your desktop computer or Thunderbolt PCIe expansion chassis, then open the case so that the compatible PCIe slot is visible and accessible.
2. Align the PCIe connector on the Accelsior 1A SSD with the compatible slot then carefully seat the card into the slot as shown at right. If there is resistance, do not force the card into the slot. Remove it, re-align the card’s connector and try again.
3. Once the card is fully seated affix the included screw to the bracket as shown. Notes: a) no auxiliary power connectors or other attachments are required to use this SSD; b) Some computers and PCIe chassis may use a plate with spring-loaded screws or other method to secure PCIe cards; please follow the manufacturer’s recommended method.

Support Resources
3.1 Troubleshooting
Many problems can be traced back to the SSD not being fully seated in the Accelsior 1A connector, or the Accelsior 1A itself not being fully seated in the host computer or expansion device’s PCIe slot. Please review Section 2 to make sure everything was installed properly. You may need to reseat and re-affix the SSD, the PCIe card, or both.
If the card is working generally but you are not seeing the expected performance levels, this can sometimes be traced back to installing the Accelsior 1A in a PCIe 2.0 or earlier slot and/or a slot with limited data lanes. Please make sure that the PCIe slot being used provides enough bandwidth. If you’re still having trouble after verifying the above items, please contact OWC Support, for award-winning Technical Support Team; we are happy to assist you.
Changes
The material in this document is for information purposes only and subject to change without notice. While reasonable efforts have been made in the preparation of this document to assure its accuracy, OWC, its parent, partners, affiliates, officers, employees, and agents assume no liability resulting from errors or omissions in this document, or from the use of the information contained herein. OWC reserves the right to make changes or revisions in the product design or the product manual without reservation and without obligation to notify any person of such revisions and changes.
FCC Statement
Warning! Modifications not authorized by the manufacturer may void the user’s authority to operate this device.
NOTE: This equipment has been tested and found to comply with the limits for a Class A digital device, pursuant to Part 15 of the FCC Rules. These limits are designed to provide reasonable protection against harmful interference when the equipment is operated in a commercial environment. This equipment generates, uses, and can radiate radio frequency energy and, if not installed and used in accordance with the instruction manual, may cause harmful interference with radio communications. Operation of this equipment in a residential area is likely to cause harmful interference, in which case the user will be required to correct the interference at his own expense.
Warranty
The Accelsior 1A has a 1 Year OWC Limited Warranty. For up-to-date product and warranty information, please visit the product web page.
Copyrights And Trademarks
No part of this publication may be reproduced, stored in a retrieval system, or transmitted in any form or by any means, electronic, mechanical, photocopying, recording or otherwise, without the prior written consent of OWC.
© 2020 Other World Computing, Inc. All rights reserved. OWC, and the OWC logo are trademarks of New Concepts Development Corporation, registered in the U.S. and/or other countries. Accelsior is a trademark of New Concepts Development Corporation. Apple, Mac, Mac Pro, and macOS are trademarks of Apple Inc., registered in the US and other countries. Other marks may be the trademark or registered trademark property of their owners.
Free Support Chat
Our free award-winning support team is ready to answer all of your questions. Technical support is available Monday - Friday: 9AM - 6PM. Customer Support & Sales is available Monday - Friday: 9AM - 6PM. Support is unavailable on U.S. Federal holidays. Talk to a human today.


 1-800-275-4576