

Every March 31 is World Backup Day, and during the month of April the Rocket Yard will be filled with articles on how to keep data safely backed up a number of ways. Since today is the official World Backup Day, we are focusing on the Mac users who still don’t have a good backup plan at all. Since we don’t want you to be “April Fools,” here is a simple plan that you can follow to start backing up your Mac’s data.
1) Determine the existing capacity of your Mac’s storage.
Not sure just how much storage your Mac has? Click on the Apple menu (upper left corner of your Mac screen), then select About This Mac. Click the storage tab at the top of the window that appears. You’ll usually see a disk icon labeled “Macintosh HD” – you may have renamed it to something else, but usually people stay with the default name.
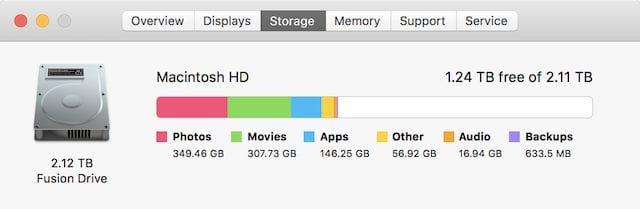
In the screenshot above, you see that my iMac has a lot of storage — a 2.12TB Fusion Drive that’s made up of a 2TB hard disk drive and a 128GB solid state drive. That means that if I ever fill up that drive, I’ll have a whopping 2.12TB of data to back up.
2) Multiply that number by two, and round up.
A good rule of thumb is to have twice the amount of capacity in a backup drive that you have in your computer. Why? Well, Time Machine doesn’t just make one backup; it’s constantly taking “snapshots” of what’s on your Mac and storing those as well. Needless to say, that takes up a lot of storage.
In this case, I’ll multiply 2.12 by 2, and I get 4.25. Just for good measure, I’ll round that up to 5. If you had a 500GB drive, you could get away with a 1000GB (1TB) backup drive.
3) Buy a hard disk drive (HDD) that has about the capacity you just calculated.
This is the easy part, because you’re already at the website for the best Mac storage vendor! But we do offer a lot of choices, so let’s look at a few.
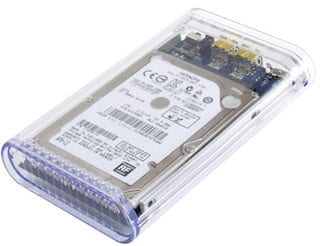 For MacBooks of any type, you might want a backup drive that you can take with you as you travel. That’s where the OWC Mercury On-The-Go Pro drives (see image at right) are wonderful. They are small, weigh less than 11 ounces, connect via fast USB 3.0, and they’re bus-driven. That last point means that you can just plug the drive into an available USB 3.0 port and there’s no need to use an AC adapter to power the drive. For our 1TB backup drive, there’s a fast 7200 RPM USB 3.0 model available currently for just $99, and up to 2TB of backup storage available for just $132.50.
Have a desktop machine or a MacBook that doesn’t get out much? The OWC Mercury Elite Pro line (see image below) is perfect for backup requirements of up to 6TB, so this would be perfect for my 2.12TB iMac and my doubled backup requirement of 5TB. Think that a drive with 5TB of storage is expensive? Not so fast, buddy — a super-fast 7200RPM 5.0TB USB 3.0 drive with an additional USB port for connecting another drive or accessory is only $245.00. That’s a small price to pay for a lot of peace of mind.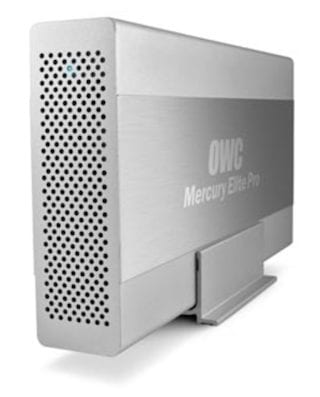 For those of you with Mac minis of any vintage, MacSales.com has just the drive for you — the miniStack line. For any Mac mini since 2010, the NewerTech miniStack sits right under your computer, providing up to 6.0TB of backup capacity that looks great with your mini. If you’d like a bit more utility out of your miniStack drive, the miniStack MAX adds an SD card reader and your choice of optical drive to the same fast hard disk drive. Have a pre-2010 Mac mini? The miniStack Classic is perfect for you, and it’s available in capacities up to 5.0TB.
Some power users really need much more storage, and that’s where OWC’s RAID (Redundant Array of Independent Disks) solutions come in. These drives pack two or more drives into an enclosure and can be set up as one big drive with or without redundancy. Set up your RAID storage with redundancy, and one or two of your drives can fail while still keeping your data safe until you can replace the drives.
In the RAID line, the Mercury Elite Pro Dual uses two drives for up to 12TB of speedy storage and features Thunderbolt and USB 3.0 interfaces for compatibility with most newer Macs. When you really have a need for huge amounts of storage to back up large video or music projects, the ThunderBay 4 – RAID 5 Edition (see photo below) can provide up to 32TB of storage with fast Thunderbolt 2 connectivity.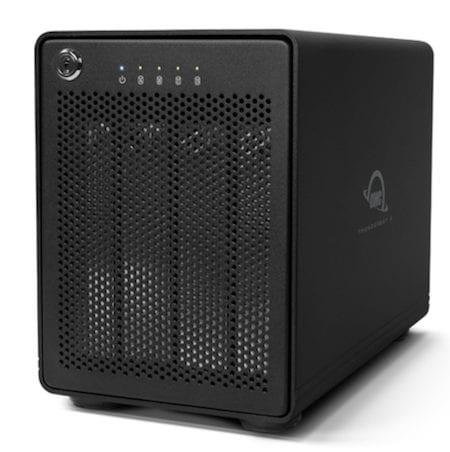
Whatever your backup storage needs may be, MacSales.com has you covered with the best drives and customer support in the business.
4) When the hard disk arrives, set it up to be your Time Machine backup drive
Here’s the easy part. To add a Time Machine drive to your Mac, all you need to do is plug it in to the Mac using any one of the standard interfaces — FireWire 400/800 or USB 2.0 on older Macs, USB 3, Thunderbolt or Thunderbolt 2 on newer Macs — and Time Machine asks if you want to use that drive with Apple’s Time Machine backup utility (see image below).
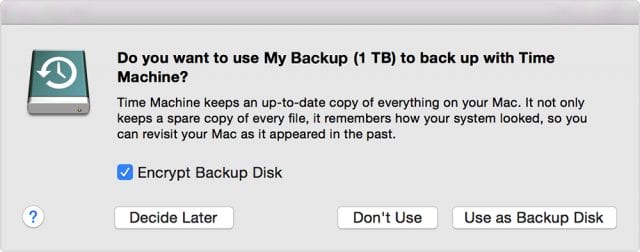
Click “Use as Backup Disk” and that’s all you have to do. A full backup of your data begins immediately. OS X and the apps on the Mac are not backed up, since they can be reloaded easily through a number of methods. Once the full backup is done, the Mac backs up changes and new documents once an hour. Every day, it condenses those changes into a daily image of your Mac’s contents. It’s fast and completely transparent to you, the user — you honestly won’t know that your data is being backed up.
For a more complete post on how Time Machine works, be sure to read the article “Time Machine: What It Is, How It Works, How to Use It with Your Mac“. In this article, you’ll find hints on how to restore your data in the case of a hard drive failure or just find an inadvertently deleted file.
And be sure to check back to the Rocket Yard through April for “Backup Month” where we will show you even more ways to keep your data safe and secure!
From the archives: See how OWC team members back up their data


Thanks for reminding people of the need to back their data up. There can never be too many reminders to do so. :)