![]() Despite the advances made by Macs in both the corporate and home PC markets, there are still many more Windows PCs in the world than there are those running OS X. But there are a lot more iOS devices — iPads and iPhones — in the world than Windows-based smartphones and tablets. This gives rise to a situation that a lot of people run into; the need to mirror their iPad or iPhone screen on a Windows PC. Fortunately, there are a number of software solutions that provide a way to do that by turning your PC into an Apple AirPlay receiver, and today we’re going to look at three popular apps.
Despite the advances made by Macs in both the corporate and home PC markets, there are still many more Windows PCs in the world than there are those running OS X. But there are a lot more iOS devices — iPads and iPhones — in the world than Windows-based smartphones and tablets. This gives rise to a situation that a lot of people run into; the need to mirror their iPad or iPhone screen on a Windows PC. Fortunately, there are a number of software solutions that provide a way to do that by turning your PC into an Apple AirPlay receiver, and today we’re going to look at three popular apps.
Reflector 2
One of the first solutions for mirroring an iOS device screen on a Mac was Reflector from the whimsically-named AirSquirrels; that app is now Reflector 2 (free 7-day trial, $14.99), and it’s compatible with OS X, Windows, and even Android. To give it a try, visit the AirSquirrels site and download the trial; as soon as the MSI file has been downloaded to your Windows PC, run it to start installation. You need to agree to the end-user license agreement for Reflector 2 and allow the installer to make changes, but a few seconds later the app is installed on your PC. The app displays a watermark on the iOS screen image until you purchase a license for the software.
Reflector 2 turns your PC into an AirPlay receiver. What that means is that the PC acts just like an Apple TV in that you can send whatever’s on the screen of your iPhone or iPad to the PC screen. To do this (and this works for our other solution as well), launch the app on the PC. From the iPhone or iPad, swipe up from the bottom of the screen to reveal Control Center. Tap on the AirPlay button, which reveals a list of all of the devices that to receive your screen images (see image below).

For Reflector 2, the device name was the name of the PC – the oddly-named “DESKTOP-LR8LNQ8”. With a tap on the device name to select the PC and then enabling the Mirroring button, the image of the iPhone screen appears immediately on the PC.
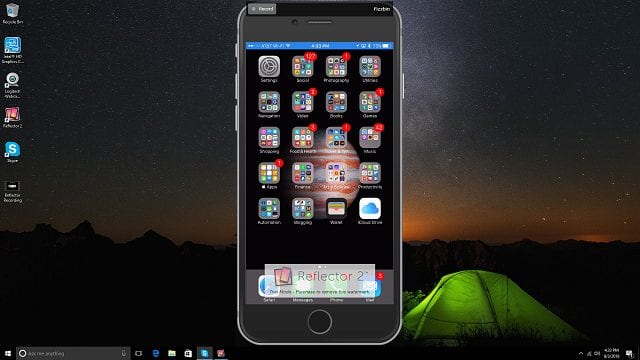
What’s great about Reflector 2 is that it shows a “frame” around the iOS device image that looks identical to the device you’re mirroring (see image above). Turn the device to landscape orientation, and the image on the screen rotates as well. One of the best features of Reflector 2 is that it can also be used to capture video of your iOS device screen in action, perfect if you’re doing a “how to” video or wish to send video game highlights to a friend.
Reflector 2 also includes a broadcast feature that lets you send the image from your iPhone or iPad through the PC direct to YouTube Live. All in all it’s a fairly impressive solution.
LonelyScreen
Another AirPlay “receiver” is LonelyScreen, available for free from the developer’s website. I definitely recommend getting it from the developer, as I’ve seen comments that the app has been infected with malware when downloaded from other sites.
LonelyScreen is easily installed, and once it is launched it acts quite a bit like Reflector 2 (see image below). The AirPlay device name is a more logical “LonelyScreen” and the connection via Wi-Fi is fast and smooth. The website says that you can “Capture and save iPhone game play, or app demo. One click to upload to YouTube, or Vimeo.” As with Reflector 2, you can record what’s on the screen to a movie file. There’s no “live broadcast” feature, but recording is as simple as pushing a big red button that slides up from the bottom of the screen.

I’m wishing that the developer would add the device frames found in Reflector 2, and perhaps we’ll see that addition in a future update.
X-Mirage
The third, and final Windows app we’ll look at for AirPlay mirroring is X-Mirage (free to try for six days, purchase license for $16). I like this app’s “Welcome Window,” which shows how to mirror your iOS device’s screen to the PC if you’re unfamiliar with AirPlay. It also has easy-to-find settings that let you do such things like add an extra audio-only AirPlay receiver for sending sound to the PC. I couldn’t get this to work, but it might very well be that it’s a feature that works only once the app is licensed.
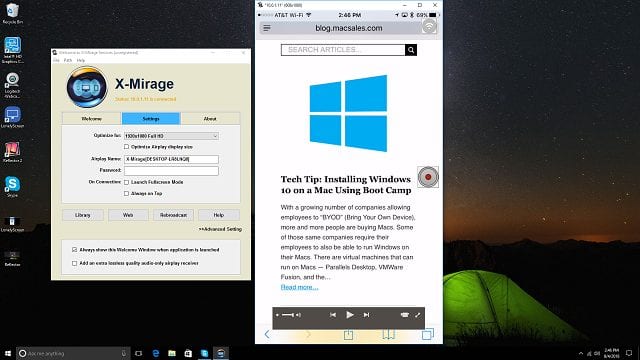
Likewise, the “Rebroadcast” button on the Welcome Window didn’t work, but that could require a license as well. The record button for creating a video of your iPad or iPhone screen appears when you hover over the AirPlay image with your mouse. X-Mirage was the only one of the three apps that allows optimization of the AirPlay display size for a number of iOS screen sizes, or it can be set to auto-optimize the mirror. It’s also the only app that allows the user to change the AirPlay receiver name and password protect the receiver, both of which could be useful if you’re using a PC connected to a projector in an office or classroom and don’t want others to be able to use it.
Readers — do you have a preferred way of sharing your iOS device screen with a Windows PC that we haven’t listed here? Please let us know about it in the comments below.






I know another two tools except the ones mentioned above. One is iTools AirPlayer. It has a trial and full version, but I just know it and never used it. Another one is 5KPlayer, it is free. I have used it for several times, works well for me. Well, it has mirroring and recording fucntion too.
I use AirServer on Windows and OS X computer. It allows you to receive AirPlay, Google Cast and Miracast streams
Two more options can also help to do this trick. One is Mirroring360, the other one is Apowersoft iPhone/iPad Recorder. Both of them work fine and can mirror iphone/ipad screen to Windows pc.