![]() Recently, we published a how-to guide titled “Three ways to remotely access and control a Mac“. As the title suggests, we outlined three ways — Back to My Mac, Apple Remote Desktop, and Parallels Access — to access and control a remote Mac. At the tail end of that post was a request for readers to add their suggestions for other remote control solutions, and we were amazed at the response. This post outlines many of the suggestions in those comments, and if you were one of the readers who provided a solution, please check out the bottom of this post…
Recently, we published a how-to guide titled “Three ways to remotely access and control a Mac“. As the title suggests, we outlined three ways — Back to My Mac, Apple Remote Desktop, and Parallels Access — to access and control a remote Mac. At the tail end of that post was a request for readers to add their suggestions for other remote control solutions, and we were amazed at the response. This post outlines many of the suggestions in those comments, and if you were one of the readers who provided a solution, please check out the bottom of this post…
macOS Screen Sharing
This suggestion completely surprised me, as I either had never heard of it or had forgotten about it in the years since I was an Apple consultant. But as reader Chris pointed out, there’s a Screen Sharing app hidden deep in the dusty basement of macOS that is used by Apple’s own support personnel to remotely control Macs.
The app can be found in /System/Library/CoreServices/Applications. This is the System library, not the User library. To find the app, open a Finder window, scroll down to the Devices, then click on the name of your Mac. In the Finder window will be icons for Macintosh HD (or whatever your Startup Volume is named), any external drives, “Network” and Remote Drives — if you don’t see Macintosh HD, go to Finder Preferences, Sidebar, and check the box next to the drive name to add it to the Finder sidebar. Double-click the Macintosh HD icon, then open the System folder, then the Library folder, and finally the CoreServices folder (see image below):
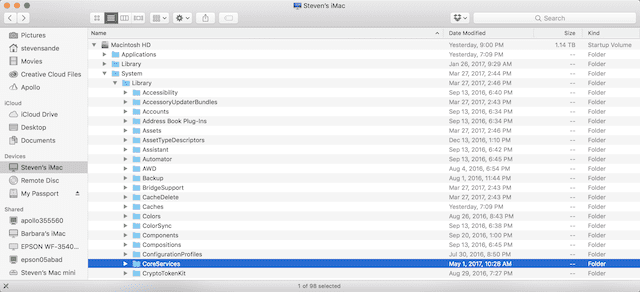
Inside the CoreServices folder is an Applications folder, and there you’ll find an app icon for Screen Sharing. That’s the app we’ll using. Double-click the Screen Sharing icon, and all you’ll get is this small dialog:

On a local network, entering the hostname is probably the easiest way to connect to another machine. To find a Mac’s hostname, launch System Preferences, then open Sharing. You’ll see the name of the Mac listed at the top, and just below that will be an name followed by “.local”. That’s the hostname (for example, “Barbaras-imac.local”). While you’re in the Sharing System Preferences pane, be sure to click the Screen Sharing service check box on the left side. This turns on the Virtual Node Controller (VNC) service on your Mac (see image below):
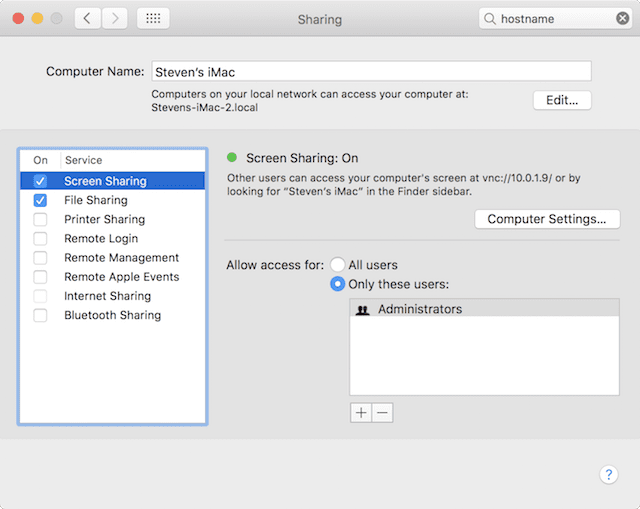
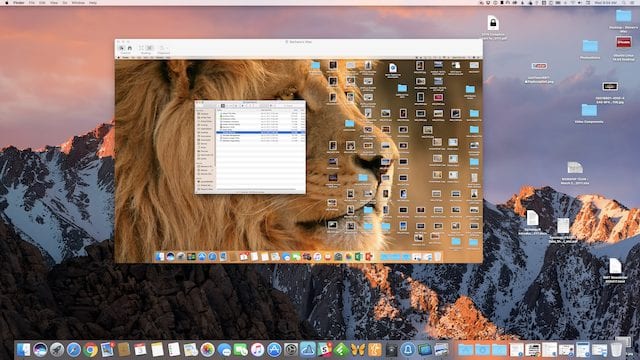
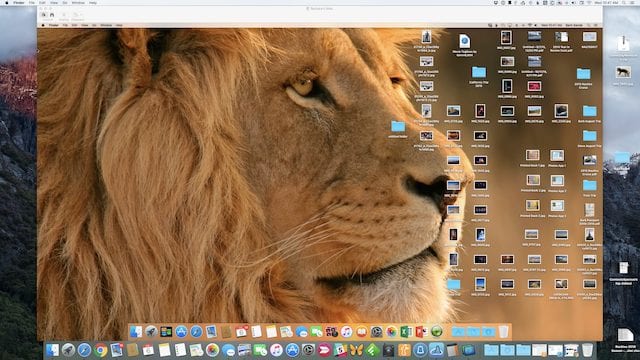
Now to control that other Mac, here’s all you need to do. In the Screen Sharing app, just type in the hostname or the Apple ID that is associated with that Mac. You may be asked to enter the User ID and password for that remote Mac, and once that is done, the other Mac’s screen appears on your Mac (screenshot below):
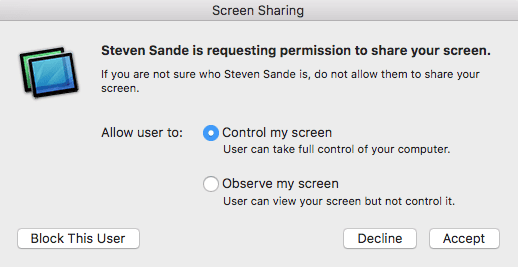
What’s even more easy? Just connecting via an Apple ID. To do this, enter the Apple ID of the Mac’s owner into the Screen Sharing app, and the other Mac receives a request to allow sharing (image below):

Once that person accepts the invitation, they have an opportunity to allow others to control or just observe their Mac (see image below):
I tried this with my elderly father, who needs assistance with his MacBook Air on occasion. It’s quite easy to set up initially for another person by enabling screen sharing, and once set up, I can request to control his Mac when he needs help. The only negative in this situation is that someone must be at the “receiving” end of the connection.
Team Viewer
Team Viewer was the next most popular suggestion, with multiple readers suggesting this commercial service. Not only does Team Viewer allow remote control of Macs, but it’s one of the only solutions that also provides a way to remotely control iOS devices. It’s free for personal use, which means that helping out a friend or relative doesn’t require a pricy license.
After downloading and installing the Team Viewer app on both Macs, sign up for a free account so that you can associate a Mac with a particular email address. You’ll need to verify that email address by clicking a link in a mail message that is sent to you and may also need to add the Mac to a “trusted devices” list on the Team Viewer website, but once that’s done, connecting to and controlling the remote Mac is quite simple.
Just launch Team Viewer, and a screen similar to that seen below shows up (see screenshot below):
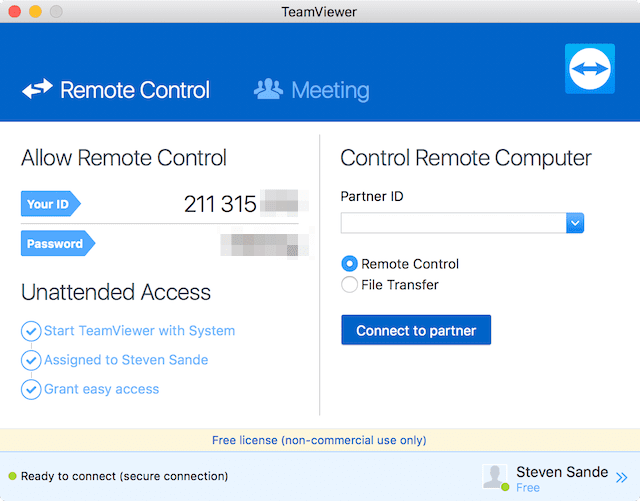
To allow remote control of this Mac, I would give “Your ID” to the person who is trying to control my Mac. The opposite is true as well. If I want to connect to a remote Mac, I ask that person for their ID and click Connect to Partner. For test purposes, I installed the iOS client onto my iPhone 7 Plus and then used it to control my Mac (see screenshot below):

Team Viewer does certain things to speed up the connection, such as turning the wallpaper of the Mac being controlled to a single color. It works very well, and I can see why it was a favorite of many readers of The Rocket Yard. One nice thing is that the remote machine does not need to be attended in order to take control, and the app can also be used to transfer files between machines.
VNC (includes RealVNC, Jump Desktop, Screens VNC, Splashtop Personal, Chicken)
Many of the solutions that were suggested involve Virtual Node Controller (VNC), a service that’s built into macOS and is actually the service behind Screen Sharing. Due to the number of different methods of installing and configuring many of these apps, I won’t go into detail on each. Instead, I’ll just provide links for downloading the various apps.
RealVNC : Free to download and use for personal use, RealVNC is limited to 5 remote computers and 3 users.
Jump Desktop: Available in the Mac App Store for $29.99 and the iOS App Store for $14.99, Jump Desktop uses the built-in VNC server (System Preferences > Sharing > Screen Sharing) on macOS.
Screens VNC: Another VNC client, Screens VNC is available in the iOS App Store for $19.99 and the Mac App Store for $29.99, and also connects to the built-in macOS VNC server.
Splashtop Personal: This VNC client is free if you wish to control Macs that are on the same network as yours. Download the macOS client here or the iOS app ($1.99 on sale, with in-app purchases for remote control). If you require control off of your local network, there’s a subscription available for $16.99 per year.
Chicken of the VNC (AKA “Chicken”): This is a VNC client that’s been available for years and a Sourceforge open source project. As such, it’s a bit of a work in progressing requires some work to get things set up. For example, it may be necessary to use something like Port Mapper ($4.99) to configure port forwarding so that you can connect to that remote Mac.
Google Chrome remote extension: The Google Chrome Remote Extension is perfect if you and the remote Mac use the Google Chrome browser. The browser is a free download from the Chrome Web Store, and once it’s installed, it’s simple to use your Google account to log into those other apps for remote support. It also works well if you wish to control a Mac from an Android smartphone or tablet and the Android client is found in the Google Play store.
A Rocket Yard Thank-You to:
- Chris (macOS Screen Sharing)
- James Theodorou (Real VNC, plus clarification on Screen Sharing and ARD)
- Reese Boyd (Jump Desktop)
- “Fastasleep” (Screens VNC)
- Steve Kruse (Logmein.com)
- Ed Glassgow (Splashtop Personal)
- John Roach (Schnitz Remote Lite, Port Mapper, Chicken of the VNC, Google Chrome remote extension)
- Terry and Julian (Team Viewer)


Correction: “VNC” stands for “Virtual Network Computing,” see: https://en.wikipedia.org/wiki/Virtual_Network_Computing
I would also mention Remotix, a commercial (but not terribly expensive) app and client. You install the client on the Macs you want to remotely control, and access them from the App, which is available for iOS devices as well as Macs (app store in both cases). It allows me to remotely log in from my iPad as well as (in an extreme pinch) from my iPhone. It can use either the VNC protocol or a proprietary protocol they call NEAR, when is based on html5, and is VERY efficient.
I can use the Google Chrome extension from either a Mac, a PC, or an iOS device to manage any computer with the same setup with the extension running. It works great to mute the kids’ computers when they’ve fallen asleep in their beds at night.
In addition to above, you can remotely access and control a MAC computer using tools like on premise R-HUB remote support servers. It works on MAC, Windows, Android, iOS etc.
Hello, do you know any solution to get remote control without screen sharing? I use a VPN connection to initiate the remote control on my mac, but I don’t want my colleague to know what I am doing on my Mac?
my previous comment assumes that you have already configured access to the remote LAN by means such as VPN or port forwarding.
you wrote: The only negative in this situation is that someone must be at the “receiving” end of the connection.
this is incorrect. you can take control of a remote Mac using screensharing.app without the other user being present as long as their Mac is awake and on the LAN.
to do so you connect using their username and password or any other admin user of that Mac.
it’s good practise to always create a second admin user on the Macs you administer just in case.
note also that if you enable remote management for Apple Remote Desktop, doing so starts the vnc service anyway because ARD requires it so you can also use screensharing.app to control a Mac that has remote management enabled.
kind regards
* * * * * * * * *
peter rhodes
macintosh support specialist
flying canoe ltd
Authorised Apple Reseller
level 1-553 richmond road
grey lynn
auckland 1021
new zealand
tel: +64 9 376 1969
fax: +64 9 376 1967
mob: +64 21 708 888
peter@flyingcanoe.com
How do the different options compare to native Screen Sharing in terms of performance? Primarily on a local gigabit Ethernet as other connections would be slower and likely impact performance more than the VNC client-server.
Why can’t I create an Alias so I can find this in the Applications Folder?
You can also use Safari to initiate a vnc connexion.
Just type:
vnc://hostname.local
into the search bar.
In older versions of Safari you could save the address to the desktop – it would create a .vncloc xml file, which you could just double click to connect with.
Safari can also initiate afp, ftp and ssh sessions this way.
Here’s an example .vncloc file, just create a file with that suffix:
URL
vnc://hostname.local
For afp – substitute vnc above to afp and save as a .afploc file.
For ssh – substitute ssh and save as a .inetloc file.
I love the double-click method and use them constantly on a day to day basis. You can create a folder and drag it to your dock and use custom icons for the files to correspond to machine types.
RPK
if you don’t mind sharing the process of saving the connection file to what format? Is it a dot doc or how do you do that? Please excuse my inexperience.
And the host. Local is the name of the machine you will connect with?
You don’t even need to do that in Safari — within Finder, select Go > Connect to Server… (Cmd-K); type in your vnc://hostname.local and you’re off and running. You can also save a list of VNC “servers” that you regularly connect to in the dialog that opens up for even quicker access.